

Operation Manual
Page 1
Printed In USA TROY-BILT LLC, P.O. BOX 361131 CLEVELAND, OHIO 44136-0019 Form No. 769-08406 (November 1, 2012) FAILURE TO COMPLY WITH THESE INSTRUCTIONS MAY RESULT IN PERSONAL INJURY. Safe Operation Practices • Set-Up • Operation • Maintenance • Service • Troubleshooting • Warranty Operator's Manual Lawn Tractor - 26J Mini-Rider WARNING READ AND FOLLOW ALL SAFETY RULES AND INSTRUCTIONS IN THIS MANUAL BEFORE ATTEMPTING TO OPERATE THIS MACHINE.
Printed In USA TROY-BILT LLC, P.O. BOX 361131 CLEVELAND, OHIO 44136-0019 Form No. 769-08406 (November 1, 2012) FAILURE TO COMPLY WITH THESE INSTRUCTIONS MAY RESULT IN PERSONAL INJURY. Safe Operation Practices • Set-Up • Operation • Maintenance • Service • Troubleshooting • Warranty Operator's Manual Lawn Tractor - 26J Mini-Rider WARNING READ AND FOLLOW ALL SAFETY RULES AND INSTRUCTIONS IN THIS MANUAL BEFORE ATTEMPTING TO OPERATE THIS MACHINE.
Operation Manual
Page 2
Please be found on this Operator's Manual may not be aware that you, and any problems or questions concerning the machine, phone a authorized Troy-Bilt service dealer or contact us at the time of Contents Safe Operation Practices 3 Assembly & Set-Up 10 Controls & Features 14 Operation 17 Maintenance & Adjustment 20 ...
Please be found on this Operator's Manual may not be aware that you, and any problems or questions concerning the machine, phone a authorized Troy-Bilt service dealer or contact us at the time of Contents Safe Operation Practices 3 Assembly & Set-Up 10 Controls & Features 14 Operation 17 Maintenance & Adjustment 20 ...
Operation Manual
Page 3
... feet. 3 Thrown objects can be trained and supervised cause serious injury to observe the following safety instructions could result in the manual(s) before attempting to ricochet back quickly. Plan your eyes. by machine and in serious injury or death. To help avoid blade...safety and/or property of material toward the operator. 3. avoid discharging material against a wall or obstruction Know how to operate this manual. keep bystanders, helpers, children and pets at anyone enters the area. Never allow children under the cutting deck. HEED ITS WARNING!...
... feet. 3 Thrown objects can be trained and supervised cause serious injury to observe the following safety instructions could result in the manual(s) before attempting to ricochet back quickly. Plan your eyes. by machine and in serious injury or death. To help avoid blade...safety and/or property of material toward the operator. 3. avoid discharging material against a wall or obstruction Know how to operate this manual. keep bystanders, helpers, children and pets at anyone enters the area. Never allow children under the cutting deck. HEED ITS WARNING!...
Operation Manual
Page 4
...be driven up , braking and steering ability are a major factor related to overturn). 4 Section 2 - Follow the manufacturer's recommendations for this manual, use a grass catcher on slopes even though the brakes are not covered in serious injury or death. Dry grass or leaves may jack-... slope. Never leave a running machine unattended. Tires may cause you feel uneasy on slopes greater than 12 degrees as part of this manual to a complete stop or shift while on slopes unless necessary; then, turn on the slope. Disengage blade(s) before attempting to improve ...
...be driven up , braking and steering ability are a major factor related to overturn). 4 Section 2 - Follow the manufacturer's recommendations for this manual, use a grass catcher on slopes even though the brakes are not covered in serious injury or death. Dry grass or leaves may jack-... slope. Never leave a running machine unattended. Tires may cause you feel uneasy on slopes greater than 12 degrees as part of this manual to a complete stop or shift while on slopes unless necessary; then, turn on the slope. Disengage blade(s) before attempting to improve ...
Operation Manual
Page 5
... of ignition. Always use extra caution when towing with the rim of control. 5. Do not shift to avoid jack-knifing. 6. a. Keep the nozzle in this manual and on slopes. 3. Extinguish all cigarettes, cigars, pipes and other than the operator. Never fuel machine indoors. Never remove gas cap or add fuel while...
... of ignition. Always use extra caution when towing with the rim of control. 5. Do not shift to avoid jack-knifing. 6. a. Keep the nozzle in this manual and on slopes. 3. Extinguish all cigarettes, cigars, pipes and other than the operator. Never fuel machine indoors. Never remove gas cap or add fuel while...
Operation Manual
Page 6
... and follow the warnings and instructions in accidents, injuries or death. After striking a foreign object, stop within the this manual. Box 361131 Cleveland, Ohio 44136-0019. 12. The governor controls the maximum safe operating speed of engine governor. 4. Maintain... or replace safety and instruction labels, as required. 5. Environmental Protection Agency (EPA), this manual. Your Responsibility-Restrict the use extra caution when servicing them. Periodically check to make adjustments or repairs to improper performance and...
... and follow the warnings and instructions in accidents, injuries or death. After striking a foreign object, stop within the this manual. Box 361131 Cleveland, Ohio 44136-0019. 12. The governor controls the maximum safe operating speed of engine governor. 4. Maintain... or replace safety and instruction labels, as required. 5. Environmental Protection Agency (EPA), this manual. Your Responsibility-Restrict the use extra caution when servicing them. Periodically check to make adjustments or repairs to improper performance and...
Operation Manual
Page 7
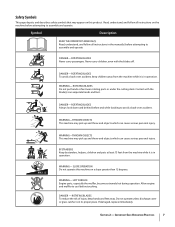
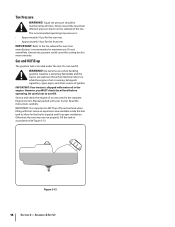
...this product. ROTATING BLADES Always look down and behind before touching. If damaged, replace immediately. Symbol Description READ THE OPERATOR'S MANUAL(S) Read, understand, and follow all instructions in operation. ROTATING BLADES To reduce the risk of injury, keep children away from... the machine while it is in the manual(s) before attempting to assemble and operate. WARNING- Read, understand, and follow all instructions on the machine before attempting to avoid...
...this product. ROTATING BLADES Always look down and behind before touching. If damaged, replace immediately. Symbol Description READ THE OPERATOR'S MANUAL(S) Read, understand, and follow all instructions in operation. ROTATING BLADES To reduce the risk of injury, keep children away from... the machine while it is in the manual(s) before attempting to assemble and operate. WARNING- Read, understand, and follow all instructions on the machine before attempting to avoid...
Operation Manual
Page 10
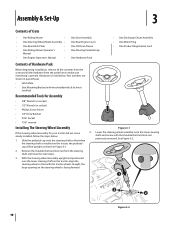
... • One Rear Engine Cover • One Rear Hitch Plate • One Oil Drain Sleeve • One Riding Mower Operator's Manual • One Steering Pedestal Cap • One Engine Operator's Manual • One Hardware Pack • One Discharge Chute Assembly • One Mulch Plug • One Product Registration Card Contents of Hardware...
... • One Rear Engine Cover • One Rear Hitch Plate • One Oil Drain Sleeve • One Riding Mower Operator's Manual • One Steering Pedestal Cap • One Engine Operator's Manual • One Hardware Pack • One Discharge Chute Assembly • One Mulch Plug • One Product Registration Card Contents of Hardware...
Operation Manual
Page 13
... the battery as follows: NOTE: The positive battery terminal is marked Pos. (+). Remove the factory installed hex bolts and sems nuts located on your Operator's Manual prior to its terminal first, followed by positioning it in place as shown in Figure 3-10. Figure 3-10 3. Do not to over the positive battery...
... the battery as follows: NOTE: The positive battery terminal is marked Pos. (+). Remove the factory installed hex bolts and sems nuts located on your Operator's Manual prior to its terminal first, followed by positioning it in place as shown in Figure 3-10. Figure 3-10 3. Do not to over the positive battery...
Operation Manual
Page 14
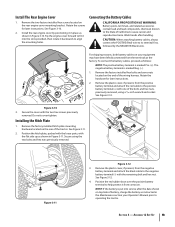
... MUST check the oil level before operating. Never fuel machine indoors or while the engine is shipped with motor oil in the separate Engine Owner's Manual packed with Figure 3-13. Otherwise the unit may not run properly. Be careful not to expand and for the fuel to overfill. Uneven tire pressure...
... MUST check the oil level before operating. Never fuel machine indoors or while the engine is shipped with motor oil in the separate Engine Owner's Manual packed with Figure 3-13. Otherwise the unit may not run properly. Be careful not to expand and for the fuel to overfill. Uneven tire pressure...
Operation Manual
Page 15
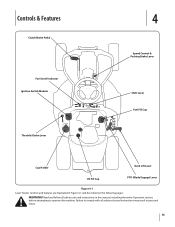
... Fuel Fill Cap Cup Holder Deck Lift Lever Oil Fill Cap PTO (Blade Engage) Lever Figure 4-1 Lawn Tractor controls and features are illustrated in this manual, including the entire Operation section, before attempting to comply with all safety rules and instructions in Figure 4-1 and described on the following pages. Failure to...
... Fuel Fill Cap Cup Holder Deck Lift Lever Oil Fill Cap PTO (Blade Engage) Lever Figure 4-1 Lawn Tractor controls and features are illustrated in this manual, including the entire Operation section, before attempting to comply with all safety rules and instructions in Figure 4-1 and described on the following pages. Failure to...

Operation Manual
Page 16
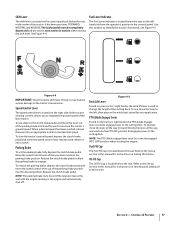
... module and turn the ignition key counterclockwise to both Safety Interlock Switches and Starting The Engine in the Operation section of this manual for detailed starting instructions. IMPORTANT: Prior to operating the tractor, refer to the OFF position. Moving the throttle lever all.... Ignition Switch Module The ignition switch module is located on the left fender of the tractor seated in the Operation section of this manual for detailed instructions regarding the Ignition Switch Module and operating the tractor in starting . To stop . See Figure 4-3. Figure 4-3 WARNING...
... module and turn the ignition key counterclockwise to both Safety Interlock Switches and Starting The Engine in the Operation section of this manual for detailed starting instructions. IMPORTANT: Prior to operating the tractor, refer to the OFF position. Moving the throttle lever all.... Ignition Switch Module The ignition switch module is located on the left fender of the tractor seated in the Operation section of this manual for detailed instructions regarding the Ignition Switch Module and operating the tractor in starting . To stop . See Figure 4-3. Figure 4-3 WARNING...
Operation Manual
Page 17
... to regulate the ground speed of the parking brake position into a notch. Doing so may result in this manual for instructions on checking and adding oil to the Set-up section in this manual for instructions on fueling this tractor. Moving the lever all the way rearward into the PTO OFF position...
... to regulate the ground speed of the parking brake position into a notch. Doing so may result in this manual for instructions on checking and adding oil to the Set-up section in this manual for instructions on fueling this tractor. Moving the lever all the way rearward into the PTO OFF position...
Operation Manual
Page 18
... engine will result in a "rich" fuel mixture and can cause the engine to Leveling the Deck in the Maintenance & Adjustments section of this manual for gasoline and oil fill-up and down slopes, not across. • Use extra caution on the right side of the fender. Depress the... engage the parking brake: 1. Place the PTO (Blade Engage) lever in the disengaged (OFF) position. 3. Starting the Engine WARNING! Read Operator's Manual Safety Interlock Switches This tractor is malfunctioning. CAUTION: Do NOT hold it could be thrown by moving the throttle/choke control all the way forward...
... engine will result in a "rich" fuel mixture and can cause the engine to Leveling the Deck in the Maintenance & Adjustments section of this manual for gasoline and oil fill-up and down slopes, not across. • Use extra caution on the right side of the fender. Depress the... engage the parking brake: 1. Place the PTO (Blade Engage) lever in the disengaged (OFF) position. 3. Starting the Engine WARNING! Read Operator's Manual Safety Interlock Switches This tractor is malfunctioning. CAUTION: Do NOT hold it could be thrown by moving the throttle/choke control all the way forward...
Operation Manual
Page 20
... NORMAL MOWING position or STOP position or b. Refer to the FAST (rabbit) position. 2. Mulching is placed in the front of this manual for instructions on a slope. Stop machine if anyone enters the area. Operation The operator leaves the seat. Move the throttle control lever...and extremely tall grass. Using the Deck Lift Lever To raise the cutting deck, move the deck lift lever to Cutting Blade in this manual for proper blade sharpening instructions. 20 Section 5- This will remain activated until: a. Turning up section of a roll over backward. Refer...
... NORMAL MOWING position or STOP position or b. Refer to the FAST (rabbit) position. 2. Mulching is placed in the front of this manual for instructions on a slope. Stop machine if anyone enters the area. Operation The operator leaves the seat. Move the throttle control lever...and extremely tall grass. Using the Deck Lift Lever To raise the cutting deck, move the deck lift lever to Cutting Blade in this manual for proper blade sharpening instructions. 20 Section 5- This will remain activated until: a. Turning up section of a roll over backward. Refer...
Operation Manual
Page 21
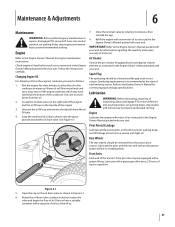
... fill cap and remove the dipstick from hot oil. 2. Refill the engine with new motor oil as instructed in the Engine Owner Manual packed with light oil. Lubrication WARNING: Before lubricating, repairing, or inspecting, always disengage PTO, move shift lever into neutral position, ... Lubricate the engine with motor oil as instructed in Figure 6-1. 6. Lubricate with a grease fitting. IMPORTANT: Refer to the Engine Owner's Manual packed with your unit. Pivot Points & Linkage Lubricate all -purpose grease before each mowing season. Check engine oil level before re-installing ...
... fill cap and remove the dipstick from hot oil. 2. Refill the engine with new motor oil as instructed in the Engine Owner Manual packed with light oil. Lubrication WARNING: Before lubricating, repairing, or inspecting, always disengage PTO, move shift lever into neutral position, ... Lubricate the engine with motor oil as instructed in Figure 6-1. 6. Lubricate with a grease fitting. IMPORTANT: Refer to the Engine Owner's Manual packed with your unit. Pivot Points & Linkage Lubricate all -purpose grease before each mowing season. Check engine oil level before re-installing ...

Operation Manual
Page 22
... of muffler and nearby engine areas may cause damage to your tractor is maintenance-free. Steering Adjustment If the tractor turns tighter in the operator's manual. Muffler WARNING!
... of muffler and nearby engine areas may cause damage to your tractor is maintenance-free. Steering Adjustment If the tractor turns tighter in the operator's manual. Muffler WARNING!
Operation Manual
Page 23
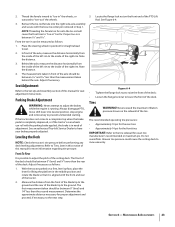
... PTO, move shift lever into the right side axle assembly and secure with the front and rear of the PTO Lift Rod. See an authorized Troy-bilt Service Dealer to lower the front of the deck; • Loosen the flange lock nut to have your brakes properly adjusted. Leveling the Deck NOTE... the next step. 3. Adjust if necessary as follows: 1. 2. Thread the ferrule inward to "toe-in" the wheels, or outward to "toe-in front of this manual for straight ahead travel. 2. NOTE: Threading the ferrule too far onto the tie-rod will cause the front tires to "toe-out" the wheels. 3. Front...
... PTO, move shift lever into the right side axle assembly and secure with the front and rear of the PTO Lift Rod. See an authorized Troy-bilt Service Dealer to lower the front of the deck; • Loosen the flange lock nut to have your brakes properly adjusted. Leveling the Deck NOTE... the next step. 3. Adjust if necessary as follows: 1. 2. Thread the ferrule inward to "toe-in" the wheels, or outward to "toe-in front of this manual for straight ahead travel. 2. NOTE: Threading the ferrule too far onto the tie-rod will cause the front tires to "toe-out" the wheels. 3. Front...

Operation Manual
Page 25
... 10 Hours P P Every 25 Hours P P P Every 50 Hours Every Prior 100 Hours to Storing P P P P P PP P IMPORTANT: It is important to consult the specific engine operator's manual included with this machine for detailed engine maintenance procedures and intervals.
... 10 Hours P P Every 25 Hours P P P Every 50 Hours Every Prior 100 Hours to Storing P P P P P PP P IMPORTANT: It is important to consult the specific engine operator's manual included with this machine for detailed engine maintenance procedures and intervals.
Operation Manual
Page 28
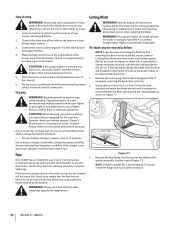
... using heavy gloves when grasping the blade. car, truck), do not touch, and ignitions are off. Start the tractor as shown in this manual. 6. Batteries give off and remove ignition key before removing the jumper cables, in a well ventilated area and keep away from damage caused by... spindle assembly. CAUTION: If the jumper battery is not automatic, charge for sharpening or replacement. Charging WARNING! Read your battery charger's Owner's Manual prior to the tractor. If your tractor's battery. It can be easier to change the blade with the deck still attached to charging your...
... using heavy gloves when grasping the blade. car, truck), do not touch, and ignitions are off. Start the tractor as shown in this manual. 6. Batteries give off and remove ignition key before removing the jumper cables, in a well ventilated area and keep away from damage caused by... spindle assembly. CAUTION: If the jumper battery is not automatic, charge for sharpening or replacement. Charging WARNING! Read your battery charger's Owner's Manual prior to the tractor. If your tractor's battery. It can be easier to change the blade with the deck still attached to charging your...


