

Operation Manual
Page 1
Operator's Manual 2-Cycle Gas Cultivator TB225 TABLE OF CONTENTS Service Information 1 Rules for Safe Operation 2 Know Your Unit 5 Specifications 5 Assembly Instructions 6 Oil and Fuel Information 7 Starting and Stopping Instructions 8 Operating Instructions 9 Maintenance and Repair 10 Cleaning and Storage 13 Troubleshooting Chart 14 Warranty Information 16 SAVE THESE INSTRUCTIONS SERVICE DO NOT ...
Operator's Manual 2-Cycle Gas Cultivator TB225 TABLE OF CONTENTS Service Information 1 Rules for Safe Operation 2 Know Your Unit 5 Specifications 5 Assembly Instructions 6 Oil and Fuel Information 7 Starting and Stopping Instructions 8 Operating Instructions 9 Maintenance and Repair 10 Cleaning and Storage 13 Troubleshooting Chart 14 Warranty Information 16 SAVE THESE INSTRUCTIONS SERVICE DO NOT ...

Operation Manual
Page 2
... a safety CAUTION signal MAY result in serious injury to others . Do not operate the unit with a spark arrestor. keep these instructions before starting the engine. Even then, they give are cracked, chipped, or damaged in the tank before using the unit, all adjustments or repairs before ...may be installed properly before operating the unit. • Inspect the unit before filling the fuel tank. Do not smoke. • Never start or run the unit inside a closed room or building. If it returns automatically to the idle position. Read the Operator's Manual and follow ...
... a safety CAUTION signal MAY result in serious injury to others . Do not operate the unit with a spark arrestor. keep these instructions before starting the engine. Even then, they give are cracked, chipped, or damaged in the tank before using the unit, all adjustments or repairs before ...may be installed properly before operating the unit. • Inspect the unit before filling the fuel tank. Do not smoke. • Never start or run the unit inside a closed room or building. If it returns automatically to the idle position. Read the Operator's Manual and follow ...
Operation Manual
Page 3
... prevent rust. • Keep these instructions. These are available from grass, leaves, excessive grease or carbon build up. • If the unit starts to Cleaning and Storage. • Clean the tines with a foreign object, stop moving parts have stopped. 3. Keep the engine and muffler free ... to instruct other debris that meet current ANSI Z87.1 standards and are not in daylight or good artificial light. • Avoid accidental starting. If you strike or become entangled with a household cleaner to them often and use them these instructions. These parts get extremely hot ...
... prevent rust. • Keep these instructions. These are available from grass, leaves, excessive grease or carbon build up. • If the unit starts to Cleaning and Storage. • Clean the tines with a foreign object, stop moving parts have stopped. 3. Keep the engine and muffler free ... to instruct other debris that meet current ANSI Z87.1 standards and are not in daylight or good artificial light. • Avoid accidental starting. If you strike or become entangled with a household cleaner to them often and use them these instructions. These parts get extremely hot ...
Operation Manual
Page 4
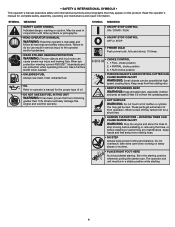
...WARNING: Keep all warnings and safety instructions. You may appear on steep slopes or inclines. • PLACE RIGHT FOOT HERE Avoid accidental starting. Wear eye protection meeting current ANSI Z87.1 standards and ear protection when operating this unit. Do not overreach, take extra care when...high speed, causing injury. Read the operator's manual for a short time. • GARDEN CULTIVATORS - SYMBOL MEANING • ON/OFF STOP CONTROL ON / START / RUN • ON/OFF STOP CONTROL OFF or STOP • PRIMER BULB Push primer bulb, fully and slowly, 10 times. • CHOKE CONTROL ...
...WARNING: Keep all warnings and safety instructions. You may appear on steep slopes or inclines. • PLACE RIGHT FOOT HERE Avoid accidental starting. Wear eye protection meeting current ANSI Z87.1 standards and ear protection when operating this unit. Do not overreach, take extra care when...high speed, causing injury. Read the operator's manual for a short time. • GARDEN CULTIVATORS - SYMBOL MEANING • ON/OFF STOP CONTROL ON / START / RUN • ON/OFF STOP CONTROL OFF or STOP • PRIMER BULB Push primer bulb, fully and slowly, 10 times. • CHOKE CONTROL ...
Operation Manual
Page 7
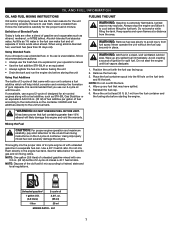
...with one 3.2 oz. (95 ml) bottle of the old fuel/oil mix according to avoid injury from the fuel container and the fueling site before starting the engine. Add 0.8 oz. (23 ml) of fuel additive per gallon of fuel according to use is extremely flammable. FUELING THE UNIT WARNING: ... which will likely damage this unit. NEVER add fuel additives directly to the oil and fuel mixing instructions on the 2-cycle oil container. Do not start the engine until fuel vapors dissipate. 1. Using improperly mixed fuel can . NOTE: Dispose of 2-cycle oil makes a 40:1 fuel/oil ratio. Do not ...
...with one 3.2 oz. (95 ml) bottle of the old fuel/oil mix according to avoid injury from the fuel container and the fueling site before starting the engine. Add 0.8 oz. (23 ml) of fuel additive per gallon of fuel according to use is extremely flammable. FUELING THE UNIT WARNING: ... which will likely damage this unit. NEVER add fuel additives directly to the oil and fuel mixing instructions on the 2-cycle oil container. Do not start the engine until fuel vapors dissipate. 1. Using improperly mixed fuel can . NOTE: Dispose of 2-cycle oil makes a 40:1 fuel/oil ratio. Do not ...
Operation Manual
Page 8
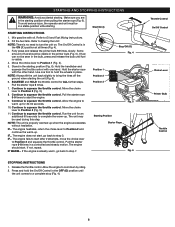
...5). 5. Move the choke lever to cool down by idling. 2. Move the choke lever to squeeze the throttle control. Pull the starter rope 3-5 times to start after 2 attempts, move the choke lever to turn the unit on. The unit may be visible in place. Continue to Position 2 (Fig. 5). 8. ...with one foot to squeeze the throttle control. Release the throttle control. SQUEEZE and HOLD the throttle control for an additional 60 seconds to start the engine. 9. Continue to Fueling the Unit. Press and hold the wheels in the primer bulb (Fig. 5). Refer to squeeze the...
...5). 5. Move the choke lever to cool down by idling. 2. Move the choke lever to squeeze the throttle control. Pull the starter rope 3-5 times to start after 2 attempts, move the choke lever to turn the unit on. The unit may be visible in place. Continue to Position 2 (Fig. 5). 8. ...with one foot to squeeze the throttle control. Release the throttle control. SQUEEZE and HOLD the throttle control for an additional 60 seconds to start the engine. 9. Continue to Fueling the Unit. Press and hold the wheels in the primer bulb (Fig. 5). Refer to squeeze the...

Operation Manual
Page 9
...the tines make contact with the controls and the handling of the cultivator. 7. With the tines off the ground, squeeze the throttle control to starting the engine. Once the ground has been broken, continue at a moderate pace until you . 6. If necessary, adjust the tines as described ...the risk of cultivation and reduce your effort. 8. OPERATING TIPS 1. Refer to the next location. Refer to Adjusting the Wheel Assembly in the Starting Instructions. 3. Do not wear loose clothing or jewelry. Wear eye and ear/hearing protection. As cultivating action begins, pull back on the ...
...the tines make contact with the controls and the handling of the cultivator. 7. With the tines off the ground, squeeze the throttle control to starting the engine. Once the ground has been broken, continue at a moderate pace until you . 6. If necessary, adjust the tines as described ...the risk of cultivation and reduce your effort. 8. OPERATING TIPS 1. Refer to the next location. Refer to Adjusting the Wheel Assembly in the Starting Instructions. 3. Do not wear loose clothing or jewelry. Wear eye and ear/hearing protection. As cultivating action begins, pull back on the ...
Operation Manual
Page 10
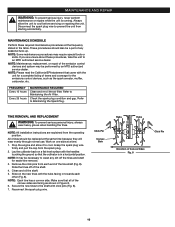
... the California/EPA statement that the cultivator is running. NOTE: It may be performed by an MTD authorized service dealer. Remove the click pins from starting accidentally. NOTE: Maintenance, replacement, or repair of any dirt off of the shaft. 4. Refer to prevent the unit from each other (Fig. 8). Stop the engine...
... the California/EPA statement that the cultivator is running. NOTE: It may be performed by an MTD authorized service dealer. Remove the click pins from starting accidentally. NOTE: Maintenance, replacement, or repair of any dirt off of the shaft. 4. Refer to prevent the unit from each other (Fig. 8). Stop the engine...
Operation Manual
Page 11
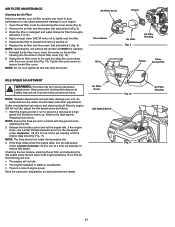
...as needed ) until the engine idles smoothly (Fig. 11). Wear protective clothing and observe all the following are not in detergent and water. Start the engine and let it to dry. 4. NOTE: The tines should make carburetor adjustments. Wash the filter in contact with the cover screw...filter housing into the slots on acceleration • There is a loss of a turn during engine idle. 3. Tighten the cover screw to the Starting and Stopping Instructions. If the tines rotate when the engine idles, turn the idle speed screw counterclockwise 1/8 of engine power Have the carburetor adjusted...
...as needed ) until the engine idles smoothly (Fig. 11). Wear protective clothing and observe all the following are not in detergent and water. Start the engine and let it to dry. 4. NOTE: The tines should make carburetor adjustments. Wash the filter in contact with the cover screw...filter housing into the slots on acceleration • There is a loss of a turn during engine idle. 3. Tighten the cover screw to the Starting and Stopping Instructions. If the tines rotate when the engine idles, turn the idle speed screw counterclockwise 1/8 of engine power Have the carburetor adjusted...
Operation Manual
Page 13
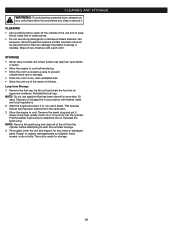
... been stored for more than 30 days. NOTE: Remove the spark plug and drain all fuel has been drained from the cylinder before attempting to start the unit after storage. 4. Thoroughly clean the unit and inspect for storage. 13 STORAGE • Never store a fueled unit where fumes may reach...Wipe off any loose or damaged parts. Reinstall the fuel cap. This ensures that all of the oil from the carburetor. 3. Reinstall the spark plug. Start the engine and allow it to cool before storing. • Store the unit in a locked up area to prevent unauthorized use or damage. •...
... been stored for more than 30 days. NOTE: Remove the spark plug and drain all fuel has been drained from the cylinder before attempting to start the unit after storage. 4. Thoroughly clean the unit and inspect for storage. 13 STORAGE • Never store a fueled unit where fumes may reach...Wipe off any loose or damaged parts. Reinstall the fuel cap. This ensures that all of the oil from the carburetor. 3. Reinstall the spark plug. Start the engine and allow it to cool before storing. • Store the unit in a locked up area to prevent unauthorized use or damage. •...
Operation Manual
Page 14
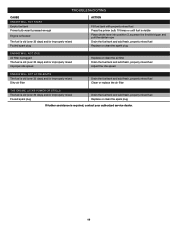
TROUBLESHOOTING CAUSE ENGINE WILL NOT START Empty fuel tank Primer bulb wasn't pressed enough Engine is flooded The fuel is old (over 30 days) and/or improperly mixed Fouled spark plug ...
TROUBLESHOOTING CAUSE ENGINE WILL NOT START Empty fuel tank Primer bulb wasn't pressed enough Engine is flooded The fuel is old (over 30 days) and/or improperly mixed Fouled spark plug ...


