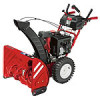

Operation Manual
Page 2
...web at www.troybilt.com ◊ Call a Customer Support Representative at the time of product specifications for purchasing a Troy-Bilt Snow Thrower. Throughout this page. You can be applicable to change product specifications, designs and equipment without notice and without first ... Operation Practices 3 Assembly & Set-Up 7 Controls 13 Operation 16 Maintenance & Adjustment 17 Service 20 Troubleshooting 24 Replacement Parts 25 Attachments 26 Warranty Back Cover Record Product Information Before setting up , operate and maintain your complete satisfaction at all times...
...web at www.troybilt.com ◊ Call a Customer Support Representative at the time of product specifications for purchasing a Troy-Bilt Snow Thrower. Throughout this page. You can be applicable to change product specifications, designs and equipment without notice and without first ... Operation Practices 3 Assembly & Set-Up 7 Controls 13 Operation 16 Maintenance & Adjustment 17 Service 20 Troubleshooting 24 Replacement Parts 25 Attachments 26 Warranty Back Cover Record Product Information Before setting up , operate and maintain your complete satisfaction at all times...

Operation Manual
Page 5
...operator's manual for instructions. 7. "Use of injury associated with snow throwers. Refer to prevent unintended starting. 3. Never store the machine or fuel container inside the discharge chute is the most common cause of parts which are certified to clean out the discharge chute. Always refer... the chute: 1. Also, visually inspect machine for gas, oil, etc. The governor controls the maximum safe operating speed of operation. Snow thrower shave plates and skid shoes are working order by law (Section 4442 of engine governor. Observe proper disposal laws and regulations for any ...
...operator's manual for instructions. 7. "Use of injury associated with snow throwers. Refer to prevent unintended starting. 3. Never store the machine or fuel container inside the discharge chute is the most common cause of parts which are certified to clean out the discharge chute. Always refer... the chute: 1. Also, visually inspect machine for gas, oil, etc. The governor controls the maximum safe operating speed of operation. Snow thrower shave plates and skid shoes are working order by law (Section 4442 of engine governor. Observe proper disposal laws and regulations for any ...

Operation Manual
Page 12
...parts to the front of rotating, immediately return to verify proper adjustment has been achieved. 12 Section 3- While standing in the disengaged "up " position, walk to stop before releasing the auger control. Allow the auger to operating your snow thrower is released and in the operator's position (behind the snow thrower...above to the operator's position and shut off the engine. In a well-ventilated area, start the snow thrower engine. Check the adjustment of motion. Repeat this several times. 5. Auger Control Warning! Perform all instructions below. Refer to verify ...
...parts to the front of rotating, immediately return to verify proper adjustment has been achieved. 12 Section 3- While standing in the disengaged "up " position, walk to stop before releasing the auger control. Allow the auger to operating your snow thrower is released and in the operator's position (behind the snow thrower...above to the operator's position and shut off the engine. In a well-ventilated area, start the snow thrower engine. Check the adjustment of motion. Repeat this several times. 5. Auger Control Warning! Perform all instructions below. Refer to verify ...

Operation Manual
Page 15
... the clean-out tool to the rear of the dash panel. • To change the angle/distance which snow is thrown, pivot the joy-stick forward or backward. Caution: Operate the snow thrower in which snow is thrown, squeeze the button on the underside of the handles. • Squeeze the right control to turn... joy-stick and pivot the joy-stick to the right or to the left. • To change the direction in open areas until all moving parts have stopped before unclogging.
... the clean-out tool to the rear of the dash panel. • To change the angle/distance which snow is thrown, pivot the joy-stick forward or backward. Caution: Operate the snow thrower in which snow is thrown, squeeze the button on the underside of the handles. • Squeeze the right control to turn... joy-stick and pivot the joy-stick to the right or to the left. • To change the direction in open areas until all moving parts have stopped before unclogging.

Operation Manual
Page 16
Release it off the snow thrower's engine and remove the key prior to replacing shear pins. Squeeze the left steering trigger control to turn left handle. Any damage to the auger gearbox or other than OEM Part No. 738-04124A replacement shear pins. Figure 5-2 Figure 5-1 16 With the throttle control in ... right steering trigger control to turn , check to see if the pins have sheared. If the augers will NOT be covered by your snow thrower for the snow conditions and a pace you wear gloves when using the heated grip. Heated Grips (if so equipped) Caution: It is designed so that...
Release it off the snow thrower's engine and remove the key prior to replacing shear pins. Squeeze the left steering trigger control to turn left handle. Any damage to the auger gearbox or other than OEM Part No. 738-04124A replacement shear pins. Figure 5-2 Figure 5-1 16 With the throttle control in ... right steering trigger control to turn , check to see if the pins have sheared. If the augers will NOT be covered by your snow thrower for the snow conditions and a pace you wear gloves when using the heated grip. Heated Grips (if so equipped) Caution: It is designed so that...

Operation Manual
Page 23
... friction wheel assembly off the shaft. Service 23 Perform the Drive Control test on page 18 in reverse order to reassemble to the snow thrower frame and lightly tap the shaft's end to ensure the plates are secured with equal force (between the side plates. Repeat this... 6. Figure 7-11 NOTE: If you 're disassembling the friction wheel and replacing only the rubber ring, proceed as a whole, discard the worn part and slide the new part onto the hex shaft. 2. Figure 7-10 Section 7 - If you 're replacing the friction wheel assembly as follows: 1. See Fig. 7-10....
... friction wheel assembly off the shaft. Service 23 Perform the Drive Control test on page 18 in reverse order to reassemble to the snow thrower frame and lightly tap the shaft's end to ensure the plates are secured with equal force (between the side plates. Repeat this... 6. Figure 7-11 NOTE: If you 're disassembling the friction wheel and replacing only the rubber ring, proceed as a whole, discard the worn part and slide the new part onto the hex shaft. 2. Figure 7-10 Section 7 - If you 're replacing the friction wheel assembly as follows: 1. See Fig. 7-10....
Operation Manual
Page 28
...snow thrower skid shoes, friction wheels, shave plates, auger spiral rubber and tires. Normal wear parts include, but are warranted to temporarily replace a warranted product. Phone: 1-866-840-6483, 1-330-558-7220 MTD Canada Limited - Check your local authorized service dealer. Troy-Bilt ..., except those sold through your Yellow Pages, or contact Troy-Bilt LLC at its territories and possessions (either entity respectively, "TroyBilt"). Attachments include, but are not genuine Troy-Bilt parts. c. Troy-Bilt does not extend any kind be liable for incidental or ...
...snow thrower skid shoes, friction wheels, shave plates, auger spiral rubber and tires. Normal wear parts include, but are warranted to temporarily replace a warranted product. Phone: 1-866-840-6483, 1-330-558-7220 MTD Canada Limited - Check your local authorized service dealer. Troy-Bilt ..., except those sold through your Yellow Pages, or contact Troy-Bilt LLC at its territories and possessions (either entity respectively, "TroyBilt"). Attachments include, but are not genuine Troy-Bilt parts. c. Troy-Bilt does not extend any kind be liable for incidental or ...


