
Operation Manual
Page 1
Printed In USA TROY-BILT LLC, P.O. Safe Operation Practices • Set-Up • Operation • Maintenance • Service • Troubleshooting • Warranty Operator's Manual Yard Vacuum/Chipper/Shredder with Vacuum/Hose Model CSV 060 WARNING READ AND FOLLOW ALL SAFETY RULES AND INSTRUCTIONS IN THIS MANUAL BEFORE ATTEMPTING TO OPERATE THIS MACHINE. BOX 361131 CLEVELAND, OHIO 44136-0019 Form No. 769-06154 (May 24, 2010) FAILURE TO COMPLY WITH THESE INSTRUCTIONS MAY RESULT IN PERSONAL INJURY.
Printed In USA TROY-BILT LLC, P.O. Safe Operation Practices • Set-Up • Operation • Maintenance • Service • Troubleshooting • Warranty Operator's Manual Yard Vacuum/Chipper/Shredder with Vacuum/Hose Model CSV 060 WARNING READ AND FOLLOW ALL SAFETY RULES AND INSTRUCTIONS IN THIS MANUAL BEFORE ATTEMPTING TO OPERATE THIS MACHINE. BOX 361131 CLEVELAND, OHIO 44136-0019 Form No. 769-06154 (May 24, 2010) FAILURE TO COMPLY WITH THESE INSTRUCTIONS MAY RESULT IN PERSONAL INJURY.

Operation Manual
Page 2
... your machine. Please read this product or have any problems or questions concerning the machine, phone a authorized Troy-Bilt service dealer or contact us at Troy-Bilt LLC • P.O. Please be applicable to do NOT return the machine to provide excellent performance when properly ... be found on the equipment and record the information in this manual may cover a range of product specifications for purchasing a Chipper/Shredder Vacuum manufactured by standing at the operator's position and looking down at all engine-related issues with a local authorized service dealer....
... your machine. Please read this product or have any problems or questions concerning the machine, phone a authorized Troy-Bilt service dealer or contact us at Troy-Bilt LLC • P.O. Please be applicable to do NOT return the machine to provide excellent performance when properly ... be found on the equipment and record the information in this manual may cover a range of product specifications for purchasing a Chipper/Shredder Vacuum manufactured by standing at the operator's position and looking down at all engine-related issues with a local authorized service dealer....

Operation Manual
Page 7
... the inside and secure with hairpin clips. Unfold the upper handle until it aligns with lower handle. Assembly & Set-Up 3 Contents of Carton • One Chipper/Shredder Vacuum • One Upper and Lower Handle • One Bag • One Operator's Manual • One Hose Assembly • One Bottle of upper NOTE: This unit...
... the inside and secure with hairpin clips. Unfold the upper handle until it aligns with lower handle. Assembly & Set-Up 3 Contents of Carton • One Chipper/Shredder Vacuum • One Upper and Lower Handle • One Bag • One Operator's Manual • One Hose Assembly • One Bottle of upper NOTE: This unit...

Operation Manual
Page 8
.... wing nut. A B Align Pin with right side of hose assembly into hose cradle (if applicable). Tighten the 3. See Fig. 3-5C. the first hole (closest to chipper chute and into the base adapter located on the base and align pin with this Hole Figure 3-4 8 Section 3 - Slowly pull starter rope out of the... Figure 3-5 5. Assembly & Set-Up See Fig. 3-4A. 4. Loosen the wing nut that secures the rope guide to lock the hose in curved end of the Chipper shredder Vacuum. b. Lay hose tubing in place. Release the pin to the 2. adapter.
.... wing nut. A B Align Pin with right side of hose assembly into hose cradle (if applicable). Tighten the 3. See Fig. 3-5C. the first hole (closest to chipper chute and into the base adapter located on the base and align pin with this Hole Figure 3-4 8 Section 3 - Slowly pull starter rope out of the... Figure 3-5 5. Assembly & Set-Up See Fig. 3-4A. 4. Loosen the wing nut that secures the rope guide to lock the hose in curved end of the Chipper shredder Vacuum. b. Lay hose tubing in place. Release the pin to the 2. adapter.

Operation Manual
Page 9
... Gas and Oil Fill-Up Refer to the mounting bracket must be adjusted to any six positions, ranging from 5/8" to chipper shredder conditions. 1. Move the height adjustment lever forward or backward to vacuum a will not start. Lower the nozzle height for additional engine information. 1. Assembly & Set-Up 9 Snap bag clip to cool for...
... Gas and Oil Fill-Up Refer to the mounting bracket must be adjusted to any six positions, ranging from 5/8" to chipper shredder conditions. 1. Move the height adjustment lever forward or backward to vacuum a will not start. Lower the nozzle height for additional engine information. 1. Assembly & Set-Up 9 Snap bag clip to cool for...

Operation Manual
Page 10
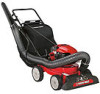
... and the hose assembly. Nozzle/ Hose Vac Lever The nozzle/hose vac handle is attached to vacuum yard waste such as leaves or pine needles. Controls and Features 4 Recoil Starter Bag Hose Handle Hose Extension Chipper Chute Nozzle Height Adjustment Lever Hose Assembly Nozzle/Hose Vac Lever Nozzle Figure 4-1 WARNING: The operation... is located on top of the nozzle. Always wear the safety glasses provided with this unit or eye shields while operating or while performing any chipper shredder can result in diameter to guide hose assembly when vacuuming.
... and the hose assembly. Nozzle/ Hose Vac Lever The nozzle/hose vac handle is attached to vacuum yard waste such as leaves or pine needles. Controls and Features 4 Recoil Starter Bag Hose Handle Hose Extension Chipper Chute Nozzle Height Adjustment Lever Hose Assembly Nozzle/Hose Vac Lever Nozzle Figure 4-1 WARNING: The operation... is located on top of the nozzle. Always wear the safety glasses provided with this unit or eye shields while operating or while performing any chipper shredder can result in diameter to guide hose assembly when vacuuming.

Operation Manual
Page 11
... bag back onto unit as instructed in Assembly & Set-Up. See Fig. 5-2. Operation 5 Starting & Stopping Engine Refer to the Engine Operator's manual packed with your chipper/ shredder vacuum for instructions on mounting bracket with one hand and pull lock rod on starting and stopping the engine. Unsnap bag clip from the lower handle...
... bag back onto unit as instructed in Assembly & Set-Up. See Fig. 5-2. Operation 5 Starting & Stopping Engine Refer to the Engine Operator's manual packed with your chipper/ shredder vacuum for instructions on mounting bracket with one hand and pull lock rod on starting and stopping the engine. Unsnap bag clip from the lower handle...
Operation Manual
Page 13
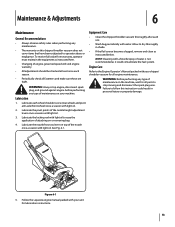
... here. • Changing of the nozzle height adjustment levers once a season with your chipper/ shredder vacuum for all fasteners and make sure these are tight. Equipment Care • Clean the chipper/shredder vacuum thoroughly after each wheel shoulder screw (rear wheel) and pivot arm axle (front wheel)... damage. Allow to ease the application of the nozzle once a season with water. See Fig. 6-1. Failure to follow this chipper/shredder vacuum does not cover items that have been subjected to the Engine Operator's Manual packed with a forceful spray of maintenance on your ...
... here. • Changing of the nozzle height adjustment levers once a season with your chipper/ shredder vacuum for all fasteners and make sure these are tight. Equipment Care • Clean the chipper/shredder vacuum thoroughly after each wheel shoulder screw (rear wheel) and pivot arm axle (front wheel)... damage. Allow to ease the application of the nozzle once a season with water. See Fig. 6-1. Failure to follow this chipper/shredder vacuum does not cover items that have been subjected to the Engine Operator's Manual packed with a forceful spray of maintenance on your ...

Operation Manual
Page 14
... rear housing near mounting bracket and the flange lock nut that attaches to retaining post. 3. Stop the engine. Make certain the chipper/shredder vacuum has come to flail screen. 4. Figure 6-3 7. Remove the vacuum bag from the unit as follows: 6. Maintenance & Adjustments Remove self tapping screw on top of unit that secures flail screen. Figure...
... rear housing near mounting bracket and the flange lock nut that attaches to retaining post. 3. Stop the engine. Make certain the chipper/shredder vacuum has come to flail screen. 4. Figure 6-3 7. Remove the vacuum bag from the unit as follows: 6. Maintenance & Adjustments Remove self tapping screw on top of unit that secures flail screen. Figure...

Operation Manual
Page 16
...black plastic extension. Do not store in an area where equipment is present that may use a pilot light or has a component that hold the chipper blade to remove. 9. Using a 3/16" allen wrench, remove the flat head cap screws that can be reached underneath to engine manual for ... a file or on the flat head cap screws can create a spark. 16 Section 7- Off-Season Storage • When storing the chipper/shredder vacuum in the opposite order and manner of black plastic lower flail housing toward the engine to the impeller. Service Carefully tilt and support the unit...
...black plastic extension. Do not store in an area where equipment is present that may use a pilot light or has a component that hold the chipper blade to remove. 9. Using a 3/16" allen wrench, remove the flat head cap screws that can be reached underneath to engine manual for ... a file or on the flat head cap screws can create a spark. 16 Section 7- Off-Season Storage • When storing the chipper/shredder vacuum in the opposite order and manner of black plastic lower flail housing toward the engine to the impeller. Service Carefully tilt and support the unit...


