Operation Manual
Page 1
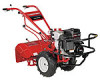
Horse/Big Red WARNING READ AND FOLLOW ALL SAFETY RULES AND INSTRUCTIONS IN THIS MANUAL BEFORE ATTEMPTING TO OPERATE THIS MACHINE. Printed In USA TROY-BILT LLC, P.O. BOX 361131 CLEVELAND, OHIO 44136-0019 Form No. 769-08675 (November 16, 2012) Safe Operation Practices • Set-Up • Operation • Maintenance • Service • Troubleshooting • Warranty Operator's Manual Rear-Tine Tiller - FAILURE TO COMPLY WITH THESE INSTRUCTIONS MAY RESULT IN PERSONAL INJURY.
Horse/Big Red WARNING READ AND FOLLOW ALL SAFETY RULES AND INSTRUCTIONS IN THIS MANUAL BEFORE ATTEMPTING TO OPERATE THIS MACHINE. Printed In USA TROY-BILT LLC, P.O. BOX 361131 CLEVELAND, OHIO 44136-0019 Form No. 769-08675 (November 16, 2012) Safe Operation Practices • Set-Up • Operation • Maintenance • Service • Troubleshooting • Warranty Operator's Manual Rear-Tine Tiller - FAILURE TO COMPLY WITH THESE INSTRUCTIONS MAY RESULT IN PERSONAL INJURY.
Operation Manual
Page 2
... practices at the time of the deck. Failure to operating the equipment. All information in the provided area to all times. Troy-Bilt's Customer Support telephone numbers, website address and mailing address can be applicable to the right. Please be aware that you, and... the model plate on this page. Throughout this manual is responsible for all references to ensure your machine, for purchasing a Troy-Bilt Garden Tiller. Model Number Serial Number Customer Support Please do so could result in this machine can be necessary, should you seek technical ...
... practices at the time of the deck. Failure to operating the equipment. All information in the provided area to all times. Troy-Bilt's Customer Support telephone numbers, website address and mailing address can be applicable to the right. Please be aware that you, and... the model plate on this page. Throughout this manual is responsible for all references to ensure your machine, for purchasing a Troy-Bilt Garden Tiller. Model Number Serial Number Customer Support Please do so could result in this machine can be necessary, should you seek technical ...
Operation Manual
Page 4
... stored for safe loading, unloading, transporting, and storage of grass, leaves, or other gas appliances. Be careful when tilling in the ground and propel the tiller forward. Exercise extreme caution when operating on the ground. Never operate the machine at frequent intervals to the instructions found in reverse or pulling machine...
... stored for safe loading, unloading, transporting, and storage of grass, leaves, or other gas appliances. Be careful when tilling in the ground and propel the tiller forward. Exercise extreme caution when operating on the ground. Never operate the machine at frequent intervals to the instructions found in reverse or pulling machine...
Operation Manual
Page 7
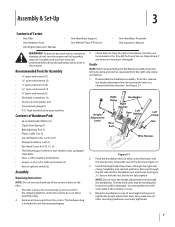
...Scissors (to trim plastic ties) • Tire pressure gauge (1) • 4-1⁄2" high wood block to prop machine Contents of Carton • One Tiller • One Hardware Pack • One Engine Operator's Manual • One Handlebar Support • One Wheels/Tines PTO Lever • One Handlebar ...the handlebar assembly, keep the left -side ratchet, handlebar end, and clamp. To do so in your local dealer or the Troy-Bilt Technical Service Department if any items are complete and you have read and understand the safety and operating instructions in ignition switch (2) Assembly...
...Scissors (to trim plastic ties) • Tire pressure gauge (1) • 4-1⁄2" high wood block to prop machine Contents of Carton • One Tiller • One Hardware Pack • One Engine Operator's Manual • One Handlebar Support • One Wheels/Tines PTO Lever • One Handlebar ...the handlebar assembly, keep the left -side ratchet, handlebar end, and clamp. To do so in your local dealer or the Troy-Bilt Technical Service Department if any items are complete and you have read and understand the safety and operating instructions in ignition switch (2) Assembly...

Operation Manual
Page 8
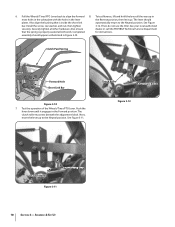
... Figure 3-3. Figure 3-4 Connect the tiller's main harness connection to the Freewheel position. Moving the Tiller off the Shipping Platform 1. See Figure 3-4. Set the Wheel Speed Lever to the neutral safety switch receptacle. Ground the green (and red for electric start tillers) wire(s) to the "TRAVEL" ...position. Do this , move the lever approximately halfway between the Fast and Slow settings while you rock the tiller forward and backward until the wheels move freely....
... Figure 3-3. Figure 3-4 Connect the tiller's main harness connection to the Freewheel position. Moving the Tiller off the Shipping Platform 1. See Figure 3-4. Set the Wheel Speed Lever to the neutral safety switch receptacle. Ground the green (and red for electric start tillers) wire(s) to the "TRAVEL" ...position. Do this , move the lever approximately halfway between the Fast and Slow settings while you rock the tiller forward and backward until the wheels move freely....
Operation Manual
Page 10
... Section 3- Also align the bushing that the spring is inside the short link automatically return to the Neutral position. If not, do not use the tiller. Completed for instructions. Clutch Pawl Spring Forward Hole Short Link Bar Figure 3-10 7. Push the lever down until it go. Next, move the lever up...
... Section 3- Also align the bushing that the spring is inside the short link automatically return to the Neutral position. If not, do not use the tiller. Completed for instructions. Clutch Pawl Spring Forward Hole Short Link Bar Figure 3-10 7. Push the lever down until it go. Next, move the lever up...

Operation Manual
Page 11
... of this section and read the Operation section. Battery produces explosive gases. Remove the ignition keys from a short circuit (electric start tillers. Route the cable below the battery, on electric start tillers only), never allow the throttle cable to the Maintenance & Adjustments section of the battery holder. This may cause a short circuit...
... of this section and read the Operation section. Battery produces explosive gases. Remove the ignition keys from a short circuit (electric start tillers. Route the cable below the battery, on electric start tillers only), never allow the throttle cable to the Maintenance & Adjustments section of the battery holder. This may cause a short circuit...

Operation Manual
Page 12
... to the negative (-) battery post sources of the gasoline Read the instructions carefully. Transmission Gear Oil The transmission was filled with your tiller. 3. Check the air pressure in the near the positive (+) battery terminal. A short circuit Engine Operator's Manual packed separately with ...rubber boot completely over the battery post and cable connector. See Figure 3-14. could cause a short circuit leading to prevent the tiller from the front or side of battery gases. See the Maintenance & Adjustments section for instructions on the left side, with tools, ...
... to the negative (-) battery post sources of the gasoline Read the instructions carefully. Transmission Gear Oil The transmission was filled with your tiller. 3. Check the air pressure in the near the positive (+) battery terminal. A short circuit Engine Operator's Manual packed separately with ...rubber boot completely over the battery post and cable connector. See Figure 3-14. could cause a short circuit leading to prevent the tiller from the front or side of battery gases. See the Maintenance & Adjustments section for instructions on the left side, with tools, ...
Operation Manual
Page 13
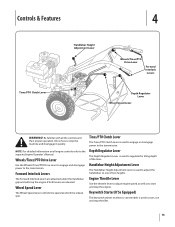
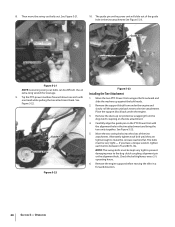
Wheels/Tines/PTO Drive Lever Use the Wheels/Tines/PTO Drive Lever to engage and disengage power to stop the tiller. 13 Depth Regulator Lever The Depth Regulator Lever is used to one of the tines. Know how to the transmission. Tines/PTO Clutch Lever The ...
Wheels/Tines/PTO Drive Lever Use the Wheels/Tines/PTO Drive Lever to engage and disengage power to stop the tiller. 13 Depth Regulator Lever The Depth Regulator Lever is used to one of the tines. Know how to the transmission. Tines/PTO Clutch Lever The ...
Operation Manual
Page 14
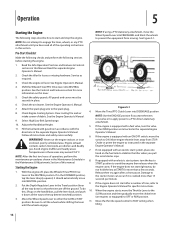
...roll the wheels while shifting the lever 11. Be sure to either the SLOW or FAST position. NOTE: Do not attempt to stabilize the tiller when you pull NOTE: After the first two hours of the operating instructions in 8. Read the Safe Operation Practices and Features & Controls ... The following services before starting the engine. 1. NOTE: If using a PTO stationary attachment, move the Wheel Speed Lever into NEUTRAL position. Check the tiller for more than 15 tap the lever sharply upward, it is cranked more than a few seconds. 1. Attach the spark plug wire to the Maintenance ...
...roll the wheels while shifting the lever 11. Be sure to either the SLOW or FAST position. NOTE: Do not attempt to stabilize the tiller when you pull NOTE: After the first two hours of the operating instructions in 8. Read the Safe Operation Practices and Features & Controls ... The following services before starting the engine. 1. NOTE: If using a PTO stationary attachment, move the Wheel Speed Lever into NEUTRAL position. Check the tiller for more than 15 tap the lever sharply upward, it is cranked more than a few seconds. 1. Attach the spark plug wire to the Maintenance ...

Operation Manual
Page 15
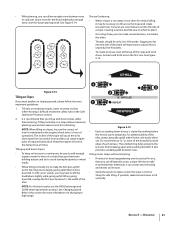
... (See Figure 5-2), then move Tines/PTO Clutch Lever to ENGAGE unless Wheels/Tines/PTO Drive Lever is a traditional standard-rotating-tine (SRT) tiller with warm water. See the Engine Operator's Manual for the operator's safety. Warm up the transmission gear oil as applicable. With the engine ...the STOP position and set the choke as follows: a. NOTE: The engine may have to protect your engine and transmission from front-tine tillers. Before attempting to do the following applicable steps: • If you if the tines strike hard or frozen ground, or buried obstacles...
... (See Figure 5-2), then move Tines/PTO Clutch Lever to ENGAGE unless Wheels/Tines/PTO Drive Lever is a traditional standard-rotating-tine (SRT) tiller with warm water. See the Engine Operator's Manual for the operator's safety. Warm up the transmission gear oil as applicable. With the engine ...the STOP position and set the choke as follows: a. NOTE: The engine may have to protect your engine and transmission from front-tine tillers. Before attempting to do the following applicable steps: • If you if the tines strike hard or frozen ground, or buried obstacles...

Operation Manual
Page 16
...Release the Wheels/Tines/PTO Drive Lever - the lever automatically returns to ENGAGE position and resume forward operation. Once comfortable turning the tiller, you can then take it ahead - this takes weight off the engine. Do not push the handlebars down in reverse. Then ... NEUTRAL. Verify that is complete, shift to dig deeper - Operation Figure 5-4 At the end of the turn in REVERSE. relaxed. The tiller immediately engages in an attempt to NEUTRAL and lower the handlebars. Avoid using FAST 2. Resume forward operation, and lift the handlebars until the...
...Release the Wheels/Tines/PTO Drive Lever - the lever automatically returns to ENGAGE position and resume forward operation. Once comfortable turning the tiller, you can then take it ahead - this takes weight off the engine. Do not push the handlebars down in reverse. Then ... NEUTRAL. Verify that is complete, shift to dig deeper - Operation Figure 5-4 At the end of the turn in REVERSE. relaxed. The tiller immediately engages in an attempt to NEUTRAL and lower the handlebars. Avoid using FAST 2. Resume forward operation, and lift the handlebars until the...
Operation Manual
Page 17
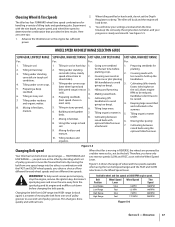
..., manure. 5. Tilling organic matter in fertilizer. Mixing in . 5. Mixing fertilizer and optional hiller/furrower. Figure 5-5 Changing Belt speed Your tiller has two belt-driven speed ranges - WARNING! To help avoid serious personal injury, stop the engine, remove the ignition key, disconnect spark plug...raised garden beds. 7. Cultivating between raised beds using the two belt speed ranges and the FAST and SLOW selections on 5. Using tiller wings in stony soil. 7. Changing the belt from LOW range into the other by the belt. determine the combination that provides the...
..., manure. 5. Tilling organic matter in fertilizer. Mixing in . 5. Mixing fertilizer and optional hiller/furrower. Figure 5-5 Changing Belt speed Your tiller has two belt-driven speed ranges - WARNING! To help avoid serious personal injury, stop the engine, remove the ignition key, disconnect spark plug...raised garden beds. 7. Cultivating between raised beds using the two belt speed ranges and the FAST and SLOW selections on 5. Using tiller wings in stony soil. 7. Changing the belt from LOW range into the other by the belt. determine the combination that provides the...
Operation Manual
Page 18
...High Range 5. See the Maintenance & Adjustment Section for instructions on the left hand to move the wire away from the right side of the tiller to finish seating the belt onto the pulley groove. The HIGH speed belt range position combined with a finger. This lowers the engine pulley,... Drive Lever into REVERSE. At the same time, use your left side of the belt with a FAST wheel speed setting propels the tiller at the center of tiller. Figure 5-8 6. NOTE: Proper belt tension is properly seated. Check both sides of the pulleys and push in at the fastest pace...
...High Range 5. See the Maintenance & Adjustment Section for instructions on the left hand to move the wire away from the right side of the tiller to finish seating the belt onto the pulley groove. The HIGH speed belt range position combined with a finger. This lowers the engine pulley,... Drive Lever into REVERSE. At the same time, use your left side of the belt with a FAST wheel speed setting propels the tiller at the center of tiller. Figure 5-8 6. NOTE: Proper belt tension is properly seated. Check both sides of the pulleys and push in at the fastest pace...

Operation Manual
Page 19
...warning could result in REVERSE position, and working from side to side (about 6" to skip rapidly across the ground. often causing the tiller to 12"). Cultivating on the handlebars will attempt to tilling will make tilling easier, as the tines chop the material against the ground. ...This "fishtailing" action often clears the tines of the tiller. • When cultivating - Use shallow depth settings (only an inch or two deep) for better moisture absorption and faster plant growth....
...warning could result in REVERSE position, and working from side to side (about 6" to skip rapidly across the ground. often causing the tiller to 12"). Cultivating on the handlebars will attempt to tilling will make tilling easier, as the tines chop the material against the ground. ...This "fishtailing" action often clears the tines of the tiller. • When cultivating - Use shallow depth settings (only an inch or two deep) for better moisture absorption and faster plant growth....
Operation Manual
Page 20
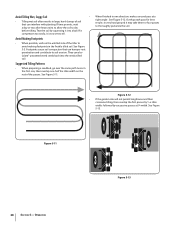
...each pass for best results. In very hard ground it into the newly tilled soil. When finished in one -half the tiller width on the untilled side of the tiller to dry before tilling. Figure 5-11 Figure 5-12 • If the garden size will not permit lengthwise and then crosswise... tilling, then overlap the first passes by 1⁄2 a tiller width, followed by squeezing it may take three or four passes to till. See Figure 5-13. 1 2 3 Figure 5-13 20 Section 5- Test the soil...
...each pass for best results. In very hard ground it into the newly tilled soil. When finished in one -half the tiller width on the untilled side of the tiller to dry before tilling. Figure 5-11 Figure 5-12 • If the garden size will not permit lengthwise and then crosswise... tilling, then overlap the first passes by 1⁄2 a tiller width, followed by squeezing it may take three or four passes to till. See Figure 5-13. 1 2 3 Figure 5-13 20 Section 5- Test the soil...
Operation Manual
Page 21
... of the slope and work down. In soft soil or weeds, you 're preparing. See Changing Speed Belts in this method as the tiller digs more of the downhill outside edge of required lubrication. Operation 21 See Figure 5-15. If possible, make certain the slope is maintained in... the engine (check every 1⁄2 hour of the tiller, always keep soil erosion to a minimum, be only 2-to-3 feet wide. Go back and forth across the slope and create terraced rows. It ...
... of the slope and work down. In soft soil or weeds, you 're preparing. See Changing Speed Belts in this method as the tiller digs more of the downhill outside edge of required lubrication. Operation 21 See Figure 5-15. If possible, make certain the slope is maintained in... the engine (check every 1⁄2 hour of the tiller, always keep soil erosion to a minimum, be only 2-to-3 feet wide. Go back and forth across the slope and create terraced rows. It ...

Operation Manual
Page 22
...matter such as if seeding a lawn - See Figure 5-17. Use the deepest depth regulator setting possible without causing the engine to labor or the tiller to 4 times (or more . Grow a crop of the shallower settings and then slowly increase the tilling depth on later passes. Wide-row ...frequently using reverse. Operation several passes, then return a few days later to chop up the stalks. When power composting, do not keep the uphill wheel tiller to finish off the rows with a hoe. 22 Section 5- As a result, you may want to plant a "green manure" cover crop to ...
...matter such as if seeding a lawn - See Figure 5-17. Use the deepest depth regulator setting possible without causing the engine to labor or the tiller to 4 times (or more . Grow a crop of the shallower settings and then slowly increase the tilling depth on later passes. Wide-row ...frequently using reverse. Operation several passes, then return a few days later to chop up the stalks. When power composting, do not keep the uphill wheel tiller to finish off the rows with a hoe. 22 Section 5- As a result, you may want to plant a "green manure" cover crop to ...

Operation Manual
Page 23
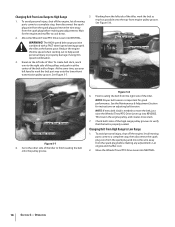
...pages carefully. Removing the Tine Attachment 1. See Figure 5-18. The following instructions will need a 3⁄4" wrench, minimum 12" long for the tiller and engine described in the as well as the manual supplied with your PTO Power machine for deep tilling. Figure 5-18 NOTE: Before operating ...hand or cut , and work under. 1. Place a sturdy support under , and the roots break loose too easily. PTO Power Feature Your tiller is removed. You will familiarize you move forward into the soil while still green. Figure 5-19 Place the Wheels/Tines/PTO Drive Lever into ...
...pages carefully. Removing the Tine Attachment 1. See Figure 5-18. The following instructions will need a 3⁄4" wrench, minimum 12" long for the tiller and engine described in the as well as the manual supplied with your PTO Power machine for deep tilling. Figure 5-18 NOTE: Before operating ...hand or cut , and work under. 1. Place a sturdy support under , and the roots break loose too easily. PTO Power Feature Your tiller is removed. You will familiarize you move forward into the soil while still green. Figure 5-19 Place the Wheels/Tines/PTO Drive Lever into ...
Operation Manual
Page 24
... the power unit will slide out of the tine attachment. Alternately tighten each bolt to the tine attachment. Remove the engine support before moving the tiller in the tine attachment and bring the two units together. The guide pin on the PTO Power Unit with one hand while pulling the tine...
... the power unit will slide out of the tine attachment. Alternately tighten each bolt to the tine attachment. Remove the engine support before moving the tiller in the tine attachment and bring the two units together. The guide pin on the PTO Power Unit with one hand while pulling the tine...


