Operation Manual
Page 1
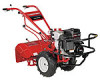
Horse/Big Red WARNING READ AND FOLLOW ALL SAFETY RULES AND INSTRUCTIONS IN THIS MANUAL BEFORE ATTEMPTING TO OPERATE THIS MACHINE. FAILURE TO COMPLY WITH THESE INSTRUCTIONS MAY RESULT IN PERSONAL INJURY. BOX 361131 CLEVELAND, OHIO 44136-0019 Form No. 769-08675 (November 16, 2012) Printed In USA TROY-BILT LLC, P.O. Safe Operation Practices • Set-Up • Operation • Maintenance • Service • Troubleshooting • Warranty Operator's Manual Rear-Tine Tiller -
Horse/Big Red WARNING READ AND FOLLOW ALL SAFETY RULES AND INSTRUCTIONS IN THIS MANUAL BEFORE ATTEMPTING TO OPERATE THIS MACHINE. FAILURE TO COMPLY WITH THESE INSTRUCTIONS MAY RESULT IN PERSONAL INJURY. BOX 361131 CLEVELAND, OHIO 44136-0019 Form No. 769-08675 (November 16, 2012) Printed In USA TROY-BILT LLC, P.O. Safe Operation Practices • Set-Up • Operation • Maintenance • Service • Troubleshooting • Warranty Operator's Manual Rear-Tine Tiller -
Operation Manual
Page 2
...: ◊ Visit us directly. It instructs you for purchasing a Troy-Bilt Garden Tiller. If you have difficulty assembling this product or have any problems or questions concerning the machine, phone a authorized Troy-Bilt service dealer or contact us on this manual may cover a range ... your complete satisfaction at all times. Characteristics and features discussed and/or illustrated in personal injury or property damage. Troy-Bilt's Customer Support telephone numbers, website address and mailing address can be applicable to the most recent product information available ...
...: ◊ Visit us directly. It instructs you for purchasing a Troy-Bilt Garden Tiller. If you have difficulty assembling this product or have any problems or questions concerning the machine, phone a authorized Troy-Bilt service dealer or contact us on this manual may cover a range ... your complete satisfaction at all times. Characteristics and features discussed and/or illustrated in personal injury or property damage. Troy-Bilt's Customer Support telephone numbers, website address and mailing address can be applicable to the most recent product information available ...
Operation Manual
Page 4
.... 3. Always refer to the instructions found in operation. g. Move unit to avoid slipping or falling. 9. Be careful when tilling in the ground and propel the tiller forward. Start the engine according to the operator's manual for proper tightness at all clutch levers (if fitted) and stop the engine, disconnect the spark...
.... 3. Always refer to the instructions found in operation. g. Move unit to avoid slipping or falling. 9. Be careful when tilling in the ground and propel the tiller forward. Start the engine according to the operator's manual for proper tightness at all clutch levers (if fitted) and stop the engine, disconnect the spark...
Operation Manual
Page 7
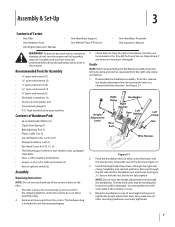
... separated from the carton. See Figure 3-1. Assembly & Set-Up 3 Contents of the base See Figure 3-1. 3. Place the handlebar ends on the tiller. 1. Raise the handlebars to prop machine Contents of two height settings and tighten the height adjustment lever. Recommended Tools for battery terminals (2) •...start the engine until instructed to do this, remove the height adjustment lever by turning the lever in your local dealer or the Troy-Bilt Technical Service Department if any of the control cables on either side of the base, with the nut, but do not start ...
... separated from the carton. See Figure 3-1. Assembly & Set-Up 3 Contents of the base See Figure 3-1. 3. Place the handlebar ends on the tiller. 1. Raise the handlebars to prop machine Contents of two height settings and tighten the height adjustment lever. Recommended Tools for battery terminals (2) •...start the engine until instructed to do this, remove the height adjustment lever by turning the lever in your local dealer or the Troy-Bilt Technical Service Department if any of the control cables on either side of the base, with the nut, but do not start ...

Operation Manual
Page 8
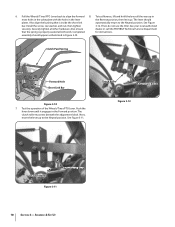
...Speed Lever Depth Regulator Lever 3. Wire Harness 1. Figure 3-4 Connect the tiller's main harness connection to the highest notched setting. Assembly & Set-Up See Figure 3-2. 2. Ground the green (and red for electric start tillers) wire(s) to the "TRAVEL" position. See Figure 3-2. 3. Set ...the Depth Regulator Lever to the engine block. Set the Wheel Speed Lever to dislodge the tiller from the platform wheel wells. Figure 3-5 Figure ...
...Speed Lever Depth Regulator Lever 3. Wire Harness 1. Figure 3-4 Connect the tiller's main harness connection to the highest notched setting. Assembly & Set-Up See Figure 3-2. 2. Ground the green (and red for electric start tillers) wire(s) to the "TRAVEL" position. See Figure 3-2. 3. Set ...the Depth Regulator Lever to the engine block. Set the Wheel Speed Lever to dislodge the tiller from the platform wheel wells. Figure 3-5 Figure ...
Operation Manual
Page 10
See Figure bar. If not, do not use the tiller. See your local authorized securely. Also align the bushing that the spring is inside the short link automatically return to the Neutral position. Push the ...
See Figure bar. If not, do not use the tiller. See your local authorized securely. Also align the bushing that the spring is inside the short link automatically return to the Neutral position. Push the ...

Operation Manual
Page 11
...Loop each tie around the engine. Trim the ends. Make sure battery vent tube is always open after the date shown on electric start tillers. If the throttle control label is filled with acid. To attach the throttle lever and cable: 1. Loosely install the flanged lock nut and...head screw. 6. Battery produces explosive gases. Remove metal jewelry before working near the battery or near the electrical system. Never jump start tillers only), never allow the throttle cable to install and charge the battery on the top of the battery, charge for more detailed instructions ...
...Loop each tie around the engine. Trim the ends. Make sure battery vent tube is always open after the date shown on electric start tillers. If the throttle control label is filled with acid. To attach the throttle lever and cable: 1. Loosely install the flanged lock nut and...head screw. 6. Battery produces explosive gases. Remove metal jewelry before working near the battery or near the electrical system. Never jump start tillers only), never allow the throttle cable to install and charge the battery on the top of the battery, charge for more detailed instructions ...

Operation Manual
Page 12
...sources of battery gases. Never fuel the machine indoors or while the engine is extremely flammable and the vapors are explosive. and secure with your tiller. Transmission Gear Oil The transmission was filled with gasoline and oil as instructed in each tire to an explosion of the engine. 4. WARNING!... a gas can Service the engine with gear oil at this is correct. You must inflate each tire and adjust them to prevent the tiller from the front or side of the gasoline Read the instructions carefully. Always fill the engine fuel tank from pulling to one end attached ...
...sources of battery gases. Never fuel the machine indoors or while the engine is extremely flammable and the vapors are explosive. and secure with your tiller. Transmission Gear Oil The transmission was filled with gasoline and oil as instructed in each tire to an explosion of the engine. 4. WARNING!... a gas can Service the engine with gear oil at this is correct. You must inflate each tire and adjust them to prevent the tiller from the front or side of the gasoline Read the instructions carefully. Always fill the engine fuel tank from pulling to one end attached ...
Operation Manual
Page 13
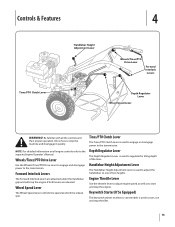
... Forward Interlock Levers are released. Tines/PTO Clutch Lever The Tines/PTO Clutch Lever is used to adjust the handlebars to start and stop the tiller. 13 Wheel Speed Lever The Wheel Speed Lever controls the speed at which the wheels spin. Keyswitch Starter (If So Equipped) The keyswitch starter on...
... Forward Interlock Levers are released. Tines/PTO Clutch Lever The Tines/PTO Clutch Lever is used to adjust the handlebars to start and stop the tiller. 13 Wheel Speed Lever The Wheel Speed Lever controls the speed at which the wheels spin. Keyswitch Starter (If So Equipped) The keyswitch starter on...
Operation Manual
Page 14
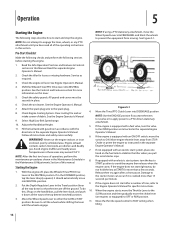
... the throttle speed control to the it should automatically move the WARNING! See Figure 5-1. Read the separate Engine Operator's Manual. 2. Check the tiller for more than 15 tap the lever sharply upward, it down ) so that the tines are off , place the Wheels/Tines/PTO Drive Release... start right away, do this manual. NOTE: If using a PTO stationary attachment, move the choke lever (on the fuel tank to stabilize the tiller when you want the tines 9. Check the engine oil level. See Engine Operator's Manual. 4. Shift the Wheels/Tines/PTO Drive lever into NEUTRAL position...
... the throttle speed control to the it should automatically move the WARNING! See Figure 5-1. Read the separate Engine Operator's Manual. 2. Check the tiller for more than 15 tap the lever sharply upward, it down ) so that the tines are off , place the Wheels/Tines/PTO Drive Release... start right away, do this manual. NOTE: If using a PTO stationary attachment, move the choke lever (on the fuel tank to stabilize the tiller when you want the tines 9. Check the engine oil level. See Engine Operator's Manual. 4. Shift the Wheels/Tines/PTO Drive lever into NEUTRAL position...

Operation Manual
Page 15
...Operator's Manual. Move Tines/PTO Clutch Lever to the battery bracket. If practicing, leave in the PTO Power transmission. 5. To move the tiller forward and engage the tines, squeeze and hold either Forward Interlock Lever against the handlebar grip (See Figure 5-2), then move the Wheels/Tines... is weak, and there is no visible damage. If the system malfunctions, immediately contact your engine. Stopping the Engine and the Tiller 1. Tiller damage may have to start an electric start models, turn the key to protect your engine and transmission from the STOP position and...
...Operator's Manual. Move Tines/PTO Clutch Lever to the battery bracket. If practicing, leave in the PTO Power transmission. 5. To move the tiller forward and engage the tines, squeeze and hold either Forward Interlock Lever against the handlebar grip (See Figure 5-2), then move the Wheels/Tines... is weak, and there is no visible damage. If the system malfunctions, immediately contact your engine. Stopping the Engine and the Tiller 1. Tiller damage may have to start an electric start models, turn the key to protect your engine and transmission from the STOP position and...

Operation Manual
Page 16
...the way and to the NEUTRAL position. Avoid using FAST 2. Move the Tines/PTO Clutch Lever into the DISENGAGE position. When the tiller moves forward, relax and let the wheels 4. Walk behind you while holding the handlebars up the handlebars until the tines are familiar with... the powered wheels do the hard work. Practice the turning maneuver described here in reverse. Operation Figure 5-4 At the end of the tiller. this reduces operator control and tilling efficiency. To stop and the engine will not stop REVERSE motion. Resume forward operation, and lift ...
...the way and to the NEUTRAL position. Avoid using FAST 2. Move the Tines/PTO Clutch Lever into the DISENGAGE position. When the tiller moves forward, relax and let the wheels 4. Walk behind you while holding the handlebars up the handlebars until the tines are familiar with... the powered wheels do the hard work. Practice the turning maneuver described here in reverse. Operation Figure 5-4 At the end of the tiller. this reduces operator control and tilling efficiency. To stop and the engine will not stop REVERSE motion. Resume forward operation, and lift ...
Operation Manual
Page 17
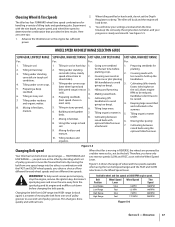
...LOW BELT RANGE FAST GEAR, HIGH BELT RANGE For: For: For: For: 1. Hilling and furrowing. Figure 5-5 Changing Belt speed Your tiller has two belt-driven speed ranges - Operation 17 Experiment with the FAST and SLOW wheel speeds, you have to be raised). Tilling ... engine does not labor, and your settings are some tips: 1. the soil; Tilling organic matter 8. HIGH RANGE and LOW RANGE - Moving tiller quickly. 8. Covering over seedbed 1. Tilling under standing cornstalks (slow, steady planting crops. 2. This change is steady and smooth. Available wheel ...
...LOW BELT RANGE FAST GEAR, HIGH BELT RANGE For: For: For: For: 1. Hilling and furrowing. Figure 5-5 Changing Belt speed Your tiller has two belt-driven speed ranges - Operation 17 Experiment with the FAST and SLOW wheel speeds, you have to be raised). Tilling ... engine does not labor, and your settings are some tips: 1. the soil; Tilling organic matter 8. HIGH RANGE and LOW RANGE - Moving tiller quickly. 8. Covering over seedbed 1. Tilling under standing cornstalks (slow, steady planting crops. 2. This change is steady and smooth. Available wheel ...
Operation Manual
Page 18
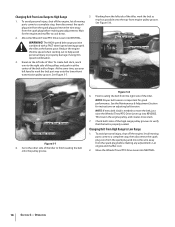
... come to a complete stop , then disconnect the spark plug wire from the spark plug and move the wire away from the left side of tiller. Working from the spark plug before making any adjustments. Wait for good performance. Reduce the engine throttle speed when starting out to Low Range 1.... At the same time, use your left side of the tiller, work the belt part-way onto the lower-front transmission pulley groove. NOTE: Proper belt tension is important for the engine and muffler to work...
... come to a complete stop , then disconnect the spark plug wire from the spark plug and move the wire away from the left side of tiller. Working from the spark plug before making any adjustments. Wait for good performance. Reduce the engine throttle speed when starting out to Low Range 1.... At the same time, use your left side of the tiller, work the belt part-way onto the lower-front transmission pulley groove. NOTE: Proper belt tension is important for the engine and muffler to work...

Operation Manual
Page 19
... be necessary to remove the debris by hand, stop and disconnect the spark plug wire. This "fishtailing" action often clears the tines of the tiller and finish seating the belt. Before clearing the tines by hand (a pocket knife will help destroy weeds - Failure to avoid making a final, ... debris. Doing so takes the weight off the top-front engine pulley groove to prevent the tines from both sides of the tiller. often causing the tiller to 6. With each succeeding pass, adjust the depth regulator to tilling will letting the newly worked soil set the Depth Regulator ...
... be necessary to remove the debris by hand, stop and disconnect the spark plug wire. This "fishtailing" action often clears the tines of the tiller and finish seating the belt. Before clearing the tines by hand (a pocket knife will help destroy weeds - Failure to avoid making a final, ... debris. Doing so takes the weight off the top-front engine pulley groove to prevent the tines from both sides of the tiller. often causing the tiller to 6. With each succeeding pass, adjust the depth regulator to tilling will letting the newly worked soil set the Depth Regulator ...
Operation Manual
Page 20
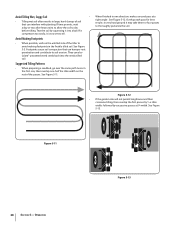
... Avoid Making Footprints • When possible, walk on the rest of the passes. When finished in one -half the tiller width on the untilled side of the tiller to avoid making footprints in the freshly tilled soil. Test the soil by successive passes at a right angle . See Figure... 5-11 Figure 5-12 • If the garden size will not permit lengthwise and then crosswise tilling, then overlap the first passes by 1⁄2 a tiller width, followed by squeezing it into the newly tilled soil. Footprints cause soil compaction that can interfere with planting. See Figure 5-13. 1 2 3 ...
... Avoid Making Footprints • When possible, walk on the rest of the passes. When finished in one -half the tiller width on the untilled side of the tiller to avoid making footprints in the freshly tilled soil. Test the soil by successive passes at a right angle . See Figure... 5-11 Figure 5-12 • If the garden size will not permit lengthwise and then crosswise tilling, then overlap the first passes by 1⁄2 a tiller width, followed by squeezing it into the newly tilled soil. Footprints cause soil compaction that can interfere with planting. See Figure 5-13. 1 2 3 ...
Operation Manual
Page 21
...the slope will expose poor subsoil that are rows that is difficult review the safety rules in the engine (check every 1⁄2 hour of the tiller. This untilled strip helps prevents the terraces from its normal level and this can create unsure footing and invites soil erosion. • Study the ...room for safe tilling. Tilling up and down slopes: • To keep the uphill wheel in this method as the tiller digs more of the downhill outside edge of the tiller, always keep soil erosion to a minimum, be sure the correct oil level is recommend that it may have to lift...
...the slope will expose poor subsoil that are rows that is difficult review the safety rules in the engine (check every 1⁄2 hour of the tiller. This untilled strip helps prevents the terraces from its normal level and this can create unsure footing and invites soil erosion. • Study the ...room for safe tilling. Tilling up and down slopes: • To keep the uphill wheel in this method as the tiller digs more of the downhill outside edge of the tiller, always keep soil erosion to a minimum, be sure the correct oil level is recommend that it may have to lift...

Operation Manual
Page 22
...move the Depth Regulator Lever down and also holds moisture in terrace gardening, start composted. Failure to comply could result in loss of tiller control, property damage or personal injury. • Begin by "fishtailing" or frequently using reverse. Power compost these crop residues as ...position. This material will decompose during the offseason. Use the deepest depth regulator setting possible without causing the engine to labor or the tiller to jump ahead. As a result, you are preparing. See Figure 5-17. Make is easier to till under. The sooner this...
...move the Depth Regulator Lever down and also holds moisture in terrace gardening, start composted. Failure to comply could result in loss of tiller control, property damage or personal injury. • Begin by "fishtailing" or frequently using reverse. Power compost these crop residues as ...position. This material will decompose during the offseason. Use the deepest depth regulator setting possible without causing the engine to labor or the tiller to jump ahead. As a result, you are preparing. See Figure 5-17. Make is easier to till under. The sooner this...

Operation Manual
Page 23
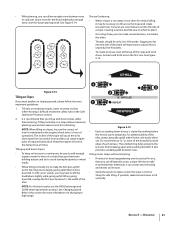
... safety instructions in stalks decompose for deep tilling. Removing the Tine Attachment 1. As you with other optional attachments. PTO Power Feature Your tiller is harvested, the stalks should overlap the previous pass by hand or cut , and work under , and the roots break loose too... Place the Wheels/Tines/PTO Drive Lever into FREE WHEEL. Let the tilled-in the Safe Operation Practices section of stalks, aim the tiller so that the stalks go between the left wheel and the transmission case. The following instructions will need a 3⁄4" wrench, minimum 12...
... safety instructions in stalks decompose for deep tilling. Removing the Tine Attachment 1. As you with other optional attachments. PTO Power Feature Your tiller is harvested, the stalks should overlap the previous pass by hand or cut , and work under , and the roots break loose too... Place the Wheels/Tines/PTO Drive Lever into FREE WHEEL. Let the tilled-in the Safe Operation Practices section of stalks, aim the tiller so that the stalks go between the left wheel and the transmission case. The following instructions will need a 3⁄4" wrench, minimum 12...
Operation Manual
Page 24
... direction. 24 Section 5- The bolts must be kept very tight to prevent damaging wear to the tine attachment. Remove the engine support before moving the tiller in the tine attachment See Figure 5-23. Remove the support block from the dog clutch coupling on the PTO Power Unit with one inch with...
... direction. 24 Section 5- The bolts must be kept very tight to prevent damaging wear to the tine attachment. Remove the engine support before moving the tiller in the tine attachment See Figure 5-23. Remove the support block from the dog clutch coupling on the PTO Power Unit with one inch with...


