
User Guide
Page 6
and/or Toshiba Corporation. HDMI, the HDMI Logo and High-Definition Multimedia Interface are trademarks of HDMI Licensing, LLC. Secure Digital and SD are trademarks or registered trademarks of SD Card Association. YouTube and the YouTube logo are trademarks or registered trademarks of Google,... Corporation in the United States and/or other countries. Facebook is a registered trademark of Google Inc. Mac is a trademark of Toshiba America Information Systems, Inc. Picasa is a trademark of Facebook Inc. and other countries. 6 Trademarks CAMILEO is a registered trademark of...
and/or Toshiba Corporation. HDMI, the HDMI Logo and High-Definition Multimedia Interface are trademarks of HDMI Licensing, LLC. Secure Digital and SD are trademarks or registered trademarks of SD Card Association. YouTube and the YouTube logo are trademarks or registered trademarks of Google,... Corporation in the United States and/or other countries. Facebook is a registered trademark of Google Inc. Mac is a trademark of Toshiba America Information Systems, Inc. Picasa is a trademark of Facebook Inc. and other countries. 6 Trademarks CAMILEO is a registered trademark of...
User Guide
Page 7
Contents Chapter 1: Getting to Know Your Camcorder 10 Overview 10 Check the components 11 System requirements 11 Front view 12 Rear view 12 Side view 13 Underside view 13 Chapter 2: Getting Started 14 Loading the battery 14 Charge your battery 16 Inserting and removing an SD™ Card (optional).....20 Protecting data on an SD™ Card 21 Turning the camcorder on and getting started .......22 Turning off the camcorder 22 Chapter 3: Record Mode 23 Button functions 23 LCD touch screen information 24 Notification icons 24 7
Contents Chapter 1: Getting to Know Your Camcorder 10 Overview 10 Check the components 11 System requirements 11 Front view 12 Rear view 12 Side view 13 Underside view 13 Chapter 2: Getting Started 14 Loading the battery 14 Charge your battery 16 Inserting and removing an SD™ Card (optional).....20 Protecting data on an SD™ Card 21 Turning the camcorder on and getting started .......22 Turning off the camcorder 22 Chapter 3: Record Mode 23 Button functions 23 LCD touch screen information 24 Notification icons 24 7
User Guide
Page 13
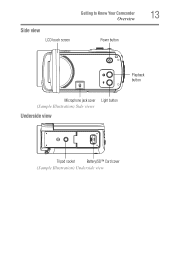
Side view LCD touch screen Getting to Know Your Camcorder Overview Power button 13 Playback button Microphone jack cover Light button (Sample Illustration) Side views Underside view Tripod socket Battery/SD™ Card cover (Sample Illustration) Underside view
Side view LCD touch screen Getting to Know Your Camcorder Overview Power button 13 Playback button Microphone jack cover Light button (Sample Illustration) Side views Underside view Tripod socket Battery/SD™ Card cover (Sample Illustration) Underside view
User Guide
Page 20
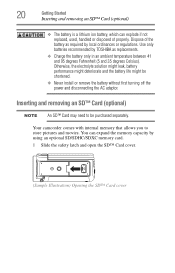
Use only batteries recommended by TOSHIBA as required by using an optional SD/SDHC/SDXC memory card. 1 Slide the safety latch and open the SD™ Card cover. (Sample Illustration) Opening the SD™ Card cover Your camcorder comes with internal memory that allows you to be shortened. ❖... 95 degrees Fahrenheit (5 and 35 degrees Celsius). Inserting and removing an SD™ Card (optional) NOTE An SD™ Card may need to store pictures and movies. 20 Getting Started Inserting and removing an SD™ Card (optional) ❖ The battery is a lithium ion battery, which ...
Use only batteries recommended by TOSHIBA as required by using an optional SD/SDHC/SDXC memory card. 1 Slide the safety latch and open the SD™ Card cover. (Sample Illustration) Opening the SD™ Card cover Your camcorder comes with internal memory that allows you to be shortened. ❖... 95 degrees Fahrenheit (5 and 35 degrees Celsius). Inserting and removing an SD™ Card (optional) NOTE An SD™ Card may need to store pictures and movies. 20 Getting Started Inserting and removing an SD™ Card (optional) ❖ The battery is a lithium ion battery, which ...
User Guide
Page 21
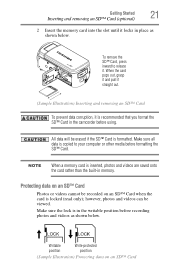
...(read only); To remove the SD™ Card, press inward to your computer or other media before using. Make sure all data is recommended that you format the SD™ Card in the camcorder before formatting the SD™ Card. Protecting data on an SD™ Card however, photos and videos can... be viewed. When the card pops out, grasp it and pull it straight out. (Sample ...
...(read only); To remove the SD™ Card, press inward to your computer or other media before using. Make sure all data is recommended that you format the SD™ Card in the camcorder before formatting the SD™ Card. Protecting data on an SD™ Card however, photos and videos can... be viewed. When the card pops out, grasp it and pull it straight out. (Sample ...

User Guide
Page 45
...Delete All Use this option to exit. Screen NOTE ❖ When an SD™ Card has been installed, only the photos and videos stored on the card are deleted. ❖ Videos or photos cannot be deleted if the card is installed), or do not delete all photos and videos. Does not ... write-protected. Deletes all photos and videos in the built-in No memory (when no SD™ Card is installed), or delete all photos and videos on the installed SD™ Card. Operation 1 In the Delete menu, touch the Delete All icon twice. 2 Touch to select the desired option. 3 Touch again ...
...Delete All Use this option to exit. Screen NOTE ❖ When an SD™ Card has been installed, only the photos and videos stored on the card are deleted. ❖ Videos or photos cannot be deleted if the card is installed), or do not delete all photos and videos. Does not ... write-protected. Deletes all photos and videos in the built-in No memory (when no SD™ Card is installed), or delete all photos and videos on the installed SD™ Card. Operation 1 In the Delete menu, touch the Delete All icon twice. 2 Touch to select the desired option. 3 Touch again ...
User Guide
Page 49
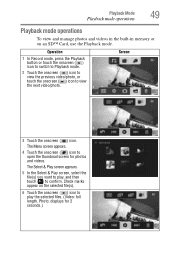
... the built-in memory or on the selected file(s). 6 Touch the onscreen ( ) icon to play , and then touch ( ) to confirm. Check marks appear on an SD™ Card, use the Playback mode.
... the built-in memory or on the selected file(s). 6 Touch the onscreen ( ) icon to play , and then touch ( ) to confirm. Check marks appear on an SD™ Card, use the Playback mode.
User Guide
Page 51
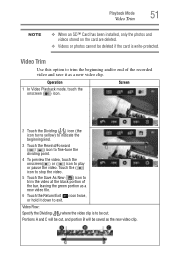
... video clip is write-protected. Playback Mode 51 Video Trim NOTE ❖ When an SD™ Card has been installed, only the photos and videos stored on the card are deleted. ❖ Videos or photos cannot be deleted if the card is to be cut , and portion B will be saved as the new video...
... video clip is write-protected. Playback Mode 51 Video Trim NOTE ❖ When an SD™ Card has been installed, only the photos and videos stored on the card are deleted. ❖ Videos or photos cannot be deleted if the card is to be cut , and portion B will be saved as the new video...
User Guide
Page 54
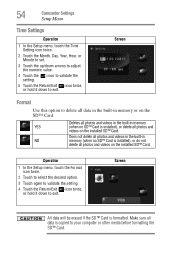
...( ) icon to validate the setting. 5 Touch the Return/Exit ( ) icon twice, or hold it down to your computer or other media before formatting the SD™ Card. Operation 1 In the Setup menu, touch the Format icon twice. 2 Touch to select the desired option. 3 Touch again to validate the setting. 4 Touch the...delete all photos and videos in the built-in memory or on the SD™ Card. Screen All data will be erased if the SD™ Card is installed), or do not delete all photos and videos on the installed SD™ Card. Make sure all data is installed), or delete all photos and ...
...( ) icon to validate the setting. 5 Touch the Return/Exit ( ) icon twice, or hold it down to your computer or other media before formatting the SD™ Card. Operation 1 In the Setup menu, touch the Format icon twice. 2 Touch to select the desired option. 3 Touch again to validate the setting. 4 Touch the...delete all photos and videos in the built-in memory or on the SD™ Card. Screen All data will be erased if the SD™ Card is installed), or do not delete all photos and videos on the installed SD™ Card. Make sure all data is installed), or delete all photos and ...
User Guide
Page 60
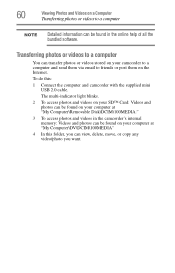
... bundled software. Transferring photos or videos to a computer You can transfer photos or videos stored on your camcorder to a computer and send them on your SD™ Card: Videos and photos can be found in the camcorder's internal memory: Videos and photos can view, delete, move, or copy any video/photo you...
... bundled software. Transferring photos or videos to a computer You can transfer photos or videos stored on your camcorder to a computer and send them on your SD™ Card: Videos and photos can be found in the camcorder's internal memory: Videos and photos can view, delete, move, or copy any video/photo you...
User Guide
Page 67
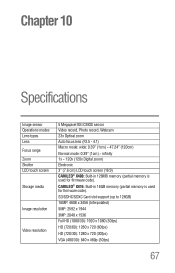
SD/SDHC/SDXC Card slot support (up to 128GB) 16MP: 4608 x 3456 (Interpolated) 5MP: 2592 x 1944 3MP: 2048 x 1536 Full HD (1080/30): 1920 x 1080 (30fps) HD (720/60): ... mode: wide: 0.39" (1cm) ~ 47.24" (120cm) Normal mode: 0.39" (1cm) ~ infinity 1x ~ 120x (120x Digital zoom) Electronic 3" (7.6 cm) LCD touch screen (16:9) CAMILEO® X400: Built-in 16GB memory (partial memory is used for firmware code). CAMILEO® X416: Built-in 128MB memory (partial memory is used for firmware code).
SD/SDHC/SDXC Card slot support (up to 128GB) 16MP: 4608 x 3456 (Interpolated) 5MP: 2592 x 1944 3MP: 2048 x 1536 Full HD (1080/30): 1920 x 1080 (30fps) HD (720/60): ... mode: wide: 0.39" (1cm) ~ 47.24" (120cm) Normal mode: 0.39" (1cm) ~ infinity 1x ~ 120x (120x Digital zoom) Electronic 3" (7.6 cm) LCD touch screen (16:9) CAMILEO® X400: Built-in 16GB memory (partial memory is used for firmware code). CAMILEO® X416: Built-in 128MB memory (partial memory is used for firmware code).
User Guide
Page 69
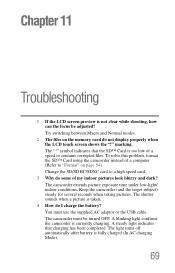
...indicates that charging has been completed. The camcorder must use the supplied AC adaptor or the USB cable. A steady light indicates that the SD™ Card is too low of my indoor pictures look blurry and dark? The "!" A blinking light confirms the camcorder is fully charged (In AC... sounds when a picture is taken. 4 How do some of a speed or contains corrupted files. marking. Change the SD/SDHC/SDXC card to "Format" on the memory card do not display properly when the LCD touch screen shows the "!" The camcorder extends picture exposure time under low-light/ indoor...
...indicates that charging has been completed. The camcorder must use the supplied AC adaptor or the USB cable. A steady light indicates that the SD™ Card is too low of my indoor pictures look blurry and dark? The "!" A blinking light confirms the camcorder is fully charged (In AC... sounds when a picture is taken. 4 How do some of a speed or contains corrupted files. marking. Change the SD/SDHC/SDXC card to "Format" on the memory card do not display properly when the LCD touch screen shows the "!" The camcorder extends picture exposure time under low-light/ indoor...
User Guide
Page 70
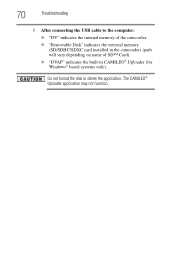
70 Troubleshooting 5 After connecting the USB cable to the computer: ❖ "DV" indicates the internal memory of the camcorder. ❖ "Removable Disk" indicates the external memory (SD/SDHC/SDXC card installed in the camcorder) (path will vary depending on name of SD™ Card). ❖ "DVAP" indicates the built-in CAMILEO® Uploader (for Windows® based systems only). The CAMILEO® Uploader application may not function. Do not format the disk or delete the application.
70 Troubleshooting 5 After connecting the USB cable to the computer: ❖ "DV" indicates the internal memory of the camcorder. ❖ "Removable Disk" indicates the external memory (SD/SDHC/SDXC card installed in the camcorder) (path will vary depending on name of SD™ Card). ❖ "DVAP" indicates the built-in CAMILEO® Uploader (for Windows® based systems only). The CAMILEO® Uploader application may not function. Do not format the disk or delete the application.
