
User Manual
Page 28
...57 Hard Disk Drive Recovery options 58 Hard Disk Drive Recovery using the Recovery media 63 Installing drivers and applications 64 Using the Toshiba Dual Pointing Device 64 Using the TouchPad 65 Scrolling with the TouchPad 66 Control buttons 66 Disabling or enabling the TouchPad 66 Using... devices 66 Directing the display output when you turn on the computer 67 Adjusting the quality of the external display......68 Using an external keyboard 68 Using a mouse 68 Connecting a printer 68 Setting up a printer 69 Connecting an optional external diskette drive........70 Turning off the ...
...57 Hard Disk Drive Recovery options 58 Hard Disk Drive Recovery using the Recovery media 63 Installing drivers and applications 64 Using the Toshiba Dual Pointing Device 64 Using the TouchPad 65 Scrolling with the TouchPad 66 Control buttons 66 Disabling or enabling the TouchPad 66 Using... devices 66 Directing the display output when you turn on the computer 67 Adjusting the quality of the external display......68 Using an external keyboard 68 Using a mouse 68 Connecting a printer 68 Setting up a printer 69 Connecting an optional external diskette drive........70 Turning off the ...
User Manual
Page 29
... computer 78 Moving the computer 79 Using a computer lock 79 Chapter 2: Learning the Basics 80 Computing tips 80 Using the keyboard 82 Character keys 82 Making your keyboard emulate a full-size keyboard 82 Ctrl, Fn, and Alt keys 83 Function keys 83 Special Windows® keys 83 Overlay keys 84 Using the overlay... Creating a CD/DVD 95 Removing a disc with the computer on 96 Removing a disc with the computer off 96 Caring for CD or DVD discs 97 Toshiba's online resources 97
... computer 78 Moving the computer 79 Using a computer lock 79 Chapter 2: Learning the Basics 80 Computing tips 80 Using the keyboard 82 Character keys 82 Making your keyboard emulate a full-size keyboard 82 Ctrl, Fn, and Alt keys 83 Function keys 83 Special Windows® keys 83 Overlay keys 84 Using the overlay... Creating a CD/DVD 95 Removing a disc with the computer on 96 Removing a disc with the computer off 96 Caring for CD or DVD discs 97 Toshiba's online resources 97

User Manual
Page 33
... conflicts on your own .....180 Fixing a problem with Device Manager ...........181 Memory problems 183 Power and the batteries 184 Keyboard problems 185 Display problems 186 Disk drive problems 188 Optical drive problems 189 Sound system problems 190 PC Card problems 191 ExpressCard... backup in the Windows® operating system 202 If you need further assistance 207 Before you contact Toshiba 207 Contacting Toshiba 207 Other Toshiba Internet Web sites 208 Toshiba's worldwide offices 208 Appendix A: Hot Keys 210 Volume Mute 210 Password security 210 Without a password ...
... conflicts on your own .....180 Fixing a problem with Device Manager ...........181 Memory problems 183 Power and the batteries 184 Keyboard problems 185 Display problems 186 Disk drive problems 188 Optical drive problems 189 Sound system problems 190 PC Card problems 191 ExpressCard... backup in the Windows® operating system 202 If you need further assistance 207 Before you contact Toshiba 207 Contacting Toshiba 207 Other Toshiba Internet Web sites 208 Toshiba's worldwide offices 208 Appendix A: Hot Keys 210 Volume Mute 210 Password security 210 Without a password ...

User Manual
Page 34
34 Contents Display brightness 214 Disabling or enabling wireless devices 215 Disabling or enabling the Toshiba Dual Pointing Device 215 Zooming applications in/out 215 Keyboard hot keys 216 Appendix B: Power Cord/Cable Connectors 217 Appendix C: Using ConfigFree™ with your Toshiba Computer 218 Getting Started 219 Starting ConfigFree 219 ConfigFree Utilities 221 Connectivity Doctor 221 Search for Wireless Devices 223 Profile Settings 228 ConfigFree SUMMIT 230 Quick Connect 234 Using the Automatic Switch 236 Semi-Automatic Switch Feature 237 Glossary 238 Index 252
34 Contents Display brightness 214 Disabling or enabling wireless devices 215 Disabling or enabling the Toshiba Dual Pointing Device 215 Zooming applications in/out 215 Keyboard hot keys 216 Appendix B: Power Cord/Cable Connectors 217 Appendix C: Using ConfigFree™ with your Toshiba Computer 218 Getting Started 219 Starting ConfigFree 219 ConfigFree Utilities 221 Connectivity Doctor 221 Search for Wireless Devices 223 Profile Settings 228 ConfigFree SUMMIT 230 Quick Connect 234 Using the Automatic Switch 236 Semi-Automatic Switch Feature 237 Glossary 238 Index 252

User Manual
Page 42
... of windows displayed, and the order in which windows appear, may vary according to your computer will connect to be chosen." Click Next to , a mouse, keyboard, printer, memory, and PC Cards. Your computer contains a rechargeable main battery that needs to the Internet and click Next. If an Internet connection could not...
... of windows displayed, and the order in which windows appear, may vary according to your computer will connect to be chosen." Click Next to , a mouse, keyboard, printer, memory, and PC Cards. Your computer contains a rechargeable main battery that needs to the Internet and click Next. If an Internet connection could not...
User Manual
Page 43
... registration can either double-click the Toshiba Registration icon on your software" on page 68) Failure to : ❖ Add more memory (see "Adding memory (optional)" on page 49) ❖ Connect a mouse (see "Using a mouse" on page 68) ❖ Connect a full-size keyboard (see "Using an external keyboard" on page 68) ❖ Connect an...
... registration can either double-click the Toshiba Registration icon on your software" on page 68) Failure to : ❖ Add more memory (see "Adding memory (optional)" on page 49) ❖ Connect a mouse (see "Using a mouse" on page 68) ❖ Connect a full-size keyboard (see "Using an external keyboard" on page 68) ❖ Connect an...
User Manual
Page 47
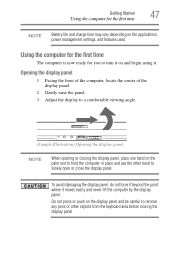
... center of the display panel. 2 Gently raise the panel. 3 Adjust the display to hold the computer in place and use the other objects from the keyboard area before closing the display panel.
... center of the display panel. 2 Gently raise the panel. 3 Adjust the display to hold the computer in place and use the other objects from the keyboard area before closing the display panel.
User Manual
Page 59
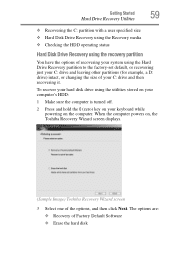
... default, or recovering just your C: drive and leaving other partitions (for example, a D: drive) intact, or changing the size of your keyboard while powering on , the Toshiba Recovery Wizard screen displays. (Sample Image) Toshiba Recovery Wizard screen 3 Select one of Factory Default Software ❖ Erase the hard disk When the computer powers on the...
... default, or recovering just your C: drive and leaving other partitions (for example, a D: drive) intact, or changing the size of your keyboard while powering on , the Toshiba Recovery Wizard screen displays. (Sample Image) Toshiba Recovery Wizard screen 3 Select one of Factory Default Software ❖ Erase the hard disk When the computer powers on the...
User Manual
Page 60
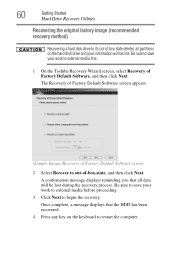
Be sure to save your work to restart the computer. Once complete, a message displays that all partitions on the keyboard to external media first. 1 On the Toshiba Recovery Wizard screen, select Recovery of Factory Default Software, and then click Next. Be sure to save your work to external media before proceeding. 3 Click ...
Be sure to save your work to restart the computer. Once complete, a message displays that all partitions on the keyboard to external media first. 1 On the Toshiba Recovery Wizard screen, select Recovery of Factory Default Software, and then click Next. Be sure to save your work to external media before proceeding. 3 Click ...
User Manual
Page 61
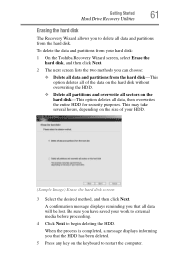
... your work to external media before proceeding. 4 Click Next to restart the computer. To delete the data and partitions from your hard disk: 1 On the Toshiba Recovery Wizard screen, select Erase the hard disk, and then click Next. 2 The next screen lists the two methods you can choose: ❖ Delete all... method, and then click Next. When the process is completed, a message displays informing you that the HDD has been deleted. 5 Press any key on the keyboard to begin deleting the HDD. A confirmation message displays reminding you that all data will be lost.
... your work to external media before proceeding. 4 Click Next to restart the computer. To delete the data and partitions from your hard disk: 1 On the Toshiba Recovery Wizard screen, select Erase the hard disk, and then click Next. 2 The next screen lists the two methods you can choose: ❖ Delete all... method, and then click Next. When the process is completed, a message displays informing you that the HDD has been deleted. 5 Press any key on the keyboard to begin deleting the HDD. A confirmation message displays reminding you that all data will be lost.
User Manual
Page 62
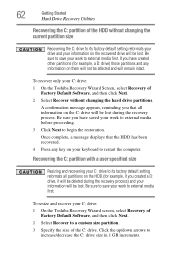
... HDD has been recovered. 4 Press any information on the HDD (for example, a D: drive) those partitions and any key on your keyboard to restart the computer. Be sure to save your work to external media before proceeding. 3 Click Next to external media first. Once complete... Next. 2 Select Recover to external media first. Recovering the C: partition with a user specified size Resizing and recovering your C: drive: 1 On the Toshiba Recovery Wizard screen, select Recovery of the C: drive. If you created a D: drive, it will be lost during the recovery process) and your C:...
... HDD has been recovered. 4 Press any information on the HDD (for example, a D: drive) those partitions and any key on your keyboard to restart the computer. Be sure to save your work to external media before proceeding. 3 Click Next to external media first. Once complete... Next. 2 Select Recover to external media first. Recovering the C: partition with a user specified size Resizing and recovering your C: drive: 1 On the Toshiba Recovery Wizard screen, select Recovery of the C: drive. If you created a D: drive, it will be lost during the recovery process) and your C:...
User Manual
Page 63
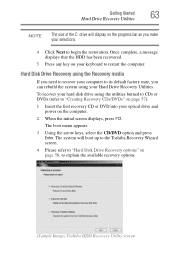
... on the computer. 2 When the initial screen displays, press F12. Once complete, a message displays that the HDD has been recovered. 5 Press any key on your keyboard to "Creating Recovery CDs/DVDs" on page 57): 1 Insert the first recovery CD or DVD into your hard disk drive using the utilities burned to...the CD/DVD option and press Enter. Getting Started 63 Hard Drive Recovery Utilities NOTE The size of the C: drive will boot up to the Toshiba Recovery Wizard screen. 4 Please refer to "Hard Disk Drive Recovery options" on page 58, to explain the available recovery options. (Sample Image...
... on the computer. 2 When the initial screen displays, press F12. Once complete, a message displays that the HDD has been recovered. 5 Press any key on your keyboard to "Creating Recovery CDs/DVDs" on page 57): 1 Insert the first recovery CD or DVD into your hard disk drive using the utilities burned to...the CD/DVD option and press Enter. Getting Started 63 Hard Drive Recovery Utilities NOTE The size of the C: drive will boot up to the Toshiba Recovery Wizard screen. 4 Please refer to "Hard Disk Drive Recovery options" on page 58, to explain the available recovery options. (Sample Image...
User Manual
Page 65
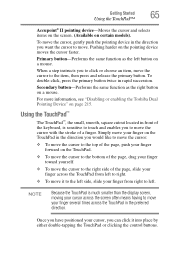
For more information, see "Disabling or enabling the Toshiba Dual Pointing Device" on the pointing device moves the cursor faster. To move the cursor, gently push the pointing device in the preferred direction. When a ...-tapping the TouchPad or clicking the control buttons. Using the TouchPad™ The TouchPad™, the small, smooth, square cutout located in front of the keyboard, is much smaller than the display screen, moving your cursor across the screen often means having to move your finger several times across the TouchPad...
For more information, see "Disabling or enabling the Toshiba Dual Pointing Device" on the pointing device moves the cursor faster. To move the cursor, gently push the pointing device in the preferred direction. When a ...-tapping the TouchPad or clicking the control buttons. Using the TouchPad™ The TouchPad™, the small, smooth, square cutout located in front of the keyboard, is much smaller than the display screen, moving your cursor across the screen often means having to move your finger several times across the TouchPad...
User Manual
Page 68
... one to match the resolution of 800 x 600 or higher. Read the documentation that came with your computer. Using an external keyboard If you must support a resolution of the external display device. See the video device documentation for additional configuration steps. The external display...printer to your computer. To determine if the printer is USBcompatible, check its documentation. The computer's USB ports support any USB-compatible keyboard. You can connect a USB-compatible printer to your computer through the USB ports. You can use a mouse instead of the ...
... one to match the resolution of 800 x 600 or higher. Read the documentation that came with your computer. Using an external keyboard If you must support a resolution of the external display device. See the video device documentation for additional configuration steps. The external display...printer to your computer. To determine if the printer is USBcompatible, check its documentation. The computer's USB ports support any USB-compatible keyboard. You can connect a USB-compatible printer to your computer through the USB ports. You can use a mouse instead of the ...

User Manual
Page 78
... Help and Support for your computer. Never spray cleaner directly onto the computer and/or display. To keep dust and dirt out of the computer's keyboard, speaker, and other openings. Caring for details. Starting again from Standby mode To start it into Standby mode by either pressing the power button or...
... Help and Support for your computer. Never spray cleaner directly onto the computer and/or display. To keep dust and dirt out of the computer's keyboard, speaker, and other openings. Caring for details. Starting again from Standby mode To start it into Standby mode by either pressing the power button or...
User Manual
Page 82
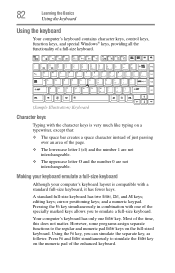
... 0 are not interchangeable. and a numeric keypad. Pressing the Fn key simultaneously in combination with a standard full-size keyboard, it has fewer keys. editing keys; 82 Learning the Basics Using the keyboard Using the keyboard Your computer's keyboard contains character keys, control keys, function keys, and special Windows® keys, providing all the functionality of...
... 0 are not interchangeable. and a numeric keypad. Pressing the Fn key simultaneously in combination with a standard full-size keyboard, it has fewer keys. editing keys; 82 Learning the Basics Using the keyboard Using the keyboard Your computer's keyboard contains character keys, control keys, function keys, and special Windows® keys, providing all the functionality of...

User Manual
Page 83
...Special Windows® keys Windows® button Application key (Sample Illustration) Special Windows® keys Your computer's keyboard has one key and one button that have special functions in combination with the Fn key, function keys marked ...with the Fn key) are the 12 keys at the top of the keyboard. (Sample Illustration) Function keys F1 through F12 are using. Ctrl, Fn, and Alt keys Learning the ...Basics 83 Using the keyboard (Sample Illustration) Ctrl, Fn, and Alt keys The Ctrl, Fn, and Alt keys do different...
...Special Windows® keys Windows® button Application key (Sample Illustration) Special Windows® keys Your computer's keyboard has one key and one button that have special functions in combination with the Fn key, function keys marked ...with the Fn key) are the 12 keys at the top of the keyboard. (Sample Illustration) Function keys F1 through F12 are using. Ctrl, Fn, and Alt keys Learning the ...Basics 83 Using the keyboard (Sample Illustration) Ctrl, Fn, and Alt keys The Ctrl, Fn, and Alt keys do different...
User Manual
Page 84
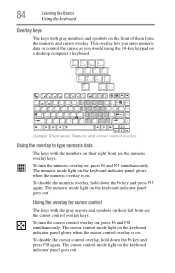
...are the numeric overlay keys. To disable the numeric overlay, hold down the Fn key and press F11 again. The numeric mode light on the keyboard indicator panel goes out. Using the overlay for cursor control The keys with the numbers on . This overlay lets you enter numeric data or ...control the cursor as you would using the 10-key keypad on a desktop computer's keyboard. (Sample Illustration) Numeric and cursor control overlay Using the overlay to type numeric data The keys with the gray arrows and symbols on the front...
...are the numeric overlay keys. To disable the numeric overlay, hold down the Fn key and press F11 again. The numeric mode light on the keyboard indicator panel goes out. Using the overlay for cursor control The keys with the numbers on . This overlay lets you enter numeric data or ...control the cursor as you would using the 10-key keypad on a desktop computer's keyboard. (Sample Illustration) Numeric and cursor control overlay Using the overlay to type numeric data The keys with the gray arrows and symbols on the front...
User Manual
Page 89
... page 69. Some applications do not support long file names and require file names limited to 255 characters and can contain up a printer" on the keyboard plus these characters and '. File names are changing printers, you connect it on showing or hiding file extensions, see your file correctly. Printing your printer...
... page 69. Some applications do not support long file names and require file names limited to 255 characters and can contain up a printer" on the keyboard plus these characters and '. File names are changing printers, you connect it on showing or hiding file extensions, see your file correctly. Printing your printer...
User Manual
Page 147
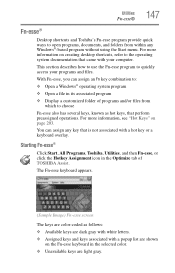
... system documentation that is not associated with a hot key or a keyboard overlay. Starting Fn-esse® Click Start, All Programs, Toshiba, Utilities, and then Fn-esse, or click the Hotkey Assignment icon in its associated program ❖ Display a customized folder of TOSHIBA Assist. 147 Utilities Fn-esse® Fn-esse® Desktop shortcuts...
... system documentation that is not associated with a hot key or a keyboard overlay. Starting Fn-esse® Click Start, All Programs, Toshiba, Utilities, and then Fn-esse, or click the Hotkey Assignment icon in its associated program ❖ Display a customized folder of TOSHIBA Assist. 147 Utilities Fn-esse® Fn-esse® Desktop shortcuts...

