User Manual
Page 10
...such products with a crossed-out wheeled bin with the related European Directives. 10 EU Declaration of Conformity TOSHIBA declares that focus on the market in the Battery Directive (2006/66/EC), then the chemical symbols for recovery and recycling. This Directive requires producers ...2005 to determine appropriate worldwide product life cycle planning and end-of this product. For information on the battery. Please contact your product, visit www.reuse.toshiba.com. The party responsible for applicable laws and regulations governing the disposal of -life strategies for our ...
...such products with a crossed-out wheeled bin with the related European Directives. 10 EU Declaration of Conformity TOSHIBA declares that focus on the market in the Battery Directive (2006/66/EC), then the chemical symbols for recovery and recycling. This Directive requires producers ...2005 to determine appropriate worldwide product life cycle planning and end-of this product. For information on the battery. Please contact your product, visit www.reuse.toshiba.com. The party responsible for applicable laws and regulations governing the disposal of -life strategies for our ...
User Manual
Page 28
Contents Introduction 36 This guide 38 Safety icons 39 Other icons used 39 Your computer's features and specifications ....40 Other documentation 40 Service options 40 Chapter 1: Getting Started 41 Selecting a place to work 41 Setting up a work environment 41 Keeping yourself comfortable 42 Precautions 42 Important information on your computer's cooling fan 44 Setting up your computer 44 Connecting to a power source 45 Charging the main battery 47 Using the computer for the first time 48 Opening the display panel 48 28
Contents Introduction 36 This guide 38 Safety icons 39 Other icons used 39 Your computer's features and specifications ....40 Other documentation 40 Service options 40 Chapter 1: Getting Started 41 Selecting a place to work 41 Setting up a work environment 41 Keeping yourself comfortable 42 Precautions 42 Important information on your computer's cooling fan 44 Setting up your computer 44 Connecting to a power source 45 Charging the main battery 47 Using the computer for the first time 48 Opening the display panel 48 28

User Manual
Page 31
... Caring for optical discs 110 Toshiba's online resources 110 Chapter 3: Mobile Computing 111 Toshiba's energy-saver design 111 Running the computer on battery power 112 Battery Notice 112 Power management 113 Using additional batteries 114 Charging batteries 114 Charging the main battery 114 Charging the RTC battery 115 Monitoring main battery power 116 Determining remaining battery power 117 What to...
... Caring for optical discs 110 Toshiba's online resources 110 Chapter 3: Mobile Computing 111 Toshiba's energy-saver design 111 Running the computer on battery power 112 Battery Notice 112 Power management 113 Using additional batteries 114 Charging batteries 114 Charging the main battery 114 Charging the RTC battery 115 Monitoring main battery power 116 Determining remaining battery power 117 What to...

User Manual
Page 34
34 Contents Fixing a problem with Device Manager 186 Checking device properties 186 Memory problems 187 Power and the batteries 187 Keyboard problems 189 Display problems 189 Disk or storage drive problems 191 Error-checking 191 Optical disc drive problems 193 ...in the Windows® operating system 201 If you need further assistance 206 Before you contact Toshiba 206 Contacting Toshiba 206 Other Toshiba Internet Web sites 207 Toshiba's worldwide offices 207 Appendix A: Hot Keys/TOSHIBA Cards 209 Hot Key Cards 209 Using the Hot Key Cards 210 Application Cards 211 Using the...
34 Contents Fixing a problem with Device Manager 186 Checking device properties 186 Memory problems 187 Power and the batteries 187 Keyboard problems 189 Display problems 189 Disk or storage drive problems 191 Error-checking 191 Optical disc drive problems 193 ...in the Windows® operating system 201 If you need further assistance 206 Before you contact Toshiba 206 Contacting Toshiba 206 Other Toshiba Internet Web sites 207 Toshiba's worldwide offices 207 Appendix A: Hot Keys/TOSHIBA Cards 209 Hot Key Cards 209 Using the Hot Key Cards 210 Application Cards 211 Using the...
User Manual
Page 36
... and the following information applies. Toshiba is a partner in AC power mode. You can accompany you wherever you go. If the model you leave this computer to meet the latest ENERGY STAR® guidelines for both AC power and battery modes. To conserve energy, your... computing. Your computer ships with the ENERGY STAR® logo on using power management settings to conserve computer energy. 36 With your Toshiba computer, your computer is labeled with the power management options preset to a configuration that your computer will provide the most stable operating...
... and the following information applies. Toshiba is a partner in AC power mode. You can accompany you wherever you go. If the model you leave this computer to meet the latest ENERGY STAR® guidelines for both AC power and battery modes. To conserve energy, your... computing. Your computer ships with the ENERGY STAR® logo on using power management settings to conserve computer energy. 36 With your Toshiba computer, your computer is labeled with the power management options preset to a configuration that your computer will provide the most stable operating...
User Manual
Page 42
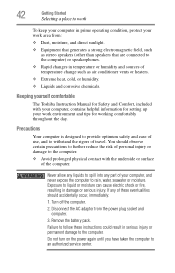
...to withstand the rigors of the computer. Exposure to an authorized service center. You should accidentally occur, immediately: 1. Remove the battery pack. Failure to follow these eventualities should observe certain precautions to further reduce the risk of personal injury or damage to the...contains helpful information for setting up your work environment and tips for working comfortably throughout the day. Keeping yourself comfortable The Toshiba Instruction Manual for Safety and Comfort, included with the underside or surface of travel. 42 Getting Started Selecting a place to...
...to withstand the rigors of the computer. Exposure to an authorized service center. You should accidentally occur, immediately: 1. Remove the battery pack. Failure to follow these eventualities should observe certain precautions to further reduce the risk of personal injury or damage to the...contains helpful information for setting up your work environment and tips for working comfortably throughout the day. Keeping yourself comfortable The Toshiba Instruction Manual for Safety and Comfort, included with the underside or surface of travel. 42 Getting Started Selecting a place to...
User Manual
Page 44
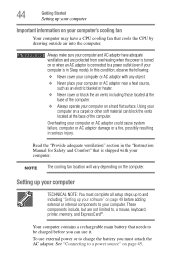
..." on page 45. In this condition, observe the following: ❖ Never cover your computer or AC adaptor with your computer. Your computer contains a rechargeable main battery that is in serious injury. Using your computer on a carpet or other soft material can use external power or to charge the... battery you must complete all setup steps up to your software" on page 49 before you can block the vents located at the base of the ...
..." on page 45. In this condition, observe the following: ❖ Never cover your computer or AC adaptor with your computer. Your computer contains a rechargeable main battery that is in serious injury. Using your computer on a carpet or other soft material can use external power or to charge the... battery you must complete all setup steps up to your software" on page 49 before you can block the vents located at the base of the ...
User Manual
Page 45
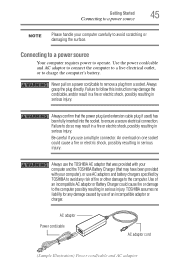
... resulting in serious injury. Use of an incompatible AC adaptor or Battery Charger could cause a fire or electric shock, possibly resulting in serious injury. TOSHIBA assumes no liability for any damage caused by TOSHIBA to avoid any risk of an incompatible adaptor or charger. Getting ...a multiple connector. An overload on a power cord/cable to ensure a secure electrical connection. Always use the TOSHIBA AC adaptor that was provided with your computer and the TOSHIBA Battery Charger (that the power plug (and extension cable plug if used) has been fully inserted into the socket,...
... resulting in serious injury. Use of an incompatible AC adaptor or Battery Charger could cause a fire or electric shock, possibly resulting in serious injury. TOSHIBA assumes no liability for any damage caused by TOSHIBA to avoid any risk of an incompatible adaptor or charger. Getting ...a multiple connector. An overload on a power cord/cable to ensure a secure electrical connection. Always use the TOSHIBA AC adaptor that was provided with your computer and the TOSHIBA Battery Charger (that the power plug (and extension cable plug if used) has been fully inserted into the socket,...
User Manual
Page 46
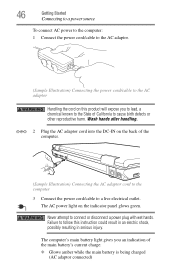
...-IN on the indicator panel glows green. The AC power light on the back of the main battery's current charge: ❖ Glows amber while the main battery is being charged (AC adaptor connected) The computer's main battery light gives you to lead, a chemical known to the State of California to a live electrical outlet...
...-IN on the indicator panel glows green. The AC power light on the back of the main battery's current charge: ❖ Glows amber while the main battery is being charged (AC adaptor connected) The computer's main battery light gives you to lead, a chemical known to the State of California to a live electrical outlet...

User Manual
Page 47
...: The recharging of the battery cannot occur when your computer is using the battery to power the computer. Getting Started 47 Charging the main battery ❖ Glows green when the main battery is fully charged ❖ Is unlit when the main battery has discharged, the battery is not charging, or the... turned off for information on the applications, power management settings, and features used to select a power level setting that , the battery will allow the battery to charge a fully charged battery can be completely charged and ready to power the computer, you must charge the...
...: The recharging of the battery cannot occur when your computer is using the battery to power the computer. Getting Started 47 Charging the main battery ❖ Glows green when the main battery is fully charged ❖ Is unlit when the main battery has discharged, the battery is not charging, or the... turned off for information on the applications, power management settings, and features used to select a power level setting that , the battery will allow the battery to charge a fully charged battery can be completely charged and ready to power the computer, you must charge the...
User Manual
Page 48
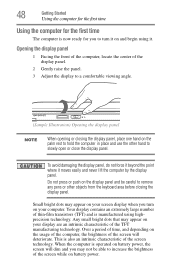
... increase the brightness of thin-film transistors (TFT) and is manufactured using it. Your display contains an extremely large number of the screen while on battery power. This is also an intrinsic characteristic of the display panel. 2 Gently raise the panel. 3 Adjust the display to a comfortable viewing angle. (Sample Illustration) Opening...
... increase the brightness of thin-film transistors (TFT) and is manufactured using it. Your display contains an extremely large number of the screen while on battery power. This is also an intrinsic characteristic of the display panel. 2 Gently raise the panel. 3 Adjust the display to a comfortable viewing angle. (Sample Illustration) Opening...
User Manual
Page 49
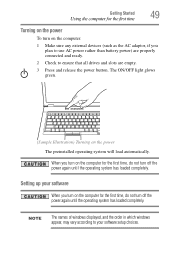
... of windows displayed, and the order in which windows appear, may vary according to your software When you plan to use AC power rather than battery power) are properly connected and ready. 2 Check to ensure that all drives and slots are empty. 3 Press and release the power button. Getting Started 49...
... of windows displayed, and the order in which windows appear, may vary according to your software When you plan to use AC power rather than battery power) are properly connected and ready. 2 Check to ensure that all drives and slots are empty. 3 Press and release the power button. Getting Started 49...
User Manual
Page 53
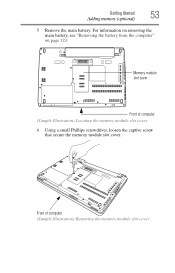
Getting Started 53 Adding memory (optional) 5 Remove the main battery. For information on removing the main battery, see "Removing the battery from the computer" on page 123. Memory module slot cover Front of computer (Sample Illustration) Removing the memory module slot cover Front of computer (Sample Illustration) Locating the memory module slot cover 6 Using a small Phillips screwdriver, loosen the captive screw that secure the memory module slot cover.
Getting Started 53 Adding memory (optional) 5 Remove the main battery. For information on removing the main battery, see "Removing the battery from the computer" on page 123. Memory module slot cover Front of computer (Sample Illustration) Removing the memory module slot cover Front of computer (Sample Illustration) Locating the memory module slot cover 6 Using a small Phillips screwdriver, loosen the captive screw that secure the memory module slot cover.

User Manual
Page 57
... Turn the computer right side up the computer. You can verify that the computer has recognized it using the screw. 15 Re-insert the main battery. For more information on inserting the main battery, see "Inserting a charged battery" on a hard flat surface. If you can now continue setting up .
... Turn the computer right side up the computer. You can verify that the computer has recognized it using the screw. 15 Re-insert the main battery. For more information on inserting the main battery, see "Inserting a charged battery" on a hard flat surface. If you can now continue setting up .
User Manual
Page 59
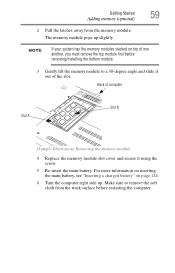
.../installing the bottom module. 3 Gently lift the memory module to remove the soft cloth from the memory module. For more information on inserting the main battery, see "Inserting a charged battery" on top of the slot. Make sure to a 30-degree angle and slide it using the screw. 5 Re-insert the main...
.../installing the bottom module. 3 Gently lift the memory module to remove the soft cloth from the memory module. For more information on inserting the main battery, see "Inserting a charged battery" on top of the slot. Make sure to a 30-degree angle and slide it using the screw. 5 Re-insert the main...
User Manual
Page 83
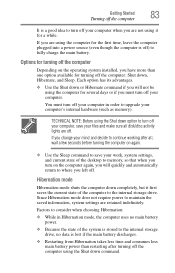
... computer for the first time, leave the computer plugged into a power source (even though the computer is off) to fully charge the main battery. Options for turning off the computer Depending on the operating system installed, you must turn off your computer in Hibernation mode, the computer uses ...state of the system is stored to the internal storage drive, no data is lost if the main battery discharges. ❖ Restarting from Hibernation takes less time and consumes less main battery power than one option available for turning off the computer: Shut down command. If you change your ...
... computer for the first time, leave the computer plugged into a power source (even though the computer is off) to fully charge the main battery. Options for turning off the computer Depending on the operating system installed, you must turn off your computer in Hibernation mode, the computer uses ...state of the system is stored to the internal storage drive, no data is lost if the main battery discharges. ❖ Restarting from Hibernation takes less time and consumes less main battery power than one option available for turning off the computer: Shut down command. If you change your ...

User Manual
Page 84
...operating system may save your internal storage drive, and then shuts down the computer. For information on using the Sleep command and the main battery discharges fully, your unsaved information will try to enter Hibernation mode. Sleep mode The Sleep command places the computer into a power-saving mode...the computer returns to the state in which you left it , including all open programs and files you were using. ❖ If the battery charge becomes critically low, the computer will be lost. Factors to consider when choosing Sleep: ❖ While in Sleep mode, the computer uses...
...operating system may save your internal storage drive, and then shuts down the computer. For information on using the Sleep command and the main battery discharges fully, your unsaved information will try to enter Hibernation mode. Sleep mode The Sleep command places the computer into a power-saving mode...the computer returns to the state in which you left it , including all open programs and files you were using. ❖ If the battery charge becomes critically low, the computer will be lost. Factors to consider when choosing Sleep: ❖ While in Sleep mode, the computer uses...
User Manual
Page 87
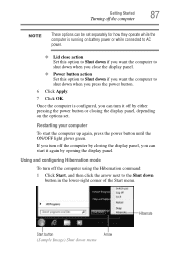
... 87 Turning off the computer NOTE These options can be set . Restarting your computer To start it off by closing the display panel, depending on battery power or while connected to AC power. ❖ Lid close action Set this option to Shut down if you want the computer to shut down...
... 87 Turning off the computer NOTE These options can be set . Restarting your computer To start it off by closing the display panel, depending on battery power or while connected to AC power. ❖ Lid close action Set this option to Shut down if you want the computer to shut down...

User Manual
Page 89
... tab of Power Options screen 5 Select Hibernate for the options you press the power button. 6 Click Apply. 7 Click OK. Once the computer is running on battery power or while connected to AC power. ❖ Lid close action Set this option to Hibernate if you want the computer to go into Hibernation...
... tab of Power Options screen 5 Select Hibernate for the options you press the power button. 6 Click Apply. 7 Click OK. Once the computer is running on battery power or while connected to AC power. ❖ Lid close action Set this option to Hibernate if you want the computer to go into Hibernation...
User Manual
Page 91
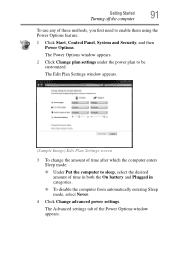
... then Power Options. The Edit Plan Settings window appears. (Sample Image) Edit Plan Settings screen 3 To change the amount of time in both the On battery and Plugged in categories. ❖ To disable the computer from automatically entering Sleep mode, select Never. 4 Click Change advanced power settings. The Power Options window...
... then Power Options. The Edit Plan Settings window appears. (Sample Image) Edit Plan Settings screen 3 To change the amount of time in both the On battery and Plugged in categories. ❖ To disable the computer from automatically entering Sleep mode, select Never. 4 Click Change advanced power settings. The Power Options window...


