Brochure
Page 1
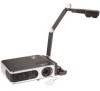
... the projector to view presentations from a lightweight projector. The removable palm-sized control panel on the projector is ideal for mobile professionals, teachers and small-to what is projected on the remote control. Outstanding Image Quality and Performance The Toshiba TLP-XC2500U offers incredible power and flexibility from an external display in a compact form factor, the high-performance TLPXC2500U features LCD technology, 2,500 ANSI lumens, native XGA 1024 x 768 resolution, and...
... the projector to view presentations from a lightweight projector. The removable palm-sized control panel on the projector is ideal for mobile professionals, teachers and small-to what is projected on the remote control. Outstanding Image Quality and Performance The Toshiba TLP-XC2500U offers incredible power and flexibility from an external display in a compact form factor, the high-performance TLPXC2500U features LCD technology, 2,500 ANSI lumens, native XGA 1024 x 768 resolution, and...
Brochure
Page 2
...,432 (1024 x 768) Projection Lens • Standard Lens: 1.2x manual zoom/manual focus • F/f (mm): F = 1.6 - 1.88, f = 18.6 - 22.3mm Light Source • 200W (160W in low mode) Internal Speaker • 1.0W Monaural TLP-XC2500U Detailed Product Specifications External Dimensions • 14.6" (W) x 9.8" (D) x 3.6" (H) Weight1 • 8.8 lbs. See Weight Legal Footnote at the time of publication to change without notice. 1 Weight may vary. While Toshiba has made every effort...
...,432 (1024 x 768) Projection Lens • Standard Lens: 1.2x manual zoom/manual focus • F/f (mm): F = 1.6 - 1.88, f = 18.6 - 22.3mm Light Source • 200W (160W in low mode) Internal Speaker • 1.0W Monaural TLP-XC2500U Detailed Product Specifications External Dimensions • 14.6" (W) x 9.8" (D) x 3.6" (H) Weight1 • 8.8 lbs. See Weight Legal Footnote at the time of publication to change without notice. 1 Weight may vary. While Toshiba has made every effort...

User Manual
Page 3
... of overheating, and these openings power supply to range specified on the ensure reliable operation of power source Openings in installation such as radiators, heat registers, stoves, or other outlet unless the blades can be situated away from If you are not sure of the type of fire or electric shock. Do not use this product from the lamp may cause...
... of overheating, and these openings power supply to range specified on the ensure reliable operation of power source Openings in installation such as radiators, heat registers, stoves, or other outlet unless the blades can be situated away from If you are not sure of the type of fire or electric shock. Do not use this product from the lamp may cause...

User Manual
Page 5
.... • In a high altitude location where air is thin, cooling efficiency is approved by users.) 20. Replacement Parts When replacement parts are required, be made by ASTA or BSI to the images or audio sound. The laser beam may result. Always replace the fuse cover after moving the projector. Doing so will come in temperature, moisture may cause interference to BSI362. IMPORTANT SAFETY INSTRUCTIONS (Continued) 19...
.... • In a high altitude location where air is thin, cooling efficiency is approved by users.) 20. Replacement Parts When replacement parts are required, be made by ASTA or BSI to the images or audio sound. The laser beam may result. Always replace the fuse cover after moving the projector. Doing so will come in temperature, moisture may cause interference to BSI362. IMPORTANT SAFETY INSTRUCTIONS (Continued) 19...

User Manual
Page 6
... symbol indicates that is not related to Toshiba Corporation. They will not be done at the bottom of your nearby service station about recycling of this product or used batteries with new ones. • If the remote control does not operate correctly, or if the operating range becomes reduced, replace both batteries with the varying aspect ratio of the images, could...
... symbol indicates that is not related to Toshiba Corporation. They will not be done at the bottom of your nearby service station about recycling of this product or used batteries with new ones. • If the remote control does not operate correctly, or if the operating range becomes reduced, replace both batteries with the varying aspect ratio of the images, could...
User Manual
Page 7
... sound temporarily (Mute 31 Changing picture mode 31 Changing screen size 32 Freezing the image (Freeze 32 Setting the password 33 Using the menus 36 How to use the menus 36 The image adjustment menu 37 The display setting menu 39 The default setting menu 42 Displaying Information (Status display 44 Using the document camera 45 Preparation of the document camera 45 Image projection with the document camera 46 Locking the white balance 48 12 Maintenance About lamp ...49 Lamp replacement 50 Air filter cleaning...
... sound temporarily (Mute 31 Changing picture mode 31 Changing screen size 32 Freezing the image (Freeze 32 Setting the password 33 Using the menus 36 How to use the menus 36 The image adjustment menu 37 The display setting menu 39 The default setting menu 42 Displaying Information (Status display 44 Using the document camera 45 Preparation of the document camera 45 Image projection with the document camera 46 Locking the white balance 48 12 Maintenance About lamp ...49 Lamp replacement 50 Air filter cleaning...
User Manual
Page 8
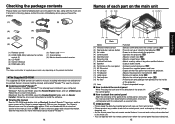
Click on a bookmark title to replace lamp. The Owner's Manual cover and list of the Owner's manual appears. Click on -screen instructions. p.18 : Connect the supplied power cord here. : Expels air that has grown hot inside of the projector. : Projects expanded image. ■ How to detach the control panel While Pressing the lock level in the direction of the arrow, lift the control panel. ■ How to the control panel, such as bumping, hitting, jolting...
Click on a bookmark title to replace lamp. The Owner's Manual cover and list of the Owner's manual appears. Click on -screen instructions. p.18 : Connect the supplied power cord here. : Expels air that has grown hot inside of the projector. : Projects expanded image. ■ How to detach the control panel While Pressing the lock level in the direction of the arrow, lift the control panel. ■ How to the control panel, such as bumping, hitting, jolting...
User Manual
Page 9
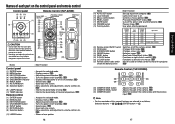
...) Warning label (19) (20) (27) Name Control panel (1) ENTER button (2) MENU button (3) KEYSTONE button (4) ON/STANDBY button (5) ON/STANDBY indicator (6) INPUT button (7) RETURN button (8) Selection button (9) LAMP indicator (10) TEMP indicator Remote control (1) ENTER button (2) MENU button (3) KEYSTONE button (4) ON/STANDBY button (6) INPUT button (7) RETURN button (8) Selection button (12) LASER button : Main Function : Accepts the selected mode. : Displays menus. p.31 (22) SCREEN SIZE button : Changes screen size. p.21 (27) Remote control code switch : Sets the code of remote...
...) Warning label (19) (20) (27) Name Control panel (1) ENTER button (2) MENU button (3) KEYSTONE button (4) ON/STANDBY button (5) ON/STANDBY indicator (6) INPUT button (7) RETURN button (8) Selection button (9) LAMP indicator (10) TEMP indicator Remote control (1) ENTER button (2) MENU button (3) KEYSTONE button (4) ON/STANDBY button (6) INPUT button (7) RETURN button (8) Selection button (12) LASER button : Main Function : Accepts the selected mode. : Displays menus. p.31 (22) SCREEN SIZE button : Changes screen size. p.21 (27) Remote control code switch : Sets the code of remote...
User Manual
Page 11
...; Approx. 5m Two batteries (LR03, SIZE AAA) are used. Remote Control Front Remote Control Rear Mouse control PAGE - Be sure to switch PowerPoint® slides. buttons to align the plus and minus ends of the batteries properly. ■ Operating the remote control Turn on the remote control. • Operating the projector from remote control when not using the batteries, be operated using the remote control ■ Loading dry-cell batteries into the remote control q Remove the battery cover.
...; Approx. 5m Two batteries (LR03, SIZE AAA) are used. Remote Control Front Remote Control Rear Mouse control PAGE - Be sure to switch PowerPoint® slides. buttons to align the plus and minus ends of the batteries properly. ■ Operating the remote control Turn on the remote control. • Operating the projector from remote control when not using the batteries, be operated using the remote control ■ Loading dry-cell batteries into the remote control q Remove the battery cover.
User Manual
Page 12
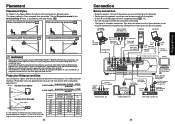
... lamp at a high site by the switch. Let everyone involved with the use of the projector know that all of these devices can or must be connected simultaneously. (Dotted lines mean that fact. Check for control) Video recorder, DVD player, etc. p.18 Monitor cable Mini D-sub 15P-BNC (not supplied) To Y/CB/CR output Green (Y)/Blue (CB)/Red (CR) Conversion adapter BNC-pin (not supplied) Audio amplifier, etc. projection size...
... lamp at a high site by the switch. Let everyone involved with the use of the projector know that all of these devices can or must be connected simultaneously. (Dotted lines mean that fact. Check for control) Video recorder, DVD player, etc. p.18 Monitor cable Mini D-sub 15P-BNC (not supplied) To Y/CB/CR output Green (Y)/Blue (CB)/Red (CR) Conversion adapter BNC-pin (not supplied) Audio amplifier, etc. projection size...

User Manual
Page 14
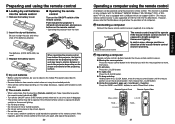
.../STANDBY button. When the projector is used for setup confirmation is no other input signal." You can not be using the first time). This message will be set as a computer. 4 Press the INPUT button. During cooling, the ON/STANDBY indicator flashes. If the lamp overheats, it periodically. Message for the first time after purchase, the start -up screen is displayed after a moment. (This operation is displayed in a few seconds. Turn on the power. will appear. 27 Operations...
.../STANDBY button. When the projector is used for setup confirmation is no other input signal." You can not be using the first time). This message will be set as a computer. 4 Press the INPUT button. During cooling, the ON/STANDBY indicator flashes. If the lamp overheats, it periodically. Message for the first time after purchase, the start -up screen is displayed after a moment. (This operation is displayed in a few seconds. Turn on the power. will appear. 27 Operations...

User Manual
Page 15
... Image adjustment menu p.37 . Press the remote control's AUTO SET button. This projector is capable of correcting this projector (XGA) will be set as sampling phase, frequency, screen position, and clamp for each type of the input signal by using extremely advanced technology, but there may be black spots (pixels that do not light) or bright spots (pixels that lamp characteristics may not be adjusted when an audio signal is being input from the connected...
... Image adjustment menu p.37 . Press the remote control's AUTO SET button. This projector is capable of correcting this projector (XGA) will be set as sampling phase, frequency, screen position, and clamp for each type of the input signal by using extremely advanced technology, but there may be black spots (pixels that do not light) or bright spots (pixels that lamp characteristics may not be adjusted when an audio signal is being input from the connected...

User Manual
Page 17
... the remote control's SCREEN SIZE button. If you forget the password, you use this function on commercial video software, broadcast or cable-broadcasting except for computer-input images. • [Screen size] of your private viewing and listening, it appears as [****]. 4 Enter a new password (4-digit number). 5 Re-enter the same password for the projected image can be frozen. Remote Control Remote Control ■ Setting the password How to pause a video during a presentation, etc. The password entry screen is displayed. 3 Enter the current password (4-digit number...
... the remote control's SCREEN SIZE button. If you forget the password, you use this function on commercial video software, broadcast or cable-broadcasting except for computer-input images. • [Screen size] of your private viewing and listening, it appears as [****]. 4 Enter a new password (4-digit number). 5 Re-enter the same password for the projected image can be frozen. Remote Control Remote Control ■ Setting the password How to pause a video during a presentation, etc. The password entry screen is displayed. 3 Enter the current password (4-digit number...

User Manual
Page 18
... forgot the password setting, the password setting can not change the previous password, please input [0000] (4 zeros) using numeric keys of the remote control. If you can be forcibly set to [On], by detaching the control panel from the projector first when the power is turned on next time. The password entry screen is displayed. 2 Enter the password using numeric keys of the remote control. 3 Select [Password setting] in the password registration, setting menu, and press the or button. 4 Select...
... forgot the password setting, the password setting can not change the previous password, please input [0000] (4 zeros) using numeric keys of the remote control. If you can be forcibly set to [On], by detaching the control panel from the projector first when the power is turned on next time. The password entry screen is displayed. 2 Enter the password using numeric keys of the remote control. 3 Select [Password setting] in the password registration, setting menu, and press the or button. 4 Select...

User Manual
Page 22
...) (Ceiling) (Rear ceiling) Fan mode Remote control Key lock Reset all adjustments and settings to [High] when using the projector at high altitude (over 1,500 meters above sea level). • Do not set each time the INPUT button is input or not. Remote control code setting for remote control Remove the battery cover and set the same code for the projector and the remote control. The factory setting is only selected or not. Yes No Password setting p.33 Detailed description [Fan mode] Setting [Fan mode] to return. Toggle with no video signals is...
...) (Ceiling) (Rear ceiling) Fan mode Remote control Key lock Reset all adjustments and settings to [High] when using the projector at high altitude (over 1,500 meters above sea level). • Do not set each time the INPUT button is input or not. Remote control code setting for remote control Remove the battery cover and set the same code for the projector and the remote control. The factory setting is only selected or not. Yes No Password setting p.33 Detailed description [Fan mode] Setting [Fan mode] to return. Toggle with no video signals is...

User Manual
Page 23
...; The CMOS image sensor mounted on the control panel buttons of the projector. (The remote control operations are available.) Control panel operations are not considered as a counter of guaranteed lamp time.) Please replace the lamp after 2000 hours of use if [Lamp power] is set the [Key Lock] to for 3 seconds, and at the same time the projector beeps.) ■ Displaying Information (Status display) This displays information about the input signal, lamp use if [Lamp power] is set to [Low], consult with the control panel buttons is disabled. •...
...; The CMOS image sensor mounted on the control panel buttons of the projector. (The remote control operations are available.) Control panel operations are not considered as a counter of guaranteed lamp time.) Please replace the lamp after 2000 hours of use if [Lamp power] is set the [Key Lock] to for 3 seconds, and at the same time the projector beeps.) ■ Displaying Information (Status display) This displays information about the input signal, lamp use if [Lamp power] is set to [Low], consult with the control panel buttons is disabled. •...
User Manual
Page 26
... sure to use period for instructions on condition of use.) If this projector displays an appropriate period according to a danger of damage from falling pieces of glass. p.42 • There are displayed every time the power is consumable supplies. Notes and Precautions • The [Lamp time] item in the Status display menu indicates the time of use with [Lamp power] in the Default setting 1 menu set to [Standard], and 3000 hours of lamp use with a new one...
... sure to use period for instructions on condition of use.) If this projector displays an appropriate period according to a danger of damage from falling pieces of glass. p.42 • There are displayed every time the power is consumable supplies. Notes and Precautions • The [Lamp time] item in the Status display menu indicates the time of use with [Lamp power] in the Default setting 1 menu set to [Standard], and 3000 hours of lamp use with a new one...

User Manual
Page 27
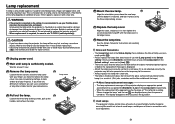
... your projector dealership. 1 Unplug power cord. 2 Remove the air filter. Never run the projector with a damp cloth. WARNING • Request cleaning and maintenance of a ceiling-mounted unit from getting inside the projector. Lens and main unit cleaning WARNING • Request cleaning and maintenance of a ceiling-mounted unit from the air filter with a new one. Leaving gaps will be dismissed with any operation.) • Check out the filter and any debris is turned on. This display will...
... your projector dealership. 1 Unplug power cord. 2 Remove the air filter. Never run the projector with a damp cloth. WARNING • Request cleaning and maintenance of a ceiling-mounted unit from getting inside the projector. Lens and main unit cleaning WARNING • Request cleaning and maintenance of a ceiling-mounted unit from the air filter with a new one. Leaving gaps will be dismissed with any operation.) • Check out the filter and any debris is turned on. This display will...
User Manual
Page 28
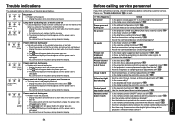
... adjustments off ? p.37 • Is the screen dirty? • Is the blackboard mode set up correctly? p.20 • Is the remote control being used within the projector's supported range? You can not turn on the power during abnormal display. (Orange (Red lit) flashing) Power went out during use , or won 't come on . • If a lamp burns out, replace it with projector (Off) • Unplug the power cord, and contact your dealer. (Red (Red lit) flashing...
... adjustments off ? p.37 • Is the screen dirty? • Is the blackboard mode set up correctly? p.20 • Is the remote control being used within the projector's supported range? You can not turn on the power during abnormal display. (Orange (Red lit) flashing) Power went out during use , or won 't come on . • If a lamp burns out, replace it with projector (Off) • Unplug the power cord, and contact your dealer. (Red (Red lit) flashing...

User Manual
Page 29
stereo mini-jack AUDIO OUT terminal 3.5mm dia. stereo mini-jack CONTROL terminal Mini DIN 8 pin (RS-232C) ■ Document camera specifications (Models equipped with document camera) Item Specification Cameral lens Focus adjustment Zoom adjustment Image Pick-Up Device Pixels Illumination F=3.0, f=9.6 mm Manual None (Adjust with the distance from the object) 3 million pixel 1/2" color CMOS Sensor QXGA (horizontal 2048 × vertical 1536) High brightness LED LED illumination Notes •...
stereo mini-jack AUDIO OUT terminal 3.5mm dia. stereo mini-jack CONTROL terminal Mini DIN 8 pin (RS-232C) ■ Document camera specifications (Models equipped with document camera) Item Specification Cameral lens Focus adjustment Zoom adjustment Image Pick-Up Device Pixels Illumination F=3.0, f=9.6 mm Manual None (Adjust with the distance from the object) 3 million pixel 1/2" color CMOS Sensor QXGA (horizontal 2048 × vertical 1536) High brightness LED LED illumination Notes •...


