User Manual
Page 2
...safeguards incorporated in electric shock or fire hazard. Do not look at his own expense. The strong light from the front of the remote control. For products intended to operate from the type of power source indicated on the marking label. WARNING: This is pressed. ... any parts that may be operated only from battery power, or other reproductive harm. Ventilation This product should never be repaired by Toshiba, could void the user's authority to operate the equipment. Before Using SAFETY PRECAUTIONS The lightning flash with arrowhead symbol, within an ...
...safeguards incorporated in electric shock or fire hazard. Do not look at his own expense. The strong light from the front of the remote control. For products intended to operate from the type of power source indicated on the marking label. WARNING: This is pressed. ... any parts that may be operated only from battery power, or other reproductive harm. Ventilation This product should never be repaired by Toshiba, could void the user's authority to operate the equipment. Before Using SAFETY PRECAUTIONS The lightning flash with arrowhead symbol, within an ...
User Manual
Page 5
... 240V, use it from a low-temperature room to ship your line voltage is an extreme or sudden change in temperature. CAUTION Label CAUTION Label (LASER) Remote Control INPUT PLAY CAUTION Label LASER WARNING Models with oil or cigarette smoke. Label MANUFACTURED; If this happens, move it away from the TV or...
... 240V, use it from a low-temperature room to ship your line voltage is an extreme or sudden change in temperature. CAUTION Label CAUTION Label (LASER) Remote Control INPUT PLAY CAUTION Label LASER WARNING Models with oil or cigarette smoke. Label MANUFACTURED; If this happens, move it away from the TV or...
User Manual
Page 7
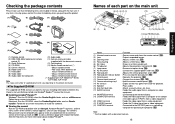
... 12 Preparations Checking the package contents 14 Names of each part on the main unit 15 Names of each part on the control panel and remote control 16 Names of each part on the document camera (models with a document camera 17 Preparing and using the... remote control 18 Placement ...19 Connection ...21 Operations Turning the power on and off 22 Basic operations 24 Using handy features 26 Using auto setting (Auto ...
... 12 Preparations Checking the package contents 14 Names of each part on the main unit 15 Names of each part on the control panel and remote control 16 Names of each part on the document camera (models with a document camera 17 Preparing and using the... remote control 18 Placement ...19 Connection ...21 Operations Turning the power on and off 22 Basic operations 24 Using handy features 26 Using auto setting (Auto ...
User Manual
Page 8
...) (9) (6) (13) (1) (14)(15)(16) (14) (17)(18)(19)(20)(21)(22) AUDIO MONITOR COMPUTER( Y/PB/PR ) VIDEO VIDEO S-VIDEO CONTROL Name : Function (1) Infrared remote sensor (2) Lens (3) Zooming lever (4) Focusing ring (5) Air intake (6) Tilt adjuster (7) Lamp cover (8) AC IN socket (9) Foot adjuster (10) Foot adjuster release button (11) Control panel.... The Owner's Manual cover and list of the Owner's manual appears. p.48 Note *: For the models with TLP-T60M, TLP-T61M, Note TLP-T70M, TLP-T71M The shape and number of each part on a bookmark title to install the software.
...) (9) (6) (13) (1) (14)(15)(16) (14) (17)(18)(19)(20)(21)(22) AUDIO MONITOR COMPUTER( Y/PB/PR ) VIDEO VIDEO S-VIDEO CONTROL Name : Function (1) Infrared remote sensor (2) Lens (3) Zooming lever (4) Focusing ring (5) Air intake (6) Tilt adjuster (7) Lamp cover (8) AC IN socket (9) Foot adjuster (10) Foot adjuster release button (11) Control panel.... The Owner's Manual cover and list of the Owner's manual appears. p.48 Note *: For the models with TLP-T60M, TLP-T61M, Note TLP-T70M, TLP-T71M The shape and number of each part on a bookmark title to install the software.
User Manual
Page 9
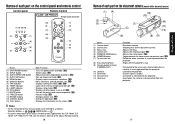
... : Connected to the accessory camera cable when a camera is disconnected from the projector. : Aligns with the TLP-T60M, TLP- T61M, TLP-T70M, TLP-T71M, see the Owner's Manual of the Mouse Remote Control. 16 Names of each part on the screen. p.36 : Adjusts the camera gain. MENU VOL.+... p.26 : Displays menus and makes selections. p.22 : Cuts off . p.30 : Displays the information on the control panel and remote control Control panel Remote Control CLASS 1 LED PRODUCT Remote control transmitter (7) (8) (9) (10) FAN TEMP LAMP ON (2) INPUT ON / STANDBY ZOOM + (1) VOL. - p.23 p.42...
... : Connected to the accessory camera cable when a camera is disconnected from the projector. : Aligns with the TLP-T60M, TLP- T61M, TLP-T70M, TLP-T71M, see the Owner's Manual of the Mouse Remote Control. 16 Names of each part on the screen. p.36 : Adjusts the camera gain. MENU VOL.+... p.26 : Displays menus and makes selections. p.22 : Cuts off . p.30 : Displays the information on the control panel and remote control Control panel Remote Control CLASS 1 LED PRODUCT Remote control transmitter (7) (8) (9) (10) FAN TEMP LAMP ON (2) INPUT ON / STANDBY ZOOM + (1) VOL. - p.23 p.42...
User Manual
Page 10
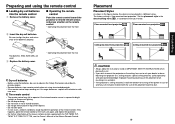
...TLP-T70M, TLP-T71M, see the Owner's Manual of the mouse remote control supplied with your dealer to do so. The factory setting is ceiling-mounted, install the breaker for extended periods. • If the remote control stops working, or if its range decreases, replace all the batteries with the use of the remote...off the power in 4 different styles. Preparing and using the remote control I Operating the remote control Point the remote control toward the projector's infrared remote sensor, and press a button on the remote control. • Operating the projector from the front w ...
...TLP-T70M, TLP-T71M, see the Owner's Manual of the mouse remote control supplied with your dealer to do so. The factory setting is ceiling-mounted, install the breaker for extended periods. • If the remote control stops working, or if its range decreases, replace all the batteries with the use of the remote...off the power in 4 different styles. Preparing and using the remote control I Operating the remote control Point the remote control toward the projector's infrared remote sensor, and press a button on the remote control. • Operating the projector from the front w ...
User Manual
Page 12
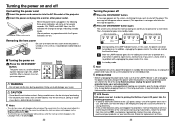
..., LAMP, and FAN. FAN TEMP LAMP ON INPUT ON / STANDBY The power turns on, and the following three green indicators will be turned back on. Remote Control CALL ON/ STANDBY KEYSTONE AUTO SET MUTE FREEZE RESIZE RESIZE OFF INPUT WARNING • Do not look into standby mode. A message appears on the...
..., LAMP, and FAN. FAN TEMP LAMP ON INPUT ON / STANDBY The power turns on, and the following three green indicators will be turned back on. Remote Control CALL ON/ STANDBY KEYSTONE AUTO SET MUTE FREEZE RESIZE RESIZE OFF INPUT WARNING • Do not look into standby mode. A message appears on the...

User Manual
Page 14
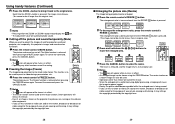
...one of the followings] [Apply: ] NTSC/PAL/SECAM/PAL-N/PAL-M/PAL60/NTSC4.43 Note • Moving pictures generated with this keystone distortion. Remote Control CALL ON/ STANDBY KEYSTONE AUTO SET MUTE FREEZE RESIZE RESIZE OFF INPUT 1 Press the AUTO KEYSTONE button. The icon will undergo keystone (... mode.) Item Description Keystone Shrink button of the screen Shrink top of the screen Notes • Depending on the remote control also allows you are finished. G Manual adjustment Use the buttons for each type of images, some degradation). 1 Press the ZOOM...
...one of the followings] [Apply: ] NTSC/PAL/SECAM/PAL-N/PAL-M/PAL60/NTSC4.43 Note • Moving pictures generated with this keystone distortion. Remote Control CALL ON/ STANDBY KEYSTONE AUTO SET MUTE FREEZE RESIZE RESIZE OFF INPUT 1 Press the AUTO KEYSTONE button. The icon will undergo keystone (... mode.) Item Description Keystone Shrink button of the screen Shrink top of the screen Notes • Depending on the remote control also allows you are finished. G Manual adjustment Use the buttons for each type of images, some degradation). 1 Press the ZOOM...
User Manual
Page 15
... image is in effect. • An enlarged image can be enlarged. 1 Press the remote control's RESIZE button. This function is pressed. 2 To decrease the enlargement ratio, press the remote control's RESIZE button. The enlargement ratio is decreased each time the RESIZE button is to ... ZOOM + VOL.- MENU VOL.+ 3 ZOOM - 4 Press the CANCEL button to the original size. Remote Control CALL ON/ STANDBY KEYSTONE AUTO SET MUTE FREEZE RESIZE RESIZE OFF INPUT Remote Control CALL ON/ STANDBY KEYSTONE AUTO SET MUTE FREEZE RESIZE RESIZE OFF INPUT Notes • The icon ...
... image is in effect. • An enlarged image can be enlarged. 1 Press the remote control's RESIZE button. This function is pressed. 2 To decrease the enlargement ratio, press the remote control's RESIZE button. The enlargement ratio is decreased each time the RESIZE button is to ... ZOOM + VOL.- MENU VOL.+ 3 ZOOM - 4 Press the CANCEL button to the original size. Remote Control CALL ON/ STANDBY KEYSTONE AUTO SET MUTE FREEZE RESIZE RESIZE OFF INPUT Remote Control CALL ON/ STANDBY KEYSTONE AUTO SET MUTE FREEZE RESIZE RESIZE OFF INPUT Notes • The icon ...
User Manual
Page 16
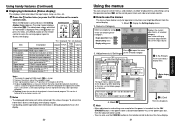
...following three categorys. Item Adjustment/Setting Value 5. Back The menu disappears. Press the button twice (or press the CALL button on the remote control once). Item shown with gray cannot be saved. • You can be different from the list by using . Press to ... These marks signify the items can be refreshed if the status changes. The table below is pressed once, the Setting Control panel Remote Control display menu appears. There are following pages as a counter of guaranteed lamp time.) When the displayed time approaches 3,000 hours,...
...following three categorys. Item Adjustment/Setting Value 5. Back The menu disappears. Press the button twice (or press the CALL button on the remote control once). Item shown with gray cannot be saved. • You can be different from the list by using . Press to ... These marks signify the items can be refreshed if the status changes. The table below is pressed once, the Setting Control panel Remote Control display menu appears. There are following pages as a counter of guaranteed lamp time.) When the displayed time approaches 3,000 hours,...
User Manual
Page 19
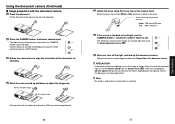
... : 100 mm to 300 mm Far : 300 mm to 5 m 6 If the screen is pressed again. • Camera input can also be selected by pressing the remote control or camera's INPUT button. 3 Rotate the camera lens to align the orientation of the projector. 2 Press the CAMERA button, and select camera input. •...
... : 100 mm to 300 mm Far : 300 mm to 5 m 6 If the screen is pressed again. • Camera input can also be selected by pressing the remote control or camera's INPUT button. 3 Rotate the camera lens to align the orientation of the projector. 2 Press the CAMERA button, and select camera input. •...

User Manual
Page 22
...; Is the correct signal format selected? p.20 • Is the projector's screen placement angle tilted too far? p.18 • Is the remote control being used within the projector's supported range? Model with a document camera FAN TEMP LAMP ON (Green lit) (Red lit) Power went out...the ambient temperature high? p.19 • Are the sharpness or sampling phase adjustments off? p.18 • Are there any obstructions between the remote control and projector? • Are there any fluorescent or other bright lights shining at least 3 minutes.) 42 Before calling service personnel If ...
...; Is the correct signal format selected? p.20 • Is the projector's screen placement angle tilted too far? p.18 • Is the remote control being used within the projector's supported range? Model with a document camera FAN TEMP LAMP ON (Green lit) (Red lit) Power went out...the ambient temperature high? p.19 • Are the sharpness or sampling phase adjustments off? p.18 • Are there any obstructions between the remote control and projector? • Are there any fluorescent or other bright lights shining at least 3 minutes.) 42 Before calling service personnel If ...
Brochure
Page 2
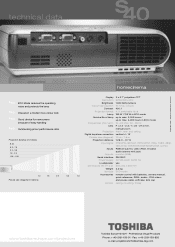
...16.7 mio. colours Contrast 400 : 1 Projection format 4 : 3, switchable 16 : 9 Lamp 165 W / 135 W in ECO mode Service life of easy handling s40 Outstanding price/ performance ratio Projection distance (in meters) 9.73 6.5 - 7.8 3.2 - 3.9 1.9 - 2.3 1.26 - 1.52 1.0 1.5 2.5 5.0 Picture size (... mm Weight 2.2 kg Specials ECO mode Accessories remote control with batteries, owners manual, 7.6 quick reference, RGB-, audio-, RCA-videoand power-cable, softcase, lens cap Options ceiling-mounting, trolley www.toshiba-europe.com/projectors Toshiba Europe GmbH · Professional Visual Products Phone...
...16.7 mio. colours Contrast 400 : 1 Projection format 4 : 3, switchable 16 : 9 Lamp 165 W / 135 W in ECO mode Service life of easy handling s40 Outstanding price/ performance ratio Projection distance (in meters) 9.73 6.5 - 7.8 3.2 - 3.9 1.9 - 2.3 1.26 - 1.52 1.0 1.5 2.5 5.0 Picture size (... mm Weight 2.2 kg Specials ECO mode Accessories remote control with batteries, owners manual, 7.6 quick reference, RGB-, audio-, RCA-videoand power-cable, softcase, lens cap Options ceiling-mounting, trolley www.toshiba-europe.com/projectors Toshiba Europe GmbH · Professional Visual Products Phone...


