User Manual
Page 2
... with the limits for ventilation and to ensure reliable operation of the product and to protect it from the front of the remote control. REFER SERVICING TO QUALIFIED SERVICE PERSONNEL ONLY. 1. Openings in the cabinet are designed to provide reasonable protection against harmful interference ...on the marking label. For products intended to operate from the type of power source indicated on . The openings should be blocked by Toshiba, could void the user's authority to operate the equipment. This set has been designed and manufactured to a mirror. 2 IMPORTANT SAFETY ...
... with the limits for ventilation and to ensure reliable operation of the product and to protect it from the front of the remote control. REFER SERVICING TO QUALIFIED SERVICE PERSONNEL ONLY. 1. Openings in the cabinet are designed to provide reasonable protection against harmful interference ...on the marking label. For products intended to operate from the type of power source indicated on . The openings should be blocked by Toshiba, could void the user's authority to operate the equipment. This set has been designed and manufactured to a mirror. 2 IMPORTANT SAFETY ...
User Manual
Page 5
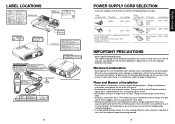
CAUTION Label CAUTION Label (LASER) Remote Control INPUT PLAY CAUTION Label LASER WARNING Models with Document Camera CAUTION Label (LASER) 8 POWER SUPPLY CORD SELECTION If your LCD projector. Always replace the fuse ...
CAUTION Label CAUTION Label (LASER) Remote Control INPUT PLAY CAUTION Label LASER WARNING Models with Document Camera CAUTION Label (LASER) 8 POWER SUPPLY CORD SELECTION If your LCD projector. Always replace the fuse ...
User Manual
Page 7
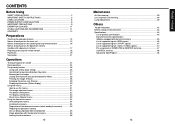
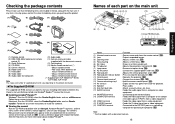
... Names of each part on the main unit 15 Names of each part on the control panel and remote control 16 Names of each part on the document camera (models with a document camera 17 Preparing and using the remote control 18 Placement ...19 Connection ...21 Operations Turning the power on and off 22 Basic operations... signals 46 List of supported signals (Y/PB/PR signals 47 List of supported signals (Video, S-Video signals 47 Pin assignment of COMPUTER & MONITOR terminals 47 CONTROL terminal 48 Separately Sold Product 48 13 Before Using
... Names of each part on the main unit 15 Names of each part on the control panel and remote control 16 Names of each part on the document camera (models with a document camera 17 Preparing and using the remote control 18 Placement ...19 Connection ...21 Operations Turning the power on and off 22 Basic operations... signals 46 List of supported signals (Y/PB/PR signals 47 List of supported signals (Video, S-Video signals 47 Pin assignment of COMPUTER & MONITOR terminals 47 CONTROL terminal 48 Separately Sold Product 48 13 Before Using
User Manual
Page 8
..., and run Reader Installer. Click on a bookmark title to view a reference page with TLP-T60M, TLP-T61M, Note TLP-T70M, TLP-T71M The shape and number of the manual. Click on Start.pdf. See the Help menu for computer) • Mouse remote control manual (*) Supplied with related information. p.25 : Adjusts screen focus. p.41 : Connect the supplied...
..., and run Reader Installer. Click on a bookmark title to view a reference page with TLP-T60M, TLP-T61M, Note TLP-T70M, TLP-T71M The shape and number of the manual. Click on Start.pdf. See the Help menu for computer) • Mouse remote control manual (*) Supplied with related information. p.25 : Adjusts screen focus. p.41 : Connect the supplied...
User Manual
Page 9
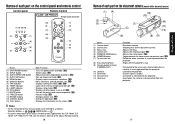
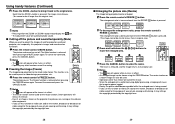
...22 : Selects input. p.31 : Menu selections and adjustments, etc. p.42 : Displays lamp mode. T61M, TLP-T70M, TLP-T71M, see the Owner's Manual of the Mouse Remote Control. 16 Names of each part on or off. p.27 : Sets up image and mode. p.23 p.42 :...separated from the projector. : Aligns with the TLP-T60M, TLP- p.30 Notes • For the remainder of this manual, buttons are referred to the projector. : Used when the camera is on the control panel and remote control Control panel Remote Control CLASS 1 LED PRODUCT Remote control transmitter (7) (8) (9) (10) FAN TEMP ...
...22 : Selects input. p.31 : Menu selections and adjustments, etc. p.42 : Displays lamp mode. T61M, TLP-T70M, TLP-T71M, see the Owner's Manual of the Mouse Remote Control. 16 Names of each part on or off. p.27 : Sets up image and mode. p.23 p.42 :...separated from the projector. : Aligns with the TLP-T60M, TLP- p.30 Notes • For the remainder of this manual, buttons are referred to the projector. : Used when the camera is on the control panel and remote control Control panel Remote Control CLASS 1 LED PRODUCT Remote control transmitter (7) (8) (9) (10) FAN TEMP ...
User Manual
Page 10
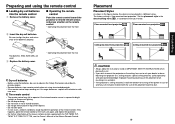
... to do so. Mounting the projector on the remote control. • Operating the projector from remote control when not using the remote control I Operating the remote control Point the remote control toward the projector's infrared remote sensor, and press a button on a ceiling requires special ceiling brackets (sold separately) and specialized knowledge. T61M, TLP-T70M, TLP-T71M, see the Owner's Manual of the Mouse...
... to do so. Mounting the projector on the remote control. • Operating the projector from remote control when not using the remote control I Operating the remote control Point the remote control toward the projector's infrared remote sensor, and press a button on a ceiling requires special ceiling brackets (sold separately) and specialized knowledge. T61M, TLP-T70M, TLP-T71M, see the Owner's Manual of the Mouse...
User Manual
Page 12
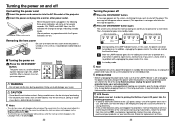
... lifetime will disappear after the message disappears.) 2 Press the ON/STANDBY button again. In this state will shorten the life of the lamp. Remote Control CALL ON/ STANDBY KEYSTONE AUTO SET MUTE FREEZE RESIZE RESIZE OFF INPUT WARNING • Do not look into standby mode. Doing so could cause... indicators will shorten the life of the lamp. FAN TEMP LAMP ON INPUT ON / STANDBY The power turns on Press the ON/STANDBY Control panel button. After a moment, the startup screen appears. Doing so could become deformed due to cool before plugging it is left on the...
... lifetime will disappear after the message disappears.) 2 Press the ON/STANDBY button again. In this state will shorten the life of the lamp. Remote Control CALL ON/ STANDBY KEYSTONE AUTO SET MUTE FREEZE RESIZE RESIZE OFF INPUT WARNING • Do not look into standby mode. Doing so could cause... indicators will shorten the life of the lamp. FAN TEMP LAMP ON INPUT ON / STANDBY The power turns on Press the ON/STANDBY Control panel button. After a moment, the startup screen appears. Doing so could become deformed due to cool before plugging it is left on the...

User Manual
Page 14
...the AUTO SET button. processing. Adjust with to eliminate periodic patterns and flickering when many vertical lines appear on the remote control also allows you to exit the menu mode.) Input Computer Y/PB/PR Video S-video Select Item Select Item Item Description... VOL. + AUTO KEYSTONE AUTO SET ZOOM - The menu disappears. (The CANCEL button on the remote control also allows you are finished. MENU VOL.+ AUTO KEYSTONE AUTO SET ZOOM- Remote Control CALL ON/ STANDBY KEYSTONE AUTO SET MUTE FREEZE RESIZE RESIZE OFF INPUT 1 Press the AUTO KEYSTONE button...
...the AUTO SET button. processing. Adjust with to eliminate periodic patterns and flickering when many vertical lines appear on the remote control also allows you to exit the menu mode.) Input Computer Y/PB/PR Video S-video Select Item Select Item Item Description... VOL. + AUTO KEYSTONE AUTO SET ZOOM - The menu disappears. (The CANCEL button on the remote control also allows you are finished. MENU VOL.+ AUTO KEYSTONE AUTO SET ZOOM- Remote Control CALL ON/ STANDBY KEYSTONE AUTO SET MUTE FREEZE RESIZE RESIZE OFF INPUT 1 Press the AUTO KEYSTONE button...
User Manual
Page 15
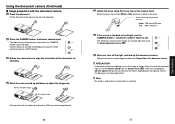
.... • An enlarged image can be used on the resize function. Press the remote control's FREEZE button. Remote Control CALL ON/ STANDBY KEYSTONE AUTO SET MUTE FREEZE RESIZE RESIZE OFF INPUT Remote Control CALL ON/ STANDBY KEYSTONE AUTO SET MUTE FREEZE RESIZE RESIZE OFF INPUT Notes •... either the ZOOM- Each time the ZOOM + button is being projected can be enlarged. 1 Press the remote control's RESIZE button. icon. Press the remote control's MUTE button. The picture pauses. The Freeze function is pressed. 2 To decrease the enlargement ratio, press the...
.... • An enlarged image can be used on the resize function. Press the remote control's FREEZE button. Remote Control CALL ON/ STANDBY KEYSTONE AUTO SET MUTE FREEZE RESIZE RESIZE OFF INPUT Remote Control CALL ON/ STANDBY KEYSTONE AUTO SET MUTE FREEZE RESIZE RESIZE OFF INPUT Notes •... either the ZOOM- Each time the ZOOM + button is being projected can be enlarged. 1 Press the remote control's RESIZE button. icon. Press the remote control's MUTE button. The picture pauses. The Freeze function is pressed. 2 To decrease the enlargement ratio, press the...
User Manual
Page 16
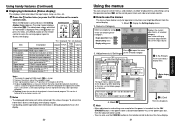
...30 The figure shows a typical example. Pressing it by using . Press the button (or press the CALL or CANCEL button on the remote control once). This mark signfy that there are saved when the power is only for operation instructions and might be different from the list by...How to use the menus The menu shown below shows what kind of adjustments and settings using the operation buttons p.16 on the control panel (main unit side) and remote control. When the button is selected, apply it again displays FAN TEMP LAMP ON CALL ON/ STANDBY information p.31 . I Displaying...
...30 The figure shows a typical example. Pressing it by using . Press the button (or press the CALL or CANCEL button on the remote control once). This mark signfy that there are saved when the power is only for operation instructions and might be different from the list by...How to use the menus The menu shown below shows what kind of adjustments and settings using the operation buttons p.16 on the control panel (main unit side) and remote control. When the button is selected, apply it again displays FAN TEMP LAMP ON CALL ON/ STANDBY information p.31 . I Displaying...
User Manual
Page 19
... • No audio is output when camera input is better in focusing. The Sharpness of the camera image can also be selected by pressing the remote control or camera's INPUT button. 3 Rotate the camera lens to either turn off the fluorescent light, or set the Shutter speed from Preparation of the document...
... • No audio is output when camera input is better in focusing. The Sharpness of the camera image can also be selected by pressing the remote control or camera's INPUT button. 3 Rotate the camera lens to either turn off the fluorescent light, or set the Shutter speed from Preparation of the document...

User Manual
Page 22
...? p.26 • Is the correct signal format selected? p.18 • Is the remote control being used within the projector's supported range? p.18 • Are there any obstructions between the remote control and projector? • Are there any fluorescent or other bright lights shining at least ...standby state waiting for a short while, then turn the power back on ? p.30 Remote control doesn't work • Are the remote control's batteries drained? • Are the batteries inserted into the remote control correctly? FAN TEMP LAMP ON (Off) No power ⇒ Problem with a new ...
...? p.26 • Is the correct signal format selected? p.18 • Is the remote control being used within the projector's supported range? p.18 • Are there any obstructions between the remote control and projector? • Are there any fluorescent or other bright lights shining at least ...standby state waiting for a short while, then turn the power back on ? p.30 Remote control doesn't work • Are the remote control's batteries drained? • Are the batteries inserted into the remote control correctly? FAN TEMP LAMP ON (Off) No power ⇒ Problem with a new ...
Brochure
Page 2
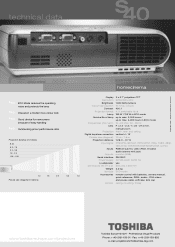
... 206 mm Weight 2.2 kg Specials ECO mode Accessories remote control with batteries, owners manual, 7.6 quick reference, RGB-, audio-, RCA-videoand power-cable, softcase, lens cap Options ceiling-mounting, trolley www.toshiba-europe.com/projectors Toshiba Europe GmbH · Professional Visual Products Phone: ++..., manual zoom Projection front-, rear- technical data s40 homecinema September 2003 • Subject to modifications and errors s40 ECO Mode reduces the operating noise and protects the lamp s40 Chassis in a modern two-colour look s40 Good device for newcomers because of lamp up to...
... 206 mm Weight 2.2 kg Specials ECO mode Accessories remote control with batteries, owners manual, 7.6 quick reference, RGB-, audio-, RCA-videoand power-cable, softcase, lens cap Options ceiling-mounting, trolley www.toshiba-europe.com/projectors Toshiba Europe GmbH · Professional Visual Products Phone: ++..., manual zoom Projection front-, rear- technical data s40 homecinema September 2003 • Subject to modifications and errors s40 ECO Mode reduces the operating noise and protects the lamp s40 Chassis in a modern two-colour look s40 Good device for newcomers because of lamp up to...


