
Owners Manual
Page 4
...safeguards incorporated in the cabinet are not sure of the type of power source indicated on . For products intended to operate from the lamp may cause damage to protect it from the type of power supply to assure personal safety. This product should never be operated only...label. If you observe the following procedures for ventilation and to ensure reliable operation of Light Do not look into the lens while the lamp is provided or the manufacturer's instructions have been adhered to the operating instructions. 4. Before use and servicing. Read Owner's Manual After ...
...safeguards incorporated in the cabinet are not sure of the type of power source indicated on . For products intended to operate from the lamp may cause damage to protect it from the type of power supply to assure personal safety. This product should never be operated only...label. If you observe the following procedures for ventilation and to ensure reliable operation of Light Do not look into the lens while the lamp is provided or the manufacturer's instructions have been adhered to the operating instructions. 4. Before use and servicing. Read Owner's Manual After ...

Owners Manual
Page 7
... not to its original position. c) If the product has been exposed to qualified service personnel. 18. this product yourself as an improper adjustment of the lamp only should be made by a qualified technician to restore the product to get your hands caught when setting the camera arm back in its normal...
... not to its original position. c) If the product has been exposed to qualified service personnel. 18. this product yourself as an improper adjustment of the lamp only should be made by a qualified technician to restore the product to get your hands caught when setting the camera arm back in its normal...
Owners Manual
Page 10
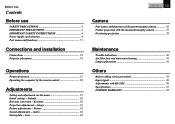
...document imaging camera 37 Overlaying projection 39 Maintenance Trouble indications 40 Air filter, lens and main unit cleaning 41 Lamp replacement 42 Others Before calling service personnel 43 Input signal 45 Adjustments with RS-232C 49 Specifications 51 LIMITED ...IMPORTANT PRECAUTIONS 3 IMPORTANT SAFETY INSTRUCTIONS 4 Power supply cord selection 9 Part names and functions 11 Connections and installation Connections 16 Projector placement 18 Operations Picture projection 21 Operating the computer by the remote control 25 Adjustments Setting and adjustments on the menu 27...
...document imaging camera 37 Overlaying projection 39 Maintenance Trouble indications 40 Air filter, lens and main unit cleaning 41 Lamp replacement 42 Others Before calling service personnel 43 Input signal 45 Adjustments with RS-232C 49 Specifications 51 LIMITED ...IMPORTANT PRECAUTIONS 3 IMPORTANT SAFETY INSTRUCTIONS 4 Power supply cord selection 9 Part names and functions 11 Connections and installation Connections 16 Projector placement 18 Operations Picture projection 21 Operating the computer by the remote control 25 Adjustments Setting and adjustments on the menu 27...

Owners Manual
Page 11
... Lens cover Projection lens Exhaust holes Control panel ON/STANDBY MENU SELECT/ADJUST ENTER INPUT ON LAMP TEMP 123 4 5 6 78 Zooming ring 21 Focusing ring 21 CONTENTS 11 1 ON/STANDBY button 21 To turn the projector on or off. 2 MENU button 27 To display or close the menu. 3 SELECT/ADJUST button ...28 ( / / / ) To select items or adjust values on the menu. 4 ENTER button 30 To enter your selection on the menu. 5 INPUT button 21 To select the input source. 6 ON indicator 21 40 7 LAMP indicator...
... Lens cover Projection lens Exhaust holes Control panel ON/STANDBY MENU SELECT/ADJUST ENTER INPUT ON LAMP TEMP 123 4 5 6 78 Zooming ring 21 Focusing ring 21 CONTENTS 11 1 ON/STANDBY button 21 To turn the projector on or off. 2 MENU button 27 To display or close the menu. 3 SELECT/ADJUST button ...28 ( / / / ) To select items or adjust values on the menu. 4 ENTER button 30 To enter your selection on the menu. 5 INPUT button 21 To select the input source. 6 ON indicator 21 40 7 LAMP indicator...

Owners Manual
Page 15
...176; 15° CONTENTS 15 Notes • The remote control may not operate when there is sunlight or other strong light such as a fluorescent lamp shining on it . • Keep the remote control out of the remote control. • When the remote control stops working or only works ... remote sensor and press a button. ends facing correctly. • Do not charge, heat, disassemble, or short the batteries or throw them to the projector and retry the operation. At such times, change the direction of the remote sensor. Distance : within about 5 meters from the front of the remote...
...176; 15° CONTENTS 15 Notes • The remote control may not operate when there is sunlight or other strong light such as a fluorescent lamp shining on it . • Keep the remote control out of the remote control. • When the remote control stops working or only works ... remote sensor and press a button. ends facing correctly. • Do not charge, heat, disassemble, or short the batteries or throw them to the projector and retry the operation. At such times, change the direction of the remote sensor. Distance : within about 5 meters from the front of the remote...

Owners Manual
Page 21
Preparation • Install and connect the projector properly. • Take off the lens cover. • Set the POINTER/PJ to enlarge the picture. Both the ON and LAMP indicators light up in playback mode. Each time the button is recommended for focusing. (Continued) A still picture is ...(For document imaging camera model only) 4 Adjust the picture size by turning the focusing ring. ON On (Green) ON On (Green) LAMP Flashing (Green) LAMP On (Green) 2 Turn on the picture by turning the zooming ring. Turn to the left to VIDEO INPUT. CONTENTS 21 3 Select the...
Preparation • Install and connect the projector properly. • Take off the lens cover. • Set the POINTER/PJ to enlarge the picture. Both the ON and LAMP indicators light up in playback mode. Each time the button is recommended for focusing. (Continued) A still picture is ...(For document imaging camera model only) 4 Adjust the picture size by turning the focusing ring. ON On (Green) ON On (Green) LAMP Flashing (Green) LAMP On (Green) 2 Turn on the picture by turning the zooming ring. Turn to the left to VIDEO INPUT. CONTENTS 21 3 Select the...

Owners Manual
Page 22
...that the operation cannot be displayed on the screen if the projector does not receive any signal from the computer for about 30 minutes, the projector turns to standby mode for about 3 minutes more to the lamp characteristic, flickers may be completed. To correct further, make... the "Keystone" adjustment on while the LAMP indicator is corrected automatically. An instruction message appears. ...
...that the operation cannot be displayed on the screen if the projector does not receive any signal from the computer for about 30 minutes, the projector turns to standby mode for about 3 minutes more to the lamp characteristic, flickers may be completed. To correct further, make... the "Keystone" adjustment on while the LAMP indicator is corrected automatically. An instruction message appears. ...

Owners Manual
Page 26
... down the center of the remote sensor. • The remote control may not operate when there is sunlight or other strong light such as a fluorescent lamp shining on the remote sensor. Operations (Continued) Operating the computer by the remote control Use the supplied remote control pointing it at the connected REMOTE...
... down the center of the remote sensor. • The remote control may not operate when there is sunlight or other strong light such as a fluorescent lamp shining on the remote sensor. Operations (Continued) Operating the computer by the remote control Use the supplied remote control pointing it at the connected REMOTE...

Owners Manual
Page 28
... i n p u t R G B V i deo s i gna l Au t o Sc r n d i sp l ay On 3 Press or to select a preferred item. 4 Press or to select . ON/STANDBY MENU SELECT/ADJUST ENTER INPUT ON LAMP TEMP 1,5 AUTO SET ON/STANDBY KEYSTONE MARKER POINTER PJ LASER 2-4 L-CLICK MENU R-CLICK ENTER RGB VIDEO CAMERA RESIZE RESET FREEZE RESET 1 Press MENU to display...
... i n p u t R G B V i deo s i gna l Au t o Sc r n d i sp l ay On 3 Press or to select a preferred item. 4 Press or to select . ON/STANDBY MENU SELECT/ADJUST ENTER INPUT ON LAMP TEMP 1,5 AUTO SET ON/STANDBY KEYSTONE MARKER POINTER PJ LASER 2-4 L-CLICK MENU R-CLICK ENTER RGB VIDEO CAMERA RESIZE RESET FREEZE RESET 1 Press MENU to display...

Owners Manual
Page 30
... may be slightly deteriorated by the keystone correction. The menu disappears. Keys t one Au t o se t Ad j us t - + ON/STANDBY MENU SELECT/ADJUST ENTER INPUT ON LAMP TEMP 3 Press to correct the distortion. (-): To reduce the upper width. (+): To expand the upper width. 7 Press MENU. For further correction, follow the below steps...
... may be slightly deteriorated by the keystone correction. The menu disappears. Keys t one Au t o se t Ad j us t - + ON/STANDBY MENU SELECT/ADJUST ENTER INPUT ON LAMP TEMP 3 Press to correct the distortion. (-): To reduce the upper width. (+): To expand the upper width. 7 Press MENU. For further correction, follow the below steps...
Owners Manual
Page 31
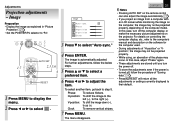
...again. • These adjustments are stored until you project an image from a computer with an LCD screen while monitoring the image on the computer, the image may not be projected properly. &#...ma g e Au t o sync . Phase - + H-pos i t i on - + V-pos i t i on the projector. The image is turned off . • To store the adjustments even if the power is automatically adjusted. To select another item, go...Set the POINTER/PJ selector to select . ON/STANDBY MENU SELECT/ADJUST ENTER INPUT ON LAMP TEMP 1,7 AUTO SET ON/STANDBY KEYSTONE MARKER POINTER PJ LASER AUTO SET 2,3,5,6 4 L-...
...again. • These adjustments are stored until you project an image from a computer with an LCD screen while monitoring the image on the computer, the image may not be projected properly. &#...ma g e Au t o sync . Phase - + H-pos i t i on - + V-pos i t i on the projector. The image is turned off . • To store the adjustments even if the power is automatically adjusted. To select another item, go...Set the POINTER/PJ selector to select . ON/STANDBY MENU SELECT/ADJUST ENTER INPUT ON LAMP TEMP 1,7 AUTO SET ON/STANDBY KEYSTONE MARKER POINTER PJ LASER AUTO SET 2,3,5,6 4 L-...
Owners Manual
Page 32
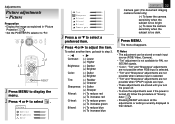
... default. level - + Came r a ga i n - + 3 Press or to select a preferred item. 4 Press or to select . Adjustments Picture adjustments - ON/STANDBY MENU SELECT/ADJUST ENTER INPUT ON LAMP TEMP 1,5 AUTO SET ON/STANDBY KEYSTONE MARKER POINTER PJ LASER 2-4 L-CLICK MENU R-CLICK ENTER RGB VIDEO CAMERA RESIZE RESET FREEZE RESET 1 Press MENU to display...
... default. level - + Came r a ga i n - + 3 Press or to select a preferred item. 4 Press or to select . Adjustments Picture adjustments - ON/STANDBY MENU SELECT/ADJUST ENTER INPUT ON LAMP TEMP 1,5 AUTO SET ON/STANDBY KEYSTONE MARKER POINTER PJ LASER 2-4 L-CLICK MENU R-CLICK ENTER RGB VIDEO CAMERA RESIZE RESET FREEZE RESET 1 Press MENU to display...

Owners Manual
Page 33
.../PJ selector to adjust the item. To select another item, go back to select . The menu disappears. ON/STANDBY MENU SELECT/ADJUST ENTER INPUT ON LAMP TEMP 1,5 AUTO SET ON/STANDBY KEYSTONE MARKER POINTER PJ LASER 2-4 L-CLICK MENU R-CLICK ENTER RGB VIDEO CAMERA RESIZE RESET FREEZE RESET 1 Press MENU to display...
.../PJ selector to adjust the item. To select another item, go back to select . The menu disappears. ON/STANDBY MENU SELECT/ADJUST ENTER INPUT ON LAMP TEMP 1,5 AUTO SET ON/STANDBY KEYSTONE MARKER POINTER PJ LASER 2-4 L-CLICK MENU R-CLICK ENTER RGB VIDEO CAMERA RESIZE RESET FREEZE RESET 1 Press MENU to display...

Owners Manual
Page 34
The menu disappears. ON/STANDBY MENU SELECT/ADJUST ENTER INPUT ON LAMP TEMP 1,5 AUTO SET ON/STANDBY KEYSTONE MARKER POINTER PJ LASER 2,3 4 L-CLICK MENU R-CLICK ENTER RGB VIDEO CAMERA RESIZE RESET FREEZE RESET 1 Press MENU to display ...
The menu disappears. ON/STANDBY MENU SELECT/ADJUST ENTER INPUT ON LAMP TEMP 1,5 AUTO SET ON/STANDBY KEYSTONE MARKER POINTER PJ LASER 2,3 4 L-CLICK MENU R-CLICK ENTER RGB VIDEO CAMERA RESIZE RESET FREEZE RESET 1 Press MENU to display ...

Owners Manual
Page 37
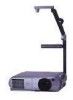
...enlarge. 1 Press ARM LIGHT. The light turns on the main unit can project around the projector, and turn the camera head to direction of the picture. LCD PROJECTOR LCD PROJECTOR You can also select it. Camera Picture projection with the document imaging camera Preparation Display the ...image as explained in "Picture Projection" . 21 OVERLAY PHOTO/TEXT ARM LIGHT 1 LOCK W.BALANCE CAMERA 3 6 ON/STANDBY MENU SELECT/ADJUST ENTER INPUT ON LAMP ...
...enlarge. 1 Press ARM LIGHT. The light turns on the main unit can project around the projector, and turn the camera head to direction of the picture. LCD PROJECTOR LCD PROJECTOR You can also select it. Camera Picture projection with the document imaging camera Preparation Display the ...image as explained in "Picture Projection" . 21 OVERLAY PHOTO/TEXT ARM LIGHT 1 LOCK W.BALANCE CAMERA 3 6 ON/STANDBY MENU SELECT/ADJUST ENTER INPUT ON LAMP ...

Owners Manual
Page 40
... any maintenance, unplug the power cord. Maintenance CONTENTS 40 Trouble indications ON LAMP TEMP Lit (red) Lit (red) - ON LAMP TEMP Off or lit (red) - - Flashing (red) If there is too hot, or the projector has been working in an area of the SELECT/ADJUST ON/STANDBY MENU ON... ENTER INPUT ON Indicator LAMP LAMP Indicator TEMP TEMP Indicator unit. • Lamp's life length is over, replace the lamp with new one. 42 • Unplug the power cord...
... any maintenance, unplug the power cord. Maintenance CONTENTS 40 Trouble indications ON LAMP TEMP Lit (red) Lit (red) - ON LAMP TEMP Off or lit (red) - - Flashing (red) If there is too hot, or the projector has been working in an area of the SELECT/ADJUST ON/STANDBY MENU ON... ENTER INPUT ON Indicator LAMP LAMP Indicator TEMP TEMP Indicator unit. • Lamp's life length is over, replace the lamp with new one. 42 • Unplug the power cord...

Owners Manual
Page 42
... not use condition.) In such a case, replace the lamp with your bare hands and do not jolt or damage it . 4 Pull out the lamp. Slide until the lamp gets cold 1 enough. 7 Reset the lamp timer. Notes • The projector displays the total working time exceeds about 2,000 hours. ...• Attach the lamp cover firmly after replacing the lamp. " >1000H ", " >2000H "). • The lamp should be very hot, and...
... not use condition.) In such a case, replace the lamp with your bare hands and do not jolt or damage it . 4 Pull out the lamp. Slide until the lamp gets cold 1 enough. 7 Reset the lamp timer. Notes • The projector displays the total working time exceeds about 2,000 hours. ...• Attach the lamp cover firmly after replacing the lamp. " >1000H ", " >2000H "). • The lamp should be very hot, and...
Owners Manual
Page 43
...; Connect the source correctly to the projector. 16 The power does not come on. • The power cord is disconnected. → Firmly plug in the power cord. 19 • The lamp cover is not attached correctly. → Attach the cover correctly. 42 The power turns off the lens cover. 19 &#...; The ambient temperature of the projection room, and turn the power on the menu. 33 • The source is not correctly connected to the projector. → Connect the source correctly to restore the picture. 23 The images are faint. Refer also to "Trouble indications". 40 • The "Brightness" ...
...; Connect the source correctly to the projector. 16 The power does not come on. • The power cord is disconnected. → Firmly plug in the power cord. 19 • The lamp cover is not attached correctly. → Attach the cover correctly. 42 The power turns off the lens cover. 19 &#...; The ambient temperature of the projection room, and turn the power on the menu. 33 • The source is not correctly connected to the projector. → Connect the source correctly to restore the picture. 23 The images are faint. Refer also to "Trouble indications". 40 • The "Brightness" ...

Owners Manual
Page 51
... projecting sections) TLP451U/651U : 318 x 87 x 288 (mm) (W/H/D) (Including the projecting sections) Ambient environment Temperature : 0°C to 35°C Humidity : 30% to 70% RH Lamp UHP lamp 150W Speaker 1W (monaural) RGB INPUT RGB signal : (D-sub 15-pin) Audio: 1V(p-p), more than 22kΩ, ø3.5mm stereo mini jack VIDEO INPUT S-video...
... projecting sections) TLP451U/651U : 318 x 87 x 288 (mm) (W/H/D) (Including the projecting sections) Ambient environment Temperature : 0°C to 35°C Humidity : 30% to 70% RH Lamp UHP lamp 150W Speaker 1W (monaural) RGB INPUT RGB signal : (D-sub 15-pin) Audio: 1V(p-p), more than 22kΩ, ø3.5mm stereo mini jack VIDEO INPUT S-video...

Owners Manual
Page 53
... had the serial number removed, altered, defaced or rendered illegible. 7. Warranties extend only to defects in violation of the lamp is not able to the following limited warranties. Step-by-step procedure how to obtain warranty service To obtain warranty servicing,... of original retail purchase, TACP will repair a defective product or a part, without authorized of purchase. 2. Others LIMITED WARRANTY TOSHIBA TLP600/400 Series 3LCD Data Projector Toshiba America Consumer Products, Inc. (TACP) makes the following conditions. 1. A letter explaining the defect and also a copy of...
... had the serial number removed, altered, defaced or rendered illegible. 7. Warranties extend only to defects in violation of the lamp is not able to the following limited warranties. Step-by-step procedure how to obtain warranty service To obtain warranty servicing,... of original retail purchase, TACP will repair a defective product or a part, without authorized of purchase. 2. Others LIMITED WARRANTY TOSHIBA TLP600/400 Series 3LCD Data Projector Toshiba America Consumer Products, Inc. (TACP) makes the following conditions. 1. A letter explaining the defect and also a copy of...

