

Owners Manual
Page 7
... broken pieces of glass may result in fire, electric shock, or other hazards. (Replacement of the lamp rupturing, thoroughly clean the area around the projector and discard any edible items placed in that are required, be made by users.) 20. Refer all servicing to rain or water. ... the product exhibits a distinct change in any service or repairs to this product yourself as the original part. In the unlikely event of the lamp only should be sure the service technician has used replacement parts specified by following conditions: a) When the power-supply cord or plug is in ...
... broken pieces of glass may result in fire, electric shock, or other hazards. (Replacement of the lamp rupturing, thoroughly clean the area around the projector and discard any edible items placed in that are required, be made by users.) 20. Refer all servicing to rain or water. ... the product exhibits a distinct change in any service or repairs to this product yourself as the original part. In the unlikely event of the lamp only should be sure the service technician has used replacement parts specified by following conditions: a) When the power-supply cord or plug is in ...
Owners Manual
Page 10
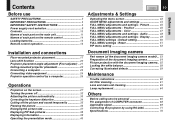
...balance 58 Correcting illuminated defects 59 Maintenance Trouble indications 60 Air filter cleaning 61 Lens and main unit cleaning 63 Lamp replacement 64 Others Before calling service personal 66 Pin assignment of each part on the screen 27 Turning the ...control operation 16 Installation and connections Floor-mounted projector placement 17 Lens shift function 20 Projector placement angle adjustment (Foot adjuster) .. 21 Ceiling-mounted projector placement 22 Connecting a computer 23 Connecting video equipment 24 Projector operation control by a computer 26 Operations Projection...
...balance 58 Correcting illuminated defects 59 Maintenance Trouble indications 60 Air filter cleaning 61 Lens and main unit cleaning 63 Lamp replacement 64 Others Before calling service personal 66 Pin assignment of each part on the screen 27 Turning the ...control operation 16 Installation and connections Floor-mounted projector placement 17 Lens shift function 20 Projector placement angle adjustment (Foot adjuster) .. 21 Ceiling-mounted projector placement 22 Connecting a computer 23 Connecting video equipment 24 Projector operation control by a computer 26 Operations Projection...
Owners Manual
Page 12
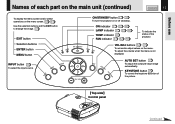
... selection buttons and the EXIT button to enlarge the image. 37 EXIT button Selection buttons ENTER button MENU button ON LAMP ON / STANDBY ON/STANDBY button 27 32 To turn the projector on the menu. Top side Control panel Continued INPUT button 29 To select the input source. To adjust the volume... of the picture. TEMP FAN VOL/ADJ buttons 42 31 To set and/or adjust values on or off (standby). ON indicator 27 32 60 LAMP indicator 27 32 60 TEMP indicator 60 FAN indicator 27 32 60 To indicate the status of the...
... selection buttons and the EXIT button to enlarge the image. 37 EXIT button Selection buttons ENTER button MENU button ON LAMP ON / STANDBY ON/STANDBY button 27 32 To turn the projector on the menu. Top side Control panel Continued INPUT button 29 To select the input source. To adjust the volume... of the picture. TEMP FAN VOL/ADJ buttons 42 31 To set and/or adjust values on or off (standby). ON indicator 27 32 60 LAMP indicator 27 32 60 TEMP indicator 60 FAN indicator 27 32 60 To indicate the status of the...
Owners Manual
Page 16
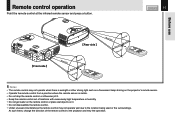
...when there is sunlight or other strong light such as a fluorescent lamp shining on it. • Do not disassemble the remote control. • Under unusual circumstances the remote control may not operate well due to the projector and retry the operation. Remote control operation Point the remote control... direction of locations with excessively high temperature or humidity. • Do not get water on the remote control or place wet objects on the projector's remote sensor. • Operate the remote control from a position where the remote sensor is visible. • Do not drop the remote ...
...when there is sunlight or other strong light such as a fluorescent lamp shining on it. • Do not disassemble the remote control. • Under unusual circumstances the remote control may not operate well due to the projector and retry the operation. Remote control operation Point the remote control... direction of locations with excessively high temperature or humidity. • Do not get water on the remote control or place wet objects on the projector's remote sensor. • Operate the remote control from a position where the remote sensor is visible. • Do not drop the remote ...
Owners Manual
Page 18
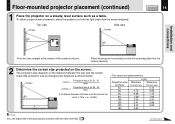
...view Screen Screen 90° KEYSTONE ON / STANDBY ON LAMP TEMP FAN ENTER EXIT AUTO SET VOL / ADJ 90°... 0.70 0.85 0.98 1.19 1.59 1.92 2.00 2.41 2.41 2.89 3.02 3.63 3.63 - Place the projector horizontally so that the light beam hits the screen squarely. Note You can adjust the vertical projection position with the lens shift.... Adjust the projection size by changing the distances as above. To obtain proper screen projection, place the projector so that the projecting light hits the screen squarely. 2 Determine the screen size projected on the distance ...
...view Screen Screen 90° KEYSTONE ON / STANDBY ON LAMP TEMP FAN ENTER EXIT AUTO SET VOL / ADJ 90°... 0.70 0.85 0.98 1.19 1.59 1.92 2.00 2.41 2.41 2.89 3.02 3.63 3.63 - Place the projector horizontally so that the light beam hits the screen squarely. Note You can adjust the vertical projection position with the lens shift.... Adjust the projection size by changing the distances as above. To obtain proper screen projection, place the projector so that the projecting light hits the screen squarely. 2 Determine the screen size projected on the distance ...
Owners Manual
Page 19
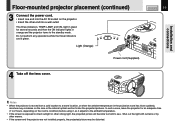
... condense on the lens or the internal optical section to blur the projected pictures. ON LAMP ON / STANDBY TEMP FAN Light (Orange) CONTENTS 19 Power cord (Supplied) 4 Take off the lens cover. Installation and connections Floor-mounted projector placement (continued) 3 Connect the power cord. • Insert one end into the AC IN...
... condense on the lens or the internal optical section to blur the projected pictures. ON LAMP ON / STANDBY TEMP FAN Light (Orange) CONTENTS 19 Power cord (Supplied) 4 Take off the lens cover. Installation and connections Floor-mounted projector placement (continued) 3 Connect the power cord. • Insert one end into the AC IN...
Owners Manual
Page 21
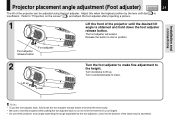
...angle is insufficient. Refer to "Projection on your fingers. • Do not tilt the projector at an angle exceeding the range adjustable by the lens shift dial 20 is obtained and hold the projector when putting the foot adjuster back so as not to let the front fall on the...27 , and adjust the foot adjuster after projecting a picture. 1 Lift the front of the projector can be shortened. Adjust this when the highest position by the foot adjusters, since the life duration of the lamp may be adjusted using the foot adjuster. The foot adjuster will extend. Release the button to...
...angle is insufficient. Refer to "Projection on your fingers. • Do not tilt the projector at an angle exceeding the range adjustable by the lens shift dial 20 is obtained and hold the projector when putting the foot adjuster back so as not to let the front fall on the...27 , and adjust the foot adjuster after projecting a picture. 1 Lift the front of the projector can be shortened. Adjust this when the highest position by the foot adjusters, since the life duration of the lamp may be adjusted using the foot adjuster. The foot adjuster will extend. Release the button to...
Owners Manual
Page 27
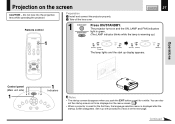
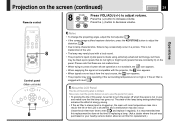
... 27 CAUTION - Do not look into the projection lens while operating the projector. TEMP FAN (Green) MENU VOL / ADJ ENTER CT-90106 EXIT / P.MODE Operations KEYSTONE Control panel (Main unit side) 1 ON LAMP ON / STANDBY TEMP FAN MENU ENTER EXIT 1 Indicators AUTO SET INPUT VOL... with procedures 2 and 3 on and the ON, LAMP and FAN indicators light in green. Projection on the menu screen. 50 • When a projector is used for a while. Continued ON/STANDBY (The LAMP indicator blinks while the lamp is displayed after the startup screen disappears. Remote control ...
... 27 CAUTION - Do not look into the projection lens while operating the projector. TEMP FAN (Green) MENU VOL / ADJ ENTER CT-90106 EXIT / P.MODE Operations KEYSTONE Control panel (Main unit side) 1 ON LAMP ON / STANDBY TEMP FAN MENU ENTER EXIT 1 Indicators AUTO SET INPUT VOL... with procedures 2 and 3 on and the ON, LAMP and FAN indicators light in green. Projection on the menu screen. 50 • When a projector is used for a while. Continued ON/STANDBY (The LAMP indicator blinks while the lamp is displayed after the startup screen disappears. Remote control ...
Owners Manual
Page 28
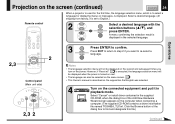
... to step 2 if you want to re-select a ENTER language. 2,3 ENTER CT-90106 EXIT / P.MODE Control panel (Main unit side) ON LAMP ON / STANDBY TEMP FAN MENU ENTER VOL / ADJ EXIT AUTO SET 2,3 2 INPUT Notes • The language selection menu will be displayed when the... TOSHIBA_TLP.inf. Select a desired language. (At shipping from factory, it in playback mode. Projection on the screen (continued) CONTENTS 28 When a projector is used for the first time, the language selection menu, which is to confirm. A menu confirming the selection result is displayed in the supplied...
... to step 2 if you want to re-select a ENTER language. 2,3 ENTER CT-90106 EXIT / P.MODE Control panel (Main unit side) ON LAMP ON / STANDBY TEMP FAN MENU ENTER VOL / ADJ EXIT AUTO SET 2,3 2 INPUT Notes • The language selection menu will be displayed when the... TOSHIBA_TLP.inf. Select a desired language. (At shipping from factory, it in playback mode. Projection on the screen (continued) CONTENTS 28 When a projector is used for the first time, the language selection menu, which is to confirm. A menu confirming the selection result is displayed in the supplied...
Owners Manual
Page 31
...button whose operation is not available, the icon appears. • When supplying the signal not compatible with the projector, the icon appears. • When signals are not input from time to lamp characteristics, flickers may be done at the time of energy saving. • If the air filter is stained... and is limited. Clean the air filter from the input source, the icon appears. • The projector may stop operating if the surrounding ...
...button whose operation is not available, the icon appears. • When supplying the signal not compatible with the projector, the icon appears. • When signals are not input from time to lamp characteristics, flickers may be done at the time of energy saving. • If the air filter is stained... and is limited. Clean the air filter from the input source, the icon appears. • The projector may stop operating if the surrounding ...
Owners Manual
Page 32
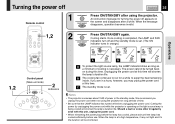
...set . Cutting the power by unplugging the power cord while the projector is operating or the light source lamp is set . (The ON indicator turns in a hurry, however, you unplug the power cord when not using the projector. Operations KEYSTONE INPUT KEYSTONE ON / STANDBY AUTO SET FREEZE MUTE... C The standby mode is being cooled will shorten the lamp's duration life. Notes • The projector consumes about 15W of time. • Be sure that the LAMP indicator has turned off before use. When the lamp is completed, the LAMP and FAN indicators turn off appears on during this time ...
...set . Cutting the power by unplugging the power cord while the projector is operating or the light source lamp is set . (The ON indicator turns in a hurry, however, you unplug the power cord when not using the projector. Operations KEYSTONE INPUT KEYSTONE ON / STANDBY AUTO SET FREEZE MUTE... C The standby mode is being cooled will shorten the lamp's duration life. Notes • The projector consumes about 15W of time. • Be sure that the LAMP indicator has turned off before use. When the lamp is completed, the LAMP and FAN indicators turn off appears on during this time ...
Owners Manual
Page 33
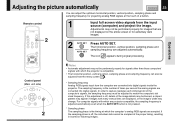
...INPUT AUTO SET The icon appears during signal processing. Operations KEYSTONE ENTER CT-90106 EXIT / P.MODE Control panel (Main unit side) ON LAMP ON / STANDBY TEMP FAN MENU ENTER VOL / ADJ EXIT AUTO SET 2 Notes • Automatic adjustment may be performed properly for extremely...the optimum horizontal position, vertical position, sampling phase and sampling frequency for signals other than those computers' signals with which are projector-compatible, the sampling frequency is adjusted automatically even when the AUTO SET button is not pressed. * Sampling phase The sampling...
...INPUT AUTO SET The icon appears during signal processing. Operations KEYSTONE ENTER CT-90106 EXIT / P.MODE Control panel (Main unit side) ON LAMP ON / STANDBY TEMP FAN MENU ENTER VOL / ADJ EXIT AUTO SET 2 Notes • Automatic adjustment may be performed properly for extremely...the optimum horizontal position, vertical position, sampling phase and sampling frequency for signals other than those computers' signals with which are projector-compatible, the sampling frequency is adjusted automatically even when the AUTO SET button is not pressed. * Sampling phase The sampling...
Owners Manual
Page 34
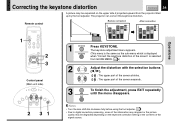
...part of the information may dropped or the picture quality may be degraded depending on the upper side if projected upward from the projector lifted up by the foot adjuster. Remote control Before correction After correction Operations KEYSTONE 1 INPUT KEYSTONE ON / STANDBY AUTO SET...ADJ ENTER CT-90106 EXIT / P.MODE 2 3 Control panel (Main unit side) ON LAMP ON / STANDBY TEMP FAN MENU ENTER VOL / ADJ EXIT AUTO SET 2 31 1 KEYSTONE Press KEYSTONE. The projector can correct this keystone distortion. Correcting the keystone distortion CONTENTS 34 A picture may be ...
...part of the information may dropped or the picture quality may be degraded depending on the upper side if projected upward from the projector lifted up by the foot adjuster. Remote control Before correction After correction Operations KEYSTONE 1 INPUT KEYSTONE ON / STANDBY AUTO SET...ADJ ENTER CT-90106 EXIT / P.MODE 2 3 Control panel (Main unit side) ON LAMP ON / STANDBY TEMP FAN MENU ENTER VOL / ADJ EXIT AUTO SET 2 31 1 KEYSTONE Press KEYSTONE. The projector can correct this keystone distortion. Correcting the keystone distortion CONTENTS 34 A picture may be ...
Owners Manual
Page 39
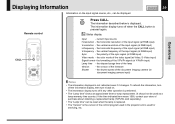
...PR signal (at RGB input) V-resolution - the color mode of the control program used in the projector and is used for lamp replacement. (It should not be used as a lamp warranty time counter.) If the time indicated here nears 1500, contact your store of purchase about obtaining...MODE CALL Press CALL. Displaying Information Information on . • The information display turns off if any other operation is performed. • The "Lamp time" shows an approximate time for servicing, etc. the vertical frequency of the input signal (at RGB input) Sync - current input source H-resolution...
...PR signal (at RGB input) V-resolution - the color mode of the control program used in the projector and is used for lamp replacement. (It should not be used as a lamp warranty time counter.) If the time indicated here nears 1500, contact your store of purchase about obtaining...MODE CALL Press CALL. Displaying Information Information on . • The information display turns off if any other operation is performed. • The "Lamp time" shows an approximate time for servicing, etc. the vertical frequency of the input signal (at RGB input) Sync - current input source H-resolution...

Owners Manual
Page 41
... into the presentation mode. INPUT In the presentation mode after step 5, the projector cannot be switched even if you press and hold for two seconds. The icon appears in the presentation mode. 6 Change a slide with INPUT... / ADJ ENTER CT-90106 EXIT / P.MODE 6 5,7 P.MODE Control panel (Main unit side) ON LAMP ON / STANDBY TEMP FAN MENU ENTER VOL / ADJ EXIT AUTO SET 3 4 Adjust the projector before presentation if necessary. The projector returns to 3. Operating the presentation mode (continued) CONTENTS 41 Remote control 3 INPUT Select the computer input...
... into the presentation mode. INPUT In the presentation mode after step 5, the projector cannot be switched even if you press and hold for two seconds. The icon appears in the presentation mode. 6 Change a slide with INPUT... / ADJ ENTER CT-90106 EXIT / P.MODE 6 5,7 P.MODE Control panel (Main unit side) ON LAMP ON / STANDBY TEMP FAN MENU ENTER VOL / ADJ EXIT AUTO SET 3 4 Adjust the projector before presentation if necessary. The projector returns to 3. Operating the presentation mode (continued) CONTENTS 41 Remote control 3 INPUT Select the computer input...
Owners Manual
Page 59
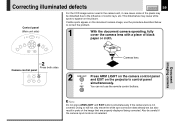
... control panel and EXIT on the document camera image, use the remote control buttons. Correcting illuminated defects CONTENTS 59 Control panel (Main unit side) ON LAMP ON / STANDBY TEMP FAN For the CCD image sensor used in the camera unit, in parts ot the image that are properly displayed being corrected.... This disturbance may be careful if the camera input mode is not covered. If white spots appear on the projector's control panel simultaneously. Also be disturbed due to appear on the picture.
... control panel and EXIT on the document camera image, use the remote control buttons. Correcting illuminated defects CONTENTS 59 Control panel (Main unit side) ON LAMP ON / STANDBY TEMP FAN For the CCD image sensor used in the camera unit, in parts ot the image that are properly displayed being corrected.... This disturbance may be careful if the camera input mode is not covered. If white spots appear on the projector's control panel simultaneously. Also be disturbed due to appear on the picture.
Owners Manual
Page 60
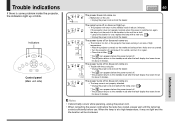
...working in an area of high (Lit in green) temperature. If the projector does not operate normally when the power is switched on . → The inside the projector, the indicators light up . → The projector will be shortened. When the lamp is at a high temperature, it may not light and the life ... the standby mode after the fault display has been shown for a while, and turn it for about 2 minutes. ON LAMP (Lit in red) TEMP FAN (Lit in red) The power turns off . * The projector returns to the standby mode after the fault display has been shown for about 2 minutes. ON...
...working in an area of high (Lit in green) temperature. If the projector does not operate normally when the power is switched on . → The inside the projector, the indicators light up . → The projector will be shortened. When the lamp is at a high temperature, it may not light and the life ... the standby mode after the fault display has been shown for a while, and turn it for about 2 minutes. ON LAMP (Lit in red) TEMP FAN (Lit in red) The power turns off . * The projector returns to the standby mode after the fault display has been shown for about 2 minutes. ON...
Owners Manual
Page 64
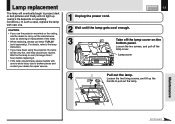
...project dark or dull pictures and finally will not light up the handle to the lamp instruction. • If you use the projector mounted on the bottom panel. 2 Loosen the two screws, and pull off the lamp cover on the ceiling, ask the dealer to carry out the maintenance such as ...cleaning or replacement of the lamp. • When replacing, always use lamp "TLPL55" (sold separately). CAUTION • If you have been using the projector, the lamp will be very hot, and may...
...project dark or dull pictures and finally will not light up the handle to the lamp instruction. • If you use the projector mounted on the bottom panel. 2 Loosen the two screws, and pull off the lamp cover on the ceiling, ask the dealer to carry out the maintenance such as ...cleaning or replacement of the lamp. • When replacing, always use lamp "TLPL55" (sold separately). CAUTION • If you have been using the projector, the lamp will be very hot, and may...

Owners Manual
Page 66
...only the Analog RGB and Video input modes can be selected with the INPUT button. Take off while using the projector. Adjust the sound volume. Adjust the distance properly. Replace the lamp. No image appears. The color is not set for support service. Cause • The power cord is ...RGB input or Y/PB/PR input colors are not correct. • The lamp life is not good. The image is heard. Make the "Brightness" adjustment. Select the input source correctly. Connect the source correctly to the projector. Make the "Picture" adjustments. Make the "Color" adjustments. No sound is...
...only the Analog RGB and Video input modes can be selected with the INPUT button. Take off while using the projector. Adjust the sound volume. Adjust the distance properly. Replace the lamp. No image appears. The color is not set for support service. Cause • The power cord is ...RGB input or Y/PB/PR input colors are not correct. • The lamp life is not good. The image is heard. Make the "Brightness" adjustment. Select the input source correctly. Connect the source correctly to the projector. Make the "Picture" adjustments. Make the "Color" adjustments. No sound is...

