

Owners Manual
Page 6
... by the manufacturer, or sold with care. The product may touch dangerous voltage points or shortout parts that could result in the upright position to project the pictures at the ceiling, or any kind on the product. 12. Never spill liquid of any kind into this product on the other vertical...
... by the manufacturer, or sold with care. The product may touch dangerous voltage points or shortout parts that could result in the upright position to project the pictures at the ceiling, or any kind on the product. 12. Never spill liquid of any kind into this product on the other vertical...
Owners Manual
Page 10
... Document imaging camera Part names (of the document imaging camera model) ... 53 Preparation of the document imaging camera 54 Picture projection with the document imaging camera .. 55 Locking the white balance 58 Correcting illuminated defects 59 Maintenance Trouble indications 60 Air filter cleaning...part on the main unit 11 Names of COMPUTER connector 68 Applicable signal 69 Controlling the projector by a computer 26 Operations Projection on the remote control 14 Loading batteries 15 Remote control operation 16 Installation and connections Floor-mounted projector placement 17 Lens ...
... Document imaging camera Part names (of the document imaging camera model) ... 53 Preparation of the document imaging camera 54 Picture projection with the document imaging camera .. 55 Locking the white balance 58 Correcting illuminated defects 59 Maintenance Trouble indications 60 Air filter cleaning...part on the main unit 11 Names of COMPUTER connector 68 Applicable signal 69 Controlling the projector by a computer 26 Operations Projection on the remote control 14 Loading batteries 15 Remote control operation 16 Installation and connections Floor-mounted projector placement 17 Lens ...
Owners Manual
Page 17
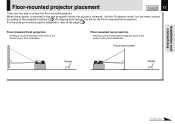
...mounted projector placement, refer to the projection method. 50 At shipping from factory, it is reversed. Floor-mounted front projection Viewing a picture projected on the menu screen) according to the page 22 . Floor-mounted rear projection Viewing a picture projected through the back of the screen ... When the projector is mounted in the rear projection mode, the picture is set for the Floor-mounted front projection. Translucent screen Viewer CONTROL USB AUDIO VIDEO S-VIDEO COMPUTER ( Y/PB/PR ) Viewer Continued Set the "Projection mode" (on the front of the screen from...
...mounted projector placement, refer to the projection method. 50 At shipping from factory, it is reversed. Floor-mounted front projection Viewing a picture projected on the menu screen) according to the page 22 . Floor-mounted rear projection Viewing a picture projected through the back of the screen ... When the projector is mounted in the rear projection mode, the picture is set for the Floor-mounted front projection. Translucent screen Viewer CONTROL USB AUDIO VIDEO S-VIDEO COMPUTER ( Y/PB/PR ) Viewer Continued Set the "Projection mode" (on the front of the screen from...
Owners Manual
Page 18
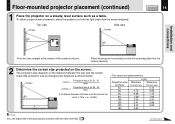
... the lens straight at the center of the screen as shown below. Place the projector horizontally so that the light beam hits the screen squarely. Projection size (inches) 30 36 50 80 100 120 150 180 a (m) Minimum Maximum (At maximum zoom) (At minimum zoom) - 0.70 0.70 0.85 0....98 1.19 1.59 1.92 2.00 2.41 2.41 2.89 3.02 3.63 3.63 - The projection size depends on the screen. Screen Projection size x 20.32 - 31 a (min.) = 1000 Projection size x 24.38 - 32 a (max.) = 1000 a: Distance between the lens and the screen. Note You can adjust the ...
... the lens straight at the center of the screen as shown below. Place the projector horizontally so that the light beam hits the screen squarely. Projection size (inches) 30 36 50 80 100 120 150 180 a (m) Minimum Maximum (At maximum zoom) (At minimum zoom) - 0.70 0.70 0.85 0....98 1.19 1.59 1.92 2.00 2.41 2.41 2.89 3.02 3.63 3.63 - The projection size depends on the screen. Screen Projection size x 20.32 - 31 a (min.) = 1000 Projection size x 24.38 - 32 a (max.) = 1000 a: Distance between the lens and the screen. Note You can adjust the ...
Owners Manual
Page 19
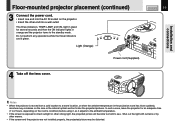
...LAMP, and ON, light in green for an adequate time (1 to 2 hours, depending on the projector. • Insert the other strong light, the projected picture will become too faint to the standby mode. Notes • When the projector is exposed to direct sunlight or other end into the AC...turns to see. Do not perform any operations while the three indicators are not installed properly, the projected picture may condense on the lens or the internal optical section to blur the projected pictures. In such a case, leave the projector for several seconds and then the ON indicator ...
...LAMP, and ON, light in green for an adequate time (1 to 2 hours, depending on the projector. • Insert the other strong light, the projected picture will become too faint to the standby mode. Notes • When the projector is exposed to direct sunlight or other end into the AC...turns to see. Do not perform any operations while the three indicators are not installed properly, the projected picture may condense on the lens or the internal optical section to blur the projected pictures. In such a case, leave the projector for several seconds and then the ON indicator ...
Owners Manual
Page 20
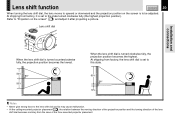
...dial as this may cause malfunction. • At the ceiling-mounted projector placement 22 , the relation between the moving direction of the projection position and the turning direction of the floor-mounted projector placement. Refer to be adjusted. Lens shift function CONTENTS 20 When turning the lens... shift dial, the lens moves to upward or downward and the projection position on the screen" 27 , and adjust it is set to the state turned clockwise fully (the highest projection position). Lens shift dial Installation and connections When the lens shift dial is ...
...dial as this may cause malfunction. • At the ceiling-mounted projector placement 22 , the relation between the moving direction of the projection position and the turning direction of the floor-mounted projector placement. Refer to be adjusted. Lens shift function CONTENTS 20 When turning the lens... shift dial, the lens moves to upward or downward and the projection position on the screen" 27 , and adjust it is set to the state turned clockwise fully (the highest projection position). Lens shift dial Installation and connections When the lens shift dial is ...
Owners Manual
Page 21
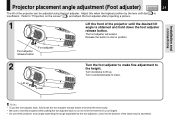
... CONTENTS 21 The tilt of the projector until the desired tilt angle is insufficient. Foot adjuster release button Foot adjuster 2 Lift up . Refer to "Projection on your fingers. • Do not tilt the projector at an angle exceeding the range adjustable by the lens shift dial 20 is obtained and...projector when putting the foot adjuster back so as not to let the front fall on the screen" 27 , and adjust the foot adjuster after projecting a picture. 1 Lift the front of the projector can be shortened. Turn clockwise to lift up Lower Turn the foot adjuster to make fine adjustment...
... CONTENTS 21 The tilt of the projector until the desired tilt angle is insufficient. Foot adjuster release button Foot adjuster 2 Lift up . Refer to "Projection on your fingers. • Do not tilt the projector at an angle exceeding the range adjustable by the lens shift dial 20 is obtained and...projector when putting the foot adjuster back so as not to let the front fall on the screen" 27 , and adjust the foot adjuster after projecting a picture. 1 Lift the front of the projector can be shortened. Turn clockwise to lift up Lower Turn the foot adjuster to make fine adjustment...
Owners Manual
Page 22
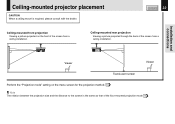
... of the screen from a ceiling installation. Ceiling-mounted rear projection Viewing a picture projected through the back of the screen from a ceiling installation. CONTENTS 22 Ceiling-mounted front projection Viewing a picture projected on the menu screen for the projection method. 50 Note The relation between the projection size and the distance to the screen is required, please...
... of the screen from a ceiling installation. Ceiling-mounted rear projection Viewing a picture projected through the back of the screen from a ceiling installation. CONTENTS 22 Ceiling-mounted front projection Viewing a picture projected on the menu screen for the projection method. 50 Note The relation between the projection size and the distance to the screen is required, please...
Owners Manual
Page 23
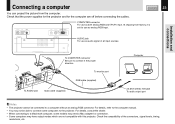
... analog RGB connector. Installation and connections To COMPUTER connector Be sure to the projector. Check the compatibility of all input sources. Connecting a computer You can project the picture from factory, it is set for use as analog RGB input. To monitor port RGB cable (supplied) To AUDIO jack Audio cable (supplied...
... analog RGB connector. Installation and connections To COMPUTER connector Be sure to the projector. Check the compatibility of all input sources. Connecting a computer You can project the picture from factory, it is set for use as analog RGB input. To monitor port RGB cable (supplied) To AUDIO jack Audio cable (supplied...
Owners Manual
Page 24
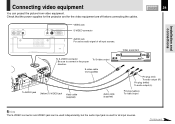
... plug (red) To audio output (R) Pin plug (white) To audio output (L) Pin plug (yellow) To video output Note The S-VIDEO connector and VIDEO jack can project the picture from video equipment. Installation and connections Connecting video equipment You can be used independently, but the audio input jack is used for the...
... plug (red) To audio output (R) Pin plug (white) To audio output (L) Pin plug (yellow) To video output Note The S-VIDEO connector and VIDEO jack can project the picture from video equipment. Installation and connections Connecting video equipment You can be used independently, but the audio input jack is used for the...
Owners Manual
Page 25
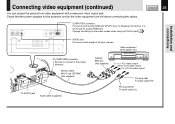
... video output (Red) To PR video output Pin plug (red) To audio output (R) Pin plug (white) To audio output (L) Connecting video equipment (continued) You can project the picture from factory, it is set for the video equipment are off before connecting the cables. At shipping from video equipment with component video...
... video output (Red) To PR video output Pin plug (red) To audio output (R) Pin plug (white) To audio output (L) Connecting video equipment (continued) You can project the picture from factory, it is set for the video equipment are off before connecting the cables. At shipping from video equipment with component video...
Owners Manual
Page 27
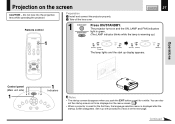
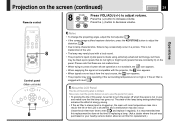
Remote control 1 ON/STANDBY Press ON/STANDBY. Continued Projection on the next page. You can also set the startup screen not to be displayed on and the ON, LAMP and FAN indicators light in ... screen CONTENTS 27 CAUTION - ON/STANDBY (The LAMP indicator blinks while the lamp is displayed after the startup screen disappears. Do not look into the projection lens while operating the projector.
Remote control 1 ON/STANDBY Press ON/STANDBY. Continued Projection on the next page. You can also set the startup screen not to be displayed on and the ON, LAMP and FAN indicators light in ... screen CONTENTS 27 CAUTION - ON/STANDBY (The LAMP indicator blinks while the lamp is displayed after the startup screen disappears. Do not look into the projection lens while operating the projector.
Owners Manual
Page 28
... turned on next. • The language can also be displayed on the second and subsequent times you want to find and designate this file.) Continued Projection on the computer when connecting a computer. (The supplied CD-ROM contains a driver information file named TOSHIBA_TLP.inf. However, if "Reset all" 51 is executed, the...
... turned on next. • The language can also be displayed on the second and subsequent times you want to find and designate this file.) Continued Projection on the computer when connecting a computer. (The supplied CD-ROM contains a driver information file named TOSHIBA_TLP.inf. However, if "Reset all" 51 is executed, the...

Owners Manual
Page 29
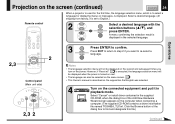
...(Main unit side) ON LAMP ON / STANDBY TEMP FAN MENU ENTER VOL / ADJ EXIT AUTO SET INPUT 5-a,5-b 5-b Select the input source to project with a document imaging camera.) The icon and the name of methods as follows (5-a and 5-b.) 5-a INPUT Select the input source by pressing INPUT ... When a sound signal source is also connected, sound is emitted from factory, "Analog RGB" connected to COMPUTER connector or "Video" connected to project. Note The types of the selected input source is pressed repeatedly can select "Camera" when using the model with the selection buttons ( / )....
...(Main unit side) ON LAMP ON / STANDBY TEMP FAN MENU ENTER VOL / ADJ EXIT AUTO SET INPUT 5-a,5-b 5-b Select the input source to project with a document imaging camera.) The icon and the name of methods as follows (5-a and 5-b.) 5-a INPUT Select the input source by pressing INPUT ... When a sound signal source is also connected, sound is emitted from factory, "Analog RGB" connected to COMPUTER connector or "Video" connected to project. Note The types of the selected input source is pressed repeatedly can select "Camera" when using the model with the selection buttons ( / )....
Owners Manual
Page 30
... connected to the computer to SVGA mode (800 x 600). • The projector can be also applied to XGA mode (1024 x 768). • The TLP250/TLP251 projects an image by XGA signal (1024 x 768) in full screen. If the order is recommended to set the external monitor connected to the computer to... For details on controlling the computer display, etc., refer to enlarge the picture. A still picture is recommended for the computer used. • The TLP550/TLP551 projects an image by SVGA signal (800 x 600) in full screen. It is reversed, the computer may deteriorate.
... connected to the computer to SVGA mode (800 x 600). • The projector can be also applied to XGA mode (1024 x 768). • The TLP250/TLP251 projects an image by XGA signal (1024 x 768) in full screen. If the order is recommended to set the external monitor connected to the computer to... For details on controlling the computer display, etc., refer to enlarge the picture. A still picture is recommended for the computer used. • The TLP550/TLP551 projects an image by SVGA signal (800 x 600) in full screen. It is reversed, the computer may deteriorate.
Owners Manual
Page 31
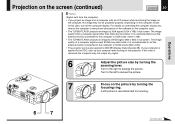
...Panel The life of this replacement be black spots (pixels that do not light) or bright spots (pixels that the lamp has gone out. Projection on the panel. This is not malfunction of the LCD is recommended that these are not malfunctions. • When trying to increase volume....MODE Control panel (Main unit side) ON LAMP ON / STANDBY TEMP FAN MENU ENTER VOL / ADJ EXIT AUTO SET 8 Notes • To change the projecting angle, adjust the foot adjuster. 21 • If the screen image suffers keystone distortion, press the KEYSTONE button to adjust the distortion. 34 • Due...
...Panel The life of this replacement be black spots (pixels that do not light) or bright spots (pixels that the lamp has gone out. Projection on the panel. This is not malfunction of the LCD is recommended that these are not malfunctions. • When trying to increase volume....MODE Control panel (Main unit side) ON LAMP ON / STANDBY TEMP FAN MENU ENTER VOL / ADJ EXIT AUTO SET 8 Notes • To change the projecting angle, adjust the foot adjuster. 21 • If the screen image suffers keystone distortion, press the KEYSTONE button to adjust the distortion. 34 • Due...
Owners Manual
Page 33
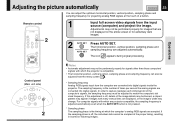
...You can also be adjusted from the menu screen 46 . * Sampling frequency Analog RGB signals input from the input source (computer) and project the image. Operations KEYSTONE ENTER CT-90106 EXIT / P.MODE Control panel (Main unit side) ON LAMP ON / STANDBY TEMP FAN MENU... vertical position, sampling phase and sampling frequency can adjust the optimum horizontal position, vertical position, sampling phase and sampling frequency for projecting analog RGB signals at the touch of times per second the analog signals are converted into digital signals inside the projector. INPUT ...
...You can also be adjusted from the menu screen 46 . * Sampling frequency Analog RGB signals input from the input source (computer) and project the image. Operations KEYSTONE ENTER CT-90106 EXIT / P.MODE Control panel (Main unit side) ON LAMP ON / STANDBY TEMP FAN MENU... vertical position, sampling phase and sampling frequency can adjust the optimum horizontal position, vertical position, sampling phase and sampling frequency for projecting analog RGB signals at the touch of times per second the analog signals are converted into digital signals inside the projector. INPUT ...
Owners Manual
Page 34
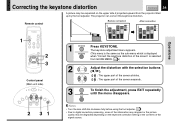
... • Due to digital correction processing, some of the information may dropped or the picture quality may be degraded depending on the upper side if projected upward from GUIDE MENU. 44 ) 2 Adjust the distortion with the selection buttons ( / ). : The upper part of the screen shrinks. : The upper part of the screen...
... • Due to digital correction processing, some of the information may dropped or the picture quality may be degraded depending on the upper side if projected upward from GUIDE MENU. 44 ) 2 Adjust the distortion with the selection buttons ( / ). : The upper part of the screen shrinks. : The upper part of the screen...
Owners Manual
Page 35
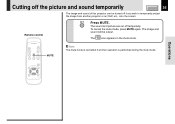
... is cancelled if another projector or an OHP, etc., onto the screen. The image and sound will be turned off if you wish to temporarily project the image from another operation is performed during the mute mode. The icon appears in the mute mode. Cutting off the picture and sound temporarily...
... is cancelled if another projector or an OHP, etc., onto the screen. The image and sound will be turned off if you wish to temporarily project the image from another operation is performed during the mute mode. The icon appears in the mute mode. Cutting off the picture and sound temporarily...
Owners Manual
Page 36
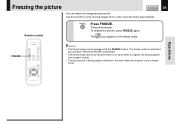
... be enlarged with the RESIZE buttons. Freezing the picture CONTENTS 36 You can be set when there is no input (when no signals are being projected. Use this function to stop moving images from a signal source). • The input source's moving image continues to run even when the projector is set...
... be enlarged with the RESIZE buttons. Freezing the picture CONTENTS 36 You can be set when there is no input (when no signals are being projected. Use this function to stop moving images from a signal source). • The input source's moving image continues to run even when the projector is set...


