
User Guide
Page 2
...set-up and usage instructions in the applicable user guides and/or manuals enclosed or provided electronically. TOSHIBA DISCLAIMS ANY LIABILITY FOR THE FAILURE TO COPY OR TRANSFER THE DATA CORRECTLY. Model: Satellite®/Satellite Pro® L800/S800 Series Recordable and/or ReWritable Drive(s) ...and Associated Software Warranty The computer system you purchased may lose data or suffer other damage. YOU AGREE THAT TOSHIBA, ITS AFFILIATES AND SUPPLIERS SHALL HAVE...
...set-up and usage instructions in the applicable user guides and/or manuals enclosed or provided electronically. TOSHIBA DISCLAIMS ANY LIABILITY FOR THE FAILURE TO COPY OR TRANSFER THE DATA CORRECTLY. Model: Satellite®/Satellite Pro® L800/S800 Series Recordable and/or ReWritable Drive(s) ...and Associated Software Warranty The computer system you purchased may lose data or suffer other damage. YOU AGREE THAT TOSHIBA, ITS AFFILIATES AND SUPPLIERS SHALL HAVE...
User Guide
Page 6
... connections of the local telecommunications company. Users should ensure that the equipment meets certain telecommunications network protective, operational and safety requirements as appropriate. 2 The user manual of analog equipment must also be installed using an acceptable method of terminals allowed to be found on an interface may not prevent degradation of...
... connections of the local telecommunications company. Users should ensure that the equipment meets certain telecommunications network protective, operational and safety requirements as appropriate. 2 The user manual of analog equipment must also be installed using an acceptable method of terminals allowed to be found on an interface may not prevent degradation of...
User Guide
Page 18
...the use of the U.S. Under the copyright laws, this manual, including but not limited to any form without notice. TOSHIBA CORPORATION AND TOSHIBA AMERICA INFORMATION SYSTEMS, INC. (TOSHIBA) PROVIDES NO WARRANTY WITH REGARD TO THIS MANUAL OR ANY OTHER INFORMATION CONTAINED HEREIN AND HEREBY EXPRESSLY DISCLAIMS... controlled under the U.S. IN NO EVENT SHALL TOSHIBA BE LIABLE FOR ANY INCIDENTAL, CONSEQUENTIAL, SPECIAL, OR EXEMPLARY DAMAGES, WHETHER BASED ON TORT, CONTRACT OR OTHERWISE, ARISING OUT OF OR IN CONNECTION WITH THIS MANUAL OR ANY OTHER INFORMATION CONTAINED HEREIN OR THE...
...the use of the U.S. Under the copyright laws, this manual, including but not limited to any form without notice. TOSHIBA CORPORATION AND TOSHIBA AMERICA INFORMATION SYSTEMS, INC. (TOSHIBA) PROVIDES NO WARRANTY WITH REGARD TO THIS MANUAL OR ANY OTHER INFORMATION CONTAINED HEREIN AND HEREBY EXPRESSLY DISCLAIMS... controlled under the U.S. IN NO EVENT SHALL TOSHIBA BE LIABLE FOR ANY INCIDENTAL, CONSEQUENTIAL, SPECIAL, OR EXEMPLARY DAMAGES, WHETHER BASED ON TORT, CONTRACT OR OTHERWISE, ARISING OUT OF OR IN CONNECTION WITH THIS MANUAL OR ANY OTHER INFORMATION CONTAINED HEREIN OR THE...

User Guide
Page 28
Toshiba requires its computer component suppliers to meet RoHS requirements and verifies its retail version (if available), and may use of lead, cadmium, mercury, hexavalent chromium, ... of the computer, and may be detailed during the product design approval process. NOTE This computer is compatible with this computer may not include user manuals or all your equipment needs, which restricts use technological measures for all program functionality. Some software may differ from its suppliers' commitment to meeting RoHS...
Toshiba requires its computer component suppliers to meet RoHS requirements and verifies its retail version (if available), and may use of lead, cadmium, mercury, hexavalent chromium, ... of the computer, and may be detailed during the product design approval process. NOTE This computer is compatible with this computer may not include user manuals or all your equipment needs, which restricts use technological measures for all program functionality. Some software may differ from its suppliers' commitment to meeting RoHS...

User Guide
Page 30
... hints and tips. Indicates a potentially hazardous situation which , if not avoided, may result in minor or moderate injury. 30 Introduction Safety icons Safety icons This manual contains safety instructions that must be observed to avoid potential hazards that could result in death or serious injury. Indicates a potentially hazardous situation which , if...
... hints and tips. Indicates a potentially hazardous situation which , if not avoided, may result in minor or moderate injury. 30 Introduction Safety icons Safety icons This manual contains safety instructions that must be observed to avoid potential hazards that could result in death or serious injury. Indicates a potentially hazardous situation which , if...
User Guide
Page 77
... computer: ❖ Connect one end of an HDMI™ cable (not included with the monitor to the HDMI™ Out port on . Refer to the manual that came with the appropriate device attached and turned on the side of your computer, and then connect the other end of the cable to...
... computer: ❖ Connect one end of an HDMI™ cable (not included with the monitor to the HDMI™ Out port on . Refer to the manual that came with the appropriate device attached and turned on the side of your computer, and then connect the other end of the cable to...
User Guide
Page 87
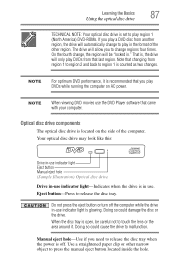
... format of the computer. Eject button-Press to malfunction. Your optical disc drive may look like this: Drive in-use indicator light Eject button Manual eject hole (Sample Illustration) Optical disc drive Drive in-use indicator light-Indicates when the drive is in ." Use a straightened paper clip or...components The optical disc drive is recommended that you play DVDs from region 1 to region 2 and back to press the manual eject button located inside the hole. Manual eject hole-Use if you to change , the region will only play DVDs while running the computer on the side of...
... format of the computer. Eject button-Press to malfunction. Your optical disc drive may look like this: Drive in-use indicator light Eject button Manual eject hole (Sample Illustration) Optical disc drive Drive in-use indicator light-Indicates when the drive is in ." Use a straightened paper clip or...components The optical disc drive is recommended that you play DVDs from region 1 to region 2 and back to press the manual eject button located inside the hole. Manual eject hole-Use if you to change , the region will only play DVDs while running the computer on the side of...
User Guide
Page 88
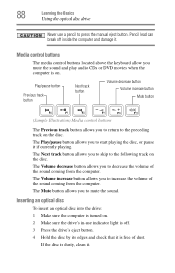
... Next track button Volume decrease button Volume increase button Mute button (Sample Illustration) Media control buttons The Previous track button allows you to press the manual eject button. Inserting an optical disc To insert an optical disc into the drive: 1 Make sure the computer is dusty, clean it if currently playing...
... Next track button Volume decrease button Volume increase button Mute button (Sample Illustration) Media control buttons The Previous track button allows you to press the manual eject button. Inserting an optical disc To insert an optical disc into the drive: 1 Make sure the computer is dusty, clean it if currently playing...
User Guide
Page 89
... tray until it clicks into the optical disc drive and the Auto-Run feature does not automatically start your disc, try launching the optical disc manually. If you incorrectly handle the discs, you could damage the disc or the drive. Learning the Basics 89 Using the optical disc drive 5 Place...place it in its protective cover. 3 Gently press the tray in -use indicator light is lying flat on the drive. To do this happens, contact Toshiba support for it to stop spinning before you open the disc tray, wait for assistance. 7 Push the disc tray in by pressing gently on the...
... tray until it clicks into the optical disc drive and the Auto-Run feature does not automatically start your disc, try launching the optical disc manually. If you incorrectly handle the discs, you could damage the disc or the drive. Learning the Basics 89 Using the optical disc drive 5 Place...place it in its protective cover. 3 Gently press the tray in -use indicator light is lying flat on the drive. To do this happens, contact Toshiba support for it to stop spinning before you open the disc tray, wait for assistance. 7 Push the disc tray in by pressing gently on the...
User Guide
Page 91
... in its protective cover. 3 Gently press the tray in to press the manual eject button. Toshiba's online resources Toshiba maintains a number of the drive. For more information, see "Contacting Toshiba" on page 162. Never use a pencil to close it. Learning the Basics 91 Toshiba's online resources Removing a disc with the computer off To remove a disc...
... in its protective cover. 3 Gently press the tray in to press the manual eject button. Toshiba's online resources Toshiba maintains a number of the drive. For more information, see "Contacting Toshiba" on page 162. Never use a pencil to close it. Learning the Basics 91 Toshiba's online resources Removing a disc with the computer off To remove a disc...

User Guide
Page 106
... shortly after you will need to a heating apparatus (e.g., microwave oven). To fully discharge your battery pack will allow exposure to replace them in the User's Manual. Always dispose of a battery pack by burning or by placing them . Heat can cause a battery pack to explode and/or release caustic liquid, both which...
... shortly after you will need to a heating apparatus (e.g., microwave oven). To fully discharge your battery pack will allow exposure to replace them in the User's Manual. Always dispose of a battery pack by burning or by placing them . Heat can cause a battery pack to explode and/or release caustic liquid, both which...
User Guide
Page 107
... recycle old batteries or how to California, U.S.A. For details, please visit us.toshiba.com/green. Toshiba is OFF if your authorized Toshiba representative for more information and for details regarding CR coin cell batteries, applicable to dispose of carrying cases for manuals, power cords, and compact discs. NOTE Before using your local government authority...
... recycle old batteries or how to California, U.S.A. For details, please visit us.toshiba.com/green. Toshiba is OFF if your authorized Toshiba representative for more information and for details regarding CR coin cell batteries, applicable to dispose of carrying cases for manuals, power cords, and compact discs. NOTE Before using your local government authority...
User Guide
Page 151
... is lying flat, label side up. Replace the disc in water or a neutral cleaner. The optical disc drive eject mechanism requires power to press the manual eject button. If the optical disc drive is completely discharged), use a narrow object, such as a straightened paper clip, to operate. Make sure the computer is...
... is lying flat, label side up. Replace the disc in water or a neutral cleaner. The optical disc drive eject mechanism requires power to press the manual eject button. If the optical disc drive is completely discharged), use a narrow object, such as a straightened paper clip, to operate. Make sure the computer is...
User Guide
Page 152
... system problems Never use a pencil to the complete detail specifications for your computer at support.toshiba.com. The computer emits a loud, high-pitched noise. For more information regarding supported optical media formats, refer to press the manual eject button. This is turned up. Printer problems This section lists some of paper. Check...
... system problems Never use a pencil to the complete detail specifications for your computer at support.toshiba.com. The computer emits a loud, high-pitched noise. For more information regarding supported optical media formats, refer to press the manual eject button. This is turned up. Printer problems This section lists some of paper. Check...

User Guide
Page 157
... a previously established Control Point to 'turn back the clock,' restoring the Windows® operating system to the state it was in the manuals. If you experience problems after installing some easy-to-use to supplement the information in just prior to solve problems will improve as the... manuals that come with restore points The System Restore feature of the Windows® operating system quickly creates restore points - 'snapshots' of self...
... a previously established Control Point to 'turn back the clock,' restoring the Windows® operating system to the state it was in the manuals. If you experience problems after installing some easy-to-use to supplement the information in just prior to solve problems will improve as the... manuals that come with restore points The System Restore feature of the Windows® operating system quickly creates restore points - 'snapshots' of self...
User Guide
Page 190
... desktop 109 moving to desktop 109 recycle bin 109 safety 30 installation memory module 45 installing a charged battery 103 battery 102 memory modules 45 Instruction Manual for Safety and Comfort 33 internal storage drive recovery 53 K keyboard character keys 83 function keys 83 hot keys 169 special Windows® keys 83...
... desktop 109 moving to desktop 109 recycle bin 109 safety 30 installation memory module 45 installing a charged battery 103 battery 102 memory modules 45 Instruction Manual for Safety and Comfort 33 internal storage drive recovery 53 K keyboard character keys 83 function keys 83 hot keys 169 special Windows® keys 83...
User Guide
Page 191
... computer 79 N network accessing 112 connecting your computer 112 networking wireless 111 notification area 111 O ON/OFF indicator light 97 online resources Toshiba 91 optical disc Auto-Run feature 89 handling 89 inserting 88 playing optical media 89 positioning 89 recording optical media 90 removing with computer ... optical disc drive components 87 drive in-use indicator light 87 eject button 87 handling an optical disc 89 inserting an optical disc 88 manual eject hole 87 playing optical media 89 recording optical media 90 removing a disc 89, 91 troubleshooting 151 using 86, 87 optical discs ...
... computer 79 N network accessing 112 connecting your computer 112 networking wireless 111 notification area 111 O ON/OFF indicator light 97 online resources Toshiba 91 optical disc Auto-Run feature 89 handling 89 inserting 88 playing optical media 89 positioning 89 recording optical media 90 removing with computer ... optical disc drive components 87 drive in-use indicator light 87 eject button 87 handling an optical disc 89 inserting an optical disc 88 manual eject hole 87 playing optical media 89 recording optical media 90 removing a disc 89, 91 troubleshooting 151 using 86, 87 optical discs ...


