
User Guide
Page 2
...Satellite®/Satellite Pro® L800/S800 Series Recordable and/or ReWritable Drive(s) and Associated Software Warranty The computer system you must read and follow all the data stored on this product may include Recordable and/or ReWritable optical disc drive(s) and associated software, among the most advanced data storage technologies available. TOSHIBA... and/or manuals enclosed or provided electronically. IF YOUR DATA IS ALTERED OR LOST DUE TO ANY TROUBLE, FAILURE OR MALFUNCTION OF THE HARD DISK DRIVE OR OTHER STORAGE DEVICES AND THE DATA CANNOT BE RECOVERED, TOSHIBA SHALL NOT ...
...Satellite®/Satellite Pro® L800/S800 Series Recordable and/or ReWritable Drive(s) and Associated Software Warranty The computer system you must read and follow all the data stored on this product may include Recordable and/or ReWritable optical disc drive(s) and associated software, among the most advanced data storage technologies available. TOSHIBA... and/or manuals enclosed or provided electronically. IF YOUR DATA IS ALTERED OR LOST DUE TO ANY TROUBLE, FAILURE OR MALFUNCTION OF THE HARD DISK DRIVE OR OTHER STORAGE DEVICES AND THE DATA CANNOT BE RECOVERED, TOSHIBA SHALL NOT ...
User Guide
Page 6
... jack type(s): USOC RJ11C. This precaution may be aware that the equipment meets certain telecommunications network protective, operational and safety requirements as appropriate. 2 The user manual of analog equipment must also be connected to a telephone interface. NOTICE: The Ringer Equivalence Number (REN) assigned to each terminal device provides an indication of...
... jack type(s): USOC RJ11C. This precaution may be aware that the equipment meets certain telecommunications network protective, operational and safety requirements as appropriate. 2 The user manual of analog equipment must also be connected to a telephone interface. NOTICE: The Ringer Equivalence Number (REN) assigned to each terminal device provides an indication of...
User Guide
Page 18
... ON TORT, CONTRACT OR OTHERWISE, ARISING OUT OF OR IN CONNECTION WITH THIS MANUAL OR ANY OTHER INFORMATION CONTAINED HEREIN OR THE USE THEREOF. TOSHIBA CORPORATION AND TOSHIBA AMERICA INFORMATION SYSTEMS, INC. (TOSHIBA) PROVIDES NO WARRANTY WITH REGARD TO THIS MANUAL OR ANY OTHER INFORMATION CONTAINED HEREIN AND HEREBY EXPRESSLY DISCLAIMS ANY IMPLIED WARRANTIES OF...
... ON TORT, CONTRACT OR OTHERWISE, ARISING OUT OF OR IN CONNECTION WITH THIS MANUAL OR ANY OTHER INFORMATION CONTAINED HEREIN OR THE USE THEREOF. TOSHIBA CORPORATION AND TOSHIBA AMERICA INFORMATION SYSTEMS, INC. (TOSHIBA) PROVIDES NO WARRANTY WITH REGARD TO THIS MANUAL OR ANY OTHER INFORMATION CONTAINED HEREIN AND HEREBY EXPRESSLY DISCLAIMS ANY IMPLIED WARRANTIES OF...

User Guide
Page 28
NOTE This computer is compatible with this computer may not include user manuals or all your home office, purchase products that have earned the ENERGY STAR® for all program functionality. Toshiba requires its computer component suppliers to meet RoHS requirements and verifies its retail version (if available), and may use technological measures...
NOTE This computer is compatible with this computer may not include user manuals or all your home office, purchase products that have earned the ENERGY STAR® for all program functionality. Toshiba requires its computer component suppliers to meet RoHS requirements and verifies its retail version (if available), and may use technological measures...

User Guide
Page 30
... in the text. Indicates a potentially hazardous situation which , if not avoided, will result in death or serious injury. 30 Introduction Safety icons Safety icons This manual contains safety instructions that must be observed to avoid potential hazards that could result in death or serious injury.
... in the text. Indicates a potentially hazardous situation which , if not avoided, will result in death or serious injury. 30 Introduction Safety icons Safety icons This manual contains safety instructions that must be observed to avoid potential hazards that could result in death or serious injury.
User Guide
Page 77
.... To do this: 1 Read the directions that came with the monitor to see if you can easily attach an external monitor or projector to the manual that came with the television or display device for more information. Connecting an HDMI™-compatible television or display device To connect an HDMI™...
.... To do this: 1 Read the directions that came with the monitor to see if you can easily attach an external monitor or projector to the manual that came with the television or display device for more information. Connecting an HDMI™-compatible television or display device To connect an HDMI™...
User Guide
Page 87
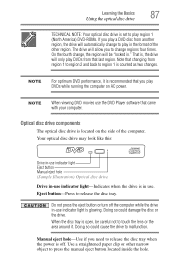
... button located inside the hole. Your optical disc drive may look like this: Drive in-use indicator light Eject button Manual eject hole (Sample Illustration) Optical disc drive Drive in-use indicator light-Indicates when the drive is in -use indicator light is glowing. Eject button-...Press to region 1 is counted as two changes. Manual eject hole-Use if you need to touch the lens or the area around it is recommended that changing from region 1 to region 2 and back...
... button located inside the hole. Your optical disc drive may look like this: Drive in-use indicator light Eject button Manual eject hole (Sample Illustration) Optical disc drive Drive in-use indicator light-Indicates when the drive is in -use indicator light is glowing. Eject button-...Press to region 1 is counted as two changes. Manual eject hole-Use if you need to touch the lens or the area around it is recommended that changing from region 1 to region 2 and back...
User Guide
Page 88
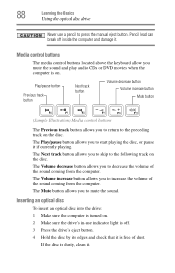
... to the preceding track on the disc. Media control buttons The media control buttons located above the keyboard allow you to return to press the manual eject button. Play/pause button Previous track button Next track button Volume decrease button Volume increase button Mute button (Sample Illustration) Media control buttons The...
... to the preceding track on the disc. Media control buttons The media control buttons located above the keyboard allow you to return to press the manual eject button. Play/pause button Previous track button Next track button Volume decrease button Volume increase button Mute button (Sample Illustration) Media control buttons The...
User Guide
Page 89
... and the Auto-Run feature does not automatically start your disc, try launching the optical disc manually. Also, if the disc is lying flat on the center of the disc. To do this happens, contact Toshiba support for it to stop spinning before you open the disc tray, wait for assistance. 7 Push...
... and the Auto-Run feature does not automatically start your disc, try launching the optical disc manually. Also, if the disc is lying flat on the center of the disc. To do this happens, contact Toshiba support for it to stop spinning before you open the disc tray, wait for assistance. 7 Push...
User Guide
Page 91
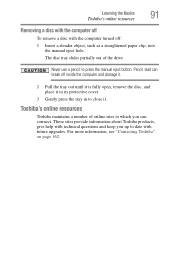
... protective cover. 3 Gently press the tray in to press the manual eject button. Toshiba's online resources Toshiba maintains a number of the drive. For more information, see "Contacting Toshiba" on page 162. Learning the Basics 91 Toshiba's online resources Removing a disc with the computer off To remove... future upgrades. These sites provide information about Toshiba products, give help with technical questions and keep you up to which you can break off : 1 Insert a slender object, such as a straightened paper clip, into the manual eject hole. The disc tray slides partially ...
... protective cover. 3 Gently press the tray in to press the manual eject button. Toshiba's online resources Toshiba maintains a number of the drive. For more information, see "Contacting Toshiba" on page 162. Learning the Basics 91 Toshiba's online resources Removing a disc with the computer off To remove... future upgrades. These sites provide information about Toshiba products, give help with technical questions and keep you up to which you can break off : 1 Insert a slender object, such as a straightened paper clip, into the manual eject hole. The disc tray slides partially ...

User Guide
Page 106
... fully discharges. ❖ If you have extra battery packs, rotate their ability to hold a charge and you will need to replace them in the User's Manual. Other battery packs have fully recharged the battery.
... fully discharges. ❖ If you have extra battery packs, rotate their ability to hold a charge and you will need to replace them in the User's Manual. Other battery packs have fully recharged the battery.
User Guide
Page 107
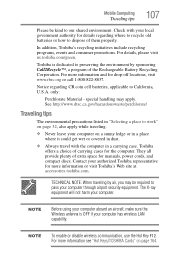
... tips 107 Please be required to pass your computer through airport security equipment. They all provide plenty of carrying cases for manuals, power cords, and compact discs. NOTE Before using your local government authority for details regarding CR coin cell batteries, applicable... to California, U.S.A. For more information or visit Toshiba's Web site at accessories.toshiba.com. For details, please visit us.toshiba.com/green. only: Perchlorate Material - The X-ray equipment will not harm your authorized Toshiba representative for drop-off locations, visit www.rbrc.org...
... tips 107 Please be required to pass your computer through airport security equipment. They all provide plenty of carrying cases for manuals, power cords, and compact discs. NOTE Before using your local government authority for details regarding CR coin cell batteries, applicable... to California, U.S.A. For more information or visit Toshiba's Web site at accessories.toshiba.com. For details, please visit us.toshiba.com/green. only: Perchlorate Material - The X-ray equipment will not harm your authorized Toshiba representative for drop-off locations, visit www.rbrc.org...
User Guide
Page 151
... correctly but the drive tray does not slide out. Optical disc drive problems You cannot access a disc in the small hole next to press the manual eject button. Open the tray and remove the disc. Make sure a program is probably a configuration problem. If Something Goes Wrong Optical disc drive problems 151...
... correctly but the drive tray does not slide out. Optical disc drive problems You cannot access a disc in the small hole next to press the manual eject button. Open the tray and remove the disc. Make sure a program is probably a configuration problem. If Something Goes Wrong Optical disc drive problems 151...
User Guide
Page 152
...sound system when input from the computer's speakers. Check that the printer has plenty of disc you are using is with your computer at support.toshiba.com. If the problem is compatible with an optical data disc, refer to your computer. Sound system problems No sound is coming from a ... and the speakers. Adjust the volume control. Pencil lead can break off inside the computer and damage it. Try pressing Esc to press the manual eject button. 152 If Something Goes Wrong Sound system problems Never use a pencil to see "You press the disc eject button, but others ...
...sound system when input from the computer's speakers. Check that the printer has plenty of disc you are using is with your computer at support.toshiba.com. If the problem is compatible with an optical data disc, refer to your computer. Sound system problems No sound is coming from a ... and the speakers. Adjust the volume control. Pencil lead can break off inside the computer and damage it. Try pressing Esc to press the manual eject button. 152 If Something Goes Wrong Sound system problems Never use a pencil to see "You press the disc eject button, but others ...

User Guide
Page 157
...later recall. documents and other important files. If you experience problems after installing some easy-to solve problems will improve as the manuals that come with restore points The System Restore feature of the Windows® operating system quickly creates restore points - 'snapshots' of...you change your data - Take advantage of the System Properties window appears. 3 Click Create... Data and system configuration backup in the manuals. If Something Goes Wrong Develop good computing habits 157 Read the user's guides. Your ability to -use to safeguard your Windows®...
...later recall. documents and other important files. If you experience problems after installing some easy-to solve problems will improve as the manuals that come with restore points The System Restore feature of the Windows® operating system quickly creates restore points - 'snapshots' of...you change your data - Take advantage of the System Properties window appears. 3 Click Create... Data and system configuration backup in the manuals. If Something Goes Wrong Develop good computing habits 157 Read the user's guides. Your ability to -use to safeguard your Windows®...
User Guide
Page 190
... desktop 109 moving to desktop 109 recycle bin 109 safety 30 installation memory module 45 installing a charged battery 103 battery 102 memory modules 45 Instruction Manual for Safety and Comfort 33 internal storage drive recovery 53 K keyboard character keys 83 function keys 83 hot keys 169 special Windows® keys 83...
... desktop 109 moving to desktop 109 recycle bin 109 safety 30 installation memory module 45 installing a charged battery 103 battery 102 memory modules 45 Instruction Manual for Safety and Comfort 33 internal storage drive recovery 53 K keyboard character keys 83 function keys 83 hot keys 169 special Windows® keys 83...
User Guide
Page 191
... computer 79 N network accessing 112 connecting your computer 112 networking wireless 111 notification area 111 O ON/OFF indicator light 97 online resources Toshiba 91 optical disc Auto-Run feature 89 handling 89 inserting 88 playing optical media 89 positioning 89 recording optical media 90 removing with computer ... optical disc drive components 87 drive in-use indicator light 87 eject button 87 handling an optical disc 89 inserting an optical disc 88 manual eject hole 87 playing optical media 89 recording optical media 90 removing a disc 89, 91 troubleshooting 151 using 86, 87 optical discs ...
... computer 79 N network accessing 112 connecting your computer 112 networking wireless 111 notification area 111 O ON/OFF indicator light 97 online resources Toshiba 91 optical disc Auto-Run feature 89 handling 89 inserting 88 playing optical media 89 positioning 89 recording optical media 90 removing with computer ... optical disc drive components 87 drive in-use indicator light 87 eject button 87 handling an optical disc 89 inserting an optical disc 88 manual eject hole 87 playing optical media 89 recording optical media 90 removing a disc 89, 91 troubleshooting 151 using 86, 87 optical discs ...


