
User Guide
Page 10
...and/or cadmium (Cd) will appear below the crossed out wheeled bin symbol on recycling and reuse. 10 EU Declaration of Conformity TOSHIBA declares that this product conforms to the following Standards: Supplementary *The product complies with the Information: requirements of this product, it ...products put on how to determine appropriate worldwide product life cycle planning and end-of waste management strategies that focus on the battery. The European Union WEEE (Waste from Electrical and Electronic Equipment) Directive Information The European Union WEEE (Waste from Electrical and ...
...and/or cadmium (Cd) will appear below the crossed out wheeled bin symbol on recycling and reuse. 10 EU Declaration of Conformity TOSHIBA declares that this product conforms to the following Standards: Supplementary *The product complies with the Information: requirements of this product, it ...products put on how to determine appropriate worldwide product life cycle planning and end-of waste management strategies that focus on the battery. The European Union WEEE (Waste from Electrical and Electronic Equipment) Directive Information The European Union WEEE (Waste from Electrical and ...
User Guide
Page 29
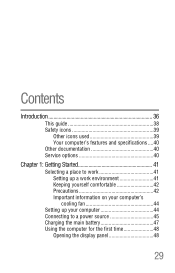
Contents Introduction 36 This guide 38 Safety icons 39 Other icons used 39 Your computer's features and specifications ....40 Other documentation 40 Service options 40 Chapter 1: Getting Started 41 Selecting a place to work 41 Setting up a work environment 41 Keeping yourself comfortable 42 Precautions 42 Important information on your computer's cooling fan 44 Setting up your computer 44 Connecting to a power source 45 Charging the main battery 47 Using the computer for the first time 48 Opening the display panel 48 29
Contents Introduction 36 This guide 38 Safety icons 39 Other icons used 39 Your computer's features and specifications ....40 Other documentation 40 Service options 40 Chapter 1: Getting Started 41 Selecting a place to work 41 Setting up a work environment 41 Keeping yourself comfortable 42 Precautions 42 Important information on your computer's cooling fan 44 Setting up your computer 44 Connecting to a power source 45 Charging the main battery 47 Using the computer for the first time 48 Opening the display panel 48 29
User Guide
Page 32
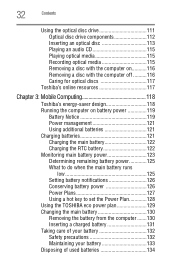
... Caring for optical discs 117 Toshiba's online resources 117 Chapter 3: Mobile Computing 118 Toshiba's energy-saver design 118 Running the computer on battery power 119 Battery Notice 119 Power management 121 Using additional batteries 121 Charging batteries 121 Charging the main battery 122 Charging the RTC battery 122 Monitoring main battery power 123 Determining remaining battery power 125 What to...
... Caring for optical discs 117 Toshiba's online resources 117 Chapter 3: Mobile Computing 118 Toshiba's energy-saver design 118 Running the computer on battery power 119 Battery Notice 119 Power management 121 Using additional batteries 121 Charging batteries 121 Charging the main battery 122 Charging the RTC battery 122 Monitoring main battery power 123 Determining remaining battery power 125 What to...
User Guide
Page 34
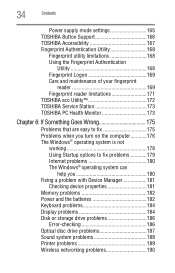
...Fingerprint Authentication Utility 168 Fingerprint Logon 169 Care and maintenance of your fingerprint reader 169 Fingerprint reader limitations 171 TOSHIBA eco Utility 172 TOSHIBA Service Station 173 TOSHIBA PC Health Monitor 173 Chapter 6: If Something Goes Wrong 175 Problems that are easy to fix 175 ...system can help you 180 Fixing a problem with Device Manager 181 Checking device properties 181 Memory problems 182 Power and the batteries 182 Keyboard problems 184 Display problems 184 Disk or storage drive problems 186 Error-checking 186 Optical disc drive problems 187 Sound...
...Fingerprint Authentication Utility 168 Fingerprint Logon 169 Care and maintenance of your fingerprint reader 169 Fingerprint reader limitations 171 TOSHIBA eco Utility 172 TOSHIBA Service Station 173 TOSHIBA PC Health Monitor 173 Chapter 6: If Something Goes Wrong 175 Problems that are easy to fix 175 ...system can help you 180 Fixing a problem with Device Manager 181 Checking device properties 181 Memory problems 182 Power and the batteries 182 Keyboard problems 184 Display problems 184 Disk or storage drive problems 186 Error-checking 186 Optical disc drive problems 187 Sound...
User Guide
Page 36
... computer from Sleep mode by pressing the power button. If the model you leave this computer to conserve computer energy. 36 Toshiba is labeled with the power management options preset to a configuration that your computer will provide the most stable operating environment and... optimum system performance for both AC power and battery modes. See the "Mobile Computing" section of the Toshiba User's Guide for energy efficiency. With your Toshiba computer, your computer is set to the world of powerful, portable, multimedia computing...
... computer from Sleep mode by pressing the power button. If the model you leave this computer to conserve computer energy. 36 Toshiba is labeled with the power management options preset to a configuration that your computer will provide the most stable operating environment and... optimum system performance for both AC power and battery modes. See the "Mobile Computing" section of the Toshiba User's Guide for energy efficiency. With your Toshiba computer, your computer is set to the world of powerful, portable, multimedia computing...

User Guide
Page 42
... helpful information for setting up your computer, and never expose the computer to rain, water, seawater or moisture. Remove the battery pack. Failure to follow these eventualities should observe certain precautions to further reduce the risk of temperature change such as air conditioner... Liquids and corrosive chemicals. Precautions Your computer is designed to provide optimum safety and ease of the computer. Keeping yourself comfortable The Toshiba Instruction Manual for Safety and Comfort, included with the underside or surface of use, and to the computer. Exposure to an authorized...
... helpful information for setting up your computer, and never expose the computer to rain, water, seawater or moisture. Remove the battery pack. Failure to follow these eventualities should observe certain precautions to further reduce the risk of temperature change such as air conditioner... Liquids and corrosive chemicals. Precautions Your computer is designed to provide optimum safety and ease of the computer. Keeping yourself comfortable The Toshiba Instruction Manual for Safety and Comfort, included with the underside or surface of use, and to the computer. Exposure to an authorized...
User Guide
Page 44
... the power is turned on or when an AC adaptor is connected to be charged before adding external or internal components to charge the battery you can block the vents located at the underside of the computer. To use it. Overheating your computer's cooling fan Your computer may...up to and including "Setting up your computer Important information on page 45. Using your computer on the computer. Your computer contains a rechargeable main battery that needs to a power outlet (even if your computer is in the "Instruction Manual for Safety and Comfort" that cools the CPU by drawing...
... the power is turned on or when an AC adaptor is connected to be charged before adding external or internal components to charge the battery you can block the vents located at the underside of the computer. To use it. Overheating your computer's cooling fan Your computer may...up to and including "Setting up your computer Important information on page 45. Using your computer on the computer. Your computer contains a rechargeable main battery that needs to a power outlet (even if your computer is in the "Instruction Manual for Safety and Comfort" that cools the CPU by drawing...
User Guide
Page 45
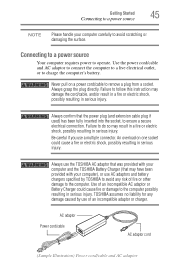
... AC adaptor to connect the computer to a live electrical outlet, or to operate. Be careful if you use the TOSHIBA AC adaptor that was provided with your computer and the TOSHIBA Battery Charger (that the power plug (and extension cable plug if used) has been fully inserted into the socket, to... avoid scratching or damaging the surface. TOSHIBA assumes no liability for any damage caused by TOSHIBA to avoid any risk of fire or ...
... AC adaptor to connect the computer to a live electrical outlet, or to operate. Be careful if you use the TOSHIBA AC adaptor that was provided with your computer and the TOSHIBA Battery Charger (that the power plug (and extension cable plug if used) has been fully inserted into the socket, to... avoid scratching or damaging the surface. TOSHIBA assumes no liability for any damage caused by TOSHIBA to avoid any risk of fire or ...

User Guide
Page 47
... an indication of the main battery's current charge: ❖ Glows amber while the main battery is being charged (AC adaptor connected) ❖ Glows green when the main battery is fully charged ❖ Is unlit when the main battery has discharged, the battery is not charging, or the... turned off until the battery light glows green. TECHNICAL NOTE: The recharging of the battery cannot occur when your computer is using the battery to recharge. Getting Started 47 Charging the main battery The computer's main battery light gives you must charge the battery. After that reduces the...
... an indication of the main battery's current charge: ❖ Glows amber while the main battery is being charged (AC adaptor connected) ❖ Glows green when the main battery is fully charged ❖ Is unlit when the main battery has discharged, the battery is not charging, or the... turned off until the battery light glows green. TECHNICAL NOTE: The recharging of the battery cannot occur when your computer is using the battery to recharge. Getting Started 47 Charging the main battery The computer's main battery light gives you must charge the battery. After that reduces the...
User Guide
Page 48
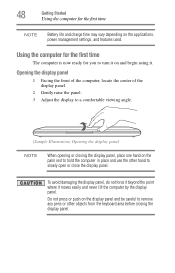
... the applications, power management settings, and features used. Using the computer for the first time The computer is now ready for the first time NOTE Battery life and charge time may vary depending on and begin using it. Do not press or push on the display panel and be careful to...
... the applications, power management settings, and features used. Using the computer for the first time The computer is now ready for the first time NOTE Battery life and charge time may vary depending on and begin using it. Do not press or push on the display panel and be careful to...

User Guide
Page 49
This is also an intrinsic characteristic of the screen will deteriorate. The ON/OFF light glows green. (Sample Illustration) Turning on battery power. Any small bright dots that may appear on your screen display when you may not be able to ensure that all drives..., the brightness of the screen technology. When the computer is manufactured using high-precision technology. When you plan to use AC power rather than battery power) are an intrinsic characteristic of the TFT manufacturing technology. Turning on the power To turn on the computer: 1 Make sure any external devices...
This is also an intrinsic characteristic of the screen will deteriorate. The ON/OFF light glows green. (Sample Illustration) Turning on battery power. Any small bright dots that may appear on your screen display when you may not be able to ensure that all drives..., the brightness of the screen technology. When the computer is manufactured using high-precision technology. When you plan to use AC power rather than battery power) are an intrinsic characteristic of the TFT manufacturing technology. Turning on the power To turn on the computer: 1 Make sure any external devices...
User Guide
Page 53
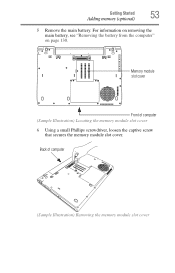
Memory module slot cover Front of computer (Sample Illustration) Removing the memory module slot cover Back of computer (Sample Illustration) Locating the memory module slot cover 6 Using a small Phillips screwdriver, loosen the captive screw that secures the memory module slot cover. For information on removing the main battery, see "Removing the battery from the computer" on page 130. Getting Started 53 Adding memory (optional) 5 Remove the main battery.
Memory module slot cover Front of computer (Sample Illustration) Removing the memory module slot cover Back of computer (Sample Illustration) Locating the memory module slot cover 6 Using a small Phillips screwdriver, loosen the captive screw that secures the memory module slot cover. For information on removing the main battery, see "Removing the battery from the computer" on page 130. Getting Started 53 Adding memory (optional) 5 Remove the main battery.
User Guide
Page 56
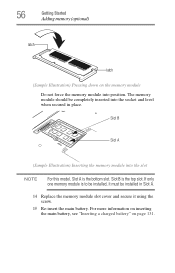
... slot cover and secure it must be installed, it using the screw. 15 Re-insert the main battery. Slot B is the bottom slot. For more information on inserting the main battery, see "Inserting a charged battery" on the memory module Do not force the memory module into the slot NOTE For this model, Slot...
... slot cover and secure it must be installed, it using the screw. 15 Re-insert the main battery. Slot B is the bottom slot. For more information on inserting the main battery, see "Inserting a charged battery" on the memory module Do not force the memory module into the slot NOTE For this model, Slot...

User Guide
Page 59
... when an AC adaptor is connected to a 30-degree angle and slide it using the screw. 5 Re-insert the main battery. For more information on inserting the main battery, see "Inserting a charged battery" on a carpet or other soft material can block the vents located at the underside of the computer. ❖ Always operate...
... when an AC adaptor is connected to a 30-degree angle and slide it using the screw. 5 Re-insert the main battery. For more information on inserting the main battery, see "Inserting a charged battery" on a carpet or other soft material can block the vents located at the underside of the computer. ❖ Always operate...
User Guide
Page 89
... current state of the desktop to memory, so that when you turn off the power while a disk/disc is off) to fully charge the main battery.
... current state of the desktop to memory, so that when you turn off the power while a disk/disc is off) to fully charge the main battery.
User Guide
Page 90
...using. 90 Getting Started Turning off the computer Factors to consider when choosing Hibernation: ❖ While in Hibernation mode, the computer uses no main battery power. ❖ Because the state of the system is stored to the internal storage drive, no data is in Sleep mode. ❖ ...Restarting from Sleep takes less time and consumes less main battery power than restarting after turning off the computer using the Shut down command. ❖ Restarting from Hibernation takes a little more time and consumes...
...using. 90 Getting Started Turning off the computer Factors to consider when choosing Hibernation: ❖ While in Hibernation mode, the computer uses no main battery power. ❖ Because the state of the system is stored to the internal storage drive, no data is in Sleep mode. ❖ ...Restarting from Sleep takes less time and consumes less main battery power than restarting after turning off the computer using the Shut down command. ❖ Restarting from Hibernation takes a little more time and consumes...
User Guide
Page 91
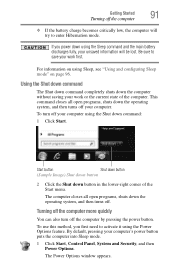
..., shuts down the operating system, and then turns off your computer. To use this method, you power down using the Sleep command and the main battery discharges fully, your unsaved information will try to activate it using the Power Options feature. For information on using Sleep, see "Using and configuring Sleep... your computer using the Shut down command: 1 Click Start. Turning off the computer more quickly You can also turn off the computer ❖ If the battery charge becomes critically low, the computer will be lost. The Power Options window appears.
..., shuts down the operating system, and then turns off your computer. To use this method, you power down using the Sleep command and the main battery discharges fully, your unsaved information will try to activate it using the Power Options feature. For information on using Sleep, see "Using and configuring Sleep... your computer using the Shut down command: 1 Click Start. Turning off the computer more quickly You can also turn off the computer ❖ If the battery charge becomes critically low, the computer will be lost. The Power Options window appears.

User Guide
Page 93
... the options you want the computer to shut down button in the lower-right corner of the Start menu. Once the computer is running on battery power or while connected to AC power. ❖ Lid close action Set this option to Shut down if you want the computer to shut down...
... the options you want the computer to shut down button in the lower-right corner of the Start menu. Once the computer is running on battery power or while connected to AC power. ❖ Lid close action Set this option to Shut down if you want the computer to shut down...
User Guide
Page 95
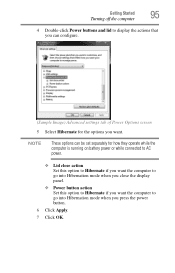
... These options can configure. (Sample Image) Advanced settings tab of Power Options screen 5 Select Hibernate for how they operate while the computer is running on battery power or while connected to AC power. ❖ Lid close action Set this option to Hibernate if you want the computer to go into Hibernation...
... These options can configure. (Sample Image) Advanced settings tab of Power Options screen 5 Select Hibernate for how they operate while the computer is running on battery power or while connected to AC power. ❖ Lid close action Set this option to Hibernate if you want the computer to go into Hibernation...

User Guide
Page 97
The Advanced settings tab of time in both the On battery and Plugged in categories. ❖ To disable the computer from automatically entering Sleep mode, select Never. 4 Click Change advanced power settings. The Edit Plan Settings ...
The Advanced settings tab of time in both the On battery and Plugged in categories. ❖ To disable the computer from automatically entering Sleep mode, select Never. 4 Click Change advanced power settings. The Edit Plan Settings ...


