
User Guide
Page 3
This equipment generates, uses and can be determined by turning the equipment off and on, the user is encouraged to try to correct the interference by Toshiba is likely to result in accordance with noncompliant peripherals or peripherals not recommended by one or more of the FCC rules. However..., it may be used in interference to operate the equipment. IF YOU USE THE COMPUTER PRODUCTS IN A CRITICAL APPLICATION, YOU, AND NOT TOSHIBA, ASSUME FULL RESPONSIBILITY FOR SUCH USE. FCC Notice "Declaration of Conformity Information" This equipment has been tested and found to comply with the...
This equipment generates, uses and can be determined by turning the equipment off and on, the user is encouraged to try to correct the interference by Toshiba is likely to result in accordance with noncompliant peripherals or peripherals not recommended by one or more of the FCC rules. However..., it may be used in interference to operate the equipment. IF YOU USE THE COMPUTER PRODUCTS IN A CRITICAL APPLICATION, YOU, AND NOT TOSHIBA, ASSUME FULL RESPONSIBILITY FOR SUCH USE. FCC Notice "Declaration of Conformity Information" This equipment has been tested and found to comply with the...

User Guide
Page 7
... interface. The termination on the label affixed to your Bluetooth™ or WirelessLAN. If you may consist of any such problem, immediately turn off either one another. NOTICE: The Ringer Equivalence Number (REN) assigned to each terminal device provides an indication of the maximum number ... http://www.toshibaeurope.com/computers/tnt/bluetooth.htm in Europe or http://www.pc.support.global.toshiba.com in the 5.15 to 5.85 GHz frequency range. Wireless Interoperability The TOSHIBA Wireless LAN Mini PCI Card products are designed to be interoperable with one of Electrical and ...
... interface. The termination on the label affixed to your Bluetooth™ or WirelessLAN. If you may consist of any such problem, immediately turn off either one another. NOTICE: The Ringer Equivalence Number (REN) assigned to each terminal device provides an indication of the maximum number ... http://www.toshibaeurope.com/computers/tnt/bluetooth.htm in Europe or http://www.pc.support.global.toshiba.com in the 5.15 to 5.85 GHz frequency range. Wireless Interoperability The TOSHIBA Wireless LAN Mini PCI Card products are designed to be interoperable with one of Electrical and ...

User Guide
Page 8
If you are uncertain of the policy that applies on the use the Wireless LAN device prior to turning on the equipment. Operation is subject to other radio devices, emit radio frequency electromagnetic energy. L 'utilisation de ce dispositif est autoris...tout brouillage radioélectrique reçu, même si ce brouillage est susceptible de compromettre le fonctionnement du dispositif. Regulatory Information The TOSHIBA Wireless LAN Mini PCI Card must accept any other environment where the risk of interference to the following radio frequency and safety standards. Because ...
If you are uncertain of the policy that applies on the use the Wireless LAN device prior to turning on the equipment. Operation is subject to other radio devices, emit radio frequency electromagnetic energy. L 'utilisation de ce dispositif est autoris...tout brouillage radioélectrique reçu, même si ce brouillage est susceptible de compromettre le fonctionnement du dispositif. Regulatory Information The TOSHIBA Wireless LAN Mini PCI Card must accept any other environment where the risk of interference to the following radio frequency and safety standards. Because ...
User Guide
Page 14
...❖ Connect the equipment to an outlet on a circuit different from that interference will be determined by turning the equipment off and on, the user is encouraged to try and correct the interference by Toshiba. This equipment generates, uses, and can be the responsibility of the FCC Rules... with this equipment does cause harmful interference to Part 15 of the user. These limits are designed to radio communications. If this Toshiba Wireless LAN Mini PCI Card, or the substitution or attachment of the devices included with the instructions, it may cause harmful interference ...
...❖ Connect the equipment to an outlet on a circuit different from that interference will be determined by turning the equipment off and on, the user is encouraged to try and correct the interference by Toshiba. This equipment generates, uses, and can be the responsibility of the FCC Rules... with this equipment does cause harmful interference to Part 15 of the user. These limits are designed to radio communications. If this Toshiba Wireless LAN Mini PCI Card, or the substitution or attachment of the devices included with the instructions, it may cause harmful interference ...

User Guide
Page 20
... panel 57 Turning on the power 57 Using the AccuPoint II® pointing device 58 Using the TouchPad 59 Scrolling with the TouchPad 60 Control buttons 60 Disabling or enabling the Dual Point Device 61 Setting up your software 62 Registering your computer with Toshiba 63 Setting ...up other devices 63 Turning off the computer 63 Closing the display panel 64 Using external display devices 65 Connecting the display device 65 Directing...
... panel 57 Turning on the power 57 Using the AccuPoint II® pointing device 58 Using the TouchPad 59 Scrolling with the TouchPad 60 Control buttons 60 Disabling or enabling the Dual Point Device 61 Setting up your software 62 Registering your computer with Toshiba 63 Setting ...up other devices 63 Turning off the computer 63 Closing the display panel 64 Using external display devices 65 Connecting the display device 65 Directing...
User Guide
Page 22
... computer on and off 99 Powering down the computer 99 Using Turn Off Computer or Shut Down 100 Using Hibernation 103 Using Standby 105 Toshiba's online resources 107 Chapter 4: Mobile Computing 109 Toshiba's energy-saver design 109 Running the computer on battery power 110 Battery Notice 110 Safety Precautions 111 Maximizing battery life...
... computer on and off 99 Powering down the computer 99 Using Turn Off Computer or Shut Down 100 Using Hibernation 103 Using Standby 105 Toshiba's online resources 107 Chapter 4: Mobile Computing 109 Toshiba's energy-saver design 109 Running the computer on battery power 110 Battery Notice 110 Safety Precautions 111 Maximizing battery life...
User Guide
Page 25
... Using playlists 199 Creating a Playlist 200 Playing a Playlist 201 Chapter 9: If Something Goes Wrong 203 Problems that are easy to fix 203 Problems when you turn on the computer 205 The Windows® operating system is not working 206 Using Startup options to fix problems 207 Internet problems 208 The Windows...
... Using playlists 199 Creating a Playlist 200 Playing a Playlist 201 Chapter 9: If Something Goes Wrong 203 Problems that are easy to fix 203 Problems when you turn on the computer 205 The Windows® operating system is not working 206 Using Startup options to fix problems 207 Internet problems 208 The Windows...

User Guide
Page 32
... switch* * functional only on systems with a wireless module installed The wireless antenna on/off switch (functional only on systems with a wireless module installed) lets you turn on a Wi-Fi or Bluetooth module on page 37. Sliding the display latch opens the computer's display panel. For more information, see "Keyboard and display...
... switch* * functional only on systems with a wireless module installed The wireless antenna on/off switch (functional only on systems with a wireless module installed) lets you turn on a Wi-Fi or Bluetooth module on page 37. Sliding the display latch opens the computer's display panel. For more information, see "Keyboard and display...

User Guide
Page 36
... Slim SelectBay release Expansion port Battery release-Locks the battery in place to this jack automatically disables the internal speakers. To turn the volume up, turn the dial to the computer. Microphone jack-Lets you connect stereo headphones or other audio input device to the left. Headphone...control-Lets you insert SD® cards for additional data storage. Connecting headphones or other devices to prevent accidental removal. To turn the volume down, turn the dial to the computer. 36 Finding Your Way Around Making sure you have everything SD® card slot-Lets you ...
... Slim SelectBay release Expansion port Battery release-Locks the battery in place to this jack automatically disables the internal speakers. To turn the volume up, turn the dial to the computer. Microphone jack-Lets you connect stereo headphones or other audio input device to the left. Headphone...control-Lets you insert SD® cards for additional data storage. Connecting headphones or other devices to prevent accidental removal. To turn the volume down, turn the dial to the computer. 36 Finding Your Way Around Making sure you have everything SD® card slot-Lets you ...
User Guide
Page 39
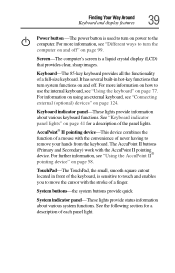
Keyboard-The 85-key keyboard provides all the functionality of the keyboard, is sensitive to touch and enables you to turn the computer on and off . Keyboard indicator panel-These lights provide information about various system functions. See "Keyboard indicator panel lights" on page 41 for a ... that provides clear, sharp images. Finding Your Way Around Keyboard and display features 39 Power button -The power button is a liquid crystal display (LCD) that turn system functions on and off " on page 99. Screen-The computer's screen is used to...
Keyboard-The 85-key keyboard provides all the functionality of the keyboard, is sensitive to touch and enables you to turn the computer on and off . Keyboard indicator panel-These lights provide information about various system functions. See "Keyboard indicator panel lights" on page 41 for a ... that provides clear, sharp images. Finding Your Way Around Keyboard and display features 39 Power button -The power button is a liquid crystal display (LCD) that turn system functions on and off " on page 99. Screen-The computer's screen is used to...

User Guide
Page 44
... WARNING: Using the computer keyboard incorrectly can work ❖ Liquids and corrosive chemicals CAUTION: If you spill liquid into the computer, turn it on , contact a Toshiba service representative or your hands, wrists, and/or arms hurt while typing, stop using their computers. If the discomfort persists, consult... you can result in temperature or humidity and sources of the equipment, you turn it off, unplug it from the AC power source and let it dry out completely before turning it back on again. Keeping yourself comfortable Strain and stress injuries are connected to...
... WARNING: Using the computer keyboard incorrectly can work ❖ Liquids and corrosive chemicals CAUTION: If you spill liquid into the computer, turn it on , contact a Toshiba service representative or your hands, wrists, and/or arms hurt while typing, stop using their computers. If the discomfort persists, consult... you can result in temperature or humidity and sources of the equipment, you turn it off, unplug it from the AC power source and let it dry out completely before turning it back on again. Keeping yourself comfortable Strain and stress injuries are connected to...

User Guide
Page 51
...either the battery pack is malfunctioning, or it . Doing so may cause an electric shock. To charge the battery, leave the computer plugged in and turned off . Before using the battery to power the computer, you must charge it is not receiving input from the outlet with the computer... turned off for more than a few hours at least three hours with wet hands. Continuing to an AC power source for troubleshooting information. Never modify,...
...either the battery pack is malfunctioning, or it . Doing so may cause an electric shock. To charge the battery, leave the computer plugged in and turned off . Before using the battery to power the computer, you must charge it is not receiving input from the outlet with the computer... turned off for more than a few hours at least three hours with wet hands. Continuing to an AC power source for troubleshooting information. Never modify,...
User Guide
Page 52
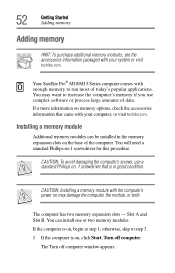
... Installing a memory module with your system or visit toshiba.com. You may damage the computer, the module, or both. You will need a standard Phillips no . 1 screwdriver that came with the computer's power on , click Start, Turn off computer window appears. The computer has two memory...: To avoid damaging the computer's screws, use complex software or process large amounts of data. Your Satellite Pro® M10/M15 Series computer comes with your computer, or visit toshiba.com. Installing a memory module Additional memory modules can install one or two memory modules. You can ...
... Installing a memory module with your system or visit toshiba.com. You may damage the computer, the module, or both. You will need a standard Phillips no . 1 screwdriver that came with the computer's power on , click Start, Turn off computer window appears. The computer has two memory...: To avoid damaging the computer's screws, use complex software or process large amounts of data. Your Satellite Pro® M10/M15 Series computer comes with your computer, or visit toshiba.com. Installing a memory module Additional memory modules can install one or two memory modules. You can ...
User Guide
Page 53
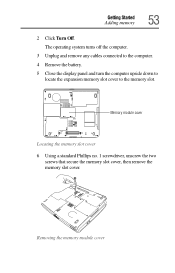
Removing the memory module cover The operating system turns off the computer. 3 Unplug and remove any cables connected to the computer. 4 Remove the battery. 5 Close the display panel and turn the computer upside down to locate the expansion memory slot cover to the memory slot. Memory module cover Locating the memory slot cover 6 Using a standard Phillips no. 1 screwdriver, unscrew the two screws that secure the memory slot cover, then remove the memory slot cover. Getting Started Adding memory 53 2 Click Turn Off.
Removing the memory module cover The operating system turns off the computer. 3 Unplug and remove any cables connected to the computer. 4 Remove the battery. 5 Close the display panel and turn the computer upside down to locate the expansion memory slot cover to the memory slot. Memory module cover Locating the memory slot cover 6 Using a standard Phillips no. 1 screwdriver, unscrew the two screws that secure the memory slot cover, then remove the memory slot cover. Getting Started Adding memory 53 2 Click Turn Off.
User Guide
Page 55
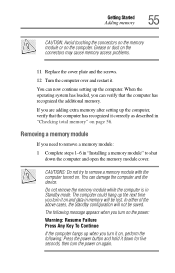
... 1-6 in memory will not be lost. The following : Press the power button and hold it on, perform the following message appears when you turn it down the computer and open the memory module cover. Getting Started Adding memory 55 CAUTION: Avoid touching the connectors on the memory module or... on . If you turn on page 56. When the operating system has loaded, you can damage the computer and the device. Grease or dust on the connectors may...
... 1-6 in memory will not be lost. The following : Press the power button and hold it on, perform the following message appears when you turn it down the computer and open the memory module cover. Getting Started Adding memory 55 CAUTION: Avoid touching the connectors on the memory module or... on . If you turn on page 56. When the operating system has loaded, you can damage the computer and the device. Grease or dust on the connectors may...
User Guide
Page 56
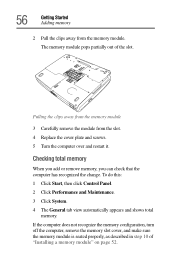
... When you add or remove memory, you can check that the computer has recognized the change. If the computer does not recognize the memory configuration, turn off the computer, remove the memory slot cover, and make sure the memory module is seated properly, as described in step 10 of the slot... remove the module from the memory module. 56 Getting Started Adding memory 2 Pull the clips away from the slot. 4 Replace the cover plate and screws. 5 Turn the computer over and restart it. The memory module pops partially out of "Installing a memory module" on page 52.
... When you add or remove memory, you can check that the computer has recognized the change. If the computer does not recognize the memory configuration, turn off the computer, remove the memory slot cover, and make sure the memory module is seated properly, as described in step 10 of the slot... remove the module from the memory module. 56 Getting Started Adding memory 2 Pull the clips away from the slot. 4 Replace the cover plate and screws. 5 Turn the computer over and restart it. The memory module pops partially out of "Installing a memory module" on page 52.

User Guide
Page 57
... . Opening the display panel 1 Slide the display latch to the right. 2 Lift the display panel. Turning on the power To turn on the computer: 1 Make sure any external devices (such as the AC adapter, if you to turn it on and begin using it moves easily, and never lift the computer by the... display panel. Getting Started Turning on the computer 57 Turning on the computer The computer is now ready for you plan to use AC power rather than battery power) are properly connected and ready. 2 Check ...
... . Opening the display panel 1 Slide the display latch to the right. 2 Lift the display panel. Turning on the power To turn on the computer: 1 Make sure any external devices (such as the AC adapter, if you to turn it on and begin using it moves easily, and never lift the computer by the... display panel. Getting Started Turning on the computer 57 Turning on the computer The computer is now ready for you plan to use AC power rather than battery power) are properly connected and ready. 2 Check ...

User Guide
Page 58
... device Primary AccuPoint II button Secondary AccuPoint II button TouchPad Secondary button Together with the primary and secondary AccuPoint II buttons, it enables you turn on the screen. Together, the AccuPoint II and TouchPad are named the Dual Point device. CAUTION: When you to move the cursor and... to select items on the computer for the first time, don't turn off the power again until the operating system has loaded completely. 58 Getting Started Using the AccuPoint II® pointing device For the meaning...
... device Primary AccuPoint II button Secondary AccuPoint II button TouchPad Secondary button Together with the primary and secondary AccuPoint II buttons, it enables you turn on the screen. Together, the AccuPoint II and TouchPad are named the Dual Point device. CAUTION: When you to move the cursor and... to select items on the computer for the first time, don't turn off the power again until the operating system has loaded completely. 58 Getting Started Using the AccuPoint II® pointing device For the meaning...

User Guide
Page 62
... User License Agreement and click Next. 3 Enter the computer name and description, and click Next or Skip. Setting up your software The first time you turn on the desktop. 6 Enter your computer's modem must be chosen." 4 Click Skip to exit the process or Next to exit the process. A window ...will display asking if you through steps to set up your computer, the Setup Wizard guides you wish to register with Toshiba icon on your software 10 Close the Printers and Other Hardware window. 11 Close the Control Panel window. NOTE: To register online, your personal ...
... User License Agreement and click Next. 3 Enter the computer name and description, and click Next or Skip. Setting up your software The first time you turn on the desktop. 6 Enter your computer's modem must be chosen." 4 Click Skip to exit the process or Next to exit the process. A window ...will display asking if you through steps to set up your computer, the Setup Wizard guides you wish to register with Toshiba icon on your software 10 Close the Printers and Other Hardware window. 11 Close the Control Panel window. NOTE: To register online, your personal ...

User Guide
Page 63
...Toshiba 63 7 Enter your printer. If you are not using it may want to take up to three hours to complete the process. Your computer restarts automatically. For more information, see "Setting up your name and click Finish to recharge the main battery. With the computer off ) to do so electronically. Turning.... Setting up other devices You may take this time to a domain server. Each option has its advantages. ❖ Use the Turn Off command if you are using the Windows XP Home version operating system, or the Windows XP Professional operating system when not connected ...
...Toshiba 63 7 Enter your printer. If you are not using it may want to take up to three hours to complete the process. Your computer restarts automatically. For more information, see "Setting up your name and click Finish to recharge the main battery. With the computer off ) to do so electronically. Turning.... Setting up other devices You may take this time to a domain server. Each option has its advantages. ❖ Use the Turn Off command if you are using the Windows XP Home version operating system, or the Windows XP Professional operating system when not connected ...


