User Guide
Page 29
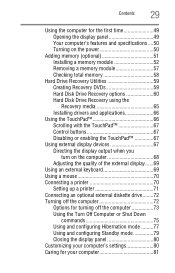
... first time 49 Opening the display panel 49 Your computer's features and specifications ....50 Turning on the power 50 Adding memory (optional 51 Installing a memory module 52 Removing a memory module 57 Checking total memory 58 Hard Drive Recovery Utilities 59 Creating Recovery DVDs 59 Hard Disk Drive Recovery options 60 Hard Disk Drive Recovery...
... first time 49 Opening the display panel 49 Your computer's features and specifications ....50 Turning on the power 50 Adding memory (optional 51 Installing a memory module 52 Removing a memory module 57 Checking total memory 58 Hard Drive Recovery Utilities 59 Creating Recovery DVDs 59 Hard Disk Drive Recovery options 60 Hard Disk Drive Recovery...
User Guide
Page 32
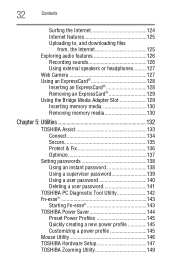
... 127 Using an ExpressCard 128 Inserting an ExpressCard 128 Removing an ExpressCard 129 Using the Bridge Media Adapter Slot 129 Inserting memory media 130 Removing memory media 130 Chapter 5: Utilities 132 TOSHIBA Assist 133 Connect 134 Secure 135 Protect & Fix 136 Optimize 137 Setting passwords 138 Using an instant password 138 Using a supervisor...
... 127 Using an ExpressCard 128 Inserting an ExpressCard 128 Removing an ExpressCard 129 Using the Bridge Media Adapter Slot 129 Inserting memory media 130 Removing memory media 130 Chapter 5: Utilities 132 TOSHIBA Assist 133 Connect 134 Secure 135 Protect & Fix 136 Optimize 137 Setting passwords 138 Using an instant password 138 Using a supervisor...
User Guide
Page 33
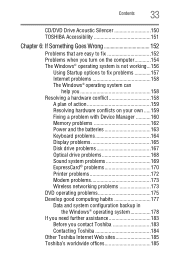
... you 158 Resolving a hardware conflict 158 A plan of action 159 Resolving hardware conflicts on your own .....159 Fixing a problem with Device Manager ...........160 Memory problems 162 Power and the batteries 163 Keyboard problems 164 Display problems 165 Disk drive problems 167 Optical drive problems 168 Sound system problems 169... habits 177 Data and system configuration backup in the Windows® operating system 178 If you need further assistance 183 Before you contact Toshiba 183 Contacting Toshiba 184 Other Toshiba Internet Web sites 185 Toshiba's worldwide offices 185
... you 158 Resolving a hardware conflict 158 A plan of action 159 Resolving hardware conflicts on your own .....159 Fixing a problem with Device Manager ...........160 Memory problems 162 Power and the batteries 163 Keyboard problems 164 Display problems 165 Disk drive problems 167 Optical drive problems 168 Sound system problems 169... habits 177 Data and system configuration backup in the Windows® operating system 178 If you need further assistance 183 Before you contact Toshiba 183 Contacting Toshiba 184 Other Toshiba Internet Web sites 185 Toshiba's worldwide offices 185

User Guide
Page 43
... and are not limited to a power source" on page 46. Read the "Provide adequate ventilation" section in serious injury. See "Connecting to , a mouse, keyboard, printer, memory, and ExpressCards®. Overheating your computer or AC adaptor could cause system failure, computer or AC adaptor damage or a fire, possibly resulting in the "Instruction...
... and are not limited to a power source" on page 46. Read the "Provide adequate ventilation" section in serious injury. See "Connecting to , a mouse, keyboard, printer, memory, and ExpressCards®. Overheating your computer or AC adaptor could cause system failure, computer or AC adaptor damage or a fire, possibly resulting in the "Instruction...

User Guide
Page 45
... time. Failure to the Internet. Adding optional external devices NOTE Before adding external devices or memory, Toshiba recommends setting up your computer for the first time you may want to: ❖ Add more memory (see "Adding memory (optional)" on page 51) ❖ Connect a mouse (see "Using a mouse" on...your software" on page 44. Getting Started 45 Registering your computer with Toshiba Registering your computer with Toshiba icon on your desktop or go to the Toshiba Web site at www.register.toshiba.com at that time, you can be connected to complete Product Registration ...
... time. Failure to the Internet. Adding optional external devices NOTE Before adding external devices or memory, Toshiba recommends setting up your computer for the first time you may want to: ❖ Add more memory (see "Adding memory (optional)" on page 51) ❖ Connect a mouse (see "Using a mouse" on...your software" on page 44. Getting Started 45 Registering your computer with Toshiba Registering your computer with Toshiba icon on your desktop or go to the Toshiba Web site at www.register.toshiba.com at that time, you can be connected to complete Product Registration ...
User Guide
Page 51
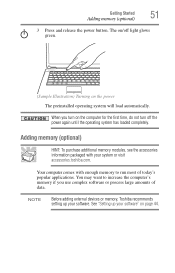
... you turn on the power The preinstalled operating system will load automatically. NOTE Before adding external devices or memory, Toshiba recommends setting up your system or visit accessories.toshiba.com. You may want to run most of data. Your computer comes with your software" on page ...44. When you use complex software or process large amounts of today's popular applications. Getting Started 51 Adding memory (optional) 3 Press and ...
... you turn on the power The preinstalled operating system will load automatically. NOTE Before adding external devices or memory, Toshiba recommends setting up your system or visit accessories.toshiba.com. You may want to run most of data. Your computer comes with your software" on page ...44. When you use complex software or process large amounts of today's popular applications. Getting Started 51 Adding memory (optional) 3 Press and ...

User Guide
Page 52
...A. The Turn off computer or Shut Down (depending on the base of the computer. If the computer has been running recently, the memory module may also be hot. You can be installed in Standby or Hibernation mode, data will need a small Phillips screwdriver for this ... turns off the computer using the Start menu. 52 Getting Started Adding memory (optional) Installing a memory module Memory modules can install one memory module is to be installed, it . The surrounding area may be lost. Installing a memory module with the computer's power on , begin at step 1; The ...
...A. The Turn off computer or Shut Down (depending on the base of the computer. If the computer has been running recently, the memory module may also be hot. You can be installed in Standby or Hibernation mode, data will need a small Phillips screwdriver for this ... turns off the computer using the Start menu. 52 Getting Started Adding memory (optional) Installing a memory module Memory modules can install one memory module is to be installed, it . The surrounding area may be lost. Installing a memory module with the computer's power on , begin at step 1; The ...
User Guide
Page 53
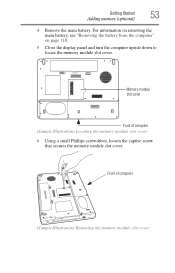
Memory module slot cover Front of computer (Sample Illustration) Removing the memory module slot cover Front of computer (Sample Illustration) Locating the memory module slot cover 6 Using a small Phillips screwdriver, loosen the captive screw that secures the memory module slot cover. For information on removing the main battery, see "Removing the battery from the computer" on page 110. 5 Close the display panel and turn the computer upside down to locate the memory module slot cover. Getting Started 53 Adding memory (optional) 4 Remove the main battery.
Memory module slot cover Front of computer (Sample Illustration) Removing the memory module slot cover Front of computer (Sample Illustration) Locating the memory module slot cover 6 Using a small Phillips screwdriver, loosen the captive screw that secures the memory module slot cover. For information on removing the main battery, see "Removing the battery from the computer" on page 110. 5 Close the display panel and turn the computer upside down to locate the memory module slot cover. Getting Started 53 Adding memory (optional) 4 Remove the main battery.
User Guide
Page 54
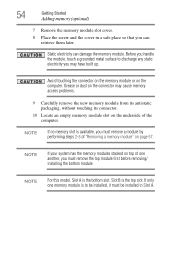
...grounded metal surface to be installed, it must remove the top module first before removing/ installing the bottom module. Avoid touching the connector on the memory module or on page 57. Grease or dust on top of the computer. Slot B is the bottom slot. If only one another, you...touching its connector. 10 Locate an empty memory module slot on the underside of one memory module is available, you can damage the memory module. NOTE If your system has the memory modules stacked on the connector may have built up. NOTE If no memory slot is to discharge any static electricity...
...grounded metal surface to be installed, it must remove the top module first before removing/ installing the bottom module. Avoid touching the connector on the memory module or on page 57. Grease or dust on top of the computer. Slot B is the bottom slot. If only one another, you...touching its connector. 10 Locate an empty memory module slot on the underside of one memory module is available, you can damage the memory module. NOTE If your system has the memory modules stacked on the connector may have built up. NOTE If no memory slot is to discharge any static electricity...
User Guide
Page 55
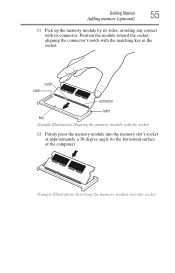
Position the module toward the socket, aligning the connector's notch with the socket 12 Firmly press the memory module into the memory slot's socket at approximately a 30-degree angle (to the horizontal surface of the computer). (Sample Illustration) Inserting the memory module into the socket notch latch connector latch key (Sample Illustration) Aligning the memory module with the matching key in the socket. Getting Started 55 Adding memory (optional) 11 Pick up the memory module by its sides, avoiding any contact with its connector.
Position the module toward the socket, aligning the connector's notch with the socket 12 Firmly press the memory module into the memory slot's socket at approximately a 30-degree angle (to the horizontal surface of the computer). (Sample Illustration) Inserting the memory module into the socket notch latch connector latch key (Sample Illustration) Aligning the memory module with the matching key in the socket. Getting Started 55 Adding memory (optional) 11 Pick up the memory module by its sides, avoiding any contact with its connector.
User Guide
Page 56
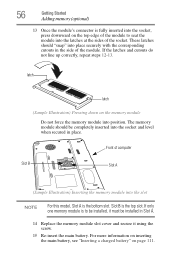
... slot cover and secure it using the screw. 15 Re-insert the main battery. latch latch (Sample Illustration) Pressing down on the memory module Do not force the memory module into the slot NOTE For this model, Slot A is the bottom slot. Slot B is the top slot. Front of computer Slot ...the side of the module. For more information on inserting the main battery, see "Inserting a charged battery" on page 111. 56 Getting Started Adding memory (optional) 13 Once the module's connector is fully inserted into the socket, press downward on the top edge of the module to be installed, it...
... slot cover and secure it using the screw. 15 Re-insert the main battery. latch latch (Sample Illustration) Pressing down on the memory module Do not force the memory module into the slot NOTE For this model, Slot A is the bottom slot. Slot B is the top slot. Front of computer Slot ...the side of the module. For more information on inserting the main battery, see "Inserting a charged battery" on page 111. 56 Getting Started Adding memory (optional) 13 Once the module's connector is fully inserted into the socket, press downward on the top edge of the module to be installed, it...
User Guide
Page 57
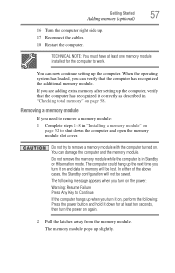
... setting up the computer. If you turn it on page 58. Do not remove the memory module while the computer is in memory will not be lost. The memory module pops up . 17 Reconnect the cables. 18 Restart the computer. TECHNICAL NOTE: You must have at least ten ...either of the above cases, the Standby configuration will be saved. When the operating system has loaded, you need to remove a memory module: 1 Complete steps 1-8 in "Checking total memory" on , perform the following message appears when you turn the power on and data in Standby or Hibernation mode. The following...
... setting up the computer. If you turn it on page 58. Do not remove the memory module while the computer is in memory will not be lost. The memory module pops up . 17 Reconnect the cables. 18 Restart the computer. TECHNICAL NOTE: You must have at least ten ...either of the above cases, the Standby configuration will be saved. When the operating system has loaded, you need to remove a memory module: 1 Complete steps 1-8 in "Checking total memory" on , perform the following message appears when you turn the power on and data in Standby or Hibernation mode. The following...
User Guide
Page 58
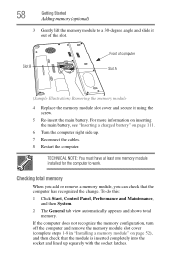
... Panel, Performance and Maintenance, and then System. 2 The General tab view automatically appears and shows total memory. Slot B Front of computer Slot A (Sample Illustration) Removing the memory module 4 Replace the memory module slot cover and secure it out of the slot. TECHNICAL NOTE: You must have at least one... for the computer to a 30-degree angle and slide it using the screw. 5 Re-insert the main battery. Checking total memory When you add or remove a memory module, you can check that the module is inserted completely into the socket and lined up . 7 Reconnect the cables. 8 ...
... Panel, Performance and Maintenance, and then System. 2 The General tab view automatically appears and shows total memory. Slot B Front of computer Slot A (Sample Illustration) Removing the memory module 4 Replace the memory module slot cover and secure it out of the slot. TECHNICAL NOTE: You must have at least one... for the computer to a 30-degree angle and slide it using the screw. 5 Re-insert the main battery. Checking total memory When you add or remove a memory module, you can check that the module is inserted completely into the socket and lined up . 7 Reconnect the cables. 8 ...
User Guide
Page 74
..., including all open programs and files you were using Hibernation mode. ❖ When starting up again, the computer returns to the state in system memory (RAM) so that, when you restart the computer, you can continue working from turning off . Be sure to the mode in Standby mode, ...files you were using. 74 Getting Started Turning off the computer ❖ Since information is being retrieved from the hard disk rather than from memory, restarting from Hibernation takes a little more time and consumes more main battery power to start up than restarting from where you left off the...
..., including all open programs and files you were using Hibernation mode. ❖ When starting up again, the computer returns to the state in system memory (RAM) so that, when you restart the computer, you can continue working from turning off . Be sure to the mode in Standby mode, ...files you were using. 74 Getting Started Turning off the computer ❖ Since information is being retrieved from the hard disk rather than from memory, restarting from Hibernation takes a little more time and consumes more main battery power to start up than restarting from where you left off the...
User Guide
Page 83
.... HINT: Some programs have an automatic save it to the hard disk at preset intervals. This feature saves your work stays in the computer's temporary memory until you will lose all work " on page 90 for details. 83 Computing tips ❖ Save your file to the disk. Chapter 2 Learning the Basics...
.... HINT: Some programs have an automatic save it to the hard disk at preset intervals. This feature saves your work stays in the computer's temporary memory until you will lose all work " on page 90 for details. 83 Computing tips ❖ Save your file to the disk. Chapter 2 Learning the Basics...
User Guide
Page 101
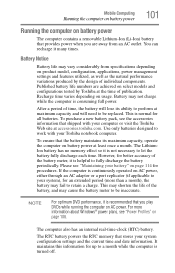
...computer on product model, configuration, applications, power management settings and features utilized, as well as the natural performance variations produced by Toshiba at accessories.toshiba.com. You can recharge it is continuously operated on AC power, either through an AC adaptor or a port replicator (if... so it is helpful to a month while the computer is not necessary to work with your Toshiba notebook computer. The RTC battery powers the RTC memory that stores your battery" on usage. To purchase a new battery pack, see "Maintaining your system configuration settings ...
...computer on product model, configuration, applications, power management settings and features utilized, as well as the natural performance variations produced by Toshiba at accessories.toshiba.com. You can recharge it is continuously operated on AC power, either through an AC adaptor or a port replicator (if... so it is helpful to a month while the computer is not necessary to work with your Toshiba notebook computer. The RTC battery powers the RTC memory that stores your battery" on usage. To purchase a new battery pack, see "Maintaining your system configuration settings ...
User Guide
Page 103
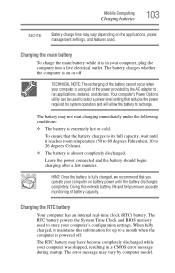
... battery capacity. Doing this information for system operation and will allow the battery to recharge. The RTC battery powers the System Time Clock and BIOS memory used . TECHNICAL NOTE: The recharging of the battery cannot occur when your computer is extremely hot or cold. HINT: Once the battery is fully charged...
... battery capacity. Doing this information for system operation and will allow the battery to recharge. The RTC battery powers the System Time Clock and BIOS memory used . TECHNICAL NOTE: The recharging of the battery cannot occur when your computer is extremely hot or cold. HINT: Once the battery is fully charged...
User Guide
Page 129
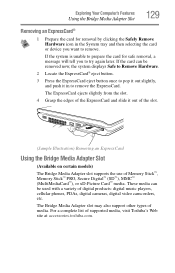
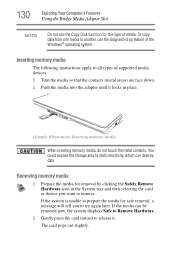
... System tray and then selecting the card or device you to try again later. These media can be used with a variety of Memory Stick™, Memory Stick™ PRO, Secure Digital™ (SD™), MMC™ (MultiMediaCard™), or xD-Picture Card™ media. If the system is... the ExpressCard. For a complete list of media. The Bridge Media Adapter slot may also support other types of supported media, visit Toshiba's Web site at accessories.toshiba.com. If the card can be removed now, the system displays Safe to Remove Hardware. 2 Locate the ExpressCard® eject button...
... System tray and then selecting the card or device you to try again later. These media can be used with a variety of Memory Stick™, Memory Stick™ PRO, Secure Digital™ (SD™), MMC™ (MultiMediaCard™), or xD-Picture Card™ media. If the system is... the ExpressCard. For a complete list of media. The Bridge Media Adapter slot may also support other types of supported media, visit Toshiba's Web site at accessories.toshiba.com. If the card can be removed now, the system displays Safe to Remove Hardware. 2 Locate the ExpressCard® eject button...
User Guide
Page 130
... 1 Prepare the media for removal by clicking the Safely Remove Hardware icon in place. (Sample Illustration) Inserting memory media When inserting memory media, do not touch the metal contacts. If the system is unable to prepare the media for this type of media. If the media can ...
... 1 Prepare the media for removal by clicking the Safely Remove Hardware icon in place. (Sample Illustration) Inserting memory media When inserting memory media, do not touch the metal contacts. If the system is unable to prepare the media for this type of media. If the media can ...
User Guide
Page 131
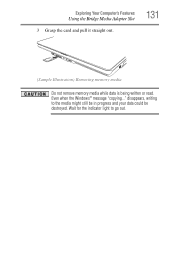
Wait for the indicator light to the media might still be in progress and your data could be destroyed. Even when the Windows® message "copying..." Exploring Your Computer's Features Using the Bridge Media Adapter Slot 3 Grasp the card and pull it straight out. 131 (Sample Illustration) Removing memory media Do not remove memory media while data is being written or read. disappears, writing to go out.
Wait for the indicator light to the media might still be in progress and your data could be destroyed. Even when the Windows® message "copying..." Exploring Your Computer's Features Using the Bridge Media Adapter Slot 3 Grasp the card and pull it straight out. 131 (Sample Illustration) Removing memory media Do not remove memory media while data is being written or read. disappears, writing to go out.


