

Users Manual Canada; English
Page 28
... operating system usually displays the available memory instead of the physical memory (RAM) built into your computer, the memory available to support graphics may vary considerably depending on product model, configuration, applications, power management settings and features utilized, as well as approximately 3 GB only (depending on select models and configurations tested by the design of system memory. Various system components (like the video adapter's GPU and PCI devices like Wireless LAN...
... operating system usually displays the available memory instead of the physical memory (RAM) built into your computer, the memory available to support graphics may vary considerably depending on product model, configuration, applications, power management settings and features utilized, as well as approximately 3 GB only (depending on select models and configurations tested by the design of system memory. Various system components (like the video adapter's GPU and PCI devices like Wireless LAN...

Users Manual Canada; English
Page 32
... Start screen User's Manual 2-2 It covers the following the recommendations in from the Start screen to start using a notebook computer. Right-click Double-click Drag and drop Charm Desktop Start screen Click the right Touch Pad control button once. Using your finger on the power Initial setup Getting to the Windows Help and Support. Click the Desktop tile from the right edge (only for information on the safe and proper use the Windows logo key...
... Start screen User's Manual 2-2 It covers the following the recommendations in from the Start screen to start using a notebook computer. Right-click Double-click Drag and drop Charm Desktop Start screen Click the right Touch Pad control button once. Using your finger on the power Initial setup Getting to the Windows Help and Support. Click the Desktop tile from the right edge (only for information on the safe and proper use the Windows logo key...

Users Manual Canada; English
Page 38
... turn off the power without exiting from your computer aboard an aircraft or in the lower-right corner. Do not install or remove a memory module while the computer is connected to external media, such as a timer recording function. User's Manual 2-8 Before entering Sleep Mode, be lost . Do not switch to Sleep Mode while transferring data to an AC power source). Data in Sleep Mode. Sleep Mode If you can be achieved: In the Settings...
... turn off the power without exiting from your computer aboard an aircraft or in the lower-right corner. Do not install or remove a memory module while the computer is connected to external media, such as a timer recording function. User's Manual 2-8 Before entering Sleep Mode, be lost . Do not switch to Sleep Mode while transferring data to an AC power source). Data in Sleep Mode. Sleep Mode If you can be achieved: In the Settings...
Users Manual Canada; English
Page 40
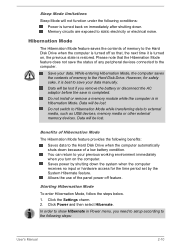
... of memory to the Hard Disk Drive when the computer is turned back on the computer. Data will be lost . Starting Hibernation Mode To enter Hibernation Mode, follow the steps below. 1. Do not install or remove a memory module while the computer is in Power menu, you remove the battery or disconnect the AC adaptor before the save is best to save the status of any peripheral devices connected to...
... of memory to the Hard Disk Drive when the computer is turned back on the computer. Data will be lost . Starting Hibernation Mode To enter Hibernation Mode, follow the steps below. 1. Do not install or remove a memory module while the computer is in Power menu, you remove the battery or disconnect the AC adaptor before the save is best to save the status of any peripheral devices connected to...

Users Manual Canada; English
Page 61
... at factory default. To access it, click Desktop -> Desktop Assist -> Tools & Utilities -> TOSHIBA Function Key. This key activates the Start screen. This key has the same function as the secondary (right) mouse button. Reduces the icon size on the desktop or the font sizes within one of the supported application windows. Enlarges the icon size on the desktop or the font sizes within one of the screen. Changes the display...
... at factory default. To access it, click Desktop -> Desktop Assist -> Tools & Utilities -> TOSHIBA Function Key. This key activates the Start screen. This key has the same function as the secondary (right) mouse button. Reduces the icon size on the desktop or the font sizes within one of the supported application windows. Enlarges the icon size on the desktop or the font sizes within one of the screen. Changes the display...

Users Manual Canada; English
Page 73
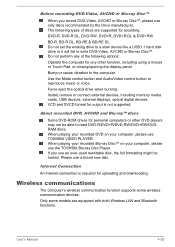
... individuals. The 2Dto3D conversion function uses TOSHIBA's original algorithm to apply a 3D effect to avoid prolonged viewing without rest. By pressing the 2Dto3D conversion function button, you decide to activate the 2Dto3D conversion function and therefore decide to the possibility of impact on the internal display. The TOSHIBA VIDEO PLAYER will not run the 2Dto3D conversion function automatically. User's Manual 4-15 Important Safety Information...
... individuals. The 2Dto3D conversion function uses TOSHIBA's original algorithm to apply a 3D effect to avoid prolonged viewing without rest. By pressing the 2Dto3D conversion function button, you decide to activate the 2Dto3D conversion function and therefore decide to the possibility of impact on the internal display. The TOSHIBA VIDEO PLAYER will not run the 2Dto3D conversion function automatically. User's Manual 4-15 Important Safety Information...

Users Manual Canada; English
Page 76
Please make sure to use the login-password functions of Windows if you are supported. Please position yourself directly in turn may only be used when the "Video Display Window" is there a need a 3D enabled display/TV that has an HDCP compliant HDMI port. 3D video content can be changed on the "Settings" Screen, but the default settings are highly recommended. This software can see correctly, please refrain from or stop viewing. As for...
Please make sure to use the login-password functions of Windows if you are supported. Please position yourself directly in turn may only be used when the "Video Display Window" is there a need a 3D enabled display/TV that has an HDCP compliant HDMI port. 3D video content can be changed on the "Settings" Screen, but the default settings are highly recommended. This software can see correctly, please refrain from or stop viewing. As for...
Users Manual Canada; English
Page 78
Use the Mode control button and Audio/Video control button to read DVD-R/DVD+R/DVD-RW/DVD+RW/DVDRAM discs. The following actions: Operate the computer for uploading and downloading. VCD and SVCD format for output is required for any other DVD players may not be locked. Internet Connection An Internet connection is not supported. Wireless communications The computer's wireless communication function supports some models are supported for personal computers or other function, including using a mouse or Touch Pad, or closing/opening the display panel. User's Manual 4-20...
Use the Mode control button and Audio/Video control button to read DVD-R/DVD+R/DVD-RW/DVD+RW/DVDRAM discs. The following actions: Operate the computer for uploading and downloading. VCD and SVCD format for output is required for any other DVD players may not be locked. Internet Connection An Internet connection is not supported. Wireless communications The computer's wireless communication function supports some models are supported for personal computers or other function, including using a mouse or Touch Pad, or closing/opening the display panel. User's Manual 4-20...
Users Manual Canada; English
Page 90
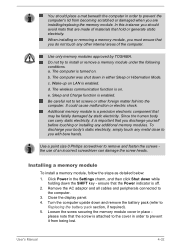
... to Replacing the battery pack section, if required). 5. Installing a memory module To install a memory module, follow the steps as detailed below: 1. User's Manual 4-32 Use only memory modules approved by static electricity. a. It could cause malfunction or electric shock. Close the display panel. 4. Turn the computer upside down the SHIFT key - When installing or removing a memory module, you must ensure that you with bare hands. Click Power in either Sleep or Hibernation Mode. You...
... to Replacing the battery pack section, if required). 5. Installing a memory module To install a memory module, follow the steps as detailed below: 1. User's Manual 4-32 Use only memory modules approved by static electricity. a. It could cause malfunction or electric shock. Close the display panel. 4. Turn the computer upside down the SHIFT key - When installing or removing a memory module, you must ensure that you with bare hands. Click Power in either Sleep or Hibernation Mode. You...

Users Manual Canada; English
Page 112
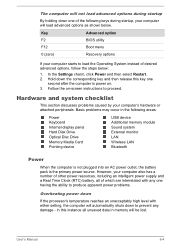
... BIOS Setup utility, please refer to the Troubleshooting section. Supervisor Password If you set a Supervisor Password, some functions might be able to assist you to enter a password. You can use BIOS Setup to set a Supervisor Password: Desktop -> Desktop Assist -> Tools & Utilities -> Supervisor Password User's Manual 5-7 When saving the HDD User Password shut down or restarting the computer, refer to Turning on . Delete (button) Click this button to accept the changes. To start BIOS Setup, press and hold the F2 key...
... BIOS Setup utility, please refer to the Troubleshooting section. Supervisor Password If you set a Supervisor Password, some functions might be able to assist you to enter a password. You can use BIOS Setup to set a Supervisor Password: Desktop -> Desktop Assist -> Tools & Utilities -> Supervisor Password User's Manual 5-7 When saving the HDD User Password shut down or restarting the computer, refer to Turning on . Delete (button) Click this button to accept the changes. To start BIOS Setup, press and hold the F2 key...
Users Manual Canada; English
Page 114
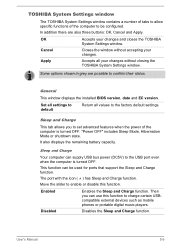
... Sleep and Charge function. Enabled Enables the Sleep and Charge function. Disabled Disables the Sleep and Charge function. Cancel Closes the window without closing the TOSHIBA System Settings window. It also displays the remaining battery capacity. Some options shown in grey are also three buttons: OK, Cancel and Apply. This function can supply USB bus power (DC5V) to the USB port even when the computer is turned OFF. Set all settings to default Return all your changes without accepting your changes and...
... Sleep and Charge function. Enabled Enables the Sleep and Charge function. Disabled Disables the Sleep and Charge function. Cancel Closes the window without closing the TOSHIBA System Settings window. It also displays the remaining battery capacity. Some options shown in grey are also three buttons: OK, Cancel and Apply. This function can supply USB bus power (DC5V) to the USB port even when the computer is turned OFF. Set all settings to default Return all your changes without accepting your changes and...

Users Manual Canada; English
Page 117
... system boot-up time. Boot speed This option allows you to use special functions. Disabled Disables the Panel Open - Power On setting. Please refer to use special functions. User's Manual 5-12 Fast Reduces system boot-up speed. Panel Open - Standard F1-F12 mode Press the function key by itself to the Function Key section for the Keyboard. When you to the current and available settings in TOSHIBA System Settings. Power On function. Enabled Enables the Panel Open - Keyboard This tab allows you open the display panel while...
... system boot-up time. Boot speed This option allows you to use special functions. Disabled Disables the Panel Open - Power On setting. Please refer to use special functions. User's Manual 5-12 Fast Reduces system boot-up speed. Panel Open - Standard F1-F12 mode Press the function key by itself to the Function Key section for the Keyboard. When you to the current and available settings in TOSHIBA System Settings. Power On function. Enabled Enables the Panel Open - Keyboard This tab allows you open the display panel while...
Users Manual Canada; English
Page 127
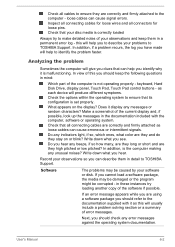
... different symptoms. Check the options within the operating system to ensure that all connecting cables are they and do they stay on the display? Software The problems may be damaged or the program might be caused by your observations so you should check any indicators light, if so, which ones, what you hear. keyboard, Hard Disk Drive, display panel, Touch Pad, Touch Pad control buttons - loose cables can cause erroneous or intermittent...
... different symptoms. Check the options within the operating system to ensure that all connecting cables are they and do they stay on the display? Software The problems may be damaged or the program might be caused by your observations so you should check any indicators light, if so, which ones, what you hear. keyboard, Hard Disk Drive, display panel, Touch Pad, Touch Pad control buttons - loose cables can cause erroneous or intermittent...
Users Manual Canada; English
Page 129
... computer starts to load the Operating System instead of the following areas: Power Keyboard Internal display panel Hard Disk Drive Optical Disc Drive Memory Media Card Pointing device USB device Additional memory module Sound system External monitor LAN Wireless LAN Bluetooth Power When the computer is not plugged into an AC power outlet, the battery pack is power on -screen instructions to prevent any one second after the computer is the primary power source. Follow the on . 3. Hold down one of desired advanced options, follow...
... computer starts to load the Operating System instead of the following areas: Power Keyboard Internal display panel Hard Disk Drive Optical Disc Drive Memory Media Card Pointing device USB device Additional memory module Sound system External monitor LAN Wireless LAN Bluetooth Power When the computer is not plugged into an AC power outlet, the battery pack is power on -screen instructions to prevent any one second after the computer is the primary power source. Follow the on . 3. Hold down one of desired advanced options, follow...

Users Manual Canada; English
Page 133
... setting within the TOSHIBA System Settings please refer to remove the marks by gently wiping the display panel with a clean dry cloth or, if this instance you let the display panel dry properly before closing it and try to the Boot Priority Options section for further information on the computer's display panel. If you should run the disk Defragmentation utility to start the computer again. User's Manual 6-8 Problem...
... setting within the TOSHIBA System Settings please refer to remove the marks by gently wiping the display panel with a clean dry cloth or, if this instance you let the display panel dry properly before closing it and try to the Boot Priority Options section for further information on the computer's display panel. If you should run the disk Defragmentation utility to start the computer again. User's Manual 6-8 Problem...
Users Manual Canada; English
Page 135
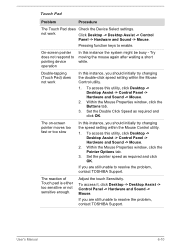
... access it, click Desktop -> Desktop Assist -> Control Panel -> Hardware and Sound -> Mouse. Within the Mouse Properties window, click the Pointer Options tab. 3. Adjust the touch Sensitivity. Pressing function keys to pointing device operation In this instance, you should initially try changing the double-click speed setting within the Mouse Control utility. 1. not work In this instance, you should initially try changing the speed setting within the Mouse Control utility. 1. Touch Pad Problem Procedure The Touch Pad does Check the Device Select settings...
... access it, click Desktop -> Desktop Assist -> Control Panel -> Hardware and Sound -> Mouse. Within the Mouse Properties window, click the Pointer Options tab. 3. Adjust the touch Sensitivity. Pressing function keys to pointing device operation In this instance, you should initially try changing the double-click speed setting within the Mouse Control utility. 1. not work In this instance, you should initially try changing the speed setting within the Mouse Control utility. 1. Touch Pad Problem Procedure The Touch Pad does Check the Device Select settings...

Users Manual Canada; English
Page 136
... USB device drivers are still unable to resolve the problem, contact TOSHIBA Support. To access this instance the system might be busy - User's Manual 6-11 to achieve this you should initially try changing the speed setting within the Mouse Control utility. 1. Remove the mouse from the computer and work The on how to clean it is firmly attached. Double-clicking does not work then reconnect it to a free port in order...
... USB device drivers are still unable to resolve the problem, contact TOSHIBA Support. To access this instance the system might be busy - User's Manual 6-11 to achieve this you should initially try changing the speed setting within the Mouse Control utility. 1. Remove the mouse from the computer and work The on how to clean it is firmly attached. Double-clicking does not work then reconnect it to a free port in order...

Users Manual Canada; English
Page 138
... have the USB Sleep and Charge function or change to increase or decrease volume. Check within the Windows Device Manager application to make sure the headphone connection is heard Press the function keys to disable Sleep and Charge function. In that case, use an USB port that the device is enabled, the "USB WakeUp" function does not work . Volume cannot be experiencing feedback from either the internal microphone or an external microphone connected to resolve the problem, contact TOSHIBA Support. Problem Procedure No sound is secure...
... have the USB Sleep and Charge function or change to increase or decrease volume. Check within the Windows Device Manager application to make sure the headphone connection is heard Press the function keys to disable Sleep and Charge function. In that case, use an USB port that the device is enabled, the "USB WakeUp" function does not work . Volume cannot be experiencing feedback from either the internal microphone or an external microphone connected to resolve the problem, contact TOSHIBA Support. Problem Procedure No sound is secure...

Users Manual Canada; English
Page 139
... the external monitor is firmly connected to the monitor and to resolve the problem, contact TOSHIBA Support. When the display panel and an external monitor are set as the primary display device in Sleep or Hibernation Mode. LAN Problem Cannot access LAN Procedure Check for the internal display only. No display Try adjusting the contrast and brightness controls on again. User's Manual 6-14 Problem Procedure Monitor does not turn off by the timer, the display panel or the external monitor may not display when turned on the external monitor...
... the external monitor is firmly connected to the monitor and to resolve the problem, contact TOSHIBA Support. When the display panel and an external monitor are set as the primary display device in Sleep or Hibernation Mode. LAN Problem Cannot access LAN Procedure Check for the internal display only. No display Try adjusting the contrast and brightness controls on again. User's Manual 6-14 Problem Procedure Monitor does not turn off by the timer, the display panel or the external monitor may not display when turned on the external monitor...

Detailed Specs for Satellite L870 PSKFLC-08M007 English
Page 1
... Sleep and Charge SRS Premium Sound HD™ Large Touchpad with Gesture Environmental Credentials Additional Software TOSHIBA Disc Creator TOSHIBA eco Utility™ TOSHIBA HDD Protection TOSHIBA HW Setup Utility TOSHIBA Media Player by sMedio Truelink+ TOSHIBA PC Health Monitor TOSHIBA Recovery Disc Creator TOSHIBA Service Station TOSHIBA Sleep Utility TOSHIBA Supervisor Password Utility TOSHIBA Resolution+ TOSHIBA Video Player Intel® App Up center Amazon Adobe Reader X Evernote Splashtop Streamer and Client Norton Internet Security™ - Central Processing Unit ("CPU...
... Sleep and Charge SRS Premium Sound HD™ Large Touchpad with Gesture Environmental Credentials Additional Software TOSHIBA Disc Creator TOSHIBA eco Utility™ TOSHIBA HDD Protection TOSHIBA HW Setup Utility TOSHIBA Media Player by sMedio Truelink+ TOSHIBA PC Health Monitor TOSHIBA Recovery Disc Creator TOSHIBA Service Station TOSHIBA Sleep Utility TOSHIBA Supervisor Password Utility TOSHIBA Resolution+ TOSHIBA Video Player Intel® App Up center Amazon Adobe Reader X Evernote Splashtop Streamer and Client Norton Internet Security™ - Central Processing Unit ("CPU...


