
User Guide
Page 21
... in Sleep mode 46 Adding optional external devices 47 Adding memory (optional 47 Installing a memory module 48 Removing a memory module 54 Checking total memory 55 Recovering the Internal Storage Drive 56 Creating recovery media 57 Restoring from recovery media 59 Refresh your PC (with user's data 61 Reset your PC 63 Installing drivers and applications 66 Using the touch pad 67 Adjusting touch pad settings 69 Disabling or enabling the touch pad 70 Connecting an external device 70 Using external display devices 71 Selecting video cables 71 Connecting an HDMI™-compatible...
... in Sleep mode 46 Adding optional external devices 47 Adding memory (optional 47 Installing a memory module 48 Removing a memory module 54 Checking total memory 55 Recovering the Internal Storage Drive 56 Creating recovery media 57 Restoring from recovery media 59 Refresh your PC (with user's data 61 Reset your PC 63 Installing drivers and applications 66 Using the touch pad 67 Adjusting touch pad settings 69 Disabling or enabling the touch pad 70 Connecting an external device 70 Using external display devices 71 Selecting video cables 71 Connecting an HDMI™-compatible...
User Guide
Page 24
... a supervisor password 124 Using a user password 126 Deleting a user password 128 System Settings 129 Sleep Utilities 131 USB Sleep and Charge 131 Enabling/Disabling USB Sleep and Charge 133 Power supply mode settings 133 Sleep and Music 134 HDD Protection Utility 135 Function Key 136 Recovery Media Creator 137 Service Station 137 TOSHIBA Application Installer 138 Chapter 7: If Something Goes Wrong 139 Problems that are easy to fix 139 Problems when you turn on the computer ........ 140 The Windows® operating system is not working 142 Using Startup options to fix problems...
... a supervisor password 124 Using a user password 126 Deleting a user password 128 System Settings 129 Sleep Utilities 131 USB Sleep and Charge 131 Enabling/Disabling USB Sleep and Charge 133 Power supply mode settings 133 Sleep and Music 134 HDD Protection Utility 135 Function Key 136 Recovery Media Creator 137 Service Station 137 TOSHIBA Application Installer 138 Chapter 7: If Something Goes Wrong 139 Problems that are easy to fix 139 Problems when you turn on the computer ........ 140 The Windows® operating system is not working 142 Using Startup options to fix problems...
User Guide
Page 25
... 156 Wireless networking problems 157 DVD operating problems 159 Develop good computing habits 160 Data and system configuration backup in the Windows® operating system ........ 161 If you need further assistance 166 Contacting Toshiba 167 Other Toshiba Internet Web sites 167 Toshiba's worldwide offices 167 Appendix A: TOSHIBA Function Keys 169 Functions 169 Help file 170 Display brightness 170 Output (Display switch 171 Disabling or enabling the touch pad 172 Media buttons 172 Volume Mute 172 Disabling or enabling wireless devices ........ 173 Keyboard Function keys 173...
... 156 Wireless networking problems 157 DVD operating problems 159 Develop good computing habits 160 Data and system configuration backup in the Windows® operating system ........ 161 If you need further assistance 166 Contacting Toshiba 167 Other Toshiba Internet Web sites 167 Toshiba's worldwide offices 167 Appendix A: TOSHIBA Function Keys 169 Functions 169 Help file 170 Display brightness 170 Output (Display switch 171 Disabling or enabling the touch pad 172 Media buttons 172 Volume Mute 172 Disabling or enabling wireless devices ........ 173 Keyboard Function keys 173...
User Guide
Page 28
... when a topic interests you. ❖ Use the table of the information provided herein, product specifications, configurations, prices, system/component/options availability are designed for a product Series. This guide This guide introduces the computer's features as well as some basic procedures needed to stay current with the various computer software or hardware options, visit Toshiba's Web site at support.toshiba.com. For the most up...
... when a topic interests you. ❖ Use the table of the information provided herein, product specifications, configurations, prices, system/component/options availability are designed for a product Series. This guide This guide introduces the computer's features as well as some basic procedures needed to stay current with the various computer software or hardware options, visit Toshiba's Web site at support.toshiba.com. For the most up...

User Guide
Page 48
... Sleep or Hibernation mode, data will need a small Phillips screwdriver for this model, Slot A is the top slot. Failure to be installed, it . You can be installed in the memory module slots on the underside of the screen or swipe in from the right edge. 2 When the Windows® charms appear, click or touch the Settings ( ) charm. Avoid touching the cover, the module(s), and the surrounding area before replacing...
... Sleep or Hibernation mode, data will need a small Phillips screwdriver for this model, Slot A is the top slot. Failure to be installed, it . You can be installed in the memory module slots on the underside of the screen or swipe in from the right edge. 2 When the Windows® charms appear, click or touch the Settings ( ) charm. Avoid touching the cover, the module(s), and the surrounding area before replacing...
User Guide
Page 49
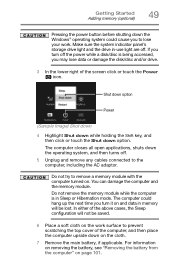
... disk/disc and/or drive. 3 In the lower right of the computer, and then place the computer upside down on the work . For information on removing the battery, see "Removing the battery from the computer" on . Getting Started Adding memory (optional) 49 Pressing the power button before shutting down the Windows® operating system could hang up the next time you turn off . 5 Unplug and remove any cables connected...
... disk/disc and/or drive. 3 In the lower right of the computer, and then place the computer upside down on the work . For information on removing the battery, see "Removing the battery from the computer" on . Getting Started Adding memory (optional) 49 Pressing the power button before shutting down the Windows® operating system could hang up the next time you turn off . 5 Unplug and remove any cables connected...
User Guide
Page 52
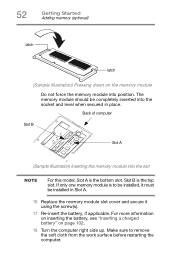
... memory (optional) latch latch (Sample Illustration) Pressing down on page 102. 18 Turn the computer right side up. For more information on inserting the battery, see "Inserting a charged battery" on the memory module Do not force the memory module into the slot NOTE For this model, Slot A is the bottom slot. If only one memory module is the top slot. Make sure to be installed in place. Slot B is to remove...
... memory (optional) latch latch (Sample Illustration) Pressing down on page 102. 18 Turn the computer right side up. For more information on inserting the battery, see "Inserting a charged battery" on the memory module Do not force the memory module into the slot NOTE For this model, Slot A is the bottom slot. If only one memory module is the top slot. Make sure to be installed in place. Slot B is to remove...
User Guide
Page 55
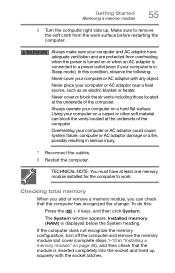
... located at the underside of the computer. If the computer does not recognize the memory configuration, turn off the computer and remove the memory module slot cover (complete steps 1-10 in Sleep mode). Make sure to work surface before restarting the computer. Using your computer and AC adaptor have at least one memory module installed for the computer to remove the soft cloth from overheating when the power is connected...
... located at the underside of the computer. If the computer does not recognize the memory configuration, turn off the computer and remove the memory module slot cover (complete steps 1-10 in Sleep mode). Make sure to work surface before restarting the computer. Using your computer and AC adaptor have at least one memory module installed for the computer to remove the soft cloth from overheating when the power is connected...
User Guide
Page 70
... Touch pad setting options vary by the next character you type. ❖ Temporarily disable the touch pad, so that came with the device to see if you first need to install new software. 2 Connect the device's video or USB cable to the port on the computer and to the device. 3 Connect the device's power cable to a live electrical outlet (if applicable). You can easily attach an external device your computer. For more information, see "Disabling or enabling the touch pad...
... Touch pad setting options vary by the next character you type. ❖ Temporarily disable the touch pad, so that came with the device to see if you first need to install new software. 2 Connect the device's video or USB cable to the port on the computer and to the device. 3 Connect the device's power cable to a live electrical outlet (if applicable). You can easily attach an external device your computer. For more information, see "Disabling or enabling the touch pad...
User Guide
Page 80
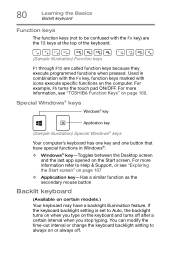
... feature. Used in Windows®: ❖ Windows® key-Toggles between the Desktop screen and the last app opened on the Start screen. You can modify the time-out interval or change the keyboard backlight setting to always on or always off after a certain interval when you stop typing. For example, F5 turns the touch pad ON/OFF. 80 Learning the Basics Backlit keyboard Function keys The function keys (not...
... feature. Used in Windows®: ❖ Windows® key-Toggles between the Desktop screen and the last app opened on the Start screen. You can modify the time-out interval or change the keyboard backlight setting to always on or always off after a certain interval when you stop typing. For example, F5 turns the touch pad ON/OFF. 80 Learning the Basics Backlit keyboard Function keys The function keys (not...

User Guide
Page 132
... external devices thoroughly before use. ❖ If USB Sleep and Charge is enabled, the computer's battery will discharge during standby and hibernation or when the computer is turned off. 132 Utilities Sleep Utilities NOTE ❖ When "USB Sleep and Charge function" is set to Enabled, the "USB Wakeup function" does not work , but the "USB Sleep and Charge function" will be depleted even when the power of the computer is turned OFF. It is recommended that you connect...
... external devices thoroughly before use. ❖ If USB Sleep and Charge is enabled, the computer's battery will discharge during standby and hibernation or when the computer is turned off. 132 Utilities Sleep Utilities NOTE ❖ When "USB Sleep and Charge function" is set to Enabled, the "USB Wakeup function" does not work , but the "USB Sleep and Charge function" will be depleted even when the power of the computer is turned OFF. It is recommended that you connect...
User Guide
Page 143
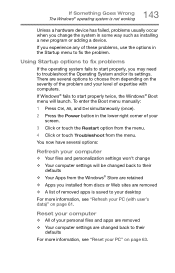
... its settings. Using Startup options to fix problems If the operating system fails to start properly twice, the Windows® Boot menu will be changed back to their defaults ❖ Your Apps from the Windows® Store are removed ❖ A list of these problems, use the options in some way such as installing a new program or adding a device. There are several options: Refresh your screen. 3 Click or touch the Restart option from the menu. 4 Click or touch Troubleshoot from discs...
... its settings. Using Startup options to fix problems If the operating system fails to start properly twice, the Windows® Boot menu will be changed back to their defaults ❖ Your Apps from the Windows® Store are removed ❖ A list of these problems, use the options in some way such as installing a new program or adding a device. There are several options: Refresh your screen. 3 Click or touch the Restart option from the menu. 4 Click or touch Troubleshoot from discs...
User Guide
Page 144
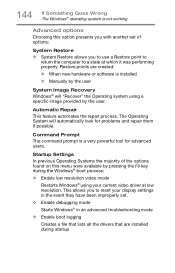
...; Enable debugging mode Starts Windows® in an advanced troubleshooting mode ❖ Enable boot logging Creates a file that lists all the drivers that are created: ❖ When new hardware or software is installed ❖ Manually by the user System Image Recovery Windows® will automatically look for advanced users. Command Prompt The command prompt is a very powerful tool for problems and repair them if possible. Startup Settings In previous Operating Systems the majority of options: System Restore ❖ System Restore...
...; Enable debugging mode Starts Windows® in an advanced troubleshooting mode ❖ Enable boot logging Creates a file that lists all the drivers that are created: ❖ When new hardware or software is installed ❖ Manually by the user System Image Recovery Windows® will automatically look for advanced users. Command Prompt The command prompt is a very powerful tool for problems and repair them if possible. Startup Settings In previous Operating Systems the majority of options: System Restore ❖ System Restore...
User Guide
Page 151
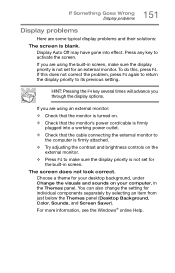
... setting for the built-in screen. For more information, see the Windows® online Help. Press any key to make sure the display priority is not set for your desktop background, under Change the visuals and sounds on the external monitor. ❖ Press F4 to activate the screen. If you are using the built-in the Themes panel. To do this does not correct the problem...
... setting for the built-in screen. For more information, see the Windows® online Help. Press any key to make sure the display priority is not set for your desktop background, under Change the visuals and sounds on the external monitor. ❖ Press F4 to activate the screen. If you are using the built-in the Themes panel. To do this does not correct the problem...
User Guide
Page 164
... safe and easy installation of new hardware (printers, pointing devices, external hard drives, optical disc drive writers, scanners, etc.) and software (applications like Microsoft® Office and Adobe® Photoshop®, or utility software such as special toolbars for "back up DVD(s) on page 163). ❖ Have your web browser). ❖ Create a restore point (refer to "Saving system configuration with the Windows® operating system" on hand in the Windows...
... safe and easy installation of new hardware (printers, pointing devices, external hard drives, optical disc drive writers, scanners, etc.) and software (applications like Microsoft® Office and Adobe® Photoshop®, or utility software such as special toolbars for "back up DVD(s) on page 163). ❖ Have your web browser). ❖ Create a restore point (refer to "Saving system configuration with the Windows® operating system" on hand in the Windows...
User Guide
Page 183
... to the internal storage drive the current state of many Toshiba computers that can control another while using this function, if connected with data. function keys-The keys labeled F1 through F12, typically located on the computer again, your work is running and have secondary hard disks that activates a memory resident program. Hard disks hold much more information than analog signal. HDMI-CEC (HDMI Consumer Electronics Control)- See also Sleep, Suspend. hardware-The...
... to the internal storage drive the current state of many Toshiba computers that can control another while using this function, if connected with data. function keys-The keys labeled F1 through F12, typically located on the computer again, your work is running and have secondary hard disks that activates a memory resident program. Hard disks hold much more information than analog signal. HDMI-CEC (HDMI Consumer Electronics Control)- See also Sleep, Suspend. hardware-The...
User Guide
Page 191
... display device 71 monitor 72 power cord/cable 42 power source 41 cooling fan adequate ventilation 39 customize computer settings 74 D data/entire system backup troubleshooting 163 desktop creating new icon 110 exploring the 109 icons 110 recycle bin 110 standard features 108, 109 Desktop Assist 119 Media & Entertainment tab 120 Support & Recovery tab 122 Tools & Utilities tab 121 Device Manager fixing a problem 146 directing display output 72 disabling touch pad 70 display troubleshooting 152 display devices external 71 display...
... display device 71 monitor 72 power cord/cable 42 power source 41 cooling fan adequate ventilation 39 customize computer settings 74 D data/entire system backup troubleshooting 163 desktop creating new icon 110 exploring the 109 icons 110 recycle bin 110 standard features 108, 109 Desktop Assist 119 Media & Entertainment tab 120 Support & Recovery tab 122 Tools & Utilities tab 121 Device Manager fixing a problem 146 directing display output 72 disabling touch pad 70 display troubleshooting 152 display devices external 71 display...
User Guide
Page 192
... 89 removing with computer on 88 DVD player troubleshooting 159 DVDs using 84 E eco power plan 99 eco Utility® 123 eject button optical disc drive 85 eject, optical disc drive 85 enabling touch pad 70 enabling/disabling touch pad 172 ENERGY STAR® 26 exploring desktop 109 Start screen 107 external display device HDMI™ Out port 71 external display, adjusting 73 F files backing up 78, 84 saving 83 Function Key 136 Function Keys disabling or enabling wireless devices 173 Function keys 172 display brightness 170 Help file 170 keyboard Function keys 173 media buttons...
... 89 removing with computer on 88 DVD player troubleshooting 159 DVDs using 84 E eco power plan 99 eco Utility® 123 eject button optical disc drive 85 eject, optical disc drive 85 enabling touch pad 70 enabling/disabling touch pad 172 ENERGY STAR® 26 exploring desktop 109 Start screen 107 external display device HDMI™ Out port 71 external display, adjusting 73 F files backing up 78, 84 saving 83 Function Key 136 Function Keys disabling or enabling wireless devices 173 Function keys 172 display brightness 170 Help file 170 keyboard Function keys 173 media buttons...
User Guide
Page 194
... 90 power down shut down 45 power light 95 power management 92 optimum performance 92 power plans selecting power plan options 98 power saving options 97 precautions safety 37 printer troubleshooting 156 problem solving contacting Toshiba 167 Startup options 143 projector connecting 72 R real-time clock (RTC) battery 92 recording sounds 113 recovery creating recovery media 57 installing drivers and applications 66 internal storage drive 56 refresh your PC 61 reset your PC 63 restoring from recovery media 59 Recovery Media Creator...
... 90 power down shut down 45 power light 95 power management 92 optimum performance 92 power plans selecting power plan options 98 power saving options 97 precautions safety 37 printer troubleshooting 156 problem solving contacting Toshiba 167 Startup options 143 projector connecting 72 R real-time clock (RTC) battery 92 recording sounds 113 recovery creating recovery media 57 installing drivers and applications 66 internal storage drive 56 refresh your PC 61 reset your PC 63 restoring from recovery media 59 Recovery Media Creator...
User Guide
Page 195
... Sleep mode 46 Sleep Utilities 131 sounds recording 113 speakers using external 114 Start screen exploring the 107 starting an app 82 starting an app from Start screen 83 Startup menu problem solving 143 supervisor password, deleting 126 supervisor password, set up 124 system indicator lights AC power 40 drive in-use indicator 85 LEDs 42, 94, 95, 115 System Settings 129 T taking care of battery 103 taskbar 110 television adjusting display 73 Tiles Start screen 109 tips for computing 77 Toshiba online...
... Sleep mode 46 Sleep Utilities 131 sounds recording 113 speakers using external 114 Start screen exploring the 107 starting an app 82 starting an app from Start screen 83 Startup menu problem solving 143 supervisor password, deleting 126 supervisor password, set up 124 system indicator lights AC power 40 drive in-use indicator 85 LEDs 42, 94, 95, 115 System Settings 129 T taking care of battery 103 taskbar 110 television adjusting display 73 Tiles Start screen 109 tips for computing 77 Toshiba online...


