User Guide
Page 34
... an ExpressCard 145 Inserting an ExpressCard 145 Removing an ExpressCard 146 Using the Memory Card Reader 146 Inserting memory media 147 Removing memory media 147 Using the i.LINK® port 148 Using the eSATA/USB combo port 148 Chapter 5: Utilities 149 TOSHIBA Assist 150 Connect 151 Secure 152 Protect & Fix 153 Optimize 154...
... an ExpressCard 145 Inserting an ExpressCard 145 Removing an ExpressCard 146 Using the Memory Card Reader 146 Inserting memory media 147 Removing memory media 147 Using the i.LINK® port 148 Using the eSATA/USB combo port 148 Chapter 5: Utilities 149 TOSHIBA Assist 150 Connect 151 Secure 152 Protect & Fix 153 Optimize 154...
User Guide
Page 35
... 159 TOSHIBA Face Recognition Utility 160 TOSHIBA PC Diagnostic Tool Utility 161 TOSHIBA HDD Protection Utility 162 TOSHIBA SD™ Memory Card Format Utility .........163 Mouse Utility 164 TOSHIBA Hardware...TOSHIBA Zooming Utility 171 TOSHIBA Button Support 172 TOSHIBA Accessibility 173 Fingerprint Authentication Utility 174 Fingerprint utility limitations 174 Using the Fingerprint Authentication Utility.....174 Fingerprint Logon 174 Care and maintenance of your fingerprint reader 175 Fingerprint reader limitations 176 TOSHIBA eco Utility 177 TOSHIBA Service Station 178 TOSHIBA...
... 159 TOSHIBA Face Recognition Utility 160 TOSHIBA PC Diagnostic Tool Utility 161 TOSHIBA HDD Protection Utility 162 TOSHIBA SD™ Memory Card Format Utility .........163 Mouse Utility 164 TOSHIBA Hardware...TOSHIBA Zooming Utility 171 TOSHIBA Button Support 172 TOSHIBA Accessibility 173 Fingerprint Authentication Utility 174 Fingerprint utility limitations 174 Using the Fingerprint Authentication Utility.....174 Fingerprint Logon 174 Care and maintenance of your fingerprint reader 175 Fingerprint reader limitations 176 TOSHIBA eco Utility 177 TOSHIBA Service Station 178 TOSHIBA...
User Guide
Page 121
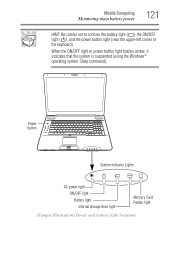
Power button System Indicator Lights AC power light ON/OFF light Battery light Internal storage drive light Memory Card Reader light (Sample Illustration) Power and battery light locations Mobile Computing Monitoring main battery power 121 HINT: Be careful not to confuse the battery light ( ), the ON/OFF light ( ), and the power button light (near the upper-left corner of the keyboard). When the ON/OFF light or power button light flashes amber, it indicates that the system is suspended (using the Windows® operating system Sleep command).
Power button System Indicator Lights AC power light ON/OFF light Battery light Internal storage drive light Memory Card Reader light (Sample Illustration) Power and battery light locations Mobile Computing Monitoring main battery power 121 HINT: Be careful not to confuse the battery light ( ), the ON/OFF light ( ), and the power button light (near the upper-left corner of the keyboard). When the ON/OFF light or power button light flashes amber, it indicates that the system is suspended (using the Windows® operating system Sleep command).
User Guide
Page 146
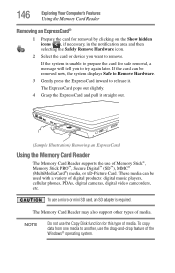
...media to release it straight out. (Sample Illustration) Removing an ExpressCard Using the Memory Card Reader The Memory Card Reader supports the use a micro or mini SD card, an SD adapter is unable to prepare the card for safe removal, a message will tell you want to try again later. NOTE...to another, use the Copy Disk function for this type of media. 146 Exploring Your Computer's Features Using the Memory Card Reader Removing an ExpressCard® 1 Prepare the card for removal by clicking on the Show hidden icons ( ), if necessary, in the notification area and then selecting ...
...media to release it straight out. (Sample Illustration) Removing an ExpressCard Using the Memory Card Reader The Memory Card Reader supports the use a micro or mini SD card, an SD adapter is unable to prepare the card for safe removal, a message will tell you want to try again later. NOTE...to another, use the Copy Disk function for this type of media. 146 Exploring Your Computer's Features Using the Memory Card Reader Removing an ExpressCard® 1 Prepare the card for removal by clicking on the Show hidden icons ( ), if necessary, in the notification area and then selecting ...

User Guide
Page 147
... out slightly. If the media can destroy data. otherwise, skip to step 3. 2 Gently press the card inward to Remove Hardware. Removing memory media 1 Prepare the card for safe removal, a message will tell you to all types of supported media devices. 1 Turn the media so that... Illustration) Inserting memory media When inserting memory media, do not touch the metal contacts. Exploring Your Computer's Features Using the Memory Card Reader 147 Inserting memory media The following instructions apply to try again later. You could expose the storage area to static electricity, which can...
... out slightly. If the media can destroy data. otherwise, skip to step 3. 2 Gently press the card inward to Remove Hardware. Removing memory media 1 Prepare the card for safe removal, a message will tell you to all types of supported media devices. 1 Turn the media so that... Illustration) Inserting memory media When inserting memory media, do not touch the metal contacts. Exploring Your Computer's Features Using the Memory Card Reader 147 Inserting memory media The following instructions apply to try again later. You could expose the storage area to static electricity, which can...

User Guide
Page 163
... Start to exit the utility. The formatting progress is displayed in the horizontal bar in the window. 5 When formatting is used to format SD™ cards used with the Memory Card Reader. Utilities TOSHIBA SD™ Memory Card Format Utility 163 TOSHIBA SD™ Memory Card Format Utility This utility is completed, click Close to begin formatting.
... Start to exit the utility. The formatting progress is displayed in the horizontal bar in the window. 5 When formatting is used to format SD™ cards used with the Memory Card Reader. Utilities TOSHIBA SD™ Memory Card Format Utility 163 TOSHIBA SD™ Memory Card Format Utility This utility is completed, click Close to begin formatting.


