User Guide
Page 5
... soon as possible. Connection to the telephone network, the telephone company may occasionally be required. Contact the state public utility commission, public service commission or corporation commission for any person to use a computer or other electronic device, including Fax machines, to send any changes necessary to state tariffs. If trouble is subject to maintain uninterrupted service. Also, you believe...
... soon as possible. Connection to the telephone network, the telephone company may occasionally be required. Contact the state public utility commission, public service commission or corporation commission for any person to use a computer or other electronic device, including Fax machines, to send any changes necessary to state tariffs. If trouble is subject to maintain uninterrupted service. Also, you believe...
User Guide
Page 27
... 50 Opening the display panel 50 Your computer's features and specifications ....51 Turning on the power 51 Adding memory (optional 52 Installing a memory module 52 Removing a memory module 58 Checking total memory 61 Using the TouchPad 61 Scrolling with the TouchPad 62 Control buttons 62 Disabling or enabling the TouchPad 62 Using the Dual Mode Pad 64 Using Dual Mode 64 Using external display devices 67 Directing the display output when you turn on the computer 68 Adjusting the quality of the external display......69 Using an external keyboard 69 Using a mouse 70 Connecting...
... 50 Opening the display panel 50 Your computer's features and specifications ....51 Turning on the power 51 Adding memory (optional 52 Installing a memory module 52 Removing a memory module 58 Checking total memory 61 Using the TouchPad 61 Scrolling with the TouchPad 62 Control buttons 62 Disabling or enabling the TouchPad 62 Using the Dual Mode Pad 64 Using Dual Mode 64 Using external display devices 67 Directing the display output when you turn on the computer 68 Adjusting the quality of the external display......69 Using an external keyboard 69 Using a mouse 70 Connecting...
User Guide
Page 53
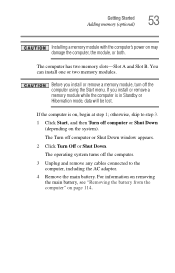
... or Shut Down window appears. 2 Click Turn Off or Shut Down. Getting Started Adding memory (optional) 53 Installing a memory module with the computer's power on page 114. Before you install or remove a memory module while the computer is on the system). If the computer is in Standby or Hibernation mode, data will be lost. The Turn off the computer using the Start menu. The computer has two memory slots-Slot A and Slot B.
... or Shut Down window appears. 2 Click Turn Off or Shut Down. Getting Started Adding memory (optional) 53 Installing a memory module with the computer's power on page 114. Before you install or remove a memory module while the computer is on the system). If the computer is in Standby or Hibernation mode, data will be lost. The Turn off the computer using the Start menu. The computer has two memory slots-Slot A and Slot B.
User Guide
Page 54
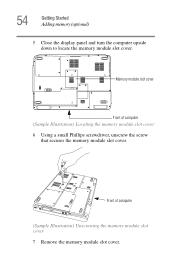
Front of computer (Sample Illustration) Locating the memory module slot cover 6 Using a small Phillips screwdriver, unscrew the screw that secures the memory module slot cover. 54 Getting Started Adding memory (optional) 5 Close the display panel and turn the computer upside down to locate the memory module slot cover. Memory module slot cover Front of computer (Sample Illustration) Unscrewing the memory module slot cover 7 Remove the memory module slot cover.
Front of computer (Sample Illustration) Locating the memory module slot cover 6 Using a small Phillips screwdriver, unscrew the screw that secures the memory module slot cover. 54 Getting Started Adding memory (optional) 5 Close the display panel and turn the computer upside down to locate the memory module slot cover. Memory module slot cover Front of computer (Sample Illustration) Unscrewing the memory module slot cover 7 Remove the memory module slot cover.

User Guide
Page 58
... Turn the computer right side up the computer, verify that the computer has recognized the additional memory module. If you need to remove a memory module: 1 Complete steps 1-8 in "Checking total memory" on page 61. 58 Getting Started Adding memory (optional) 14 Replace the memory module slot cover and secure it correctly as described in "Installing a memory module" on page 52 to work. Removing a memory module If you are adding an extra memory module after setting up...
... Turn the computer right side up the computer, verify that the computer has recognized the additional memory module. If you need to remove a memory module: 1 Complete steps 1-8 in "Checking total memory" on page 61. 58 Getting Started Adding memory (optional) 14 Replace the memory module slot cover and secure it correctly as described in "Installing a memory module" on page 52 to work. Removing a memory module If you are adding an extra memory module after setting up...

User Guide
Page 60
For more information on inserting the main battery, see "Inserting a charged battery" on page 116. 6 Turn the computer right side up. 7 Reconnect the cables. 8 Restart the computer. TECHNICAL NOTE: You must have at least one memory module installed for the computer to a 30-degree angle and slide it out of computer (Sample Illustration) Removing the memory module 4 Replace the memory module slot cover and tighten the screws. 5 Re-insert the main battery. 60 Getting Started Adding memory (optional) 3 Gently lift the memory module to work. Memory slots Front of the slot.
For more information on inserting the main battery, see "Inserting a charged battery" on page 116. 6 Turn the computer right side up. 7 Reconnect the cables. 8 Restart the computer. TECHNICAL NOTE: You must have at least one memory module installed for the computer to a 30-degree angle and slide it out of computer (Sample Illustration) Removing the memory module 4 Replace the memory module slot cover and tighten the screws. 5 Re-insert the main battery. 60 Getting Started Adding memory (optional) 3 Gently lift the memory module to work. Memory slots Front of the slot.
User Guide
Page 61
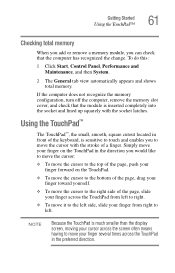
... Start, Control Panel, Performance and Maintenance, and then System. 2 The General tab view automatically appears and shows total memory. Getting Started Using the TouchPad™ 61 Checking total memory When you add or remove a memory module, you can check that the module is inserted completely into the socket and lined up squarely with the stroke of the keyboard, is much smaller than the display screen, moving...
... Start, Control Panel, Performance and Maintenance, and then System. 2 The General tab view automatically appears and shows total memory. Getting Started Using the TouchPad™ 61 Checking total memory When you add or remove a memory module, you can check that the module is inserted completely into the socket and lined up squarely with the stroke of the keyboard, is much smaller than the display screen, moving...

User Guide
Page 67
... Started Using external display devices 67 Using external display devices Your computer comes with a built-in LCD display, but you can easily attach an external monitor or projector to your computer for the type of the computer. 2 Connect the device's power cable to the documentation for connecting computers to the RGB (monitor) port on the external device. 4 Set the display mode by pressing Fn + F5, or by configuring the Display Properties settings. To do this : 1 Connect the monitor's video cable to digital monitors. Connecting an external monitor...
... Started Using external display devices 67 Using external display devices Your computer comes with a built-in LCD display, but you can easily attach an external monitor or projector to your computer for the type of the computer. 2 Connect the device's power cable to the documentation for connecting computers to the RGB (monitor) port on the external device. 4 Set the display mode by pressing Fn + F5, or by configuring the Display Properties settings. To do this : 1 Connect the monitor's video cable to digital monitors. Connecting an external monitor...
User Guide
Page 153
... Set. 7 Click OK if you want to save the password to a text file on -screen instructions to exit. Setting a user password To register a password for the power-on password function: 1 Click Start, All Programs, Toshiba, Utilities, and then TOSHIBA Assist. Disabling a user password To cancel the power-on password functions: 1 Click Start, All Programs, Toshiba, Utilities, and then TOSHIBA Assist. Select your user name and enter your password, if any key or touch the pointing device and the Windows® Logon screen will...
... Set. 7 Click OK if you want to save the password to a text file on -screen instructions to exit. Setting a user password To register a password for the power-on password function: 1 Click Start, All Programs, Toshiba, Utilities, and then TOSHIBA Assist. Disabling a user password To cancel the power-on password functions: 1 Click Start, All Programs, Toshiba, Utilities, and then TOSHIBA Assist. Select your user name and enter your password, if any key or touch the pointing device and the Windows® Logon screen will...
User Guide
Page 155
... power-on -screen instructions to remove the supervisor password. 155 Toshiba Utilities Toshiba Password Utility 3 Select the Supervisor Password icon. 4 Click Set. 5 Enter your choice, or click Cancel to continue without saving the password to a text file. 8 Click OK to exit. The TOSHIBA Assist window appears. 2 On the left side, select Secure. 3 Select the Supervisor Password icon. 4 Click Delete. 5 Follow the on password function: 1 Click Start, All Programs, Toshiba, Utilities, and then TOSHIBA...
... power-on -screen instructions to remove the supervisor password. 155 Toshiba Utilities Toshiba Password Utility 3 Select the Supervisor Password icon. 4 Click Set. 5 Enter your choice, or click Cancel to continue without saving the password to a text file. 8 Click OK to exit. The TOSHIBA Assist window appears. 2 On the left side, select Secure. 3 Select the Supervisor Password icon. 4 Click Delete. 5 Follow the on password function: 1 Click Start, All Programs, Toshiba, Utilities, and then TOSHIBA...
User Guide
Page 156
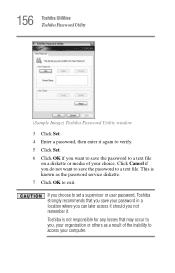
... others as the password service diskette. 7 Click OK to a text file on a diskette or media of the inability to access your computer. This is not responsible for any losses that you save your choice. 156 Toshiba Utilities Toshiba Password Utility (Sample Image) Toshiba Password Utility window 3 Click Set. 4 Enter a password, then enter it . Toshiba is known as a result of your password in a location where you can later access it should you...
... others as the password service diskette. 7 Click OK to a text file on a diskette or media of the inability to access your computer. This is not responsible for any losses that you save your choice. 156 Toshiba Utilities Toshiba Password Utility (Sample Image) Toshiba Password Utility window 3 Click Set. 4 Enter a password, then enter it . Toshiba is known as a result of your password in a location where you can later access it should you...
User Guide
Page 184
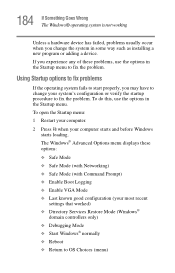
... Windows® operating system is not working Unless a hardware device has failed, problems usually occur when you change your system's configuration or verify the startup procedure to fix the problem. To open the Startup menu: 1 Restart your computer. 2 Press F8 when your most recent settings that worked) ❖ Directory Services Restore Mode (Windows® domain controllers only) ❖ Debugging Mode ❖ Start Windows® normally ❖ Reboot ❖ Return to change the system in the Startup menu. Using Startup options to fix problems...
... Windows® operating system is not working Unless a hardware device has failed, problems usually occur when you change your system's configuration or verify the startup procedure to fix the problem. To open the Startup menu: 1 Restart your computer. 2 Press F8 when your most recent settings that worked) ❖ Directory Services Restore Mode (Windows® domain controllers only) ❖ Debugging Mode ❖ Start Windows® normally ❖ Reboot ❖ Return to change the system in the Startup menu. Using Startup options to fix problems...
User Guide
Page 194
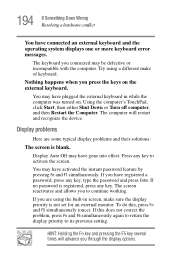
... return the display priority to activate the screen. Try using the built-in while the computer was turned on the external keyboard. The keyboard you have plugged the external keyboard in screen, make of keyboard. You may have connected an external keyboard and the operating system displays one or more keyboard error messages. The screen reactivates and allows you are some typical display problems and their solutions: The screen is not set for an external monitor. If...
... return the display priority to activate the screen. Try using the built-in while the computer was turned on the external keyboard. The keyboard you have plugged the external keyboard in screen, make of keyboard. You may have connected an external keyboard and the operating system displays one or more keyboard error messages. The screen reactivates and allows you are some typical display problems and their solutions: The screen is not set for an external monitor. If...
User Guide
Page 209
... establish a wireless connection. 209 If Something Goes Wrong DVD operating problems 3 Select Allow me to connect to the selected wireless network, even though it is not secure. 4 Windows XP will now try the following steps: 1 Verify that the disc is in a format that the drive supports. 2 Ensure that the disc is properly inserted in which case you must use the adapter's management utility. To verify your display settings: a Click Start, Control Panel, Appearance...
... establish a wireless connection. 209 If Something Goes Wrong DVD operating problems 3 Select Allow me to connect to the selected wireless network, even though it is not secure. 4 Windows XP will now try the following steps: 1 Verify that the disc is in a format that the drive supports. 2 Ensure that the disc is properly inserted in which case you must use the adapter's management utility. To verify your display settings: a Click Start, Control Panel, Appearance...
User Guide
Page 231
... hot key turns the Zooming utility to zoom-out. 231 Hot Keys Disabling or enabling the TouchPad or Dual Mode Pad Disabling or enabling the TouchPad or Dual Mode Pad Fn + This hot key enables/disables either the TouchPad or Dual Mode Pad. For more information, see "TOSHIBA Zooming Utility" on page 163. For more information, see "TOSHIBA Zooming Utility" on page 163. Keyboard hot keys Fn + [Space bar] This hot key switches screen resolution. For more information on using the TouchPad, see "Using the Dual Mode Pad" on...
... hot key turns the Zooming utility to zoom-out. 231 Hot Keys Disabling or enabling the TouchPad or Dual Mode Pad Disabling or enabling the TouchPad or Dual Mode Pad Fn + This hot key enables/disables either the TouchPad or Dual Mode Pad. For more information, see "TOSHIBA Zooming Utility" on page 163. For more information, see "TOSHIBA Zooming Utility" on page 163. Keyboard hot keys Fn + [Space bar] This hot key switches screen resolution. For more information on using the TouchPad, see "Using the Dual Mode Pad" on...

User Guide
Page 272
... files 83 battery alarms 111 changing 114 charge indicator light 48, 107 charge not lasting 192 charging 46, 49 conserving power 112 disposal 119 low charge 110 monitoring power 48, 107 272 not charging 192 power profile 226 power scheme hot key 113 real-time clock (RTC) 104 removing 114 BIOS Setup see Toshiba Hardware Setup Bridge Media Adapter inserting memory media 143 removing memory media 144 button power 51 start 124 C CD playing an audio 97 CD, using 93 CD/DVD creating 99 CD/DVD button functionality 95...
... files 83 battery alarms 111 changing 114 charge indicator light 48, 107 charge not lasting 192 charging 46, 49 conserving power 112 disposal 119 low charge 110 monitoring power 48, 107 272 not charging 192 power profile 226 power scheme hot key 113 real-time clock (RTC) 104 removing 114 BIOS Setup see Toshiba Hardware Setup Bridge Media Adapter inserting memory media 143 removing memory media 144 button power 51 start 124 C CD playing an audio 97 CD, using 93 CD/DVD creating 99 CD/DVD button functionality 95...

User Guide
Page 273
... disk or disk error message 183 not accessing disk drives 182 running on battery power 102 setting up 43, 53 warning resume failure message 182 computer lock 81 computing tips 82 connecting to a power source 46 connection set up 129 control buttons 62 Ctrl keys 84 D desktop creating new icon 123 major features 123 desktop exploration 122 desktop icons 123 Device Manager 189 checking properties 189 disabling a device 189 devices keyboard 69 mouse 70 Disk Defragmenter 198 disk drive...
... disk or disk error message 183 not accessing disk drives 182 running on battery power 102 setting up 43, 53 warning resume failure message 182 computer lock 81 computing tips 82 connecting to a power source 46 connection set up 129 control buttons 62 Ctrl keys 84 D desktop creating new icon 123 major features 123 desktop exploration 122 desktop icons 123 Device Manager 189 checking properties 189 disabling a device 189 devices keyboard 69 mouse 70 Disk Defragmenter 198 disk drive...
User Guide
Page 274
... 141 removing 142 external monitor not working 196 mouse 70 external diskette drive connecting 72 external display, adjusting 69 F FAT (File Allocation Table) 197 file extensions 90 file, backing up 83 files backing up 92 printing 91 restoring 92 saving 89 fingerprint authentication 166 enrollment 167 Fn keys 84 function keys 85 H hardware conflicts 186 resolving 188 headphones using 136 Help and Support Windows XP 185 Hibernation mode 74 configuring 77 starting...
... 141 removing 142 external monitor not working 196 mouse 70 external diskette drive connecting 72 external display, adjusting 69 F FAT (File Allocation Table) 197 file extensions 90 file, backing up 83 files backing up 92 printing 91 restoring 92 saving 89 fingerprint authentication 166 enrollment 167 Fn keys 84 function keys 85 H hardware conflicts 186 resolving 188 headphones using 136 Help and Support Windows XP 185 Hibernation mode 74 configuring 77 starting...
User Guide
Page 275
... cover 54 memory module inserting 56 installation 52 removing 60 microphone 135 modem connecting to telephone line 127 determining COM port 126 problem solving 205 resetting port to default settings 126 upgrading 126 monitor 67 connecting 67 not working 195 mouse installing 70 serial 70 mouse utility 160 N network accessing 129 Dial-Up Networking Wizard 129 networking wireless 131 O opening the display panel 50 optical drive problems 199 troubleshooting 199 other documentation 37 P password deleting a supervisor 155 disabling a user 153 supervisor set up 154 types 152 passwords instant, using...
... cover 54 memory module inserting 56 installation 52 removing 60 microphone 135 modem connecting to telephone line 127 determining COM port 126 problem solving 205 resetting port to default settings 126 upgrading 126 monitor 67 connecting 67 not working 195 mouse installing 70 serial 70 mouse utility 160 N network accessing 129 Dial-Up Networking Wizard 129 networking wireless 131 O opening the display panel 50 optical drive problems 199 troubleshooting 199 other documentation 37 P password deleting a supervisor 155 disabling a user 153 supervisor set up 154 types 152 passwords instant, using...
User Guide
Page 276
... Device Manager 189 disabling a device 189 disk drive is slow 198 display is blank 194 external display not working 196 external monitor 195 faulty memory 191 hardware conflict 186, 187 high-pitched noise 201 illegal operation 181 Internet bookmarked site not found 185 Internet connection is slow 185 keyboard not responding 182 missing files/trouble accessing a disk 197 modem not receiving or transmitting 205 no sound 200 non-system disk or disk error 183, 199 PC Card...
... Device Manager 189 disabling a device 189 disk drive is slow 198 display is blank 194 external display not working 196 external monitor 195 faulty memory 191 hardware conflict 186, 187 high-pitched noise 201 illegal operation 181 Internet bookmarked site not found 185 Internet connection is slow 185 keyboard not responding 182 missing files/trouble accessing a disk 197 modem not receiving or transmitting 205 no sound 200 non-system disk or disk error 183, 199 PC Card...


