User Manual
Page 48
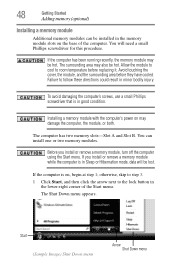
... Sleep or Hibernation mode, data will need a small Phillips screwdriver for this procedure. The computer has two memory slots-Slot A and Slot B. If the computer is on may damage the computer, the module, or both. You will be hot. If you install or remove a memory module, turn off the computer using the Start menu. otherwise, skip to step 3. 1 Click Start, and then click the arrow next to the lock button...
... Sleep or Hibernation mode, data will need a small Phillips screwdriver for this procedure. The computer has two memory slots-Slot A and Slot B. If the computer is on may damage the computer, the module, or both. You will be hot. If you install or remove a memory module, turn off the computer using the Start menu. otherwise, skip to step 3. 1 Click Start, and then click the arrow next to the lock button...
User Manual
Page 54
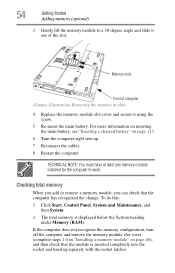
... main battery. If the computer does not recognize the memory configuration, turn off the computer and remove the memory module slot cover (complete steps 1-8 in "Installing a memory module" on page 113. 6 Turn the computer right side up squarely with the socket latches. Checking total memory When you add or remove a memory module, you can check that the module is displayed below the System heading under Memory (RAM). To do this: 1 Click Start, Control Panel...
... main battery. If the computer does not recognize the memory configuration, turn off the computer and remove the memory module slot cover (complete steps 1-8 in "Installing a memory module" on page 113. 6 Turn the computer right side up squarely with the socket latches. Checking total memory When you add or remove a memory module, you can check that the module is displayed below the System heading under Memory (RAM). To do this: 1 Click Start, Control Panel...
User Manual
Page 146
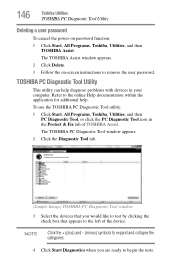
..., Toshiba, Utilities, and then PC Diagnostic Tool, or click the PC Diagnostic Tool icon in your computer. The TOSHIBA PC Diagnostic Tool window appears. 2 Click the Diagnostic Tool tab. (Sample Image) TOSHIBA PC Diagnostic Tool window 3 Select the devices that you are ready to begin the tests. 146 Toshiba Utilities TOSHIBA PC Diagnostic Tool Utility Deleting a user password To cancel the power-on -screen instructions to remove...
..., Toshiba, Utilities, and then PC Diagnostic Tool, or click the PC Diagnostic Tool icon in your computer. The TOSHIBA PC Diagnostic Tool window appears. 2 Click the Diagnostic Tool tab. (Sample Image) TOSHIBA PC Diagnostic Tool window 3 Select the devices that you are ready to begin the tests. 146 Toshiba Utilities TOSHIBA PC Diagnostic Tool Utility Deleting a user password To cancel the power-on -screen instructions to remove...
User Manual
Page 173
... this, use the options in the Startup menu. To open the Startup menu: 1 Restart your computer. 2 Press F8 when your system's configuration or verify the startup procedure to your computer model. The Windows® Advanced Boot Options menu displays these problems, use the options in the Startup menu to change the system in the DC-IN socket. The computer may have to fix the problem. For example: ❖ The operating system fails to start after...
... this, use the options in the Startup menu. To open the Startup menu: 1 Restart your computer. 2 Press F8 when your system's configuration or verify the startup procedure to your computer model. The Windows® Advanced Boot Options menu displays these problems, use the options in the Startup menu to change the system in the DC-IN socket. The computer may have to fix the problem. For example: ❖ The operating system fails to start after...
User Manual
Page 177
... drive, optional external diskette drive, and other power-using functions. Memory problems Incorrectly connected or faulty memory modules may be hardware or even software related. It is causing a problem. For more information about Device Manager, refer to another. This tab also provides options for updating the driver or rolling back the driver in "Installing a memory module" on page 53. 4 Reinstall the memory module, following the instructions in case the new version is worthwhile checking for these first: 1 Click Start...
... drive, optional external diskette drive, and other power-using functions. Memory problems Incorrectly connected or faulty memory modules may be hardware or even software related. It is causing a problem. For more information about Device Manager, refer to another. This tab also provides options for updating the driver or rolling back the driver in "Installing a memory module" on page 53. 4 Reinstall the memory module, following the instructions in case the new version is worthwhile checking for these first: 1 Click Start...
User Manual
Page 180
... previous setting. Click Windows Color and Appearance to activate the screen. HINT: Holding the Fn key and pressing the F5 key several times will advance you have gone into a working . If you are using the built-in screen, make sure the display priority is blank. You may have registered a password, press any key, type the password and press Enter. If you through the display options. You can change the display settings...
... previous setting. Click Windows Color and Appearance to activate the screen. HINT: Holding the Fn key and pressing the F5 key several times will advance you have gone into a working . If you are using the built-in screen, make sure the display priority is blank. You may have registered a password, press any key, type the password and press Enter. If you through the display options. You can change the display settings...
User Manual
Page 225
... the change. K keyboard shortcut - See device. A 3.5-inch diskette that saves to interact with the Fn key can set system options or control system parameters, such as a mouse. A feature of many Toshiba notebook computers that holds 1.44 MB of your work , including all open files and programs, when you turn the computer off . 225 Glossary Hibernation - hot key - (1) A feature in combination with any device to the hard disk the...
... the change. K keyboard shortcut - See device. A 3.5-inch diskette that saves to interact with the Fn key can set system options or control system parameters, such as a mouse. A feature of many Toshiba notebook computers that holds 1.44 MB of your work , including all open files and programs, when you turn the computer off . 225 Glossary Hibernation - hot key - (1) A feature in combination with any device to the hard disk the...
User Manual
Page 231
... battery changing 111 charge indicator light 44, 104 charge not lasting 178 charging 42, 44 conserving power 108 disposal 116 low charge 106 monitoring power 44, 104 not charging 178 notification 107 power plan 208 power plan hot key card 110 real-time clock (RTC) 101 removing 111 BIOS Setup see Toshiba Hardware Setup Bridge Media Adapter inserting memory media 133 removing memory media 134 button power 47, 56 start 120 C CD creating 97 playing an audio 96 CD, using 92 character keys 86 charging the battery 44 checking device...
... battery changing 111 charge indicator light 44, 104 charge not lasting 178 charging 42, 44 conserving power 108 disposal 116 low charge 106 monitoring power 44, 104 not charging 178 notification 107 power plan 208 power plan hot key card 110 real-time clock (RTC) 101 removing 111 BIOS Setup see Toshiba Hardware Setup Bridge Media Adapter inserting memory media 133 removing memory media 134 button power 47, 56 start 120 C CD creating 97 playing an audio 96 CD, using 92 character keys 86 charging the battery 44 checking device...
User Manual
Page 232
... files/trouble accessing a disk 182 running slow 182 diskette drive cannot insert a diskette 183 cannot read a diskette 183 connecting 71 external, connecting 71 display does not look normal/flickers 180 external monitor not working 181 screen is blank 180 display device external 67 display output settings 68 display, external adjusting 69 disposal information 25 disposing of used batteries 116 double-click 64 DVD creating 97 DVD player general problems 191 DVD, using 92 E environment computer-friendly 37 error messages device driver...
... files/trouble accessing a disk 182 running slow 182 diskette drive cannot insert a diskette 183 cannot read a diskette 183 connecting 71 external, connecting 71 display does not look normal/flickers 180 external monitor not working 181 screen is blank 180 display device external 67 display output settings 68 display, external adjusting 69 disposal information 25 disposing of used batteries 116 double-click 64 DVD creating 97 DVD player general problems 191 DVD, using 92 E environment computer-friendly 37 error messages device driver...
User Manual
Page 234
...L lock computer, using 83 M main battery removing 111 Media button functionality 94 memory adding 47 problem solving 177 removing expansion slot cover 50 memory module inserting 50 installation 48 removing 54 microphone 128 modem connecting to telephone line 122 determining COM port 121 problem solving 187, 188 resetting port to default settings 121 upgrading 121 monitor 67 connecting 68 not working 180 mouse installing 69 serial 69 mouse utility 148 N network accessing 123 Dial-Up Networking Wizard 123 networking wireless 125 Notification Area 120 O opening the display panel 45 optical drive...
...L lock computer, using 83 M main battery removing 111 Media button functionality 94 memory adding 47 problem solving 177 removing expansion slot cover 50 memory module inserting 50 installation 48 removing 54 microphone 128 modem connecting to telephone line 122 determining COM port 121 problem solving 187, 188 resetting port to default settings 121 upgrading 121 monitor 67 connecting 68 not working 180 mouse installing 69 serial 69 mouse utility 148 N network accessing 123 Dial-Up Networking Wizard 123 networking wireless 125 Notification Area 120 O opening the display panel 45 optical drive...

User Manual
Page 235
Index 235 power button 47, 56 power plan hot key card 110 power plans 108 power source 42 connecting 43 precautions 38 primary button 64 printer connecting 70 problem solving 187 printing a file 91 problem solving AC power 178 accessing disk drives 171 battery charge does not last 178 battery not charging 178 cannot insert diskette in drive 183 cannot read a diskette 183 changing display properties 181 checking device properties 176 computer hangs when PC Card inserted...
Index 235 power button 47, 56 power plan hot key card 110 power plans 108 power source 42 connecting 43 precautions 38 primary button 64 printer connecting 70 problem solving 187 printing a file 91 problem solving AC power 178 accessing disk drives 171 battery charge does not last 178 battery not charging 178 cannot insert diskette in drive 183 cannot read a diskette 183 changing display properties 181 checking device properties 176 computer hangs when PC Card inserted...
User Manual
Page 2
... to transform data formats) or modify these to infringements of this manual cannot be authorized by TOSHIBA Corporation. Use of TOSHIBA. The instructions and descriptions it contains are accurate for the TOSHIBA Satellite P100 / Satellite Pro P100 Series Portable Personal Computer at home only. ii User's Manual TOSHIBA Satellite P100 / Satellite Pro P100 Series Copyright © 2005 by Macrovision, and is prohibited. All rights reserved. are subject to change without the prior written...
... to transform data formats) or modify these to infringements of this manual cannot be authorized by TOSHIBA Corporation. Use of TOSHIBA. The instructions and descriptions it contains are accurate for the TOSHIBA Satellite P100 / Satellite Pro P100 Series Portable Personal Computer at home only. ii User's Manual TOSHIBA Satellite P100 / Satellite Pro P100 Series Copyright © 2005 by Macrovision, and is prohibited. All rights reserved. are subject to change without the prior written...
User Manual
Page 7
... device to send any changes necessary to maintain uninterrupted service. If the telephone company notes a problem, they should complete the setup of your fax software before sending messages. If these changes might affect your service or the operation of your equipment, the telephone company will give you should be performed by TOSHIBA Corporation or an authorized representative of TOSHIBA Corporation. User's Manual vii TOSHIBA Satellite P100 / Satellite Pro P100 Series...
... device to send any changes necessary to maintain uninterrupted service. If the telephone company notes a problem, they should complete the setup of your fax software before sending messages. If these changes might affect your service or the operation of your equipment, the telephone company will give you should be performed by TOSHIBA Corporation or an authorized representative of TOSHIBA Corporation. User's Manual vii TOSHIBA Satellite P100 / Satellite Pro P100 Series...
User Manual
Page 9
.... TOSHIBA Satellite P100 / Satellite Pro P100 Series Notes for Users in Australia and New Zealand Modem warning notice for the connection of non-permitted equipment. Notes for use of other end of not less than 5 seconds apart. This modem has been designed to specifically configure to ensure compliance with the application at the other country/region setting while the modem is attached to different numbers shall...
.... TOSHIBA Satellite P100 / Satellite Pro P100 Series Notes for Users in Australia and New Zealand Modem warning notice for the connection of non-permitted equipment. Notes for use of other end of not less than 5 seconds apart. This modem has been designed to specifically configure to ensure compliance with the application at the other country/region setting while the modem is attached to different numbers shall...

User Manual
Page 33
... Installing a memory module 8-10 Removing a memory module 8-12 Additional battery pack 8-13 Additional AC adapter 8-13 External monitor 8-13 Television 8-13 i.LINK (IEEE1394 8-14 Precautions 8-14 Connecting 8-14 Disconnecting 8-15 Security lock 8-15 Chapter 9 Troubleshooting Problem solving process 9-1 Preliminary checklist 9-2 Analyzing the problem 9-2 Hardware and system checklist 9-3 System start-up 9-4 Self test 9-4 Power 9-4 Keyboard 9-7 LCD panel 9-7 Hard disk drive 9-7 Password 9-8 DVD-ROM&CD-R/RW drive 9-8 DVD Super Multi drive 9-9 Diskette drive 9-11 PC Card...
... Installing a memory module 8-10 Removing a memory module 8-12 Additional battery pack 8-13 Additional AC adapter 8-13 External monitor 8-13 Television 8-13 i.LINK (IEEE1394 8-14 Precautions 8-14 Connecting 8-14 Disconnecting 8-15 Security lock 8-15 Chapter 9 Troubleshooting Problem solving process 9-1 Preliminary checklist 9-2 Analyzing the problem 9-2 Hardware and system checklist 9-3 System start-up 9-4 Self test 9-4 Power 9-4 Keyboard 9-7 LCD panel 9-7 Hard disk drive 9-7 Password 9-8 DVD-ROM&CD-R/RW drive 9-8 DVD Super Multi drive 9-9 Diskette drive 9-11 PC Card...

User Manual
Page 143
.... 1. User's Manual 8-9 If you install or remove a memory module while the computer is in the Windows Start menu. Ask your vendor or check the TOSHIBA web site for a list of liquid. 7. This section describes how to containers of approved memory products. In this case, shut down the power and remove the incompatible memory module. Do not twist or bend memory cards. 6. Optional Devices Memory card care Set the write-protect switch to the lock position...
.... 1. User's Manual 8-9 If you install or remove a memory module while the computer is in the Windows Start menu. Ask your vendor or check the TOSHIBA web site for a list of liquid. 7. This section describes how to containers of approved memory products. In this case, shut down the power and remove the incompatible memory module. Do not twist or bend memory cards. 6. Optional Devices Memory card care Set the write-protect switch to the lock position...
User Manual
Page 144
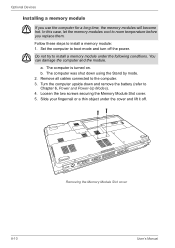
... the computer and the module. b. Turn the computer upside down using the Stand by mode. 2. Optional Devices Installing a memory module If you replace them. In this case, let the memory modules cool to boot mode and turn off . Set the computer to room temperature before you use the computer for a long time, the memory modules will become hot. The computer is turned on. Loosen the two screws securing the Memory Module Slot cover. 5. Removing the Memory Module Slot cover 8-10 User's Manual
... the computer and the module. b. Turn the computer upside down using the Stand by mode. 2. Optional Devices Installing a memory module If you replace them. In this case, let the memory modules cool to boot mode and turn off . Set the computer to room temperature before you use the computer for a long time, the memory modules will become hot. The computer is turned on. Loosen the two screws securing the Memory Module Slot cover. 5. Removing the Memory Module Slot cover 8-10 User's Manual
User Manual
Page 146
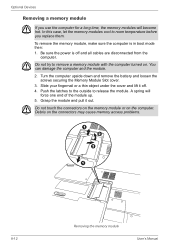
... this case, let the memory modules cool to release the module. Be sure the power is in boot mode then: 1. Debris on the computer. A spring will become hot. Do not try to remove a memory module with the computer turned on. Turn the computer upside down and remove the battery and loosen the screws securing the Memory Module Slot cover. 3. Optional Devices Removing a memory module If you replace them. To remove the memory module, make sure the computer is...
... this case, let the memory modules cool to release the module. Be sure the power is in boot mode then: 1. Debris on the computer. A spring will become hot. Do not try to remove a memory module with the computer turned on. Turn the computer upside down and remove the battery and loosen the screws securing the Memory Module Slot cover. 3. Optional Devices Removing a memory module If you replace them. To remove the memory module, make sure the computer is...
User Manual
Page 156
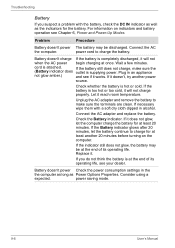
Unplug the AC adapter and remove the battery to make sure the (Battery indicator does outlet is supplying power. Check the Battery indicator. Consider using a expected. power saving mode. 9-6 User's Manual Connect the AC the computer. Wait a few minutes. If the battery still does not charge, make sure the terminals are clean. If it doesn't, try another 20 minutes before turning on indicators and battery operation see Chapter 6, Power and Power-Up Modes. If necessary wipe...
Unplug the AC adapter and remove the battery to make sure the (Battery indicator does outlet is supplying power. Check the Battery indicator. Consider using a expected. power saving mode. 9-6 User's Manual Connect the AC the computer. Wait a few minutes. If the battery still does not charge, make sure the terminals are clean. If it doesn't, try another 20 minutes before turning on indicators and battery operation see Chapter 6, Power and Power-Up Modes. If necessary wipe...
User Manual
Page 168
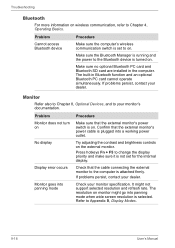
... screen resolution is on . No display Display error occurs Monitor goes into panning mode Try adjusting the contrast and brightness controls on . Make sure no optional Bluetooth PC card and Bluetooth SD card are installed in Bluetooth function and an optional Bluetooth PC card cannot operate simultaneously. Confirm that the external monitor's power cable is not set to change the display priority and make sure it is plugged into a working power outlet. Check that the external monitor's power switch is selected. Check your monitor's documentation. Problem Procedure Monitor...
... screen resolution is on . No display Display error occurs Monitor goes into panning mode Try adjusting the contrast and brightness controls on . Make sure no optional Bluetooth PC card and Bluetooth SD card are installed in Bluetooth function and an optional Bluetooth PC card cannot operate simultaneously. Confirm that the external monitor's power cable is not set to change the display priority and make sure it is plugged into a working power outlet. Check that the external monitor's power switch is selected. Check your monitor's documentation. Problem Procedure Monitor...


