

Users Manual Canada; English
Page 2
... is prohibited. TOSHIBA Satellite P100 / Satellite Pro P100 Series Copyright © 2005 by the copyright laws. Under the copyright laws, this manual's production. TOSHIBA Satellite P100 / Satellite Pro P100 Series Portable Personal Computer User's Manual First edition October 2005 Ownership and copyright of this product to the use the screen mode switching functions (e.g. These copyrighted materials may infringe the owner's rights protected by Macrovision. ii User's Manual Wide mode, Wide Zoom mode, etc.) of music, video, computer programs...
... is prohibited. TOSHIBA Satellite P100 / Satellite Pro P100 Series Copyright © 2005 by the copyright laws. Under the copyright laws, this manual's production. TOSHIBA Satellite P100 / Satellite Pro P100 Series Portable Personal Computer User's Manual First edition October 2005 Ownership and copyright of this product to the use the screen mode switching functions (e.g. These copyrighted materials may infringe the owner's rights protected by Macrovision. ii User's Manual Wide mode, Wide Zoom mode, etc.) of music, video, computer programs...

Users Manual Canada; English
Page 7
... program this change. TOSHIBA Satellite P100 / Satellite Pro P100 Series Telephone company procedures The goal of the telephone company is to provide you with the FCC. In the event repairs are notified, you will give you notice in writing to allow you to make changes in their equipment, operations, or procedures. When you should immediately remove it can. In order to maintain uninterrupted service. If...
... program this change. TOSHIBA Satellite P100 / Satellite Pro P100 Series Telephone company procedures The goal of the telephone company is to provide you with the FCC. In the event repairs are notified, you will give you notice in writing to allow you to make changes in their equipment, operations, or procedures. When you should immediately remove it can. In order to maintain uninterrupted service. If...
Users Manual Canada; English
Page 9
... operating depend on -hook for the connection of the next. The use of this device in New Zealand ■ The grant of a Telepermit for a device in force for this modem is attached to the Australian telecoms network must have a valid Austel permit. To set to customers. User's Manual ix The associated equipment shall be set the country/region permanently to Australia, enter...
... operating depend on -hook for the connection of the next. The use of this device in New Zealand ■ The grant of a Telepermit for a device in force for this modem is attached to the Australian telecoms network must have a valid Austel permit. To set to customers. User's Manual ix The associated equipment shall be set the country/region permanently to Australia, enter...
Users Manual Canada; English
Page 11
...connected to the Telecom network. An additional charge of $337.50 is payable where an assessment is based on the Telepermit label artwork. Optical disc drive safety instructions Be sure to other parties or other products without Telecom approval. The grant of this Telepermit is specific... waste disposal service or the shop where you purchased. TOSHIBA Satellite P100 / Satellite Pro P100 Series General conditions As required by PTC 100, please ensure that the product is charged for each device is included from which you may prepare any changes to the specifications of these ...
...connected to the Telecom network. An additional charge of $337.50 is payable where an assessment is based on the Telepermit label artwork. Optical disc drive safety instructions Be sure to other parties or other products without Telecom approval. The grant of this Telepermit is specific... waste disposal service or the shop where you purchased. TOSHIBA Satellite P100 / Satellite Pro P100 Series General conditions As required by PTC 100, please ensure that the product is charged for each device is included from which you may prepare any changes to the specifications of these ...

Users Manual Canada; English
Page 33
... checklist 9-2 Analyzing the problem 9-2 Hardware and system checklist 9-3 System start-up 9-4 Self test 9-4 Power 9-4 Keyboard 9-7 LCD panel 9-7 Hard disk drive 9-7 Password 9-8 DVD-ROM&CD-R/RW drive 9-8 DVD Super Multi drive 9-9 Diskette drive 9-11 PC Card 9-11 Memory Card 9-11 Sound system 9-12 Pointing device 9-12 Fingerprint Sensor 9-13 USB 9-14 TV output signal 9-14 Standby/Hibernation 9-15 Real Time Clock 9-15 Memory expansion 9-16 Modem 9-16 LAN 9-17 Wireless LAN 9-17 Bluetooth 9-18 Monitor 9-18 i.LINK (IEEE1394 9-19 User's Manual xxxi
... checklist 9-2 Analyzing the problem 9-2 Hardware and system checklist 9-3 System start-up 9-4 Self test 9-4 Power 9-4 Keyboard 9-7 LCD panel 9-7 Hard disk drive 9-7 Password 9-8 DVD-ROM&CD-R/RW drive 9-8 DVD Super Multi drive 9-9 Diskette drive 9-11 PC Card 9-11 Memory Card 9-11 Sound system 9-12 Pointing device 9-12 Fingerprint Sensor 9-13 USB 9-14 TV output signal 9-14 Standby/Hibernation 9-15 Real Time Clock 9-15 Memory expansion 9-16 Modem 9-16 LAN 9-17 Wireless LAN 9-17 Bluetooth 9-18 Monitor 9-18 i.LINK (IEEE1394 9-19 User's Manual xxxi
Users Manual Canada; English
Page 35
... to familiarize yourself with this manual by -step instructions on setting up your work area. Chapter 1, Satellite P100 / Satellite Pro P100 Series Features, is designed to read the sections on setting up and begin operating your computer and gives tips on using the following devices: TouchPad/Dual Pad, Fingerprint sensor, the optical disc drives, the internal modem, LAN and wireless communications (Wireless LAN and Bluetooth), Express Media Player and the TOSHIBA Remote Control. User's Manual xxxiii Be sure to...
... to familiarize yourself with this manual by -step instructions on setting up your work area. Chapter 1, Satellite P100 / Satellite Pro P100 Series Features, is designed to read the sections on setting up and begin operating your computer and gives tips on using the following devices: TouchPad/Dual Pad, Fingerprint sensor, the optical disc drives, the internal modem, LAN and wireless communications (Wireless LAN and Bluetooth), Express Media Player and the TOSHIBA Remote Control. User's Manual xxxiii Be sure to...
Users Manual Canada; English
Page 55
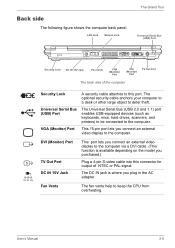
... 15V Jack This port lets you connect an external video display to the computer via a DVI cable. (This function is where you plug in the AC adapter. The DC IN jack is available depending on the model you connect an external video display to the computer. Back side The following figure shows the computer back panel. Universal Serial Bus (USB) Port The Universal Serial Bus (USB 2.0 and 1.1) port enables USB-equipped devices (such as keyboards, mice, hard drives...
... 15V Jack This port lets you connect an external video display to the computer via a DVI cable. (This function is where you plug in the AC adapter. The DC IN jack is available depending on the model you connect an external video display to the computer. Back side The following figure shows the computer back panel. Universal Serial Bus (USB) Port The Universal Serial Bus (USB 2.0 and 1.1) port enables USB-equipped devices (such as keyboards, mice, hard drives...
Users Manual Canada; English
Page 58
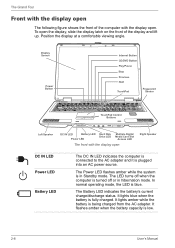
... mode. The LED turns off when the computer is plugged into an AC power source. It lights blue when the battery is being charged from the AC adapter. It lights amber while the battery is fully charged. In normal operating mode, the LED is low. 2-8 User's Manual Display Screen Power Button Internet Button CD/DVD Button Play/Pause Stop Previous Next TouchPad Fingerprint Sensor TouchPad Control Buttons Left Speaker DC IN LED Battery LED Hard Disk Drive LED Power LED Multiple Digital Media Card Slot Access LED The front with the display open the display...
... mode. The LED turns off when the computer is plugged into an AC power source. It lights blue when the battery is being charged from the AC adapter. It lights amber while the battery is fully charged. In normal operating mode, the LED is low. 2-8 User's Manual Display Screen Power Button Internet Button CD/DVD Button Play/Pause Stop Previous Next TouchPad Fingerprint Sensor TouchPad Control Buttons Left Speaker DC IN LED Battery LED Hard Disk Drive LED Power LED Multiple Digital Media Card Slot Access LED The front with the display open the display...
Users Manual Canada; English
Page 65
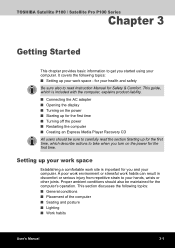
... the computer, explains product liability. ■ Connecting the AC adapter ■ Opening the display ■ Turning on the power for Safety & Comfort. Proper ambient conditions should be maintained for you started using your work habits can result in discomfort or serious injury from repetitive strain to get you and your computer. TOSHIBA Satellite P100 / Satellite Pro P100 Series Chapter 3 Getting Started This chapter provides basic information to...
... the computer, explains product liability. ■ Connecting the AC adapter ■ Opening the display ■ Turning on the power for Safety & Comfort. Proper ambient conditions should be maintained for you started using your work habits can result in discomfort or serious injury from repetitive strain to get you and your computer. TOSHIBA Satellite P100 / Satellite Pro P100 Series Chapter 3 Getting Started This chapter provides basic information to...
Users Manual Canada; English
Page 72
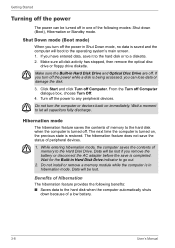
... a low battery. 3-8 User's Manual Click Start and click Turn off the power to the operating system's main screen. 1. From the Turn off . Data will boot to any peripheral devices. Benefits of Hibernation The hibernation feature provides the following modes: Shut down because of the following benefits: ■ Saves data to the Hard Disk Drive. Hibernation mode The hibernation feature saves the contents of memory to the hard disk when...
... a low battery. 3-8 User's Manual Click Start and click Turn off the power to the operating system's main screen. 1. From the Turn off . Data will boot to any peripheral devices. Benefits of Hibernation The hibernation feature provides the following modes: Shut down because of the following benefits: ■ Saves data to the Hard Disk Drive. Hibernation mode The hibernation feature saves the contents of memory to the hard disk when...
Users Manual Canada; English
Page 90
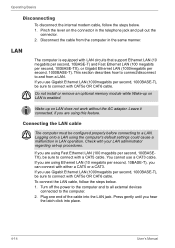
... LAN jack. If you use a CAT3 cable. If you are using Ethernet LAN (10 megabits per second, 1000BASE-T), be configured properly before connecting to connect with CAT5e OR CAT6 cable. Plug one end of the cable into place. 4-14 User's Manual Pinch the lever on LAN does not work without the AC adapter. Operating Basics Disconnecting To disconnect the internal modem cable, follow the steps below . 1. Disconnect the cable from a LAN. Connecting...
... LAN jack. If you use a CAT3 cable. If you are using Ethernet LAN (10 megabits per second, 1000BASE-T), be configured properly before connecting to connect with CAT5e OR CAT6 cable. Plug one end of the cable into place. 4-14 User's Manual Pinch the lever on LAN does not work without the AC adapter. Operating Basics Disconnecting To disconnect the internal modem cable, follow the steps below . 1. Disconnect the cable from a LAN. Connecting...

Users Manual Canada; English
Page 132
... cursor keys to set or reset the user password for an external monitor. The boot select screen will be used when the computer is booted (This setting is connected. Otherwise, it selects the internal LCD (Default). Boot-up your computer's display settings for either the internal LCD screen or for power on Windows® Desktop). Display This tab lets you to highlight the boot device you want and press Enter. 7-2 User's Manual HW Setup General This window displays the BIOS version and contains two buttons: Default...
... cursor keys to set or reset the user password for an external monitor. The boot select screen will be used when the computer is booted (This setting is connected. Otherwise, it selects the internal LCD (Default). Boot-up your computer's display settings for either the internal LCD screen or for power on Windows® Desktop). Display This tab lets you to highlight the boot device you want and press Enter. 7-2 User's Manual HW Setup General This window displays the BIOS version and contains two buttons: Default...
Users Manual Canada; English
Page 143
.... Satellite P100 / Satellite Pro P100 Series: There will be physically installed but are not compatible with the Shut Down option in progress. 3. Ask your vendor or check the TOSHIBA web site for a list of RAM. If you hear it can install additional memory in Standby or Hibernation mode, data will issue a warning. The memory card is in the computer's Memory Module Slot to increase the amount of approved memory products. User's Manual...
.... Satellite P100 / Satellite Pro P100 Series: There will be physically installed but are not compatible with the Shut Down option in progress. 3. Ask your vendor or check the TOSHIBA web site for a list of RAM. If you hear it can install additional memory in Standby or Hibernation mode, data will issue a warning. The memory card is in the computer's Memory Module Slot to increase the amount of approved memory products. User's Manual...
Users Manual Canada; English
Page 144
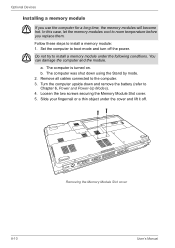
... time, the memory modules will become hot. Remove all cables connected to install a memory module under the cover and lift it off the power. Removing the Memory Module Slot cover 8-10 User's Manual Optional Devices Installing a memory module If you replace them. b. The computer is turned on. Turn the computer upside down using the Stand by mode. 2. Loosen the two screws securing the Memory Module Slot cover. 5. In this case, let the memory modules cool to Chapter 6, Power and Power-Up Modes). 4. Set the computer to install a memory module: 1. Slide your...
... time, the memory modules will become hot. Remove all cables connected to install a memory module under the cover and lift it off the power. Removing the Memory Module Slot cover 8-10 User's Manual Optional Devices Installing a memory module If you replace them. b. The computer is turned on. Turn the computer upside down using the Stand by mode. 2. Loosen the two screws securing the Memory Module Slot cover. 5. In this case, let the memory modules cool to Chapter 6, Power and Power-Up Modes). 4. Set the computer to install a memory module: 1. Slide your...
Users Manual Canada; English
Page 146
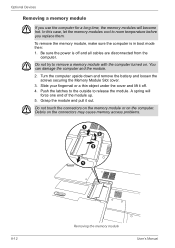
... in boot mode then: 1. You can damage the computer and the module. 2. A spring will become hot. To remove the memory module, make sure the computer is off . 4. Turn the computer upside down and remove the battery and loosen the screws securing the Memory Module Slot cover. 3. In this case, let the memory modules cool to release the module. Do not touch the connectors on the memory module or on the computer. Optional Devices Removing a memory module...
... in boot mode then: 1. You can damage the computer and the module. 2. A spring will become hot. To remove the memory module, make sure the computer is off . 4. Turn the computer upside down and remove the battery and loosen the screws securing the Memory Module Slot cover. 3. In this case, let the memory modules cool to release the module. Do not touch the connectors on the memory module or on the computer. Optional Devices Removing a memory module...
Users Manual Canada; English
Page 156
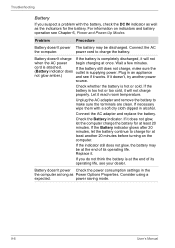
....) and see Chapter 6, Power and Power-Up Modes. Replace it will not when the AC power begin charging at least another power source. For information on indicators and battery operation see if it doesn't, try another 20 minutes before turning on the computer. If the battery still does not charge, make sure the terminals are clean. If it works. Connect the AC adapter and replace the battery. Wait a few...
....) and see Chapter 6, Power and Power-Up Modes. Replace it will not when the AC power begin charging at least another power source. For information on indicators and battery operation see if it doesn't, try another 20 minutes before turning on the computer. If the battery still does not charge, make sure the terminals are clean. If it works. Connect the AC adapter and replace the battery. Wait a few...
Users Manual Canada; English
Page 164
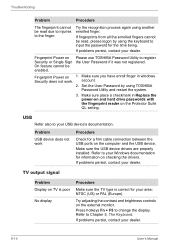
... enroll finger in Replace the power-on and hard drive passwords with the fingerprint reader on the external monitor. Set the User Password by using the keyboard to your dealer. Press hotkeys Fn + F5 to Chapter 5, The Keyboard. If problems persist, contact your USB device's documentation. USB Refer also to input the password for your Windows documentation for information on TV is poor No display Procedure Make sure the TV type is correct for...
... enroll finger in Replace the power-on and hard drive passwords with the fingerprint reader on the external monitor. Set the User Password by using the keyboard to your dealer. Press hotkeys Fn + F5 to Chapter 5, The Keyboard. If problems persist, contact your USB device's documentation. USB Refer also to input the password for your Windows documentation for information on TV is poor No display Procedure Make sure the TV type is correct for...
Users Manual Canada; English
Page 165
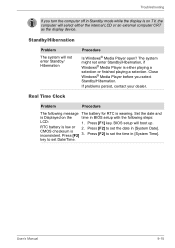
... battery for RTC is either the internal LCD or an external computer CRT as the display device. Press [F1] key. Press [F2] to set the time in [System Date]. If problems persist, contact your dealer. Real Time Clock Problem Procedure The following steps: LCD: 1. Press [F2] to set Date/Time. CMOS checksum is low or 2. User's Manual 9-15 The system might not enter Standby/Hibernation, if Windows...
... battery for RTC is either the internal LCD or an external computer CRT as the display device. Press [F1] key. Press [F2] to set the time in [System Date]. If problems persist, contact your dealer. Real Time Clock Problem Procedure The following steps: LCD: 1. Press [F2] to set Date/Time. CMOS checksum is low or 2. User's Manual 9-15 The system might not enter Standby/Hibernation, if Windows...
Users Manual Canada; English
Page 168
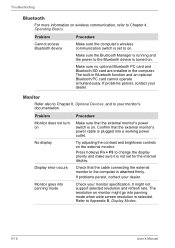
... 4, Operating Basics. No display Display error occurs Monitor goes into panning mode Try adjusting the contrast and brightness controls on monitor might not support selected resolution and refresh rate. Check that the external monitor's power cable is plugged into panning mode when wide screen resolution is on . Press hotkeys Fn + F5 to change the display priority and make sure it is set for the internal display. Problem Cannot access Bluetooth device Procedure Make sure the computer's wireless communication switch is not set...
... 4, Operating Basics. No display Display error occurs Monitor goes into panning mode Try adjusting the contrast and brightness controls on monitor might not support selected resolution and refresh rate. Check that the external monitor's power cable is plugged into panning mode when wide screen resolution is on . Press hotkeys Fn + F5 to change the display priority and make sure it is set for the internal display. Problem Cannot access Bluetooth device Procedure Make sure the computer's wireless communication switch is not set...

Detailed Specs for Satellite P100 PSPA3C-MA202C English
Page 1
... network connections • use of complex modeling software, such as On-site and Next Business Day Service visit toshiba.ca Accessories ACC021 USB floppy disk drive PA2521C-2AC3 90W AC adaptor PA3480U-1BAS 9 Cell Li-ion Battery Pack Part Number/UPC code PSPA3C-MA202C (Bilingual)/6-23506-01398-7 iToshiba of Canada Limited Information Systems Group shall not be filled with 12 function keys 2.7mm keystroke, 6mm height Dedicated Windows Keys. Optical Drive...
... network connections • use of complex modeling software, such as On-site and Next Business Day Service visit toshiba.ca Accessories ACC021 USB floppy disk drive PA2521C-2AC3 90W AC adaptor PA3480U-1BAS 9 Cell Li-ion Battery Pack Part Number/UPC code PSPA3C-MA202C (Bilingual)/6-23506-01398-7 iToshiba of Canada Limited Information Systems Group shall not be filled with 12 function keys 2.7mm keystroke, 6mm height Dedicated Windows Keys. Optical Drive...


