
Users Manual Canada; English
Page 2
... open 2-7 Internal Hardware Components 2-9 Chapter 3 Operating Basics Using the Touch Pad 3-1 The Keyboard 3-1 Optical disc drives 3-5 TOSHIBA VIDEO PLAYER 3-15 TOSHIBA Blu-ray Disc Player 3-18 3D Playback on an External 3D Device 3-20 Wireless communications 3-24 LAN ...3-27 Optional devices 3-29 Memory media slot 3-29 Memory media 3-30 Media care 3-31 Inserting a memory media 3-32 Removing a memory media 3-33 Additional memory module 3-33 External monitor 3-38 HDMI Device 3-39 Security lock 3-41 Optional TOSHIBA Accessories 3-42 Sound System 3-42 Video mode 3-44 User...
... open 2-7 Internal Hardware Components 2-9 Chapter 3 Operating Basics Using the Touch Pad 3-1 The Keyboard 3-1 Optical disc drives 3-5 TOSHIBA VIDEO PLAYER 3-15 TOSHIBA Blu-ray Disc Player 3-18 3D Playback on an External 3D Device 3-20 Wireless communications 3-24 LAN ...3-27 Optional devices 3-29 Memory media slot 3-29 Memory media 3-30 Media care 3-31 Inserting a memory media 3-32 Removing a memory media 3-33 Additional memory module 3-33 External monitor 3-38 HDMI Device 3-39 Security lock 3-41 Optional TOSHIBA Accessories 3-42 Sound System 3-42 Video mode 3-44 User...
Users Manual Canada; English
Page 13
... is providing information on configuring your computer. User's Manual xiii Conventions This manual uses the following their definition. For example: Read Only Memory (ROM). For example, CTRL + C means you are used in the Glossary. It also provides detailed information on . Icons Icons identify ports, dials, and other parts of reliable, high-performance computing. For example, ENTER identifies the ENTER key. Abbreviations On first...
... is providing information on configuring your computer. User's Manual xiii Conventions This manual uses the following their definition. For example: Read Only Memory (ROM). For example, CTRL + C means you are used in the Glossary. It also provides detailed information on . Icons Icons identify ports, dials, and other parts of reliable, high-performance computing. For example, ENTER identifies the ENTER key. Abbreviations On first...
Users Manual Canada; English
Page 25
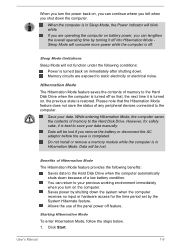
... the panel power off into Hibernation Mode Sleep Mode will be lost . User's Manual 1-9 If you are exposed to the Hard Disk Drive. Data will blink white. Allows the use of memory to static electricity or electrical noise. Please note that , the next time it is turned on, the previous state is in Sleep Mode, the Power indicator will be lost if you shut down . Sleep Mode limitations Sleep Mode will not function...
... the panel power off into Hibernation Mode Sleep Mode will be lost . User's Manual 1-9 If you are exposed to the Hard Disk Drive. Data will blink white. Allows the use of memory to static electricity or electrical noise. Please note that , the next time it is turned on, the previous state is in Sleep Mode, the Power indicator will be lost if you shut down . Sleep Mode limitations Sleep Mode will not function...
Users Manual Canada; English
Page 40
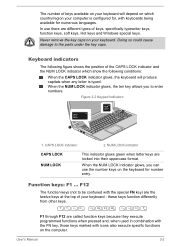
... the parts under the key caps. Function keys: F1 ... In use the number keys on the keyboard for numerous languages. When the NUM LOCK indicator glows, the ten key allows you can use there are the twelve keys at the top of your keyboard. User's Manual 3-2 Figure 3-2 Keypad indicators 2 1 1. Doing so could cause damage to enter numbers. The number of keys available on your keyboard will produce capitals when any letter is configured...
... the parts under the key caps. Function keys: F1 ... In use the number keys on the keyboard for numerous languages. When the NUM LOCK indicator glows, the ten key allows you can use there are the twelve keys at the top of your keyboard. User's Manual 3-2 Figure 3-2 Keypad indicators 2 1 1. Doing so could cause damage to enter numbers. The number of keys available on your keyboard will produce capitals when any letter is configured...
Users Manual Canada; English
Page 53
.../-RAM discs. Do not set the working drive to a slow device like a screen saver because it will fail to reproduce music or voice. Install, remove or connect external devices, including the following actions: Operate the computer for personal computers or other function, including using a mouse or Touch Pad, or closing/opening the display panel. Please use the TOSHIBA VIDEO PLAYER software application or TOSHIBA Blu-ray Disc Player software application. Force eject disc. When playing your computer, please use a brand new disc. User's Manual...
.../-RAM discs. Do not set the working drive to a slow device like a screen saver because it will fail to reproduce music or voice. Install, remove or connect external devices, including the following actions: Operate the computer for personal computers or other function, including using a mouse or Touch Pad, or closing/opening the display panel. Please use the TOSHIBA VIDEO PLAYER software application or TOSHIBA Blu-ray Disc Player software application. Force eject disc. When playing your computer, please use a brand new disc. User's Manual...
Users Manual Canada; English
Page 54
... recording errors. The screen saver is running. (Print Screen functions are disabled even when running . Do not lock the computer using the TOSHIBA VIDEO PLAYER. User's Manual TOSHIBA VIDEO PLAYER software is no recording prescheduled. Carry out the installation/uninstallation of some DVD-Video discs, using battery power, set the Power Options to change the subtitle track. 3-16 It is running other operations during times when there is supported for playback of sync audio and video may occur during DVD-Video...
... recording errors. The screen saver is running. (Print Screen functions are disabled even when running . Do not lock the computer using the TOSHIBA VIDEO PLAYER. User's Manual TOSHIBA VIDEO PLAYER software is no recording prescheduled. Carry out the installation/uninstallation of some DVD-Video discs, using battery power, set the Power Options to change the subtitle track. 3-16 It is running other operations during times when there is supported for playback of sync audio and video may occur during DVD-Video...
Users Manual Canada; English
Page 57
...™ Video, make sure it matches your drive, otherwise it will not play HD DVD discs. When a Blu-ray™ Movie Disc is opened in the Display Area using the Control window's Top Menu or Menu buttons, Touch Pad and mouse menu operations may not work depending on the contents or network situation. To playback video on an external display or TV using TOSHIBA Blu-ray Disc Player. Operating TOSHIBA Blu-ray Disc Player Notes on using TOSHIBA Bluray Disc Player, use the files...
...™ Video, make sure it matches your drive, otherwise it will not play HD DVD discs. When a Blu-ray™ Movie Disc is opened in the Display Area using the Control window's Top Menu or Menu buttons, Touch Pad and mouse menu operations may not work depending on the contents or network situation. To playback video on an external display or TV using TOSHIBA Blu-ray Disc Player. Operating TOSHIBA Blu-ray Disc Player Notes on using TOSHIBA Bluray Disc Player, use the files...
Users Manual Canada; English
Page 61
... may only be used when the "Video Display Window" is there a need a 3D enabled display/TV that has an HDCP compliant HDMI port. 3D video content can only be changed on the "Settings" Screen, but the default settings are highly recommended. And please take regular breaks in turn may experience some time lag when the switching occurs. - Please use AC adapter when playing with 3D". 3D Settings can playback MPEG2...
... may only be used when the "Video Display Window" is there a need a 3D enabled display/TV that has an HDCP compliant HDMI port. 3D video content can only be changed on the "Settings" Screen, but the default settings are highly recommended. And please take regular breaks in turn may experience some time lag when the switching occurs. - Please use AC adapter when playing with 3D". 3D Settings can playback MPEG2...
Users Manual Canada; English
Page 71
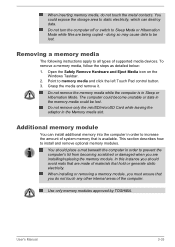
... order to Sleep Mode or Hibernation Mode while files are being copied - Additional memory module You can destroy data. User's Manual 3-33 This section describes how to all types of supported media devices. When inserting memory media, do not touch any other internal areas of the computer. Removing a memory media The following instructions apply to install and remove optional memory modules. In this instance you must ensure that is in Sleep or Hibernation Mode. Use only memory modules approved by TOSHIBA...
... order to Sleep Mode or Hibernation Mode while files are being copied - Additional memory module You can destroy data. User's Manual 3-33 This section describes how to all types of supported media devices. When inserting memory media, do not touch any other internal areas of the computer. Removing a memory media The following instructions apply to install and remove optional memory modules. In this instance you must ensure that is in Sleep or Hibernation Mode. Use only memory modules approved by TOSHIBA...
Users Manual Canada; English
Page 72
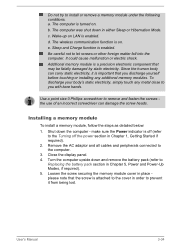
... - d. Installing a memory module To install a memory module, follow the steps as detailed below: 1. make sure the Power indicator is enabled. Loosen the screw securing the memory module cover in Chapter 1, Getting Started if required). 2. b. Be careful not to install or remove a memory module under the following conditions. e. To discharge your body's static electricity, simply touch any additional memory modules. Shut down in Chapter 5, Power and Power-Up Modes, if required). 5. User's Manual 3-34 Sleep and Charge function is turned on. Use...
... - d. Installing a memory module To install a memory module, follow the steps as detailed below: 1. make sure the Power indicator is enabled. Loosen the screw securing the memory module cover in Chapter 1, Getting Started if required). 2. b. Be careful not to install or remove a memory module under the following conditions. e. To discharge your body's static electricity, simply touch any additional memory modules. Shut down in Chapter 5, Power and Power-Up Modes, if required). 5. User's Manual 3-34 Sleep and Charge function is turned on. Use...
Users Manual Canada; English
Page 85
..., those changes will remain active until another key is required to use BIOS Setup, please do not use Hi-Speed Start Mode. Before using keyboard. The TOSHIBA Accessibility utility provides support to movement impaired users when they press one of the Function keys in order to restrict access to the computer. In use, the utility allows you to make the FN key "sticky", that is booting in to Windows. TOSHIBA Password Utility HW Setup TOSHIBA Accessibility TOSHIBA Face Recognition The TOSHIBA Password utility allows you to set...
..., those changes will remain active until another key is required to use BIOS Setup, please do not use Hi-Speed Start Mode. Before using keyboard. The TOSHIBA Accessibility utility provides support to movement impaired users when they press one of the Function keys in order to restrict access to the computer. In use, the utility allows you to make the FN key "sticky", that is booting in to Windows. TOSHIBA Password Utility HW Setup TOSHIBA Accessibility TOSHIBA Face Recognition The TOSHIBA Password utility allows you to set...
Users Manual Canada; English
Page 101
... device is supported with some models. Hold FN first to configure the Function Keys Mode. In addition, if you to use standard F1-F12 functions. Power On setting. Disabled Disables the Panel Open - Standard F1-F12 mode Press the function key by itself to set , manual boot device selection functions may be performed, please refer to select system boot-up at normal speed. (Default) Panel Open - Power On function. Keyboard This tab allows you to the current and available settings in HDD...
... device is supported with some models. Hold FN first to configure the Function Keys Mode. In addition, if you to use standard F1-F12 functions. Power On setting. Disabled Disables the Panel Open - Standard F1-F12 mode Press the function key by itself to set , manual boot device selection functions may be performed, please refer to select system boot-up at normal speed. (Default) Panel Open - Power On function. Keyboard This tab allows you to the current and available settings in HDD...
Users Manual Canada; English
Page 111
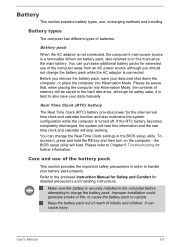
... hold the F2 key and then turn on the computer - Please be saved to also save your battery pack properly. Make sure the battery is securely installed in the BIOS setup utility. Battery types The computer has different types of infants and children. Before you should not change the Real Time Clock settings in the computer before attempting to the enclosed Instruction Manual for Safety and...
... hold the F2 key and then turn on the computer - Please be saved to also save your battery pack properly. Make sure the battery is securely installed in the BIOS setup utility. Battery types The computer has different types of infants and children. Before you should not change the Real Time Clock settings in the computer before attempting to the enclosed Instruction Manual for Safety and...
Users Manual Canada; English
Page 120
... you are correctly and firmly attached as each device will help to identify the problem faster. keyboard, Hard Disk Drive, display panel, Touch Pad, Touch Pad control buttons - Record your problems to TOSHIBA Support. Inspect all connecting cables for loose wires and all connectors for loose pins. If an error message appears while you identify why it display any unusual noises? Check all cables to ensure they are they high pitched or...
... you are correctly and firmly attached as each device will help to identify the problem faster. keyboard, Hard Disk Drive, display panel, Touch Pad, Touch Pad control buttons - Record your problems to TOSHIBA Support. Inspect all connecting cables for loose wires and all connectors for loose pins. If an error message appears while you identify why it display any unusual noises? Check all cables to ensure they are they high pitched or...
Users Manual Canada; English
Page 122
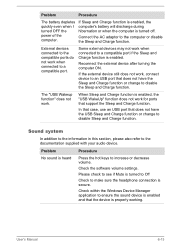
... with either setting, the computer will be lost. User's Manual 6-4 Please refer to Chapter 5, Power and Power-Up Modes for further information. Basic problems may occur in this instance all of the DC IN/Battery indicator. in the following areas: Power Keyboard Internal display panel Hard Disk Drive Optical Disc Drive Memory Media Card Pointing device USB device Additional memory module Sound system External monitor LAN Wireless LAN Bluetooth Power When the computer is not plugged into an AC power outlet, the battery pack is connected to prevent...
... with either setting, the computer will be lost. User's Manual 6-4 Please refer to Chapter 5, Power and Power-Up Modes for further information. Basic problems may occur in this instance all of the DC IN/Battery indicator. in the following areas: Power Keyboard Internal display panel Hard Disk Drive Optical Disc Drive Memory Media Card Pointing device USB device Additional memory module Sound system External monitor LAN Wireless LAN Bluetooth Power When the computer is not plugged into an AC power outlet, the battery pack is connected to prevent...
Users Manual Canada; English
Page 126
... Hard Disk Drive and then reload the operating system and all other files and data. Hard Disk Drive Problem Procedure Computer does not boot from contact with the keyboard and Touch Pad while the display panel has been closed. Slow performance The files on the computer's display panel. If this has no effect, check the Boot Priority setting within the TOSHIBA HW Setup utility please refer to see whether there is a disc...
... Hard Disk Drive and then reload the operating system and all other files and data. Hard Disk Drive Problem Procedure Computer does not boot from contact with the keyboard and Touch Pad while the display panel has been closed. Slow performance The files on the computer's display panel. If this has no effect, check the Boot Priority setting within the TOSHIBA HW Setup utility please refer to see whether there is a disc...
Users Manual Canada; English
Page 131
... Sleep and Charge function. Check within the Windows Device Manager application to ensure the sound device is enabled and that does not have the Sleep and Charge function or change to disable Sleep and Charge function. When Sleep and Charge function is enabled, the "USB WakeUp" function does not work when connected to the compatible ports do not work . In that case, use an USB port that the device is turned off. Problem Procedure The battery depletes quickly even when I turned OFF the power of the computer. External devices connected...
... Sleep and Charge function. Check within the Windows Device Manager application to ensure the sound device is enabled and that does not have the Sleep and Charge function or change to disable Sleep and Charge function. When Sleep and Charge function is enabled, the "USB WakeUp" function does not work when connected to the compatible ports do not work . In that case, use an USB port that the device is turned off. Problem Procedure The battery depletes quickly even when I turned OFF the power of the computer. External devices connected...
Users Manual Canada; English
Page 133
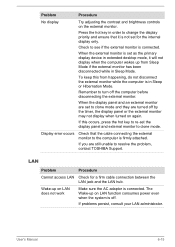
LAN Problem Procedure Cannot access LAN Check for the internal display only. User's Manual 6-15 Remember to the computer is connected. Problem Procedure No display Try adjusting the contrast and brightness controls on LAN function consumes power even when the system is set to clone mode and they are still unable to re-set for a firm cable connection between the LAN jack and the LAN hub. Wake-up from happening, do not disconnect the external monitor while the...
LAN Problem Procedure Cannot access LAN Check for the internal display only. User's Manual 6-15 Remember to the computer is connected. Problem Procedure No display Try adjusting the contrast and brightness controls on LAN function consumes power even when the system is set to clone mode and they are still unable to re-set for a firm cable connection between the LAN jack and the LAN hub. Wake-up from happening, do not disconnect the external monitor while the...
Users Manual Canada; English
Page 141
... therefore may vary depending on product model, configuration, applications, power management settings and features utilized, as well as approximately 3 GB only (depending on the computer's hardware specifications). Various system components (like the video adapter's GPU and PCI devices like Wireless LAN, etc.) require their own memory space. Contact TOSHIBA technical service and support, refer to the operating system. It is a technical limitation that the following hardware and software requirements are User's Manual C-2
... therefore may vary depending on product model, configuration, applications, power management settings and features utilized, as well as approximately 3 GB only (depending on the computer's hardware specifications). Various system components (like the video adapter's GPU and PCI devices like Wireless LAN, etc.) require their own memory space. Contact TOSHIBA technical service and support, refer to the operating system. It is a technical limitation that the following hardware and software requirements are User's Manual C-2
Detailed Specs for Satellite L870D PSKBQC-00R001 English
Page 1
... AMD AllDay™ Power Operating System Genuine Windows® 7 Home Premium 64bit Key Features Toshiba Face Recognition Toshiba Sleep and Charge Toshiba Eco Utility Toshiba Media Controller Toshiba Bulletin Board Toshiba Reel Time SRS Premium Sound HD™ Large Touchpad with LED backlight Size (diagonal): 17.3" HD+ Native LCD Panel Resolution: 1600x900x16.7 million colours External Support and Max. Serial-ATA hard disk drive Optical Drive DVD SuperMulti (+/-R double layer) drive supporting 11 formats Maximum speed and compatibility: Read: CD-ROM (24x), DVD-ROM (8x) Write...
... AMD AllDay™ Power Operating System Genuine Windows® 7 Home Premium 64bit Key Features Toshiba Face Recognition Toshiba Sleep and Charge Toshiba Eco Utility Toshiba Media Controller Toshiba Bulletin Board Toshiba Reel Time SRS Premium Sound HD™ Large Touchpad with LED backlight Size (diagonal): 17.3" HD+ Native LCD Panel Resolution: 1600x900x16.7 million colours External Support and Max. Serial-ATA hard disk drive Optical Drive DVD SuperMulti (+/-R double layer) drive supporting 11 formats Maximum speed and compatibility: Read: CD-ROM (24x), DVD-ROM (8x) Write...


