
User Manual
Page 63
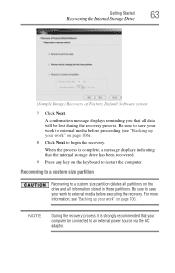
...all partitions on page 106. Be sure to save your computer be lost during the recovery process. Recovering to a custom size partition Recovering to begin the recovery. For more information, see "Backing up your work to external media before executing the recovery.... Getting Started 63 Recovering the Internal Storage Drive (Sample Image) Recovery of Factory Default Software screen 7 Click Next. NOTE During the recovery process it is complete, a message displays indicating that the internal storage drive has been recovered. ...
...all partitions on page 106. Be sure to save your computer be lost during the recovery process. Recovering to a custom size partition Recovering to begin the recovery. For more information, see "Backing up your work to external media before executing the recovery.... Getting Started 63 Recovering the Internal Storage Drive (Sample Image) Recovery of Factory Default Software screen 7 Click Next. NOTE During the recovery process it is complete, a message displays indicating that the internal storage drive has been recovered. ...
User Manual
Page 64
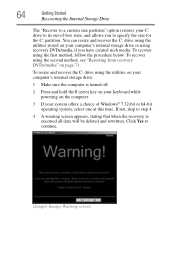
... DVDs/media" on your system offers a choice of -box state, and allows you have created such media. Click Yes to step 4. 4 A warning screen appears, stating that when the recovery is turned off. 2 Press and hold the 0 (zero) key on your keyboard while powering on the computer. 3... recover using the first method, follow the procedure below. If not, skip to continue. (Sample Image) Warning screen 64 Getting Started Recovering the Internal Storage Drive The "Recover to a custom size partition" option restores your C: drive to its out-of Windows® 7 32-bit or 64-bit operating...
... DVDs/media" on your system offers a choice of -box state, and allows you have created such media. Click Yes to step 4. 4 A warning screen appears, stating that when the recovery is turned off. 2 Press and hold the 0 (zero) key on your keyboard while powering on the computer. 3... recover using the first method, follow the procedure below. If not, skip to continue. (Sample Image) Warning screen 64 Getting Started Recovering the Internal Storage Drive The "Recover to a custom size partition" option restores your C: drive to its out-of Windows® 7 32-bit or 64-bit operating...
User Manual
Page 65
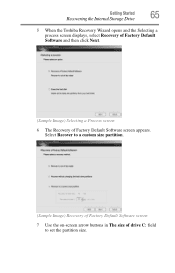
Select Recover to set the partition size. Getting Started 65 Recovering the Internal Storage Drive 5 When the Toshiba Recovery Wizard opens and the Selecting a process screen displays, select Recovery of Factory Default Software and then click Next. (Sample Image) Selecting a Process screen 6 The Recovery of drive C: field to a custom size partition. (Sample Image) Recovery of Factory Default Software screen 7 Use the on-screen arrow buttons in The size of Factory Default Software screen appears.
Select Recover to set the partition size. Getting Started 65 Recovering the Internal Storage Drive 5 When the Toshiba Recovery Wizard opens and the Selecting a process screen displays, select Recovery of Factory Default Software and then click Next. (Sample Image) Selecting a Process screen 6 The Recovery of drive C: field to a custom size partition. (Sample Image) Recovery of Factory Default Software screen 7 Use the on-screen arrow buttons in The size of Factory Default Software screen appears.
User Manual
Page 72
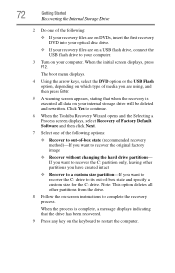
Click Yes to continue. 6 When the Toshiba Recovery Wizard opens and the Selecting a Process screen displays, select Recovery of Factory Default Software and then click Next. 7 Select one of -box state and specify a custom size for the C: drive. When the process is complete, a message displays indicating ...executed all other partitions you have created intact ❖ Recover to a custom size partition-If you want to recover the C: partition only, leaving other partitions from the drive. 8 Follow the on-screen instructions to its out-of the following options: ❖ Recover to out-of...
Click Yes to continue. 6 When the Toshiba Recovery Wizard opens and the Selecting a Process screen displays, select Recovery of Factory Default Software and then click Next. 7 Select one of -box state and specify a custom size for the C: drive. When the process is complete, a message displays indicating ...executed all other partitions you have created intact ❖ Recover to a custom size partition-If you want to recover the C: partition only, leaving other partitions from the drive. 8 Follow the on-screen instructions to its out-of the following options: ❖ Recover to out-of...
User Manual
Page 73
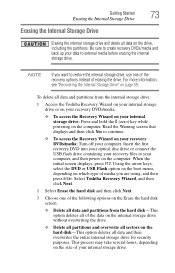
... For more information, see "Recovering the Internal Storage Drive" on the computer. Read the Warning screen that displays and then click Yes to external media before erasing the internal storage drive. Select Toshiba Recovery Wizard, and then click Next. 2 Select Erase the hard disk and then click Next....press F12. Be sure to your computer, and then power on the size of the following options on the Erase the hard disk screen: ❖ Delete all data and partitions from the internal storage drive: 1 Access the Toshiba Recovery Wizard on your internal storage drive or on your recovery DVDs/...
... For more information, see "Recovering the Internal Storage Drive" on the computer. Read the Warning screen that displays and then click Yes to external media before erasing the internal storage drive. Select Toshiba Recovery Wizard, and then click Next. 2 Select Erase the hard disk and then click Next....press F12. Be sure to your computer, and then power on the size of the following options on the Erase the hard disk screen: ❖ Delete all data and partitions from the internal storage drive: 1 Access the Toshiba Recovery Wizard on your internal storage drive or on your recovery DVDs/...
User Manual
Page 98
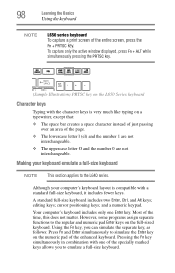
...not interchangeable. ❖ The uppercase letter O and the number 0 are not interchangeable. Most of the entire screen, press the Fn + PRTSC key. Although your keyboard emulate a full-size keyboard NOTE This section applies to the regular and numeric pad Enter keys on a typewriter, except that: ... Basics Using the keyboard NOTE L650 series keyboard To capture a print screen of the time, this does not matter. Making your computer's keyboard layout is very much like typing on the full-sized keyboard. cursor positioning keys; However, some programs assign separate functions to...
...not interchangeable. ❖ The uppercase letter O and the number 0 are not interchangeable. Most of the entire screen, press the Fn + PRTSC key. Although your keyboard emulate a full-size keyboard NOTE This section applies to the regular and numeric pad Enter keys on a typewriter, except that: ... Basics Using the keyboard NOTE L650 series keyboard To capture a print screen of the time, this does not matter. Making your computer's keyboard layout is very much like typing on the full-sized keyboard. cursor positioning keys; However, some programs assign separate functions to...
User Manual
Page 172
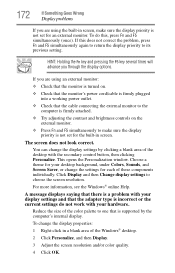
...sure the display priority is not set for the built-in screen. If you through the display options. For more information, see the Windows® online Help. Choose a theme for your hardware. Reduce the size of these components individually. You can change the display settings ...by the computer's internal display. To change the settings for an external monitor. To do not work with the secondary control button, then clicking Personalize. The screen does not look correct. ...
...sure the display priority is not set for the built-in screen. If you through the display options. For more information, see the Windows® online Help. Choose a theme for your hardware. Reduce the size of these components individually. You can change the display settings ...by the computer's internal display. To change the settings for an external monitor. To do not work with the secondary control button, then clicking Personalize. The screen does not look correct. ...
User Manual
Page 191
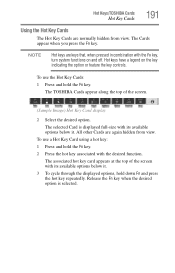
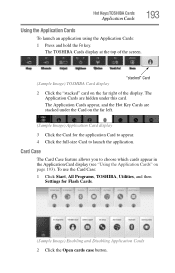
The associated hot key card appears at the top of the screen. (Sample Image) Hot Key Card display 2 Select the desired option. To use the Hot Key...To cycle through the displayed options, hold down Fn and press the hot key repeatedly. The TOSHIBA Cards appear along the top of the screen with the Fn key, turn system functions on the key indicating the option or feature the key...All other Cards are again hidden from view. The Cards appear when you press the Fn key. Hot Keys/TOSHIBA Cards Hot Key Cards 191 Using the Hot Key Cards The Hot Key Cards are normally hidden from view....
The associated hot key card appears at the top of the screen. (Sample Image) Hot Key Card display 2 Select the desired option. To use the Hot Key...To cycle through the displayed options, hold down Fn and press the hot key repeatedly. The TOSHIBA Cards appear along the top of the screen with the Fn key, turn system functions on the key indicating the option or feature the key...All other Cards are again hidden from view. The Cards appear when you press the Fn key. Hot Keys/TOSHIBA Cards Hot Key Cards 191 Using the Hot Key Cards The Hot Key Cards are normally hidden from view....
User Manual
Page 193
... stacked under this card. The Application Cards appear, and the Hot Key Cards are hidden under the Card on the far right of the screen. (Sample Image) TOSHIBA Card display "stacked" Card 2 Click the "stacked" card on the far left. (Sample Image) Application Card display 3 Click the Card ...2 Click the Open cards case button. To use the Card Case: 1 Click Start, All Programs, TOSHIBA, Utilities, and then Settings for the application Card to appear. 4 Click the full-size Card to choose which cards appear in the Application Card display (see "Using the Application Cards" on page...
... stacked under this card. The Application Cards appear, and the Hot Key Cards are hidden under the Card on the far right of the screen. (Sample Image) TOSHIBA Card display "stacked" Card 2 Click the "stacked" card on the far left. (Sample Image) Application Card display 3 Click the Card ...2 Click the Open cards case button. To use the Card Case: 1 Click Start, All Programs, TOSHIBA, Utilities, and then Settings for the application Card to appear. 4 Click the full-size Card to choose which cards appear in the Application Card display (see "Using the Application Cards" on page...
User Manual
Page 217
... See Central Processing Unit (CPU). See also memory. peripheral - pointing device - processor - The attributes of instructions that moves on the screen. For example, the properties of characters entered by the computer's CPU. R RAM (Random Access Memory) - PC Card - Any device..., and utility. See also operating system, application, utility. pixel - A unique string of a file include the file's type, size, and creation date. Plug and Play - Generally, refers to the computer's ability to automatically configure itself automatically to work with peripheral...
... See Central Processing Unit (CPU). See also memory. peripheral - pointing device - processor - The attributes of instructions that moves on the screen. For example, the properties of characters entered by the computer's CPU. R RAM (Random Access Memory) - PC Card - Any device..., and utility. See also operating system, application, utility. pixel - A unique string of a file include the file's type, size, and creation date. Plug and Play - Generally, refers to the computer's ability to automatically configure itself automatically to work with peripheral...
User Manual
Page 223
...look normal/flickers 172 external monitor not working 173 display devices external 79 display output settings 81 display panel opening 48 display problems screen is blank 171 display, external adjusting 82 disposal information 28 disposing of used batteries 129 DVD caring for discs 113 removing with ... 112 DVD player general problems 180 DVDs using 107 E eject button optical disc drive 109 eject, optical disc drive 109 emulate a full-size keyboard 98 enabling TouchPad™ 79, 202 ENERGY STAR® 36 error messages problem with display settings/ current settings not working with hardware...
...look normal/flickers 172 external monitor not working 173 display devices external 79 display output settings 81 display panel opening 48 display problems screen is blank 171 display, external adjusting 82 disposal information 28 disposing of used batteries 129 DVD caring for discs 113 removing with ... 112 DVD player general problems 180 DVDs using 107 E eject button optical disc drive 109 eject, optical disc drive 109 emulate a full-size keyboard 98 enabling TouchPad™ 79, 202 ENERGY STAR® 36 error messages problem with display settings/ current settings not working with hardware...
User Manual
Page 227
...73 installing drivers and applications 75 internal storage drive 59 out-of-box state 61 restoring from recovery DVDs/ media 71 to custom size partition 63 without changing drive partitions 66 recycle bin icon 132 registering computer 50 removing an optical disc with computer on 112 and... S safety computer 130 disposing of batteries 129 icons 39 precautions 42 safety precautions battery 127 saving files 103, 104 screen does not look normal/flickers 172 screen problems blank screen 171 Search programs and files field starting a program 103 selecting a place to work 41 power plan options 122 video...
...73 installing drivers and applications 75 internal storage drive 59 out-of-box state 61 restoring from recovery DVDs/ media 71 to custom size partition 63 without changing drive partitions 66 recycle bin icon 132 registering computer 50 removing an optical disc with computer on 112 and... S safety computer 130 disposing of batteries 129 icons 39 precautions 42 safety precautions battery 127 saving files 103, 104 screen does not look normal/flickers 172 screen problems blank screen 171 Search programs and files field starting a program 103 selecting a place to work 41 power plan options 122 video...


