User Manual
Page 30
... custom size partition 63 Recovering without changing the internal storage drive partitions 66 Creating recovery DVDs/media 68 Restoring from recovery DVDs/media 71 Erasing the Internal Storage Drive 73 Checking the internal storage drive operating status 74 Installing drivers and applications 75 Using the TouchPad 75 Adjusting TouchPad™ settings 78 Disabling or enabling the TouchPad 79 Using external display devices 79 Selecting video cables 80 Connecting an HDMI™-compatible television or external display device............80 Connecting an external monitor or projector...
... custom size partition 63 Recovering without changing the internal storage drive partitions 66 Creating recovery DVDs/media 68 Restoring from recovery DVDs/media 71 Erasing the Internal Storage Drive 73 Checking the internal storage drive operating status 74 Installing drivers and applications 75 Using the TouchPad 75 Adjusting TouchPad™ settings 78 Disabling or enabling the TouchPad 79 Using external display devices 79 Selecting video cables 80 Connecting an HDMI™-compatible television or external display device............80 Connecting an external monitor or projector...
User Manual
Page 51
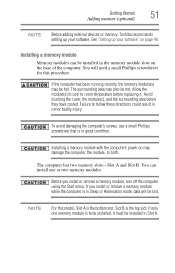
... you install or remove a memory module, turn off the computer using the Start menu. NOTE For this procedure. If only one or two memory modules. Failure to be installed in minor bodily injury. Installing a memory module Memory modules can install one memory module is the bottom slot. Slot B is the top slot. Getting Started 51 Adding memory (optional) NOTE Before adding external devices or memory, Toshiba recommends setting up your software. Before you install or remove a memory module while the computer is in the memory module slots on...
... you install or remove a memory module, turn off the computer using the Start menu. NOTE For this procedure. If only one or two memory modules. Failure to be installed in minor bodily injury. Installing a memory module Memory modules can install one memory module is the bottom slot. Slot B is the top slot. Getting Started 51 Adding memory (optional) NOTE Before adding external devices or memory, Toshiba recommends setting up your software. Before you install or remove a memory module while the computer is in the memory module slots on...
User Manual
Page 56
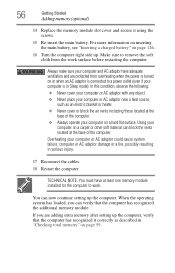
... a fire, possibly resulting in Sleep mode). Using your computer on page 126. 16 Turn the computer right side up the computer. TECHNICAL NOTE: You must have adequate ventilation and are adding extra memory after setting up the computer, verify that the computer has recognized the additional memory module. 56 Getting Started Adding memory (optional) 14 Replace the memory module slot cover and secure it correctly as...
... a fire, possibly resulting in Sleep mode). Using your computer on page 126. 16 Turn the computer right side up the computer. TECHNICAL NOTE: You must have adequate ventilation and are adding extra memory after setting up the computer, verify that the computer has recognized the additional memory module. 56 Getting Started Adding memory (optional) 14 Replace the memory module slot cover and secure it correctly as...
User Manual
Page 57
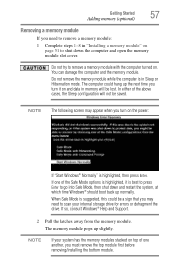
... open the memory module slot cover. Do not try to remove a memory module with the computer turned on and data in Sleep or Hibernation mode. In either of the Safe Mode options is highlighted, then press Enter. When Safe Mode is suggested, this could hang up slightly. NOTE If your system has the memory modules stacked on page 51 to shut down and restart the system, at which time Windows...
... open the memory module slot cover. Do not try to remove a memory module with the computer turned on and data in Sleep or Hibernation mode. In either of the Safe Mode options is highlighted, then press Enter. When Safe Mode is suggested, this could hang up slightly. NOTE If your system has the memory modules stacked on page 51 to shut down and restart the system, at which time Windows...
User Manual
Page 58
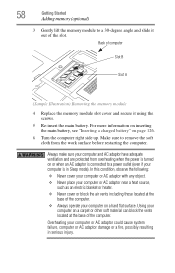
.... 5 Re-insert the main battery. Using your computer on a carpet or other soft material can block the vents located at the base of computer Slot B Slot A (Sample Illustration) Removing the memory module 4 Replace the memory module slot cover and secure it out of the computer. Back of the computer. ❖ Always operate your computer on a hard flat surface. Make sure to a power outlet (even if your computer...
.... 5 Re-insert the main battery. Using your computer on a carpet or other soft material can block the vents located at the base of computer Slot B Slot A (Sample Illustration) Removing the memory module 4 Replace the memory module slot cover and secure it out of the computer. Back of the computer. ❖ Always operate your computer on a hard flat surface. Make sure to a power outlet (even if your computer...
User Manual
Page 59
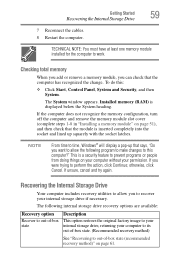
... window appears. This is a security feature to work. If the computer does not recognize the memory configuration, turn off the computer and remove the memory module slot cover (complete steps 1-8 in "Installing a memory module" on page 51), and then check that the module is displayed below the System heading. Recovering the Internal Storage Drive Your computer includes recovery utilities to allow you want to allow the following internal storage drive recovery options are available: Recovery option Recover...
... window appears. This is a security feature to work. If the computer does not recognize the memory configuration, turn off the computer and remove the memory module slot cover (complete steps 1-8 in "Installing a memory module" on page 51), and then check that the module is displayed below the System heading. Recovering the Internal Storage Drive Your computer includes recovery utilities to allow you want to allow the following internal storage drive recovery options are available: Recovery option Recover...
User Manual
Page 80
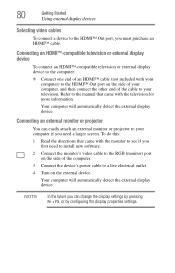
... can easily attach an external monitor or projector to your television. Refer to the manual that came with the monitor to see if you must purchase an HDMI™ cable. 80 Getting Started Using external display devices Selecting video cables To connect a device to the HDMI™ Out port, you first need a larger screen. NOTE In the future you need to install new software. 2 Connect the monitor's video cable to the RGB (monitor) port on the external device. To do this...
... can easily attach an external monitor or projector to your television. Refer to the manual that came with the monitor to see if you must purchase an HDMI™ cable. 80 Getting Started Using external display devices Selecting video cables To connect a device to the HDMI™ Out port, you first need a larger screen. NOTE In the future you need to install new software. 2 Connect the monitor's video cable to the RGB (monitor) port on the external device. To do this...
User Manual
Page 111
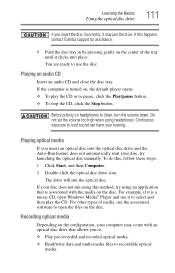
... the Stop button. If the computer is turned on the configuration, your hearing. If your disc, try using headphones. For example, if it is associated with an optical disc drive that is a music CD, open the files on the center of media, use the associated software to use it to listen, turn the volume down. Before putting on the disc. Do not set the volume too high...
... the Stop button. If the computer is turned on the configuration, your hearing. If your disc, try using headphones. For example, if it is associated with an optical disc drive that is a music CD, open the files on the center of media, use the associated software to use it to listen, turn the volume down. Before putting on the disc. Do not set the volume too high...
User Manual
Page 152
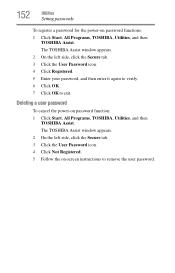
... Utilities Setting passwords To register a password for the power-on password function: 1 Click Start, All Programs, TOSHIBA, Utilities, and then TOSHIBA Assist. The TOSHIBA Assist window appears. 2 On the left side, click the Secure tab. 3 Click the User Password icon. 4 Click Not Registered. 5 Follow the on-screen instructions to exit. The TOSHIBA Assist window appears. 2 On the left side, click the Secure tab. 3 Click the User Password icon. 4 Click Registered. 5 Enter your password...
... Utilities Setting passwords To register a password for the power-on password function: 1 Click Start, All Programs, TOSHIBA, Utilities, and then TOSHIBA Assist. The TOSHIBA Assist window appears. 2 On the left side, click the Secure tab. 3 Click the User Password icon. 4 Click Not Registered. 5 Follow the on-screen instructions to exit. The TOSHIBA Assist window appears. 2 On the left side, click the Secure tab. 3 Click the User Password icon. 4 Click Registered. 5 Enter your password...
User Manual
Page 161
... and device usage (e.g.: power settings, battery temperature and recharging, CPU, memory, backlight illumination time, and temperatures for various devices). This information is not limited to specific system conditions via pop-up messages. The collected information includes device operation time and number of actuations or status changes (e.g.: number of power button and Fn key combination uses, and AC adaptor, battery, LCD, fan, HDD, sound volume, wireless communication switch, docking and USB information), date of the total hard disk capacity...
... and device usage (e.g.: power settings, battery temperature and recharging, CPU, memory, backlight illumination time, and temperatures for various devices). This information is not limited to specific system conditions via pop-up messages. The collected information includes device operation time and number of actuations or status changes (e.g.: number of power button and Fn key combination uses, and AC adaptor, battery, LCD, fan, HDD, sound volume, wireless communication switch, docking and USB information), date of the total hard disk capacity...
User Manual
Page 166
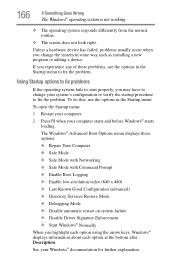
... Networking ❖ Safe Mode with Command Prompt ❖ Enable Boot Logging ❖ Enable low-resolution video (640 x 480) ❖ Last Known Good Configuration (advanced) ❖ Directory Services Restore Mode ❖ Debugging Mode ❖ Disable automatic restart on system failure ❖ Disable Driver Signature Enforcement ❖ Start Windows® Normally When you highlight each option using the arrow keys, Windows® displays information about each option at the bottom after Description. Unless a hardware device has failed, problems...
... Networking ❖ Safe Mode with Command Prompt ❖ Enable Boot Logging ❖ Enable low-resolution video (640 x 480) ❖ Last Known Good Configuration (advanced) ❖ Directory Services Restore Mode ❖ Debugging Mode ❖ Disable automatic restart on system failure ❖ Disable Driver Signature Enforcement ❖ Start Windows® Normally When you highlight each option using the arrow keys, Windows® displays information about each option at the bottom after Description. Unless a hardware device has failed, problems...
User Manual
Page 172
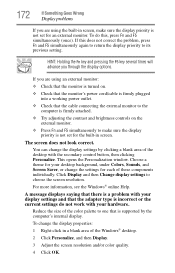
... F5 key several times will advance you through the display options. 172 If Something Goes Wrong Display problems If you are using the built-in screen, make sure the display priority is not set for an external monitor. To change the settings for each of the Windows® desktop. 2 Click Personalize, and then Display. 3 Adjust the screen resolution and/or color quality. 4 Click OK. This opens the Personalization window. Click Display...
... F5 key several times will advance you through the display options. 172 If Something Goes Wrong Display problems If you are using the built-in screen, make sure the display priority is not set for an external monitor. To change the settings for each of the Windows® desktop. 2 Click Personalize, and then Display. 3 Adjust the screen resolution and/or color quality. 4 Click OK. This opens the Personalization window. Click Display...
User Manual
Page 178
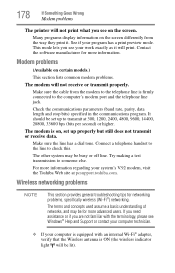
... on certain models.) This section lists common modem problems. The modem will be set up to the telephone line is ON (the wireless indicator light will not receive or transmit properly. For more information regarding your program has a print preview mode. Wireless networking problems NOTE This section provides general troubleshooting tips for more information. Make sure the line has a dial tone. Connect a telephone handset...
... on certain models.) This section lists common modem problems. The modem will be set up to the telephone line is ON (the wireless indicator light will not receive or transmit properly. For more information regarding your program has a print preview mode. Wireless networking problems NOTE This section provides general troubleshooting tips for more information. Make sure the line has a dial tone. Connect a telephone handset...
User Manual
Page 184
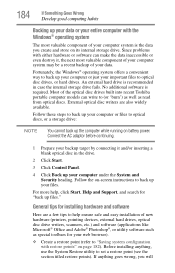
... Toshiba portable computer models can make the data inaccessible or even destroy it and/or inserting a blank optical disc in case the internal storage drive fails. Follow the on battery power. If anything , use the System Restore utility to set a restore point (see the section titled restore points). Since problems with either hardware or software can write to "Saving system configuration with restore points" on its internal storage drive. Fortunately, the Windows...
... Toshiba portable computer models can make the data inaccessible or even destroy it and/or inserting a blank optical disc in case the internal storage drive fails. Follow the on battery power. If anything , use the System Restore utility to set a restore point (see the section titled restore points). Since problems with either hardware or software can write to "Saving system configuration with restore points" on its internal storage drive. Fortunately, the Windows...
User Manual
Page 214
... image displayed on the screen that you use to perform a task instead of using this function, if connected with the Fn key can set system options or control system parameters, such as a mouse. Interlaced monitors take two passes to add or remove devices from a computer while the computer is returned to help improve processing speed. K keyboard shortcut - A key or combination of your work , including all open files and...
... image displayed on the screen that you use to perform a task instead of using this function, if connected with the Fn key can set system options or control system parameters, such as a mouse. Interlaced monitors take two passes to add or remove devices from a computer while the computer is returned to help improve processing speed. K keyboard shortcut - A key or combination of your work , including all open files and...
User Manual
Page 221
... adaptor 45 AC power 116 AC power light 45 accessing network 135 adding memory 50 check total memory 59 optional external devices 50 adequate ventilation cooling fan 44 adjusting TouchPad™ settings 78 Application Cards 192 audio features 137 B backing up files 96, 106 battery battery life 115 Call2Recycle™ 130 care 127, 128 changing 124 charge indicator light 46 charge not lasting 170 charge time 116 charger 116 charging 47, 116 charging the real-time...
... adaptor 45 AC power 116 AC power light 45 accessing network 135 adding memory 50 check total memory 59 optional external devices 50 adequate ventilation cooling fan 44 adjusting TouchPad™ settings 78 Application Cards 192 audio features 137 B backing up files 96, 106 battery battery life 115 Call2Recycle™ 130 care 127, 128 changing 124 charge indicator light 46 charge not lasting 170 charge time 116 charger 116 charging 47, 116 charging the real-time...

User Manual
Page 222
... on battery power 114 safety precautions 127 setting notifications 120 battery indicator light 119 BD player general problems 180 BDs using 107 BIOS Setup see TOSHIBA Hardware Setup Blu-ray Disc™ using 107 button eject, optical disc drive 109 power 49 Shut down 52, 86 start 133 C Call2Recycle™ battery 130 caring for your computer 94 changing battery 124 character keys 98 charging the battery 47 checking device properties 168 cleaning the computer 94 communications network connection 135 set...
... on battery power 114 safety precautions 127 setting notifications 120 battery indicator light 119 BD player general problems 180 BDs using 107 BIOS Setup see TOSHIBA Hardware Setup Blu-ray Disc™ using 107 button eject, optical disc drive 109 power 49 Shut down 52, 86 start 133 C Call2Recycle™ battery 130 caring for your computer 94 changing battery 124 character keys 98 charging the battery 47 checking device properties 168 cleaning the computer 94 communications network connection 135 set...
User Manual
Page 224
... 91 using 89 hot key disabling or enabling wireless devices 201 display brightness 200 Hibernation mode 198 keyboard overlays 204 Lock (Instant security) 195 Output (Display switch) 199 power plan 196 Sleep mode 197 using to set a power plan 123 volume mute 194 Zoom (Display resolution) 203 zooming in 204 zooming out 204 Hot Key Cards 190 Hot key functions 194 I icon desktop 132 moving to desktop 132 recycle bin 132 safety 39 installation memory module 51 installing a charged battery 126 battery 124 memory modules 50 mouse 82 Instruction Manual...
... 91 using 89 hot key disabling or enabling wireless devices 201 display brightness 200 Hibernation mode 198 keyboard overlays 204 Lock (Instant security) 195 Output (Display switch) 199 power plan 196 Sleep mode 197 using to set a power plan 123 volume mute 194 Zoom (Display resolution) 203 zooming in 204 zooming out 204 Hot Key Cards 190 Hot key functions 194 I icon desktop 132 moving to desktop 132 recycle bin 132 safety 39 installation memory module 51 installing a charged battery 126 battery 124 memory modules 50 mouse 82 Instruction Manual...
User Manual
Page 226
... features 114 problem solving 169 turning on 49 power button 49 power management 116 optimum performance 116 power plans selecting power plan options 122 using a hot key 123 power saving options 121 powering down using Hibernate 89 using Sleep 92 precautions safety 42 printer connecting 82 problem solving 177, 178 setting up 83 USB-compatible 82 printing a file 105 problem solving AC power 169 battery charge does not last 170 battery not charging 170 changing display properties 172 checking device properties...
... features 114 problem solving 169 turning on 49 power button 49 power management 116 optimum performance 116 power plans selecting power plan options 122 using a hot key 123 power saving options 121 powering down using Hibernate 89 using Sleep 92 precautions safety 42 printer connecting 82 problem solving 177, 178 setting up 83 USB-compatible 82 printing a file 105 problem solving AC power 169 battery charge does not last 170 battery not charging 170 changing display properties 172 checking device properties...
User Manual
Page 228
... Installer 148 TOSHIBA Assist 143 Connect tab 144 Optimize tab 147 Protect & Fix tab 146 Secure tab 145 TOSHIBA eco power plan 124 TOSHIBA eco Utility™ 160 TOSHIBA Face Recognition Utility 153 TOSHIBA Hardware Setup 156 TOSHIBA PC Diagnostic Tool Utility 154 TOSHIBA PC Health Monitor 161 TOSHIBA Service Station 161 TOSHIBA Zooming Utility 158 TouchPad™ using 75 traveling tips 130 troubleshooting BD player general problems 180 DVD player general problems 180 external keyboard 171 keyboard 171 optical disc drive...
... Installer 148 TOSHIBA Assist 143 Connect tab 144 Optimize tab 147 Protect & Fix tab 146 Secure tab 145 TOSHIBA eco power plan 124 TOSHIBA eco Utility™ 160 TOSHIBA Face Recognition Utility 153 TOSHIBA Hardware Setup 156 TOSHIBA PC Diagnostic Tool Utility 154 TOSHIBA PC Health Monitor 161 TOSHIBA Service Station 161 TOSHIBA Zooming Utility 158 TouchPad™ using 75 traveling tips 130 troubleshooting BD player general problems 180 DVD player general problems 180 external keyboard 171 keyboard 171 optical disc drive...


