
User Guide
Page 29
Memory Stick, Memory Stick PRO, and Memory Stick PRO Duo are trademarks or registered trademarks of SD Card Association. TouchPad is a registered trademark of the Wi-Fi Alliance. Intel, Intel Core, Celeron, Centrino and Pentium are trademarks or registered trademarks of Toshiba's ..., Inc. HDMI, the HDMI Logo and High-Definition Multimedia Interface are trademarks or registered trademarks of Toshiba America Information Systems, Inc. 29 Trademarks Satellite and ConfigFree are registered trademarks of HDMI Licensing LLC. For disposal, reuse or recycling information, please ...
Memory Stick, Memory Stick PRO, and Memory Stick PRO Duo are trademarks or registered trademarks of SD Card Association. TouchPad is a registered trademark of the Wi-Fi Alliance. Intel, Intel Core, Celeron, Centrino and Pentium are trademarks or registered trademarks of Toshiba's ..., Inc. HDMI, the HDMI Logo and High-Definition Multimedia Interface are trademarks or registered trademarks of Toshiba America Information Systems, Inc. 29 Trademarks Satellite and ConfigFree are registered trademarks of HDMI Licensing LLC. For disposal, reuse or recycling information, please ...
User Guide
Page 31
Contents 31 Turning on the power 50 Setting up your software 51 Registering your computer with Toshiba 51 Adding optional external devices 52 Adding memory (optional 52 Installing a memory module 53 Removing a memory module 58 Checking total memory 60 Recovering the Internal Storage Drive 61 Recovering to out-of-box state (recommended recovery method 62 Recovering...
Contents 31 Turning on the power 50 Setting up your software 51 Registering your computer with Toshiba 51 Adding optional external devices 52 Adding memory (optional 52 Installing a memory module 53 Removing a memory module 58 Checking total memory 60 Recovering the Internal Storage Drive 61 Recovering to out-of-box state (recommended recovery method 62 Recovering...
User Guide
Page 34
... instant password 146 Using a supervisor password 147 Using a user password 148 Deleting a user password 149 TOSHIBA Face Recognition Utility 150 TOSHIBA PC Diagnostic Tool Utility 151 TOSHIBA SD™ Memory Card Format Utility .........152 Mouse Utility 153 TOSHIBA Hardware Setup 154 TOSHIBA Zooming Utility 156 TOSHIBA Button Support 157 TOSHIBA Accessibility 158 TOSHIBA eco Utility 159 TOSHIBA Service Station 160
... instant password 146 Using a supervisor password 147 Using a user password 148 Deleting a user password 149 TOSHIBA Face Recognition Utility 150 TOSHIBA PC Diagnostic Tool Utility 151 TOSHIBA SD™ Memory Card Format Utility .........152 Mouse Utility 153 TOSHIBA Hardware Setup 154 TOSHIBA Zooming Utility 156 TOSHIBA Button Support 157 TOSHIBA Accessibility 158 TOSHIBA eco Utility 159 TOSHIBA Service Station 160

User Guide
Page 35
... The Windows® operating system can help you 175 Resolving a hardware conflict 175 A plan of action 175 Fixing a problem with Device Manager ...........176 Memory problems 177 Power and the batteries 178 Keyboard problems 179 Display problems 180 Disk or internal storage drive problems ..........182 Optical drive problems 183 Sound... habits 189 Data and system configuration backup in the Windows® operating system 190 If you need further assistance 195 Before you contact Toshiba 195 Contacting Toshiba 195 Other Toshiba Internet Web sites 196 Toshiba's worldwide offices 196
... The Windows® operating system can help you 175 Resolving a hardware conflict 175 A plan of action 175 Fixing a problem with Device Manager ...........176 Memory problems 177 Power and the batteries 178 Keyboard problems 179 Display problems 180 Disk or internal storage drive problems ..........182 Optical drive problems 183 Sound... habits 189 Data and system configuration backup in the Windows® operating system 190 If you need further assistance 195 Before you contact Toshiba 195 Contacting Toshiba 195 Other Toshiba Internet Web sites 196 Toshiba's worldwide offices 196
User Guide
Page 45
... or other soft material can use external power or to your computer. Your computer contains a rechargeable main battery that needs to , a mouse, keyboard, printer, and memory. Always make sure your computer and AC adaptor have a CPU cooling fan that is in serious injury. Read the "Provide adequate ventilation" section in the...
... or other soft material can use external power or to your computer. Your computer contains a rechargeable main battery that needs to , a mouse, keyboard, printer, and memory. Always make sure your computer and AC adaptor have a CPU cooling fan that is in serious injury. Read the "Provide adequate ventilation" section in the...
User Guide
Page 52
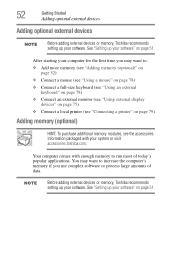
...software" on page 51. NOTE Before adding external devices or memory, Toshiba recommends setting up your software. See "Setting up your software" on page 79) Adding memory (optional) HINT: To purchase additional memory modules, see the accessories information packaged with enough memory to run most of data. After starting your computer for the... 51. See "Setting up your software. 52 Getting Started Adding optional external devices Adding optional external devices NOTE Before adding external devices or memory, Toshiba recommends setting up your system or visit accessories...
...software" on page 51. NOTE Before adding external devices or memory, Toshiba recommends setting up your software. See "Setting up your software" on page 79) Adding memory (optional) HINT: To purchase additional memory modules, see the accessories information packaged with enough memory to run most of data. After starting your computer for the... 51. See "Setting up your software. 52 Getting Started Adding optional external devices Adding optional external devices NOTE Before adding external devices or memory, Toshiba recommends setting up your system or visit accessories...
User Guide
Page 53
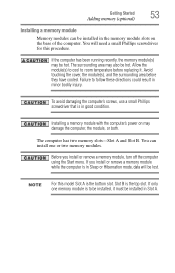
...A and Slot B. NOTE For this procedure. The surrounding area may also be hot. Getting Started Adding memory (optional) 53 Installing a memory module Memory modules can install one memory module is to follow these directions could result in minor bodily injury. To avoid damaging the computer's screws,... use a small Phillips screwdriver that is in the memory module slots on may damage the computer, the module, or both. You will be installed, it . Slot B is the bottom...
...A and Slot B. NOTE For this procedure. The surrounding area may also be hot. Getting Started Adding memory (optional) 53 Installing a memory module Memory modules can install one memory module is to follow these directions could result in minor bodily injury. To avoid damaging the computer's screws,... use a small Phillips screwdriver that is in the memory module slots on may damage the computer, the module, or both. You will be installed, it . Slot B is the bottom...
User Guide
Page 54
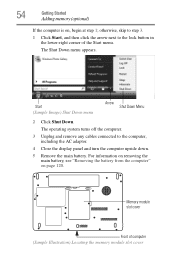
... turns off the computer. 3 Unplug and remove any cables connected to the lock button in the lower-right corner of computer (Sample Illustration) Locating the memory module slot cover Start (Sample Image) Shut Down menu Arrow Shut Down Menu 2 Click Shut Down. For information on removing the main battery, see "Removing...
... turns off the computer. 3 Unplug and remove any cables connected to the lock button in the lower-right corner of computer (Sample Illustration) Locating the memory module slot cover Start (Sample Image) Shut Down menu Arrow Shut Down Menu 2 Click Shut Down. For information on removing the main battery, see "Removing...
User Guide
Page 55
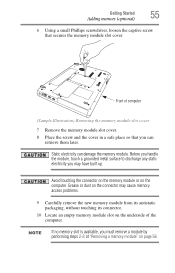
Static electricity can retrieve them later. Avoid touching the connector on the memory module or on page 58. NOTE If no memory slot is available, you must remove a module by performing steps 2-3 of "Removing a memory module" on the computer. Getting Started Adding memory (optional) 55 6 Using a small Phillips screwdriver, loosen the captive screw that you...
Static electricity can retrieve them later. Avoid touching the connector on the memory module or on page 58. NOTE If no memory slot is available, you must remove a module by performing steps 2-3 of "Removing a memory module" on the computer. Getting Started Adding memory (optional) 55 6 Using a small Phillips screwdriver, loosen the captive screw that you...
User Guide
Page 56
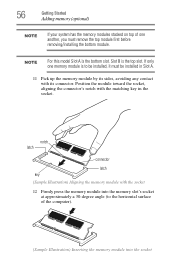
... must be installed in the socket. notch latch connector latch key (Sample Illustration) Aligning the memory module with its sides, avoiding any contact with the socket 12 Firmly press the memory module into the socket NOTE For this model Slot A is the top slot. Slot B is...matching key in Slot A. 11 Pick up the memory module by its connector. 56 Getting Started Adding memory (optional) NOTE If your system has the memory modules stacked on top of the computer). (Sample Illustration) Inserting the memory module into the memory slot's socket at approximately a 30-degree angle (...
... must be installed in the socket. notch latch connector latch key (Sample Illustration) Aligning the memory module with its sides, avoiding any contact with the socket 12 Firmly press the memory module into the socket NOTE For this model Slot A is the top slot. Slot B is...matching key in Slot A. 11 Pick up the memory module by its connector. 56 Getting Started Adding memory (optional) NOTE If your system has the memory modules stacked on top of the computer). (Sample Illustration) Inserting the memory module into the memory slot's socket at approximately a 30-degree angle (...
User Guide
Page 57
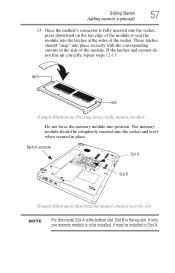
..."snap" into place securely with the corresponding cutouts in the side of the socket. Slot B is the bottom slot. If only one memory module is to seat the module into the latches at the sides of the module. latch latch (Sample Illustration) Pressing down on the ...top edge of computer Slot A Slot B (Sample Illustration) Inserting the memory module into the socket and level when secured in Slot A. Getting Started Adding memory (optional) 57 13 Once the module's connector is fully inserted into the socket, press downward on the...
..."snap" into place securely with the corresponding cutouts in the side of the socket. Slot B is the bottom slot. If only one memory module is to seat the module into the latches at the sides of the module. latch latch (Sample Illustration) Pressing down on the ...top edge of computer Slot A Slot B (Sample Illustration) Inserting the memory module into the socket and level when secured in Slot A. Getting Started Adding memory (optional) 57 13 Once the module's connector is fully inserted into the socket, press downward on the...
User Guide
Page 58
..., the Sleep configuration will be saved. When the operating system has loaded, you need to remove a memory module: 1 Complete steps 1-8 in memory will not be lost. Do not try to remove a memory module with the computer turned on page 53 to work. For more information on inserting the main battery,... setting up the computer. If you turn it using the screw. 15 Re-insert the main battery. 58 Getting Started Adding memory (optional) 14 Replace the memory module slot cover and secure it on page 121. 16 Turn the computer right side up. 17 Reconnect the cables. 18 Restart the...
..., the Sleep configuration will be saved. When the operating system has loaded, you need to remove a memory module: 1 Complete steps 1-8 in memory will not be lost. Do not try to remove a memory module with the computer turned on page 53 to work. For more information on inserting the main battery,... setting up the computer. If you turn it using the screw. 15 Re-insert the main battery. 58 Getting Started Adding memory (optional) 14 Replace the memory module slot cover and secure it on page 121. 16 Turn the computer right side up. 17 Reconnect the cables. 18 Restart the...
User Guide
Page 59
...pops up normally. If so, consult Windows® Help and Support. 2 Pull the latches away from the memory module. When Safe Mode is best to press Enter to scan your system has the memory modules stacked on top of the Safe Mode options is highlighted, it is suggested, this could be a ...sign that you may appear when you must remove the top module first before removing/installing the bottom module. Getting Started Adding memory (optional) 59 NOTE The following screen may need to go into Safe Mode, then shut down and restart the system, at which time Windows®...
...pops up normally. If so, consult Windows® Help and Support. 2 Pull the latches away from the memory module. When Safe Mode is best to press Enter to scan your system has the memory modules stacked on top of the Safe Mode options is highlighted, it is suggested, this could be a ...sign that you may appear when you must remove the top module first before removing/installing the bottom module. Getting Started Adding memory (optional) 59 NOTE The following screen may need to go into Safe Mode, then shut down and restart the system, at which time Windows®...
User Guide
Page 60
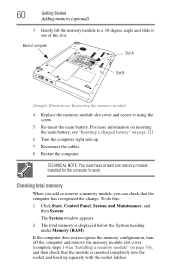
... the screw. 5 Re-insert the main battery. If the computer does not recognize the memory configuration, turn off the computer and remove the memory module slot cover (complete steps 1-8 in "Installing a memory module" on page 121. 6 Turn the computer right side up squarely with the socket ...check that the computer has recognized the change. Checking total memory When you add or remove a memory module, you can check that the module is displayed below the System heading under Memory (RAM). The System window appears. 2 The total memory is inserted completely into the socket and lined up ....
... the screw. 5 Re-insert the main battery. If the computer does not recognize the memory configuration, turn off the computer and remove the memory module slot cover (complete steps 1-8 in "Installing a memory module" on page 121. 6 Turn the computer right side up squarely with the socket ...check that the computer has recognized the change. Checking total memory When you add or remove a memory module, you can check that the module is displayed below the System heading under Memory (RAM). The System window appears. 2 The total memory is inserted completely into the socket and lined up ....
User Guide
Page 81
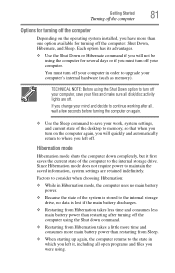
...from Sleep. ❖ When starting up again, the computer returns to the state in order to upgrade your computer's internal hardware (such as memory). Hibernation mode Hibernation mode shuts the computer down command. ❖ Restarting from Hibernation takes a little more time and consumes more than one ... Hibernation: ❖ While in Hibernation mode, the computer uses no main battery power. ❖ Because the state of the desktop to memory, so that when you turn off . Getting Started Turning off the computer 81 Options for turning off the computer Depending on the computer again...
...from Sleep. ❖ When starting up again, the computer returns to the state in order to upgrade your computer's internal hardware (such as memory). Hibernation mode Hibernation mode shuts the computer down command. ❖ Restarting from Hibernation takes a little more time and consumes more than one ... Hibernation: ❖ While in Hibernation mode, the computer uses no main battery power. ❖ Because the state of the desktop to memory, so that when you turn off . Getting Started Turning off the computer 81 Options for turning off the computer Depending on the computer again...
User Guide
Page 82
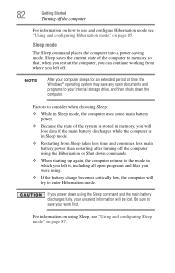
Sleep saves the current state of the computer to memory so that, when you restart the computer, you can continue working from Sleep takes less time and consumes less main battery power than restarting after ... The Sleep command places the computer into a power-saving mode. NOTE After your computer sleeps for an extended period of the system is stored in memory, you will be lost.
Sleep saves the current state of the computer to memory so that, when you restart the computer, you can continue working from Sleep takes less time and consumes less main battery power than restarting after ... The Sleep command places the computer into a power-saving mode. NOTE After your computer sleeps for an extended period of the system is stored in memory, you will be lost.
User Guide
Page 88
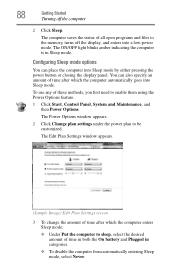
... programs and files to sleep, select the desired amount of time after which the computer enters Sleep mode: ❖ Under Put the computer to the memory, turns off the computer 2 Click Sleep. 88 Getting Started Turning off the display, and enters into a low-power mode. The ON/OFF light blinks amber...
... programs and files to sleep, select the desired amount of time after which the computer enters Sleep mode: ❖ Under Put the computer to the memory, turns off the computer 2 Click Sleep. 88 Getting Started Turning off the display, and enters into a low-power mode. The ON/OFF light blinks amber...
User Guide
Page 93
... fails, you will lose all work frequently. See your files to external media on a regular basis. See "Saving your work stays in the computer's temporary memory until you have an automatic save it unless you save feature that can be activated. For more information, see "Data and system configuration backup in...
... fails, you will lose all work frequently. See your files to external media on a regular basis. See "Saving your work stays in the computer's temporary memory until you have an automatic save it unless you save feature that can be activated. For more information, see "Data and system configuration backup in...
User Guide
Page 110
...may not charge while the computer is consuming full power. This is helpful to retain a charge. The LithiumIon battery has no memory effect so it is normal for an extended period (more information about Windows® power plans, see the accessories information included...on product model, configuration, applications, power management settings and features utilized, as well as the natural performance variations produced by Toshiba at accessories.toshiba.com. You can recharge it is continuously operated on usage. Battery Notice Battery life may fail to fully discharge the ...
...may not charge while the computer is consuming full power. This is helpful to retain a charge. The LithiumIon battery has no memory effect so it is normal for an extended period (more information about Windows® power plans, see the accessories information included...on product model, configuration, applications, power management settings and features utilized, as well as the natural performance variations produced by Toshiba at accessories.toshiba.com. You can recharge it is continuously operated on usage. Battery Notice Battery life may fail to fully discharge the ...
User Guide
Page 112
... ensure that the battery charges to its full capacity, wait until the battery discharges completely. The RTC battery powers the System Time Clock and BIOS memory used to select a power level setting that you operate your computer's configuration settings. TECHNICAL NOTE: The recharging of the battery cannot occur when your computer...
... ensure that the battery charges to its full capacity, wait until the battery discharges completely. The RTC battery powers the System Time Clock and BIOS memory used to select a power level setting that you operate your computer's configuration settings. TECHNICAL NOTE: The recharging of the battery cannot occur when your computer...


