User Guide
Page 5
... uninterrupted service. If Problems Arise If this computer. Disconnection If you in advance that you to make changes in their equipment, operations or procedures. If these changes might affect your service or the operation of the telephone company is to provide you with the FCC if you believe it is necessary. In order to make any changes necessary to the fax software instructions installed...
... uninterrupted service. If Problems Arise If this computer. Disconnection If you in advance that you to make changes in their equipment, operations or procedures. If these changes might affect your service or the operation of the telephone company is to provide you with the FCC if you believe it is necessary. In order to make any changes necessary to the fax software instructions installed...

User Guide
Page 69
... port (Sample Illustration) Video port Connecting the display device If you type" into the Search field. Selecting video cables To connect a device to "Connecting an HDMI™-compatible television or VCR/DVD player" on page 70. Getting Started Using external display devices 69 NOTE TouchPad setting options vary by default. The TouchPad settings are connecting a television or other video display device to the computer's HDMI™ Out port, refer to the HDMI™ Out port, you can disable only the tapping feature. Disabling or enabling the TouchPad...
... port (Sample Illustration) Video port Connecting the display device If you type" into the Search field. Selecting video cables To connect a device to "Connecting an HDMI™-compatible television or VCR/DVD player" on page 70. Getting Started Using external display devices 69 NOTE TouchPad setting options vary by default. The TouchPad settings are connecting a television or other video display device to the computer's HDMI™ Out port, refer to the HDMI™ Out port, you can disable only the tapping feature. Disabling or enabling the TouchPad...

User Guide
Page 70
... Control) is selected using the Fn+F5 key. ❖ Switch the video output (HDMI or LCD) when executing certain desktop icons. ❖ Enable/Disable the HDMI-CEC function on page 142 for more information. Your computer will automatically detect the external display device. See "TOSHIBA Application Installer" on the computer. For more information). Refer to the manual that came with HDMI-CEC include a Toshiba utility (The utility may need to be installed. The HDMI...
... Control) is selected using the Fn+F5 key. ❖ Switch the video output (HDMI or LCD) when executing certain desktop icons. ❖ Enable/Disable the HDMI-CEC function on page 142 for more information. Your computer will automatically detect the external display device. See "TOSHIBA Application Installer" on the computer. For more information). Refer to the manual that came with HDMI-CEC include a Toshiba utility (The utility may need to be installed. The HDMI...
User Guide
Page 146
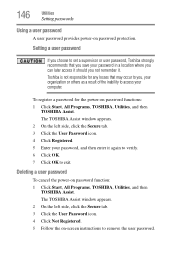
.... 5 Follow the on password function: 1 Click Start, All Programs, TOSHIBA, Utilities, and then TOSHIBA Assist. The TOSHIBA Assist window appears. 2 On the left side, click the Secure tab. 3 Click the User Password icon. 4 Click Registered. 5 Enter your password, and then enter it . Deleting a user password To cancel the power-on -screen instructions to remove the user password. 146 Utilities Setting passwords Using a user password A user password provides power-on password functions: 1 Click Start, All Programs, TOSHIBA, Utilities, and then TOSHIBA Assist. To register...
.... 5 Follow the on password function: 1 Click Start, All Programs, TOSHIBA, Utilities, and then TOSHIBA Assist. The TOSHIBA Assist window appears. 2 On the left side, click the Secure tab. 3 Click the User Password icon. 4 Click Registered. 5 Enter your password, and then enter it . Deleting a user password To cancel the power-on -screen instructions to remove the user password. 146 Utilities Setting passwords Using a user password A user password provides power-on password functions: 1 Click Start, All Programs, TOSHIBA, Utilities, and then TOSHIBA Assist. To register...
User Guide
Page 155
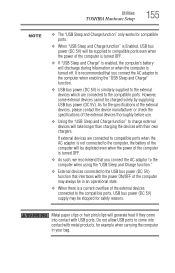
... when using the "USB Sleep and Charge function." ❖ External devices connected to the USB bus power (DC 5V) function that you connect the AC adaptor to the computer when enabling the "USB Sleep and Charge" function. ❖ USB bus power (DC 5V) is similarly supplied to the external devices which are connected to the compatible ports. Do not allow USB ports to come into contact with USB ports. Utilities TOSHIBA Hardware Setup 155 NOTE ❖ The "USB Sleep and Charge function" only works for compatible ports...
... when using the "USB Sleep and Charge function." ❖ External devices connected to the USB bus power (DC 5V) function that you connect the AC adaptor to the computer when enabling the "USB Sleep and Charge" function. ❖ USB bus power (DC 5V) is similarly supplied to the external devices which are connected to the compatible ports. Do not allow USB ports to come into contact with USB ports. Utilities TOSHIBA Hardware Setup 155 NOTE ❖ The "USB Sleep and Charge function" only works for compatible ports...
User Guide
Page 156
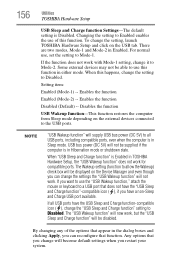
.... Enables the function Enabled (Mode-2) -- Disables the function USB Wakeup function-This function restores the computer from Sleep mode depending on the external devices connected to Disabled. Changing the setting to all USB ports have a non-Sleep and Charge USB port available. NOTE "USB Wakeup function" will not work. USB bus power (DC 5V) will be displayed on the USB tab. The Wakeup setting (function to Mode-1. Any options that function. 156 Utilities TOSHIBA Hardware Setup USB Sleep and Charge function Settings-The default setting is Enabled in TOSHIBA Hardware...
.... Enables the function Enabled (Mode-2) -- Disables the function USB Wakeup function-This function restores the computer from Sleep mode depending on the external devices connected to Disabled. Changing the setting to all USB ports have a non-Sleep and Charge USB port available. NOTE "USB Wakeup function" will not work. USB bus power (DC 5V) will be displayed on the USB tab. The Wakeup setting (function to Mode-1. Any options that function. 156 Utilities TOSHIBA Hardware Setup USB Sleep and Charge function Settings-The default setting is Enabled in TOSHIBA Hardware...
User Guide
Page 163
...; A warning message will be error-free. ConfigFree® NOTE All references to control communication devices and network connections. Toshiba does not guarantee that makes it easy to Bluetooth® in a fingerprint. Utilities TOSHIBA Service Station 163 Fingerprint reader limitations ❖ The fingerprint reader compares and analyzes the unique characteristics in this section are applicable only if Bluetooth® is available on using ConfigFree, see the ConfigFree...
...; A warning message will be error-free. ConfigFree® NOTE All references to control communication devices and network connections. Toshiba does not guarantee that makes it easy to Bluetooth® in a fingerprint. Utilities TOSHIBA Service Station 163 Fingerprint reader limitations ❖ The fingerprint reader compares and analyzes the unique characteristics in this section are applicable only if Bluetooth® is available on using ConfigFree, see the ConfigFree...
User Guide
Page 164
... detailed information on page 165. Starting ConfigFree® To start and set up and using ConfigFree, see "Profile Settings" on setting up ConfigFree. The Connectivity Doctor works with the following : ❖ Connectivity Doctor-The Connectivity Doctor utility is used to analyze network connections and fix networking problems with an "X." NOTE If your computer is displayed with your network connections and fix network connection problems. Using Connectivity Doctor, you switch between network configurations. Getting Started This section contains information about the...
... detailed information on page 165. Starting ConfigFree® To start and set up and using ConfigFree, see "Profile Settings" on setting up ConfigFree. The Connectivity Doctor works with the following : ❖ Connectivity Doctor-The Connectivity Doctor utility is used to analyze network connections and fix networking problems with an "X." NOTE If your computer is displayed with your network connections and fix network connection problems. Using Connectivity Doctor, you switch between network configurations. Getting Started This section contains information about the...
User Guide
Page 165
... example, you enable or disable settings of wired and wireless network devices, infrared devices, and set up profiles to the network. Similarly, users who access networks in the office and at home can set up a profile to match that opens automatically when Internet Explorer® starts ❖ Devices-lets you can set the power status of Bluetooth® antennas ❖ TCP/IP settings-includes DHCP, IP address, subnet mask, default gateway, DNS...
... example, you enable or disable settings of wired and wireless network devices, infrared devices, and set up profiles to the network. Similarly, users who access networks in the office and at home can set up a profile to match that opens automatically when Internet Explorer® starts ❖ Devices-lets you can set the power status of Bluetooth® antennas ❖ TCP/IP settings-includes DHCP, IP address, subnet mask, default gateway, DNS...
User Guide
Page 171
... output specifications of the AC adaptor must be equal to fix the problem. For example: ❖ The operating system fails to start . ❖ The operating system responds differently from the normal routine. ❖ The screen does not look right. The battery light is blinking when the computer is not working 171 plug fits correctly in the DC-IN socket. See "Contacting Toshiba...
... output specifications of the AC adaptor must be equal to fix the problem. For example: ❖ The operating system fails to start . ❖ The operating system responds differently from the normal routine. ❖ The screen does not look right. The battery light is blinking when the computer is not working 171 plug fits correctly in the DC-IN socket. See "Contacting Toshiba...
User Guide
Page 177
... instant password feature by clicking a blank area of these components individually. The screen reactivates and allows you through the display options. This opens the Personalization window. If this , press Fn and F5 simultaneously (once). Click Display and then Change display settings to continue working power outlet. ❖ Check that the cable connecting the external monitor to the computer is firmly attached. ❖ Try adjusting the contrast and brightness controls...
... instant password feature by clicking a blank area of these components individually. The screen reactivates and allows you through the display options. This opens the Personalization window. If this , press Fn and F5 simultaneously (once). Click Display and then Change display settings to continue working power outlet. ❖ Check that the cable connecting the external monitor to the computer is firmly attached. ❖ Try adjusting the contrast and brightness controls...
User Guide
Page 188
... -screen instructions to back up your files. Before installing anything goes wrong, you need any changes that accompany the hardware or software. Always carefully follow directions carefully! It is connected first, it and/or inserting a blank optical disc in case you will then be very difficult to complete the installation successfully. For more help ensure safe and easy installation of new hardware (printers, pointing devices, external hard drives, DVD...
... -screen instructions to back up your files. Before installing anything goes wrong, you need any changes that accompany the hardware or software. Always carefully follow directions carefully! It is connected first, it and/or inserting a blank optical disc in case you will then be very difficult to complete the installation successfully. For more help ensure safe and easy installation of new hardware (printers, pointing devices, external hard drives, DVD...
User Guide
Page 189
... to Disabled. ❖ Make sure that support the "USB Sleep and Charge function." Always restart the Windows® operating system after turning OFF the computer. If this function cannot be able to do so. This will clean up critical data. 2 Create a restore point. 3 Install one item of hardware or software. 4 Restart the Windows® operating system. 5 Use the new hardware or software for ports that you are connected. ❖ Connect external devices after each additional hardware or software item...
... to Disabled. ❖ Make sure that support the "USB Sleep and Charge function." Always restart the Windows® operating system after turning OFF the computer. If this function cannot be able to do so. This will clean up critical data. 2 Create a restore point. 3 Install one item of hardware or software. 4 Restart the Windows® operating system. 5 Use the new hardware or software for ports that you are connected. ❖ Connect external devices after each additional hardware or software item...
User Guide
Page 219
...) cache - See also cache, CPU cache, L2 cache. When you use to interact with the Fn key can set system options or control system parameters, such as a mouse. The ability to create a complete screen image. interlaced - Internet - A key or combination of keys that enables any other services. A group of using a pointing device such as the battery save mode. (2) A key or combination of data. See also Sleep, Suspend. A 3.5-inch diskette that...
...) cache - See also cache, CPU cache, L2 cache. When you use to interact with the Fn key can set system options or control system parameters, such as a mouse. The ability to create a complete screen image. interlaced - Internet - A key or combination of keys that enables any other services. A group of using a pointing device such as the battery save mode. (2) A key or combination of data. See also Sleep, Suspend. A 3.5-inch diskette that...

User Guide
Page 225
... changing 116 charge indicator light 48 charge not lasting 175 charging 48, 109 conserving power 113 disposal 121 installing 116, 118 low charge 112 maintaining 120 225 monitoring power 48 not charging 175 notifications 113 power plan 201 power plan hot key 115 real-time clock (RTC) 107, 109 remaining power 112 removing 116 safety precautions 119 BIOS Setup see TOSHIBA Hardware Setup button power 50 start 125 buttons eject, optical drive 100 Media control buttons 101 C Call2Recycle™ battery 121 changing main battery...
... changing 116 charge indicator light 48 charge not lasting 175 charging 48, 109 conserving power 113 disposal 121 installing 116, 118 low charge 112 maintaining 120 225 monitoring power 48 not charging 175 notifications 113 power plan 201 power plan hot key 115 real-time clock (RTC) 107, 109 remaining power 112 removing 116 safety precautions 119 BIOS Setup see TOSHIBA Hardware Setup button power 50 start 125 buttons eject, optical drive 100 Media control buttons 101 C Call2Recycle™ battery 121 changing main battery...
User Guide
Page 226
... files/trouble accessing a drive 178 running slow 179 display does not look normal/flickers 177 external monitor not working 178 display devices external 69 display output settings 71 display panel opening 49 display problems screen is blank 177 display, external adjusting 72 disposal information 29 disposing of used batteries 121 DVD using 99 DVD player general problems 184 E eject button optical drive 100 eject, optical drive 100 ENERGY STAR® 37 error messages non-system disk or disk error 170 problem with display settings/ current settings not working with hardware...
... files/trouble accessing a drive 178 running slow 179 display does not look normal/flickers 177 external monitor not working 178 display devices external 69 display output settings 71 display panel opening 49 display problems screen is blank 177 display, external adjusting 72 disposal information 29 disposing of used batteries 121 DVD using 99 DVD player general problems 184 E eject button optical drive 100 eject, optical drive 100 ENERGY STAR® 37 error messages non-system disk or disk error 170 problem with display settings/ current settings not working with hardware...
User Guide
Page 227
... disabling or enabling wireless devices 206 display brightness 205 Hibernation mode 203 keyboard overlays 209 Lock (Instant security) 200 Output (Display switch) 204 power plan 201 Sleep mode 202 volume mute 199 Zoom (Display resolution) 208 zooming in 209 zooming out 209 Hot Key Cards 194 Hot key functions 198 hot key power plan 115 http 127 I icon 124 desktop 124 moving to desktop 124 recycle bin 124 safety 40 installing main battery 116, 118 memory modules 52 mouse 72 Internet...
... disabling or enabling wireless devices 206 display brightness 205 Hibernation mode 203 keyboard overlays 209 Lock (Instant security) 200 Output (Display switch) 204 power plan 201 Sleep mode 202 volume mute 199 Zoom (Display resolution) 208 zooming in 209 zooming out 209 Hot Key Cards 194 Hot key functions 198 hot key power plan 115 http 127 I icon 124 desktop 124 moving to desktop 124 recycle bin 124 safety 40 installing main battery 116, 118 memory modules 52 mouse 72 Internet...
User Guide
Page 228
... mouse installing 72 mouse utility 151 N networking wireless 126 notification area 125 O optical disc handling 103 inserting 102 positioning 102 optical drive drive in-use indicator light 100 eject button 100 manual eject hole 100 problems 180 removing disc 104, 105 troubleshooting 180 using 99 optical media recording 104 other documentation 41 overlay keys 92 P password deleting a supervisor 145 disabling a user 146 setting a user 146 supervisor set up 144 types 143 passwords instant, using 143 setting 143 port monitor 69 power computer will not start...
... mouse installing 72 mouse utility 151 N networking wireless 126 notification area 125 O optical disc handling 103 inserting 102 positioning 102 optical drive drive in-use indicator light 100 eject button 100 manual eject hole 100 problems 180 removing disc 104, 105 troubleshooting 180 using 99 optical media recording 104 other documentation 41 overlay keys 92 P password deleting a supervisor 145 disabling a user 146 setting a user 146 supervisor set up 144 types 143 passwords instant, using 143 setting 143 port monitor 69 power computer will not start...
User Guide
Page 229
... keyboard produces unexpected characters 176 missing files/trouble accessing a drive 178 no sound 181 non-system disk or disk error 170 power and batteries 175 printer 181, 182 program not responding 167 program not working properly 179 screen does not look correct/ flickers 177 Startup options 172 URL address not found 173 USB Sleep and Charge cannot use 189 USB Wakeup function does not work 189 warning resume failure 169 Windows® operating...
... keyboard produces unexpected characters 176 missing files/trouble accessing a drive 178 no sound 181 non-system disk or disk error 170 power and batteries 175 printer 181, 182 program not responding 167 program not working properly 179 screen does not look correct/ flickers 177 Startup options 172 URL address not found 173 USB Sleep and Charge cannot use 189 USB Wakeup function does not work 189 warning resume failure 169 Windows® operating...

User Guide
Page 230
... Tool Utility 148 TOSHIBA SD™ Memory Card Format Utility 150 TOSHIBA Service Station 163 TOSHIBA Zooming Utility 157 TouchPad™ adjusting settings 68 disabling 69 enabling 69 using 66 traveling tips 122 troubleshooting DVD player general problems 184 external keyboard 176 keyboard 176 optical drive 180 turning on the computer 50 turning on the power 50 U USB Sleep and Charge cannot use 189 USB Wakeup function does not work 189 USB-compatible printer 73 user password, disabling 146 user password, setting 146 using a file extension 97 Utilities 136 V video projector adjusting display...
... Tool Utility 148 TOSHIBA SD™ Memory Card Format Utility 150 TOSHIBA Service Station 163 TOSHIBA Zooming Utility 157 TouchPad™ adjusting settings 68 disabling 69 enabling 69 using 66 traveling tips 122 troubleshooting DVD player general problems 184 external keyboard 176 keyboard 176 optical drive 180 turning on the computer 50 turning on the power 50 U USB Sleep and Charge cannot use 189 USB Wakeup function does not work 189 USB-compatible printer 73 user password, disabling 146 user password, setting 146 using a file extension 97 Utilities 136 V video projector adjusting display...


