User Guide
Page 7
... stations can cause interference with the Information: requirements of the 5.25 GHz to 5.35 GHz and 5.65 GHz to co-channel Mobile Satellite systems. High power radars are allocated as primary users of the Low Voltage Directive 73/23/EEC, the EMC Directive 89/336/EEC ...des fenetres afin de Fournier un ecram de blindage maximal. This product is TOSHIBA Europe GmbH, Hammfelddamm 8, 41460 Neuss, Germany. NOTE The above caution applies to 5.25 GHz frequency range. If the product's battery or accumulator contains more than the specified values of electrical and electronic products put...
... stations can cause interference with the Information: requirements of the 5.25 GHz to 5.35 GHz and 5.65 GHz to co-channel Mobile Satellite systems. High power radars are allocated as primary users of the Low Voltage Directive 73/23/EEC, the EMC Directive 89/336/EEC ...des fenetres afin de Fournier un ecram de blindage maximal. This product is TOSHIBA Europe GmbH, Hammfelddamm 8, 41460 Neuss, Germany. NOTE The above caution applies to 5.25 GHz frequency range. If the product's battery or accumulator contains more than the specified values of electrical and electronic products put...
User Guide
Page 8
...power or change the features and functions of the original design. Please contact your product, visit www.reuse.toshiba.com. The legal communications mentioned in Europe, Toshiba is caused, the use of low power radio frequency electric machinery shall not affect aviation safety and interfere with... legal communications. For information on the battery. Any use of this product, it must be resumed only when ...
...power or change the features and functions of the original design. Please contact your product, visit www.reuse.toshiba.com. The legal communications mentioned in Europe, Toshiba is caused, the use of low power radio frequency electric machinery shall not affect aviation safety and interfere with... legal communications. For information on the battery. Any use of this product, it must be resumed only when ...
User Guide
Page 20
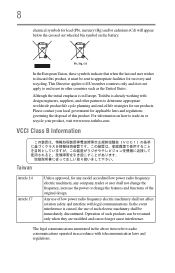
... 37 Setting up your computer 38 Connecting to a power source 38 Charging the main battery 41 Using the computer for the first time 41 Initial setup 42 Setting up your software 42 Registering your computer with Toshiba 42 To Shut down your computer 43 To Restart your computer 43 To place your...
... 37 Setting up your computer 38 Connecting to a power source 38 Charging the main battery 41 Using the computer for the first time 41 Initial setup 42 Setting up your software 42 Registering your computer with Toshiba 42 To Shut down your computer 43 To Restart your computer 43 To place your...

User Guide
Page 21
... Removing a disc with the computer off 82 Toshiba's online resources 83 Chapter 3: Mobile Computing 84 Toshiba's energy-saver design 84 Running the computer on battery power 84 Battery Notice 85 Power management 86 Charging the main battery 86 Charging the RTC battery 87 Monitoring main battery power 88 Determining remaining battery power 89 What to do when the...
... Removing a disc with the computer off 82 Toshiba's online resources 83 Chapter 3: Mobile Computing 84 Toshiba's energy-saver design 84 Running the computer on battery power 84 Battery Notice 85 Power management 86 Charging the main battery 86 Charging the RTC battery 87 Monitoring main battery power 88 Determining remaining battery power 89 What to do when the...
User Guide
Page 22
22 Contents Power Plans 92 Using the eco power plan 93 Changing the main battery 94 Removing the battery from the computer .........94 Inserting a charged battery 95 Taking care of your battery 97 Safety precautions 97 Maintaining your battery 98 Disposing of used batteries 98 Traveling tips 99 Chapter 4: Exploring Your Computer's Features 100 Exploring the Start...
22 Contents Power Plans 92 Using the eco power plan 93 Changing the main battery 94 Removing the battery from the computer .........94 Inserting a charged battery 95 Taking care of your battery 97 Safety precautions 97 Maintaining your battery 98 Disposing of used batteries 98 Traveling tips 99 Chapter 4: Exploring Your Computer's Features 100 Exploring the Start...
User Guide
Page 23
... supply mode settings 122 Function Key 123 PC Diagnostic Tool Utility 124 PC Health Monitor 125 Recovery Media Creator 126 Service Station 126 TOSHIBA Application Installer 127 Chapter 6: If Something Goes Wrong 128 Problems that are easy to fix 128 Problems when you turn on the... operating system can help you 135 Fixing a problem with Device Manager 135 Checking device properties 135 Memory problems 136 Power and the batteries 137 Keyboard problems 138 Display problems 139 Disk or storage drive problems 141 Error-checking 141 Optical disc drive problems 143 Sound system ...
... supply mode settings 122 Function Key 123 PC Diagnostic Tool Utility 124 PC Health Monitor 125 Recovery Media Creator 126 Service Station 126 TOSHIBA Application Installer 127 Chapter 6: If Something Goes Wrong 128 Problems that are easy to fix 128 Problems when you turn on the... operating system can help you 135 Fixing a problem with Device Manager 135 Checking device properties 135 Memory problems 136 Power and the batteries 137 Keyboard problems 138 Display problems 139 Disk or storage drive problems 141 Error-checking 141 Optical disc drive problems 143 Sound system ...
User Guide
Page 25
... provide the most stable operating environment and optimum system performance for both AC power and battery modes. See the "Mobile Computing" section of powerful, portable, multimedia computing. With your Toshiba computer, your computer is ENERGY STAR® qualified. We recommend that you go. To...you leave this computer to meet the latest ENERGY STAR® guidelines for energy efficiency. Toshiba is a partner in AC power mode. Introduction Welcome to the world of the Toshiba User's Guide for more information on using power management settings to conserve computer energy. ...
... provide the most stable operating environment and optimum system performance for both AC power and battery modes. See the "Mobile Computing" section of powerful, portable, multimedia computing. With your Toshiba computer, your computer is ENERGY STAR® qualified. We recommend that you go. To...you leave this computer to meet the latest ENERGY STAR® guidelines for energy efficiency. Toshiba is a partner in AC power mode. Introduction Welcome to the world of the Toshiba User's Guide for more information on using power management settings to conserve computer energy. ...
User Guide
Page 36
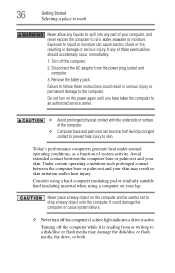
... a drive is reading from the power plug socket and computer. 3. Avoid extended contact between the computer base or palm rest and your lap. Remove the battery pack. It could result in serious injury or permanent damage to rain, water, seawater or moisture.
... a drive is reading from the power plug socket and computer. 3. Avoid extended contact between the computer base or palm rest and your lap. Remove the battery pack. It could result in serious injury or permanent damage to rain, water, seawater or moisture.
User Guide
Page 38
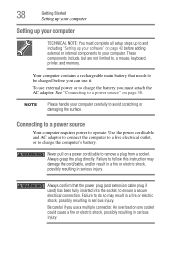
... the surface. Be careful if you use it. NOTE Please handle your computer. Never pull on page 38. Your computer contains a rechargeable main battery that the power plug (and extension cable plug if used) has been fully inserted into the socket, to remove a plug from a socket. See...and including "Setting up your software" on page 42 before you can use a multiple connector. To use external power or to charge the battery you must complete all setup steps up to follow this instruction may result in a fire or electric shock, possibly resulting in serious injury. Always...
... the surface. Be careful if you use it. NOTE Please handle your computer. Never pull on page 38. Your computer contains a rechargeable main battery that the power plug (and extension cable plug if used) has been fully inserted into the socket, to remove a plug from a socket. See...and including "Setting up your software" on page 42 before you can use a multiple connector. To use external power or to charge the battery you must complete all setup steps up to follow this instruction may result in a fire or electric shock, possibly resulting in serious injury. Always...
User Guide
Page 40
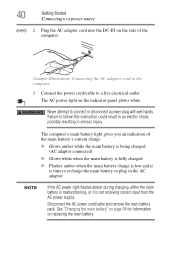
... an indication of the computer. (Sample Illustration) Connecting the AC adaptor cord to the computer 3 Connect the power cord/cable to recharge the main battery or plug in serious injury. Failure to connect or disconnect a power plug with wet hands. Never attempt to follow this instruction could result in an... electric shock, possibly resulting in the AC adaptor NOTE If the AC power light flashes amber during charging, either the main battery is malfunctioning, or it is not receiving correct input from the AC power supply. The AC power light on replacing the main...
... an indication of the computer. (Sample Illustration) Connecting the AC adaptor cord to the computer 3 Connect the power cord/cable to recharge the main battery or plug in serious injury. Failure to connect or disconnect a power plug with wet hands. Never attempt to follow this instruction could result in an... electric shock, possibly resulting in the AC adaptor NOTE If the AC power light flashes amber during charging, either the main battery is malfunctioning, or it is not receiving correct input from the AC power supply. The AC power light on replacing the main...

User Guide
Page 41
... is now ready for more than a few hours at a time. Small bright dots may appear on your screen display when you must charge the battery. Your display contains an extremely large number of thin-film transistors (TFT) and is also an intrinsic characteristic of the screen will be careful to...plugged in place and use the other hand to slowly open or close the display panel. Getting Started 41 Charging the main battery Charging the main battery Before using the battery to power the computer, you turn it on and begin using high-precision technology. Do not press or push on the ...
... is now ready for more than a few hours at a time. Small bright dots may appear on your screen display when you must charge the battery. Your display contains an extremely large number of thin-film transistors (TFT) and is also an intrinsic characteristic of the screen will be careful to...plugged in place and use the other hand to slowly open or close the display panel. Getting Started 41 Charging the main battery Charging the main battery Before using the battery to power the computer, you turn it on and begin using high-precision technology. Do not press or push on the ...
User Guide
Page 44
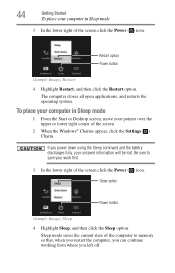
... sure to memory so that, when you restart the computer, you can continue working from where you power down using the Sleep command and the battery discharges fully, your work first. 3 In the lower right of the screen click the Power ( ) icon. Restart option Power button (Sample Image) Restart 4 Highlight Restart...
... sure to memory so that, when you restart the computer, you can continue working from where you power down using the Sleep command and the battery discharges fully, your work first. 3 In the lower right of the screen click the Power ( ) icon. Restart option Power button (Sample Image) Restart 4 Highlight Restart...
User Guide
Page 47
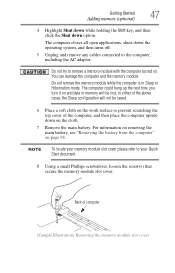
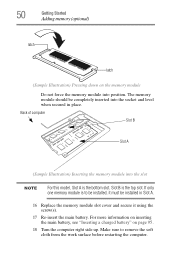
...the above cases, the Sleep configuration will be saved. 6 Place a soft cloth on page 94. For information on removing the main battery, see "Removing the battery from the computer" on the work surface to the computer, including the AC adaptor. Do not try to your memory module slot ...cover please refer to remove a memory module with the computer turned on the cloth. 7 Remove the main battery. Back of the computer, and then place the computer upside down on . NOTE To locate your Quick Start document. 8 Using a small Phillips ...
...the above cases, the Sleep configuration will be saved. 6 Place a soft cloth on page 94. For information on removing the main battery, see "Removing the battery from the computer" on the work surface to the computer, including the AC adaptor. Do not try to your memory module slot ...cover please refer to remove a memory module with the computer turned on the cloth. 7 Remove the main battery. Back of the computer, and then place the computer upside down on . NOTE To locate your Quick Start document. 8 Using a small Phillips ...
User Guide
Page 50
For more information on inserting the main battery, see "Inserting a charged battery" on the memory module Do not force the memory module into the slot NOTE For this model, Slot A is the bottom slot. 50 Getting Started ... socket and level when secured in Slot A. 16 Replace the memory module slot cover and secure it using the screw(s). 17 Re-insert the main battery. Back of computer Slot B Slot A (Sample Illustration) Inserting the memory module into position. Slot B is to remove the soft cloth from the work surface before...
For more information on inserting the main battery, see "Inserting a charged battery" on the memory module Do not force the memory module into the slot NOTE For this model, Slot A is the bottom slot. 50 Getting Started ... socket and level when secured in Slot A. 16 Replace the memory module slot cover and secure it using the screw(s). 17 Re-insert the main battery. Back of computer Slot B Slot A (Sample Illustration) Inserting the memory module into position. Slot B is to remove the soft cloth from the work surface before...
User Guide
Page 52
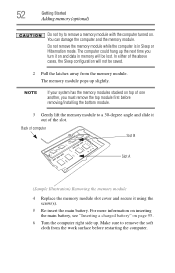
... B Slot A (Sample Illustration) Removing the memory module 4 Replace the memory module slot cover and secure it using the screw(s). 5 Re-insert the main battery. NOTE If your system has the memory modules stacked on top of one another, you turn it on . You can damage the computer and the... memory module. The computer could hang up . For more information on inserting the main battery, see "Inserting a charged battery" on page 95. 6 Turn the computer right side up the next time you must remove the top module first before restarting the computer...
... B Slot A (Sample Illustration) Removing the memory module 4 Replace the memory module slot cover and secure it using the screw(s). 5 Re-insert the main battery. NOTE If your system has the memory modules stacked on top of one another, you turn it on . You can damage the computer and the... memory module. The computer could hang up . For more information on inserting the main battery, see "Inserting a charged battery" on page 95. 6 Turn the computer right side up the next time you must remove the top module first before restarting the computer...

User Guide
Page 70
... steps. When the Windows® Charms appear, click the Settings ( ) Charm and then click Change PC Settings. For more information, see "Taking care of your battery" on cleaning and moving your needs. You may also wish to customize your computer's settings NOTE You may need to suit your computer. Caring for... scratching or damaging the surface. You can customize your computer to suit your computer carefully to change. For information about taking care of your computer's battery, see "Power Plans" on page 110.
... steps. When the Windows® Charms appear, click the Settings ( ) Charm and then click Change PC Settings. For more information, see "Taking care of your battery" on cleaning and moving your needs. You may also wish to customize your computer's settings NOTE You may need to suit your computer. Caring for... scratching or damaging the surface. You can customize your computer to suit your computer carefully to change. For information about taking care of your computer's battery, see "Power Plans" on page 110.

User Guide
Page 73
... " on page 78 for details. 73 HINT: Some applications have an automatic save it to the internal storage drive at preset intervals. See "Saving your battery runs out of charge while you are working, you will lose all work frequently. See your work since you save feature that can be activated...
... " on page 78 for details. 73 HINT: Some applications have an automatic save it to the internal storage drive at preset intervals. See "Saving your battery runs out of charge while you are working, you will lose all work frequently. See your work since you save feature that can be activated...

User Guide
Page 84
... of these features active, allowing your computer while traveling. We recommend you leave these energy-saving features have been preset by Toshiba. Chapter 3 Mobile Computing This chapter covers all aspects of using your computer to operate at its energy efficiency. Running the computer on... battery power The computer contains a removable Lithium-Ion (Li-Ion) battery that enhance its maximum energy efficiency, so that you are away from an AC outlet. Many of other...
... of these features active, allowing your computer while traveling. We recommend you leave these energy-saving features have been preset by Toshiba. Chapter 3 Mobile Computing This chapter covers all aspects of using your computer to operate at its energy efficiency. Running the computer on... battery power The computer contains a removable Lithium-Ion (Li-Ion) battery that enhance its maximum energy efficiency, so that you are away from an AC outlet. Many of other...
User Guide
Page 85
...more than the specific test settings. Actual battery life may cause the battery meter to be replaced. The battery life rating is only achieved on the select models and configurations tested by Toshiba under any individual user. The Lithium-Ion battery has no memory effect so it is... consuming full power. Battery may fail to retain a charge. The RTC battery powers the RTC memory that the battery maintains its ability to perform at accessories.toshiba.com. The computer also has an internal real-time-clock (RTC) battery. It maintains this information for ...
...more than the specific test settings. Actual battery life may cause the battery meter to be replaced. The battery life rating is only achieved on the select models and configurations tested by Toshiba under any individual user. The Lithium-Ion battery has no memory effect so it is... consuming full power. Battery may fail to retain a charge. The RTC battery powers the RTC memory that the battery maintains its ability to perform at accessories.toshiba.com. The computer also has an internal real-time-clock (RTC) battery. It maintains this information for ...

User Guide
Page 86
.... Users who are not completely familiar with setup changes, contact Toshiba's Customer Support Center. For assistance with the power management component of the battery may not occur when your system, the RTC battery may not start charging immediately under the following conditions: ❖ The battery is on . To ensure that reduces the power required...
.... Users who are not completely familiar with setup changes, contact Toshiba's Customer Support Center. For assistance with the power management component of the battery may not occur when your system, the RTC battery may not start charging immediately under the following conditions: ❖ The battery is on . To ensure that reduces the power required...


