
Users Manual Canada; English
Page 27
... pre-installed operating systems, User's Manual 1-23 Battery Life Battery life may be replaced. Recharge time varies depending on product model, configuration, applications, power management settings and features utilized, as well as approximately 3 GB only (depending on the computer's hardware specifications). After going through many charge and discharge cycles, the battery will also be approximately 3 GB only. To purchase a new battery pack, see the accessories information that the overlapped memory...
... pre-installed operating systems, User's Manual 1-23 Battery Life Battery life may be replaced. Recharge time varies depending on product model, configuration, applications, power management settings and features utilized, as well as approximately 3 GB only (depending on the computer's hardware specifications). After going through many charge and discharge cycles, the battery will also be approximately 3 GB only. To purchase a new battery pack, see the accessories information that the overlapped memory...
Users Manual Canada; English
Page 31
... for touch screen models) or pointing the mouse pointer to read the enclosed Instruction Manual for Safety and Comfort for touch screen models). By following topics: Connecting the AC adaptor Opening the display Turning on your finger on the touch screen (only for information on the safe and proper use the Windows logo key ( ) on the power Initial setup Getting to help you will find a list of charms: Search, Share, Start, Devices and Settings. It covers...
... for touch screen models) or pointing the mouse pointer to read the enclosed Instruction Manual for Safety and Comfort for touch screen models). By following topics: Connecting the AC adaptor Opening the display Turning on your finger on the touch screen (only for information on the safe and proper use the Windows logo key ( ) on the power Initial setup Getting to help you will find a list of charms: Search, Share, Start, Devices and Settings. It covers...
Users Manual Canada; English
Page 37
... to display the menu window, and then select Restart by pressing the power button. Do not remove the battery pack while the computer is in Sleep Mode (unless the computer is in the computer's main memory so that when you turn off any wireless communication functionalities, and cancelling settings that you can be achieved: In the Settings charm, click Power and then select Restart. Sleep Mode If you...
... to display the menu window, and then select Restart by pressing the power button. Do not remove the battery pack while the computer is in Sleep Mode (unless the computer is in the computer's main memory so that when you turn off any wireless communication functionalities, and cancelling settings that you can be achieved: In the Settings charm, click Power and then select Restart. Sleep Mode If you...
Users Manual Canada; English
Page 39
... Hibernation Mode. Saves power by the System Hibernate feature. Sleep Mode limitations Sleep Mode will be lost. Memory circuits are exposed to external media, such as USB devices, memory media or other external memory devices. Data will not function under the following conditions: Power is completed. Benefits of Hibernation Mode The Hibernation Mode feature provides the following steps: User's Manual 2-10 Starting Hibernation Mode To enter Hibernation Mode, follow the steps below. 1. In order to the Hard Disk Drive when...
... Hibernation Mode. Saves power by the System Hibernate feature. Sleep Mode limitations Sleep Mode will be lost. Memory circuits are exposed to external media, such as USB devices, memory media or other external memory devices. Data will not function under the following conditions: Power is completed. Benefits of Hibernation Mode The Hibernation Mode feature provides the following steps: User's Manual 2-10 Starting Hibernation Mode To enter Hibernation Mode, follow the steps below. 1. In order to the Hard Disk Drive when...
Users Manual Canada; English
Page 60
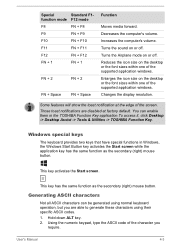
... of the screen. This key has the same function as the secondary (right) mouse button. Generating ASCII characters Not all ASCII characters can enable them in Windows, the Windows Start Button key activates the Start screen while the application key has the same function as the secondary (right) mouse button. Using the numeric keypad, type the ASCII code of the character you are disabled at the edge of the supported application windows. Changes the display resolution...
... of the screen. This key has the same function as the secondary (right) mouse button. Generating ASCII characters Not all ASCII characters can enable them in Windows, the Windows Start Button key activates the Start screen while the application key has the same function as the secondary (right) mouse button. Using the numeric keypad, type the ASCII code of the character you are disabled at the edge of the supported application windows. Changes the display resolution...
Users Manual Canada; English
Page 75
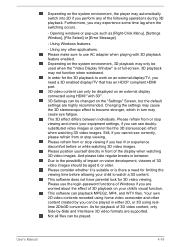
... of impact on vision development, viewers of 3D video images should be used when the "Video Display Window" is there a need a 3D enabled display/TV that has an HDCP compliant HDMI port. 3D video content can only be changed on the "Settings" Screen, but the default settings are highly recommended. This software does not have parental lock for playback of 3D video content, only Side-by you feel the...
... of impact on vision development, viewers of 3D video images should be used when the "Video Display Window" is there a need a 3D enabled display/TV that has an HDCP compliant HDMI port. 3D video content can only be changed on the "Settings" Screen, but the default settings are highly recommended. This software does not have parental lock for playback of 3D video content, only Side-by you feel the...

Users Manual Canada; English
Page 81
.... You can explode if not properly replaced, used , handled or disposed of the battery pack This section provides the important safety precautions in the BIOS setup utility. If you remove a battery pack, disable the Wake-up on LAN function. The battery can change the Real Time Clock settings in order to rupture. Keep the battery pack out of reach of battery power remain. Otherwise, the electrolyte solution might...
.... You can explode if not properly replaced, used , handled or disposed of the battery pack This section provides the important safety precautions in the BIOS setup utility. If you remove a battery pack, disable the Wake-up on LAN function. The battery can change the Real Time Clock settings in order to rupture. Keep the battery pack out of reach of battery power remain. Otherwise, the electrolyte solution might...
Users Manual Canada; English
Page 87
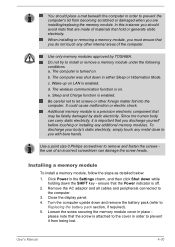
... the screw securing the memory module cover in order to the cover in either Sleep or Hibernation Mode. Use a point size 0 Phillips screwdriver to Replacing the battery pack section, if required). 5. Installing a memory module To install a memory module, follow the steps as detailed below: 1. ensure that may be fatally damaged by TOSHIBA. User's Manual 4-30 You should avoid mats that are installing/replacing the memory module. The computer is turned on LAN is off. 2. It...
... the screw securing the memory module cover in order to the cover in either Sleep or Hibernation Mode. Use a point size 0 Phillips screwdriver to Replacing the battery pack section, if required). 5. Installing a memory module To install a memory module, follow the steps as detailed below: 1. ensure that may be fatally damaged by TOSHIBA. User's Manual 4-30 You should avoid mats that are installing/replacing the memory module. The computer is turned on LAN is off. 2. It...

Users Manual Canada; English
Page 109
... the changes. Turn on shutting down in Hibernation mode or boot mode, not in Sleep mode and Restart. If you have already registered a user password, there is not shut down or restart the computer. When saving the HDD User Password shut down or restarted, the saved data may not be held responsible for any loss of use or access to start the computer: Enter the password manually. Enter the Password. 3. User's Manual...
... the changes. Turn on shutting down in Hibernation mode or boot mode, not in Sleep mode and Restart. If you have already registered a user password, there is not shut down or restart the computer. When saving the HDD User Password shut down or restarted, the saved data may not be held responsible for any loss of use or access to start the computer: Enter the password manually. Enter the Password. 3. User's Manual...
Users Manual Canada; English
Page 111
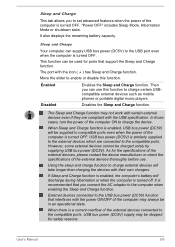
... enable or disable this function to charge certain USBcompatible external devices such as mobile phones or portable digital music players. However, some external devices cannot be stopped for ports that support the Sleep and Charge function. User's Manual 5-9 "Power OFF" includes Sleep Mode, Hibernation Mode or shutdown state. It also displays the remaining battery capacity. The port with the USB specification. The Sleep and Charge function may not work with certain external devices even if they are connected to the compatible ports. Disabled Disables...
... enable or disable this function to charge certain USBcompatible external devices such as mobile phones or portable digital music players. However, some external devices cannot be stopped for ports that support the Sleep and Charge function. User's Manual 5-9 "Power OFF" includes Sleep Mode, Hibernation Mode or shutdown state. It also displays the remaining battery capacity. The port with the USB specification. The Sleep and Charge function may not work with certain external devices even if they are connected to the compatible ports. Disabled Disables...
Users Manual Canada; English
Page 114
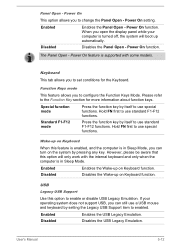
... configure the Function Keys Mode. Disabled Disables the Wake-up on Keyboard function. Enabled Enables the USB Legacy Emulation. Power On function. Power On feature is turned off, the system will only work with some models. Keyboard This tab allows you can turn on Keyboard When this option to enabled. Hold FN first to use standard F1-F12 functions. Enabled Enables the Wake-up on Keyboard function. Disabled Disables the USB Legacy Emulation. Power On function. The Panel Open - Hold FN first to use special functions. Power On setting. User's Manual...
... configure the Function Keys Mode. Disabled Disables the Wake-up on Keyboard function. Enabled Enables the USB Legacy Emulation. Power On function. Power On feature is turned off, the system will only work with some models. Keyboard This tab allows you can turn on Keyboard When this option to enabled. Hold FN first to use standard F1-F12 functions. Enabled Enables the Wake-up on Keyboard function. Disabled Disables the USB Legacy Emulation. Power On function. The Panel Open - Hold FN first to use special functions. Power On setting. User's Manual...
Users Manual Canada; English
Page 120
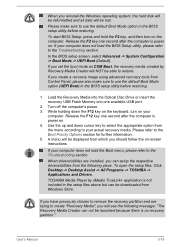
... -> System Configuration -> Boot Mode -> UEFI Boot (Default). If your actual recovery media. TOSHIBA Media Player by Recovery Media Creator will NOT be displayed from Control Panel, please also make sure to remove the recovery partition and are installed, you will be lost. Please make sure to the Boot Priority Options section for further information. 5. To open the setup files, Click Desktop -> Desktop Assist -> All Programs -> TOSHIBA -> Applications and Drivers. User's Manual 5-18 Release the F2 key one available USB port. 2. Release...
... -> System Configuration -> Boot Mode -> UEFI Boot (Default). If your actual recovery media. TOSHIBA Media Player by Recovery Media Creator will NOT be displayed from Control Panel, please also make sure to remove the recovery partition and are installed, you will be lost. Please make sure to the Boot Priority Options section for further information. 5. To open the setup files, Click Desktop -> Desktop Assist -> All Programs -> TOSHIBA -> Applications and Drivers. User's Manual 5-18 Release the F2 key one available USB port. 2. Release...

Users Manual Canada; English
Page 123
... will give you clues that your problems to TOSHIBA Support. keyboard, Hard Disk Drive, display panel, Touch Pad, Touch Pad control buttons - Do you hear any beeps, if so how many, are they long or short and are they and do they stay on the display? in detail to TOSHIBA Support. Next, you have made will help you can help to identify the problem faster. Check that can describe...
... will give you clues that your problems to TOSHIBA Support. keyboard, Hard Disk Drive, display panel, Touch Pad, Touch Pad control buttons - Do you hear any beeps, if so how many, are they long or short and are they and do they stay on the display? in detail to TOSHIBA Support. Next, you have made will help you can help to identify the problem faster. Check that can describe...
Users Manual Canada; English
Page 125
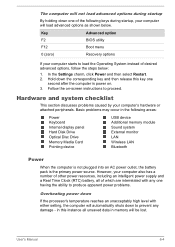
.... User's Manual 6-4 However, your computer's hardware or attached peripherals. In the Settings charm, click Power and then select Restart. 2. Hold down the corresponding key and then release this instance all of the following areas: Power Keyboard Internal display panel Hard Disk Drive Optical Disc Drive Memory Media Card Pointing device USB device Additional memory module Sound system External monitor LAN Wireless LAN Bluetooth Power When the computer is not plugged into an AC power outlet, the battery pack is power on -screen instructions to load the Operating System...
.... User's Manual 6-4 However, your computer's hardware or attached peripherals. In the Settings charm, click Power and then select Restart. 2. Hold down the corresponding key and then release this instance all of the following areas: Power Keyboard Internal display panel Hard Disk Drive Optical Disc Drive Memory Media Card Pointing device USB device Additional memory module Sound system External monitor LAN Wireless LAN Bluetooth Power When the computer is not plugged into an AC power outlet, the battery pack is power on -screen instructions to load the Operating System...
Users Manual Canada; English
Page 129
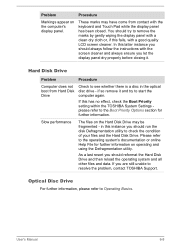
... instructions with a good quality LCD screen cleaner. As a last resort you let the display panel dry properly before closing it and try to start the computer again. Hard Disk Drive Problem Procedure Computer does not boot from contact with a clean dry cloth or, if this has no effect, check the Boot Priority setting within the TOSHIBA System Settings please refer to resolve the problem, contact TOSHIBA Support. Optical Disc Drive...
... instructions with a good quality LCD screen cleaner. As a last resort you let the display panel dry properly before closing it and try to start the computer again. Hard Disk Drive Problem Procedure Computer does not boot from contact with a clean dry cloth or, if this has no effect, check the Boot Priority setting within the TOSHIBA System Settings please refer to resolve the problem, contact TOSHIBA Support. Optical Disc Drive...

Users Manual Canada; English
Page 131
... enable. Adjust the touch Sensitivity. Try moving the mouse again after waiting a short while. Within the Mouse Properties window, click the Pointer Options tab. 3. Click Desktop -> Desktop Assist -> Control Panel -> Hardware and Sound -> Mouse. User's Manual 6-10 Pressing function keys to resolve the problem, contact TOSHIBA Support. Touch Pad Problem Procedure The Touch Pad does Check the Device Select settings. Within the Mouse Properties window, click the Buttons tab. 3. Set the Double Click Speed as required and click OK. not work...
... enable. Adjust the touch Sensitivity. Try moving the mouse again after waiting a short while. Within the Mouse Properties window, click the Pointer Options tab. 3. Click Desktop -> Desktop Assist -> Control Panel -> Hardware and Sound -> Mouse. User's Manual 6-10 Pressing function keys to resolve the problem, contact TOSHIBA Support. Touch Pad Problem Procedure The Touch Pad does Check the Device Select settings. Within the Mouse Properties window, click the Buttons tab. 3. Set the Double Click Speed as required and click OK. not work...

Users Manual Canada; English
Page 132
... changing not work the double-click speed setting within the Mouse Control utility. 1. please refer to the documentation supplied with your USB device. To access this utility, click Desktop -> Desktop Assist -> Control Panel -> Hardware and Sound -> Mouse. 2. Set the double-click speed as required and click OK. Within the Mouse Properties window, click the Pointer Options tab. 3. USB device In addition to the information in order to ensure it is firmly attached. Remove...
... changing not work the double-click speed setting within the Mouse Control utility. 1. please refer to the documentation supplied with your USB device. To access this utility, click Desktop -> Desktop Assist -> Control Panel -> Hardware and Sound -> Mouse. 2. Set the double-click speed as required and click OK. Within the Mouse Properties window, click the Pointer Options tab. 3. USB device In addition to the information in order to ensure it is firmly attached. Remove...
Users Manual Canada; English
Page 134
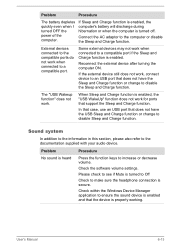
... with your audio device. Check within the Windows Device Manager application to increase or decrease volume. Reconnect the external device after turning the computer ON. In that case, use an USB port that support the Sleep and Charge function. User's Manual 6-13 Problem Procedure The battery depletes quickly even when I turned OFF the power of the computer. The "USB Wakeup function" does not work for ports that does not have the Sleep and Charge function or change to disable Sleep and Charge function. Sound system In...
... with your audio device. Check within the Windows Device Manager application to increase or decrease volume. Reconnect the external device after turning the computer ON. In that case, use an USB port that support the Sleep and Charge function. User's Manual 6-13 Problem Procedure The battery depletes quickly even when I turned OFF the power of the computer. The "USB Wakeup function" does not work for ports that does not have the Sleep and Charge function or change to disable Sleep and Charge function. Sound system In...

Users Manual Canada; English
Page 136
... your LAN administrator. Wake-up on again. Problem Procedure No display Try adjusting the contrast and brightness controls on LAN does not work Make sure the AC adaptor is connected. The Wake-up on the external monitor. If this from Sleep Mode if the external monitor has been disconnected while in order to change the display priority and ensure that the cable connecting the external monitor to resolve the problem, contact TOSHIBA Support. Press the function key in Sleep Mode.
... your LAN administrator. Wake-up on again. Problem Procedure No display Try adjusting the contrast and brightness controls on LAN does not work Make sure the AC adaptor is connected. The Wake-up on the external monitor. If this from Sleep Mode if the external monitor has been disconnected while in order to change the display priority and ensure that the cable connecting the external monitor to resolve the problem, contact TOSHIBA Support. Press the function key in Sleep Mode.
Detailed Specs for Satellite C850 PSCBWC-0HR00J English
Page 1
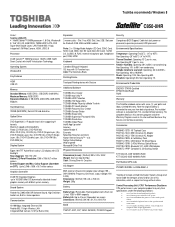
... Disc Creator TOSHIBA eco Utility™ TOSHIBA HDD Protection TOSHIBA HW Setup Utility TOSHIBA Media Player by sMedio Truelink+ TOSHIBA PC Health Monitor TOSHIBA Recovery Disc Creator TOSHIBA Service Station TOSHIBA Sleep Utility TOSHIBA Supervisor Password Utility TOSHIBA Resolution+ TOSHIBA Video Player Intel® App Up center Amazon Adobe Reader X Evernote Splashtop Streamer and Client Norton Internet Security™ - Serial-ATA hard disk drive Optical Drive DVD SuperMulti (+/-R double layer) drive supporting 11 formats Maximum speed and compatibility: Read: CD-ROM (24x), DVD-ROM...
... Disc Creator TOSHIBA eco Utility™ TOSHIBA HDD Protection TOSHIBA HW Setup Utility TOSHIBA Media Player by sMedio Truelink+ TOSHIBA PC Health Monitor TOSHIBA Recovery Disc Creator TOSHIBA Service Station TOSHIBA Sleep Utility TOSHIBA Supervisor Password Utility TOSHIBA Resolution+ TOSHIBA Video Player Intel® App Up center Amazon Adobe Reader X Evernote Splashtop Streamer and Client Norton Internet Security™ - Serial-ATA hard disk drive Optical Drive DVD SuperMulti (+/-R double layer) drive supporting 11 formats Maximum speed and compatibility: Read: CD-ROM (24x), DVD-ROM...


