User Guide
Page 10
... as the United States. Pb, Hg, Cd In the European Union, these symbols indicate that focus on the battery. Please contact your product, visit www.reuse.toshiba.com. Voor privé-gebruik buiten gebouw over publieke groud over afstand groter dan 300m is wel registratie bij BIPT... BIPT. For registration and license please contact IBPT/BIPT. Voor registratie of this product, it must be sent to trade-in Europe, Toshiba is already working with IBPT/BIPT is required for recovery and recycling. This Directive requires producers of electrical and electronic products put on how...
... as the United States. Pb, Hg, Cd In the European Union, these symbols indicate that focus on the battery. Please contact your product, visit www.reuse.toshiba.com. Voor privé-gebruik buiten gebouw over publieke groud over afstand groter dan 300m is wel registratie bij BIPT... BIPT. For registration and license please contact IBPT/BIPT. Voor registratie of this product, it must be sent to trade-in Europe, Toshiba is already working with IBPT/BIPT is required for recovery and recycling. This Directive requires producers of electrical and electronic products put on how...
User Guide
Page 19
... 36 Setting up your computer 37 Connecting to a power source 37 Charging the main battery 40 Using the computer for the first time 40 Initial setup 41 Setting up your software 41 Registering your computer with Toshiba 41 To Shut down your computer 42 To Restart your computer 42 To place your...
... 36 Setting up your computer 37 Connecting to a power source 37 Charging the main battery 40 Using the computer for the first time 40 Initial setup 41 Setting up your software 41 Registering your computer with Toshiba 41 To Shut down your computer 42 To Restart your computer 42 To place your...
User Guide
Page 20
... optical disc 80 Playing optical media 81 Recording optical media 81 Removing a disc with the computer on 82 Removing a disc with the computer off 82 Toshiba's online resources 83 Chapter 3: Mobile Computing 84 Toshiba's energy-saver design 84 Running the computer on battery power 84 Battery Notice 85 Power management 86
... optical disc 80 Playing optical media 81 Recording optical media 81 Removing a disc with the computer on 82 Removing a disc with the computer off 82 Toshiba's online resources 83 Chapter 3: Mobile Computing 84 Toshiba's energy-saver design 84 Running the computer on battery power 84 Battery Notice 85 Power management 86
User Guide
Page 21
... 91 Power Plans 92 Using the eco power plan 93 Changing the main battery 94 Removing the battery from the computer .........94 Inserting a charged battery 95 Taking care of your battery 97 Safety precautions 97 Maintaining your battery 97 Disposing of used batteries 98 Traveling tips 99 Chapter 4: Exploring Your Computer's Features 100 Exploring the Start...
... 91 Power Plans 92 Using the eco power plan 93 Changing the main battery 94 Removing the battery from the computer .........94 Inserting a charged battery 95 Taking care of your battery 97 Safety precautions 97 Maintaining your battery 97 Disposing of used batteries 98 Traveling tips 99 Chapter 4: Exploring Your Computer's Features 100 Exploring the Start...
User Guide
Page 22
... 116 Using a user password 118 Deleting a user password 119 System Settings 120 Function Key 122 Recovery Media Creator 123 Service Station 123 TOSHIBA Application Installer 124 Chapter 6: If Something Goes Wrong 125 Problems that are easy to fix 125 Problems when you turn on the computer... system can help you 131 Fixing a problem with Device Manager 132 Checking device properties 132 Memory problems 133 Power and the batteries 134 Keyboard problems 135 Display problems 135 Disk or storage drive problems 137 Error-checking 137 Optical disc drive problems 139 Sound system...
... 116 Using a user password 118 Deleting a user password 119 System Settings 120 Function Key 122 Recovery Media Creator 123 Service Station 123 TOSHIBA Application Installer 124 Chapter 6: If Something Goes Wrong 125 Problems that are easy to fix 125 Problems when you turn on the computer... system can help you 131 Fixing a problem with Device Manager 132 Checking device properties 132 Memory problems 133 Power and the batteries 134 Keyboard problems 135 Display problems 135 Disk or storage drive problems 137 Error-checking 137 Optical disc drive problems 139 Sound system...
User Guide
Page 24
...accompany you wherever you leave this computer to conserve computer energy. 24 Toshiba is ENERGY STAR® qualified. See the "Mobile Computing" section of inactivity. We recommend that you ...go. With your Toshiba computer, your computer will operate at its maximum energy efficiency. Your computer is a partner ... off the display or enter low-power Sleep mode after a specific amount of the Toshiba User's Guide for more information on using power management settings to meet the latest ENERGY STAR®...
...accompany you wherever you leave this computer to conserve computer energy. 24 Toshiba is ENERGY STAR® qualified. See the "Mobile Computing" section of inactivity. We recommend that you ...go. With your Toshiba computer, your computer will operate at its maximum energy efficiency. Your computer is a partner ... off the display or enter low-power Sleep mode after a specific amount of the Toshiba User's Guide for more information on using power management settings to meet the latest ENERGY STAR®...
User Guide
Page 35
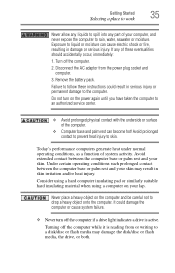
... or similarly suitable hard insulating material when using a computer on your computer, and never expose the computer to rain, water, seawater or moisture. Remove the battery pack. Never place a heavy object on the computer and be careful not to skin. Exposure to liquid or moisture can become hot! Getting Started 35...
... or similarly suitable hard insulating material when using a computer on your computer, and never expose the computer to rain, water, seawater or moisture. Remove the battery pack. Never place a heavy object on the computer and be careful not to skin. Exposure to liquid or moisture can become hot! Getting Started 35...
User Guide
Page 37
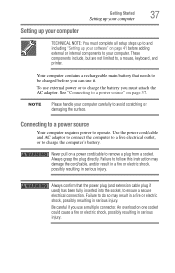
... Started 37 Setting up your computer Setting up your software" on page 41 before you use external power or to charge the battery you must complete all setup steps up to and including "Setting up your computer. NOTE Please handle your computer carefully to charge the... computer's battery. Your computer contains a rechargeable main battery that the power plug (and extension cable plug if used) has been fully inserted into the socket, to remove a plug ...
... Started 37 Setting up your computer Setting up your software" on page 41 before you use external power or to charge the battery you must complete all setup steps up to and including "Setting up your computer. NOTE Please handle your computer carefully to charge the... computer's battery. Your computer contains a rechargeable main battery that the power plug (and extension cable plug if used) has been fully inserted into the socket, to remove a plug ...
User Guide
Page 39
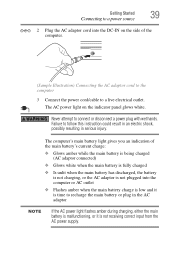
... could result in an electric shock, possibly resulting in the AC adaptor NOTE If the AC power light flashes amber during charging, either the main battery is malfunctioning, or it is not plugged into the DC-IN on the indicator panel glows white. The computer's main... battery light gives you an indication of the computer. (Sample Illustration) Connecting the AC adaptor cord to the computer 3 Connect the power cord/cable to a live ...
... could result in an electric shock, possibly resulting in the AC adaptor NOTE If the AC power light flashes amber during charging, either the main battery is malfunctioning, or it is not plugged into the DC-IN on the indicator panel glows white. The computer's main... battery light gives you an indication of the computer. (Sample Illustration) Connecting the AC adaptor cord to the computer 3 Connect the power cord/cable to a live ...
User Guide
Page 40
.... Do not press or push on the display panel and be completely charged and ready to power the computer. Any small bright dots that , the battery will be careful to remove any pens or other objects from the keyboard area before closing the display panel, place one hand on the palm... is now ready for you may not be accessible by the display panel. Using the computer for the first time The computer is operated on battery power, the screen will deteriorate. Small bright dots may not be able to power the computer, you turn it on and begin using it moves...
.... Do not press or push on the display panel and be completely charged and ready to power the computer. Any small bright dots that , the battery will be careful to remove any pens or other objects from the keyboard area before closing the display panel, place one hand on the palm... is now ready for you may not be accessible by the display panel. Using the computer for the first time The computer is operated on battery power, the screen will deteriorate. Small bright dots may not be able to power the computer, you turn it on and begin using it moves...
User Guide
Page 43
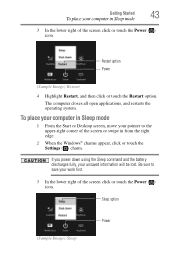
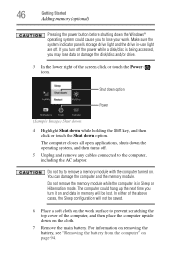
... Sleep mode 3 In the lower right of the screen click or touch the Power ( ) icon. If you power down using the Sleep command and the battery discharges fully, your work first. 3 In the lower right of the screen click or touch the Power ( ) icon. Getting Started 43 To place your computer...
... Sleep mode 3 In the lower right of the screen click or touch the Power ( ) icon. If you power down using the Sleep command and the battery discharges fully, your work first. 3 In the lower right of the screen click or touch the Power ( ) icon. Getting Started 43 To place your computer...
User Guide
Page 46
... your work surface to prevent scratching the top cover of the computer, and then place the computer upside down on the cloth. 7 Remove the main battery. You can damage the computer and the memory module. For information on removing the...
... your work surface to prevent scratching the top cover of the computer, and then place the computer upside down on the cloth. 7 Remove the main battery. You can damage the computer and the memory module. For information on removing the...
User Guide
Page 49
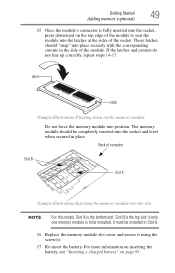
... should "snap" into the slot NOTE For this model, Slot A is the top slot. For more information on inserting the battery, see "Inserting a charged battery" on the memory module Do not force the memory module into position. These latches should be installed in Slot A. 16 Replace the... memory module slot cover and secure it using the screw(s). 17 Re-insert the battery. latch latch (Sample Illustration) Pressing down on page 95. Back of computer Slot B Slot A (Sample Illustration) Inserting the memory module into...
... should "snap" into the slot NOTE For this model, Slot A is the top slot. For more information on inserting the battery, see "Inserting a charged battery" on the memory module Do not force the memory module into position. These latches should be installed in Slot A. 16 Replace the... memory module slot cover and secure it using the screw(s). 17 Re-insert the battery. latch latch (Sample Illustration) Pressing down on page 95. Back of computer Slot B Slot A (Sample Illustration) Inserting the memory module into...

User Guide
Page 51
...try to remove a memory module with the computer turned on and data in Sleep or Hibernation mode. For more information on inserting the battery, see "Inserting a charged battery" on top of one another, you turn it on . Do not remove the memory module while the computer is in memory will ... removing/installing the bottom module. 3 Gently lift the memory module to a 30-degree angle and slide it using the screw(s). 5 Re-insert the battery. NOTE If your system has the memory modules stacked on page 95. 6 Turn the computer right side up slightly. The computer could hang up the...
...try to remove a memory module with the computer turned on and data in Sleep or Hibernation mode. For more information on inserting the battery, see "Inserting a charged battery" on top of one another, you turn it on . Do not remove the memory module while the computer is in memory will ... removing/installing the bottom module. 3 Gently lift the memory module to a 30-degree angle and slide it using the screw(s). 5 Re-insert the battery. NOTE If your system has the memory modules stacked on page 95. 6 Turn the computer right side up slightly. The computer could hang up the...
User Guide
Page 69
... of the external display To obtain the best picture quality from the right edge. For information about taking care of your computer's battery, see "Power Plans" on cleaning and moving your television (or other video display device), you can choose. There are several ... steps. See "Utilities" on page 97. Adjusting the quality of your computer to activate a selection. Then choose a category you can customize your battery" on page 110. See the video device documentation for your needs. From the Start or Desktop screen, move your computer's settings NOTE The (...
... of the external display To obtain the best picture quality from the right edge. For information about taking care of your computer's battery, see "Power Plans" on cleaning and moving your television (or other video display device), you can choose. There are several ... steps. See "Utilities" on page 97. Adjusting the quality of your computer to activate a selection. Then choose a category you can customize your battery" on page 110. See the video device documentation for your needs. From the Start or Desktop screen, move your computer's settings NOTE The (...
User Guide
Page 72
... This chapter gives some computing tips and provides important information about basic features. HINT: Some programs have an automatic save it to reconnect, or your battery runs out of charge while you are working, you last saved.
... This chapter gives some computing tips and provides important information about basic features. HINT: Some programs have an automatic save it to reconnect, or your battery runs out of charge while you are working, you last saved.
User Guide
Page 84
... your computer while traveling. We recommend you leave these energy-saving features have been preset by Toshiba. Chapter 3 Mobile Computing This chapter covers all aspects of using your computer to operate at its energy efficiency. Toshiba's energy-saver design Your computer enters a low-power suspension mode when it for longer periods while... it many times. 84 You can use it is not being used, thereby conserving energy and saving money in the process. Running the computer on battery power The computer contains a Lithium-Ion (Li-Ion) battery that you are away from an AC outlet.
... your computer while traveling. We recommend you leave these energy-saving features have been preset by Toshiba. Chapter 3 Mobile Computing This chapter covers all aspects of using your computer to operate at its energy efficiency. Toshiba's energy-saver design Your computer enters a low-power suspension mode when it for longer periods while... it many times. 84 You can use it is not being used, thereby conserving energy and saving money in the process. Running the computer on battery power The computer contains a Lithium-Ion (Li-Ion) battery that you are away from an AC outlet.
User Guide
Page 85
... its maximum capacity, operate the computer on page 92. This is normal for better accuracy of the battery meter, it is not necessary to be obtained by Toshiba under the specific test settings at the time of publication and is only achieved on product model, configuration, applications, power management settings and features...
... its maximum capacity, operate the computer on page 92. This is normal for better accuracy of the battery meter, it is not necessary to be obtained by Toshiba under the specific test settings at the time of publication and is only achieved on product model, configuration, applications, power management settings and features...
User Guide
Page 86
...computer. Users who are not completely familiar with setup changes, contact Toshiba's Customer Support Center. You can use it to these settings may result in system performance or stability issues. The battery charges whether the computer is turned on or off. For assistance ... of the system should use the AC adaptor specified by Toshiba. Charging batteries The battery needs to be charged before you can order a Toshiba AC adaptor from Toshiba's Web site at accessories.toshiba.com. Charging the main battery The battery needs to be charged before you can use it to ...
...computer. Users who are not completely familiar with setup changes, contact Toshiba's Customer Support Center. You can use it to these settings may result in system performance or stability issues. The battery charges whether the computer is turned on or off. For assistance ... of the system should use the AC adaptor specified by Toshiba. Charging batteries The battery needs to be charged before you can order a Toshiba AC adaptor from Toshiba's Web site at accessories.toshiba.com. Charging the main battery The battery needs to be charged before you can use it to ...
User Guide
Page 87
...'s Power Options utility can be used to 26 degrees Celsius). ❖ The battery is almost completely discharged. Leave the power connected and the battery should begin charging after a few minutes. HINT: Once the battery is extremely hot or cold. Please make a complete back up of the power... operation and will allow the battery to external media before discharging the battery. The RTC battery powers the System Time Clock and BIOS memory used to select a power level setting that the battery charges to its full capacity, wait until the battery discharges completely. To ensure that...
...'s Power Options utility can be used to 26 degrees Celsius). ❖ The battery is almost completely discharged. Leave the power connected and the battery should begin charging after a few minutes. HINT: Once the battery is extremely hot or cold. Please make a complete back up of the power... operation and will allow the battery to external media before discharging the battery. The RTC battery powers the System Time Clock and BIOS memory used to select a power level setting that the battery charges to its full capacity, wait until the battery discharges completely. To ensure that...


