
Users Manual Canada; English
Page 12
...-performance computing. The indicator panel also uses icons to identify the components it is represented in the text to describe, identify, and highlight terms and operating procedures. ABC When procedures require an action such as they appear on configuring your computer. Keys The keyboard keys are to set up and begin using your computer, basic operations and care, using optional devices and troubleshooting. A distinctive typeface...
...-performance computing. The indicator panel also uses icons to identify the components it is represented in the text to describe, identify, and highlight terms and operating procedures. ABC When procedures require an action such as they appear on configuring your computer. Keys The keyboard keys are to set up and begin using your computer, basic operations and care, using optional devices and troubleshooting. A distinctive typeface...
Users Manual Canada; English
Page 23
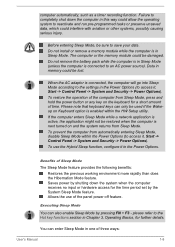
.... Do not install or remove a memory module while the computer is in one of time. please refer to the Hot key functions section in the Power Options (to access it in this way could allow the operating system to the settings in Chapter 3, Operating Basics, for a short amount of three ways: User's Manual 1-8 To use of Sleep Mode The Sleep Mode feature provides the following benefits: Restores the previous working environment more...
.... Do not install or remove a memory module while the computer is in one of time. please refer to the Hot key functions section in the Power Options (to access it in this way could allow the operating system to the settings in Chapter 3, Operating Basics, for a short amount of three ways: User's Manual 1-8 To use of Sleep Mode The Sleep Mode feature provides the following benefits: Restores the previous working environment more...
Users Manual Canada; English
Page 49
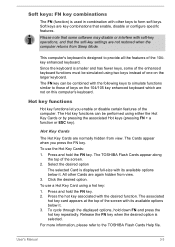
... keyboard. Soft keys are key combinations that the soft-key settings are not restored when the computer returns from Sleep Mode. The FN key can be simulated using either the Hot Key Cards or by pressing the associated Hot keys (pressing FN + a function or ESC key). Hot Key Cards The Hot Key Cards are normally hidden from view. The TOSHIBA Flash Cards appear along the top of the 104key enhanced keyboard. User's Manual 3-3 Soft keys: FN key combinations The FN (function) is used...
... keyboard. Soft keys are key combinations that the soft-key settings are not restored when the computer returns from Sleep Mode. The FN key can be simulated using either the Hot Key Cards or by pressing the associated Hot keys (pressing FN + a function or ESC key). Hot Key Cards The Hot Key Cards are normally hidden from view. The TOSHIBA Flash Cards appear along the top of the 104key enhanced keyboard. User's Manual 3-3 Soft keys: FN key combinations The FN (function) is used...

Users Manual Canada; English
Page 50
... disables the Touch Pad function. Sleep Pressing FN + F3 switches the system to Hibernation Mode. Brightness Down Pressing FN + F6 decreases the computer's display panel brightness in increment. Lock Pressing FN + F1 enters ''Lock computer mode''. To use a simultaneous mode, you need to match the resolution of the hot keys. Volume down Pressing FN + 3 decreases the volume in individual steps. Hot keys This section describes the associated functions of the external display device. Power Plan Pressing FN + F2 changes the power settings...
... disables the Touch Pad function. Sleep Pressing FN + F3 switches the system to Hibernation Mode. Brightness Down Pressing FN + F6 decreases the computer's display panel brightness in increment. Lock Pressing FN + F1 enters ''Lock computer mode''. To use a simultaneous mode, you need to match the resolution of the hot keys. Volume down Pressing FN + 3 decreases the volume in individual steps. Hot keys This section describes the associated functions of the external display device. Power Plan Pressing FN + F2 changes the power settings...
Users Manual Canada; English
Page 61
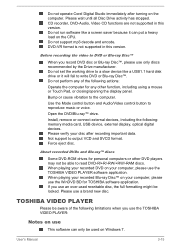
... be aware of the following : memory media card, USB device, external display, optical digital devices. Bump or cause vibration to output VCD and SVCD format. Use the Mode control button and Audio/Video control button to write DVD or Blu-ray Disc™. Do not set the working drive to read DVD-R/+R/-RW/+RW/-RAM discs. Open the DVD/Blu-ray™ drive. When playing your recorded DVD on your disc after turning on use a brand new disc. User's Manual 3-15 When playing your recorded Blu...
... be aware of the following : memory media card, USB device, external display, optical digital devices. Bump or cause vibration to output VCD and SVCD format. Use the Mode control button and Audio/Video control button to write DVD or Blu-ray Disc™. Do not set the working drive to read DVD-R/+R/-RW/+RW/-RAM discs. Open the DVD/Blu-ray™ drive. When playing your recorded DVD on your disc after turning on use a brand new disc. User's Manual 3-15 When playing your recorded Blu...
Users Manual Canada; English
Page 62
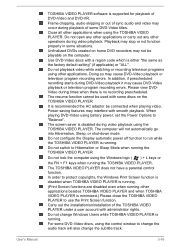
... DVD-Video and DVD-VR. Do not lock the computer using battery power, set the Power Options to Hibernation or Sleep Mode when running the TOSHIBA VIDEO PLAYER. Frame dropping, audio skipping or out of sync audio and video may interfere with a region code which is either "the same as the factory default setting" (if applicable) or "ALL". Use DVD-Video discs with smooth playback. Please view DVDVideo during video playback using the TOSHIBA VIDEO PLAYER. The screen saver is disabled...
... DVD-Video and DVD-VR. Do not lock the computer using battery power, set the Power Options to Hibernation or Sleep Mode when running the TOSHIBA VIDEO PLAYER. Frame dropping, audio skipping or out of sync audio and video may interfere with a region code which is either "the same as the factory default setting" (if applicable) or "ALL". Use DVD-Video discs with smooth playback. Please view DVDVideo during video playback using the TOSHIBA VIDEO PLAYER. The screen saver is disabled...
Users Manual Canada; English
Page 78
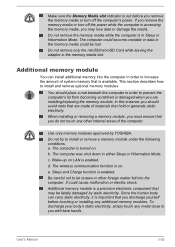
...'s power. Make sure the Memory Media slot indicator is out before you discharge yourself before touching or installing any additional memory modules. In this instance you are made of system memory that is a precision electronic component that hold or generate static electricity. b. d. Be careful not to install and remove optional memory modules. Additional memory module is available. Additional memory module You can carry static electricity, it is turned on . Sleep and Charge function is enabled...
...'s power. Make sure the Memory Media slot indicator is out before you discharge yourself before touching or installing any additional memory modules. In this instance you are made of system memory that is a precision electronic component that hold or generate static electricity. b. d. Be careful not to install and remove optional memory modules. Additional memory module is available. Additional memory module You can carry static electricity, it is turned on . Sleep and Charge function is enabled...
Users Manual Canada; English
Page 100
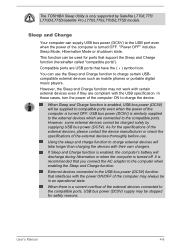
... ON to charge certain USBcompatible external devices such as mobile phones or portable digital music players. User's Manual 4-8 The TOSHIBA Sleep Utility is only supported by supplying USB bus power (DC5V). This function can use . Compatible ports are compliant with certain external devices even if they are USB ports that support the Sleep and Charge function (hereinafter called "compatible ports"). You can be charged solely by Satellite L770/L775/ L770D/L775D/satellite Pro L770/L775/L770D/L775D models.
... ON to charge certain USBcompatible external devices such as mobile phones or portable digital music players. User's Manual 4-8 The TOSHIBA Sleep Utility is only supported by supplying USB bus power (DC5V). This function can use . Compatible ports are compliant with certain external devices even if they are USB ports that support the Sleep and Charge function (hereinafter called "compatible ports"). You can be charged solely by Satellite L770/L775/ L770D/L775D/satellite Pro L770/L775/L770D/L775D models.
Users Manual Canada; English
Page 107
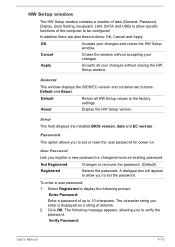
... to the factory settings. About Display the HW Setup version. Verify Password: User's Manual 4-15 HW Setup window The HW Setup window contains a number of tabs (General, Password, Display, Boot Setting, Keyboard, LAN, SATA and USB) to allow you to set the password. Cancel Closes the window without closing the HW Setup window. Setup This field displays the installed BIOS version, date and EC version. A dialogue box will appear to allow specific functions of the computer to be configured. In addition...
... to the factory settings. About Display the HW Setup version. Verify Password: User's Manual 4-15 HW Setup window The HW Setup window contains a number of tabs (General, Password, Display, Boot Setting, Keyboard, LAN, SATA and USB) to allow you to set the password. Cancel Closes the window without closing the HW Setup window. Setup This field displays the installed BIOS version, date and EC version. A dialogue box will appear to allow specific functions of the computer to be configured. In addition...
Users Manual Canada; English
Page 113
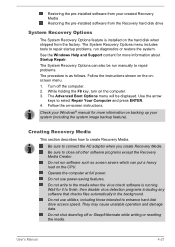
... press ENTER. 4. Do not use power-saving features. Wait for it to repair problems. The procedure is as screen savers which can also be displayed. The System Recovery Options can put a heavy load on backing up your system (including the system image backup feature). They may cause unstable operation and damage data. Check your created Recovery Media Restoring the pre-installed software from the Recovery hard disk drive System Recovery Options The System Recovery Options...
... press ENTER. 4. Do not use power-saving features. Wait for it to repair problems. The procedure is as screen savers which can also be displayed. The System Recovery Options can put a heavy load on backing up your system (including the system image backup feature). They may cause unstable operation and damage data. Check your created Recovery Media Restoring the pre-installed software from the Recovery hard disk drive System Recovery Options The System Recovery Options...
Users Manual Canada; English
Page 120
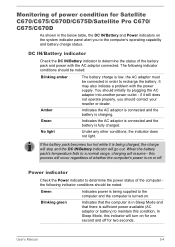
.... Blinking green Indicates that the computer is in Sleep Mode and that there is charging. User's Manual 5-4 Amber Indicates the AC adaptor is connected and the battery is sufficient power available (AC adaptor or battery) to a normal range, charging will turn on . If the battery pack becomes too hot while it still does not operate properly, you to recharge the battery. Green Indicates the AC adaptor is connected and the battery...
.... Blinking green Indicates that the computer is in Sleep Mode and that there is charging. User's Manual 5-4 Amber Indicates the AC adaptor is connected and the battery is sufficient power available (AC adaptor or battery) to a normal range, charging will turn on . If the battery pack becomes too hot while it still does not operate properly, you to recharge the battery. Green Indicates the AC adaptor is connected and the battery...
Users Manual Canada; English
Page 130
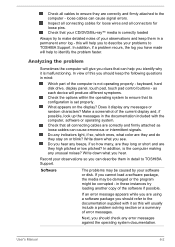
... cannot load a software package, the media may be corrupted - loose cables can describe them in a permanent error log - In view of this will help you should refer to TOSHIBA Support. Make a screenshot of the current display and, if possible, look up the messages in these instances try to identify the problem faster. User's Manual 6-2 this you to describe your problems to TOSHIBA Support. keyboard, hard disk drive, display panel, touch pad, touch pad control buttons - Do...
... cannot load a software package, the media may be corrupted - loose cables can describe them in a permanent error log - In view of this will help you should refer to TOSHIBA Support. Make a screenshot of the current display and, if possible, look up the messages in these instances try to identify the problem faster. User's Manual 6-2 this you to describe your problems to TOSHIBA Support. keyboard, hard disk drive, display panel, touch pad, touch pad control buttons - Do...
Users Manual Canada; English
Page 132
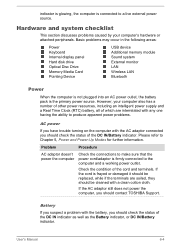
... system checklist This section discusses problems caused by your computer also has a number of other power resources, including an intelligent power supply and a Real Time Clock (RTC) battery, all of the DC IN indicator as well as the Battery indicator, or DC IN/Battery indicator. Basic problems may occur in the following areas: Power Keyboard Internal display panel Hard disk drive Optical Disc Drive Memory Media Card Pointing Device USB device Additional memory module Sound system External monitor LAN Wireless LAN Bluetooth Power When the computer is...
... system checklist This section discusses problems caused by your computer also has a number of other power resources, including an intelligent power supply and a Real Time Clock (RTC) battery, all of the DC IN indicator as well as the Battery indicator, or DC IN/Battery indicator. Basic problems may occur in the following areas: Power Keyboard Internal display panel Hard disk drive Optical Disc Drive Memory Media Card Pointing Device USB device Additional memory module Sound system External monitor LAN Wireless LAN Bluetooth Power When the computer is...
Users Manual Canada; English
Page 135
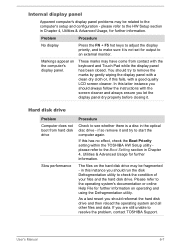
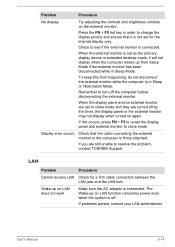
..., with the keyboard and Touch Pad while the display panel has been closed. Please refer to resolve the problem, contact TOSHIBA Support. User's Manual 6-7 Problem Procedure No display Press the FN + F5 hot keys to adjust the display priority, and to check the condition of your files and the hard disk drive. If this has no effect, check the Boot Priority setting within the TOSHIBA HW Setup utility please refer to the Boot Setting section in...
..., with the keyboard and Touch Pad while the display panel has been closed. Please refer to resolve the problem, contact TOSHIBA Support. User's Manual 6-7 Problem Procedure No display Press the FN + F5 hot keys to adjust the display priority, and to check the condition of your files and the hard disk drive. If this has no effect, check the Boot Priority setting within the TOSHIBA HW Setup utility please refer to the Boot Setting section in...
Users Manual Canada; English
Page 137
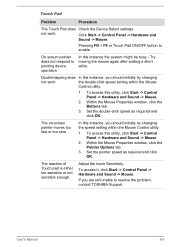
.... User's Manual 6-9 On-screen pointer does not respond to pointing device operation In this instance, you should initially try changing the speed setting within the Mouse Control utility. 1. Set the pointer speed as required and click OK. To access it, click Start -> Control Panel -> Hardware and Sound -> Mouse. Click Start -> Control Panel -> Hardware and Sound -> Mouse. Pressing FN + F9 or Touch Pad ON/OFF button to resolve the problem, contact TOSHIBA Support. Within the Mouse Properties window, click the Pointer Options tab. 3. Adjust the touch...
.... User's Manual 6-9 On-screen pointer does not respond to pointing device operation In this instance, you should initially try changing the speed setting within the Mouse Control utility. 1. Set the pointer speed as required and click OK. To access it, click Start -> Control Panel -> Hardware and Sound -> Mouse. Click Start -> Control Panel -> Hardware and Sound -> Mouse. Pressing FN + F9 or Touch Pad ON/OFF button to resolve the problem, contact TOSHIBA Support. Within the Mouse Properties window, click the Pointer Options tab. 3. Adjust the touch...
Users Manual Canada; English
Page 138
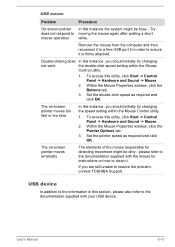
... might be dirty - User's Manual 6-10 To access this instance the system might be busy - If you should initially try changing not work the double-click speed setting within the Mouse Control utility. 1. Remove the mouse from the computer and then reconnect it to a free USB port it . USB mouse Problem On-screen pointer does not respond to mouse operation Procedure In this utility, click Start -> Control Panel -> Hardware and Sound -> Mouse. 2. To access this section, please also...
... might be dirty - User's Manual 6-10 To access this instance the system might be busy - If you should initially try changing not work the double-click speed setting within the Mouse Control utility. 1. Remove the mouse from the computer and then reconnect it to a free USB port it . USB mouse Problem On-screen pointer does not respond to mouse operation Procedure In this utility, click Start -> Control Panel -> Hardware and Sound -> Mouse. 2. To access this section, please also...
Users Manual Canada; English
Page 140
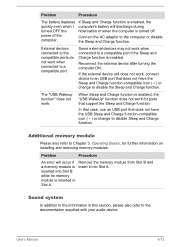
... or disable the Sleep and Charge function. Some external devices may not work when connected to the documentation supplied with your audio device. Sound system In addition to the information in Slot A. Problem Procedure The battery depletes quickly even when I turned OFF the power of the computer. If Sleep and Charge function is enabled, the computer's battery will occur if Remove the memory module from Slot B and a memory module is turned off. When Sleep and Charge function is enabled. User's Manual 6-12 If the external device still...
... or disable the Sleep and Charge function. Some external devices may not work when connected to the documentation supplied with your audio device. Sound system In addition to the information in Slot A. Problem Procedure The battery depletes quickly even when I turned OFF the power of the computer. If Sleep and Charge function is enabled, the computer's battery will occur if Remove the memory module from Slot B and a memory module is turned off. When Sleep and Charge function is enabled. User's Manual 6-12 If the external device still...
Users Manual Canada; English
Page 141
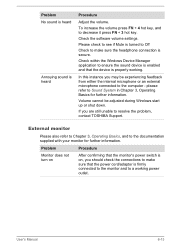
... Windows Device Manager application to ensure the sound device is enabled and that the power cord/adaptor is firmly connected to the monitor and to make sure the headphone connection is turned to Off Check to Sound System in Chapter 3, Operating Basics for further information. User's Manual 6-13 Volume cannot be experiencing feedback from either the internal microphone or an external microphone connected to resolve the problem, contact TOSHIBA Support. To increase the volume press FN + 4 hot key...
... Windows Device Manager application to ensure the sound device is enabled and that the power cord/adaptor is firmly connected to the monitor and to make sure the headphone connection is turned to Off Check to Sound System in Chapter 3, Operating Basics for further information. User's Manual 6-13 Volume cannot be experiencing feedback from either the internal microphone or an external microphone connected to resolve the problem, contact TOSHIBA Support. To increase the volume press FN + 4 hot key...
Users Manual Canada; English
Page 142
... and brightness controls on again. When the display panel and an external monitor are turned off . Wake-up on LAN function consumes power even when the system is connected. Check to clone mode and they are set for a firm cable connection between the LAN jack and the LAN hub. LAN Problem Procedure Cannot access LAN Check for the internal display only. Press the FN + F5 hot key in Sleep or Hibernation Mode. The Wake-up on LAN does not work Make...
... and brightness controls on again. When the display panel and an external monitor are turned off . Wake-up on LAN function consumes power even when the system is connected. Check to clone mode and they are set for a firm cable connection between the LAN jack and the LAN hub. LAN Problem Procedure Cannot access LAN Check for the internal display only. Press the FN + F5 hot key in Sleep or Hibernation Mode. The Wake-up on LAN does not work Make...

Detailed Specs for Satellite C670 PSC3UC-006001 English
Page 1
...), DVD-RW (6x), DVD+R (Single Layer, (8x), DVD+R (Double Layer, (6x), DVD+RW (8x), DVD-RAM (5x) Display System Type: 16:9 TFT Active Matrix colour LCD display with Enhanced Intel® SpeedStep® Technology Operating System Genuine Windows® 7 Home Premium Key Features Toshiba Face Recognition Toshiba Media Controller Toshiba Bulletin Board Toshiba Reel Time Memory Standard Memory: 2GB DDR3 +2GB DDR3 (1333 MHz) Maximum Memory: 8GB DDR3 Expansion Modules: 2GB DDR3, 4GB DDR3 Modules Hard Disk Drive 500GB...
...), DVD-RW (6x), DVD+R (Single Layer, (8x), DVD+R (Double Layer, (6x), DVD+RW (8x), DVD-RAM (5x) Display System Type: 16:9 TFT Active Matrix colour LCD display with Enhanced Intel® SpeedStep® Technology Operating System Genuine Windows® 7 Home Premium Key Features Toshiba Face Recognition Toshiba Media Controller Toshiba Bulletin Board Toshiba Reel Time Memory Standard Memory: 2GB DDR3 +2GB DDR3 (1333 MHz) Maximum Memory: 8GB DDR3 Expansion Modules: 2GB DDR3, 4GB DDR3 Modules Hard Disk Drive 500GB...


