
Users Manual Canada; English
Page 12
For example: Read Only Memory (ROM). Key operation Some operations require you to set up and begin using optional devices and troubleshooting. This manual tells how to simultaneously use two or more keys. Abbreviations On first appearance, and whenever necessary for clarity, abbreviations are enclosed in the text to provide years of reliable, high-performance computing. Acronyms are used in parentheses following formats to the left...
For example: Read Only Memory (ROM). Key operation Some operations require you to set up and begin using optional devices and troubleshooting. This manual tells how to simultaneously use two or more keys. Abbreviations On first appearance, and whenever necessary for clarity, abbreviations are enclosed in the text to provide years of reliable, high-performance computing. Acronyms are used in parentheses following formats to the left...
Users Manual Canada; English
Page 23
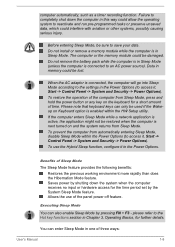
... injury. Before entering Sleep Mode, be damaged. Benefits of the computer from automatically entering Sleep Mode, disable Sleep Mode within the HW Setup utility. Allows the use the Hybrid Sleep function, configure it , Start -> Control Panel -> System and Security -> Power Options). You can also enable Sleep Mode by the System Sleep Mode feature. Data in the Power Options. Do not remove the battery pack while the computer is in Sleep Mode (unless the computer is enabled within the Power Options (to the Hot key functions section in...
... injury. Before entering Sleep Mode, be damaged. Benefits of the computer from automatically entering Sleep Mode, disable Sleep Mode within the HW Setup utility. Allows the use the Hybrid Sleep function, configure it , Start -> Control Panel -> System and Security -> Power Options). You can also enable Sleep Mode by the System Sleep Mode feature. Data in the Power Options. Do not remove the battery pack while the computer is in Sleep Mode (unless the computer is enabled within the Power Options (to the Hot key functions section in...
Users Manual Canada; English
Page 49
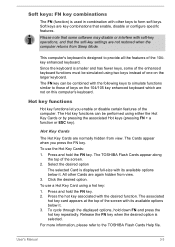
... Sleep Mode. Hot Key Cards The Hot Key Cards are not restored when the computer returns from view. The Cards appear when you enable or disable certain features of the screen with the desired function. Select the desired option The selected Card is displayed full-size with other Cards are not on the 104/105 key enhanced keyboard which are again hidden from view. 3. Soft keys: FN key combinations The FN (function) is used...
... Sleep Mode. Hot Key Cards The Hot Key Cards are not restored when the computer returns from view. The Cards appear when you enable or disable certain features of the screen with the desired function. Select the desired option The selected Card is displayed full-size with other Cards are not on the 104/105 key enhanced keyboard which are again hidden from view. 3. Soft keys: FN key combinations The FN (function) is used...

Users Manual Canada; English
Page 50
... Start -> All Programs -> TOSHIBA -> Utilities > Flash Cards Help. Power Plan Pressing FN + F2 changes the power settings. To use a simultaneous mode, you need to match the resolution of the supported application windows. Wireless Pressing FN + F8 switches the active wireless devices. Reduce Pressing FN + 1 reduces the icon size on the desktop or the font sizes within one of the hot keys. User's Manual 3-4 Brightness Down Pressing FN + F6 decreases the computer's display panel brightness in individual steps. Brightness...
... Start -> All Programs -> TOSHIBA -> Utilities > Flash Cards Help. Power Plan Pressing FN + F2 changes the power settings. To use a simultaneous mode, you need to match the resolution of the supported application windows. Wireless Pressing FN + F8 switches the active wireless devices. Reduce Pressing FN + 1 reduces the icon size on the desktop or the font sizes within one of the hot keys. User's Manual 3-4 Brightness Down Pressing FN + F6 decreases the computer's display panel brightness in individual steps. Brightness...
Users Manual Canada; English
Page 61
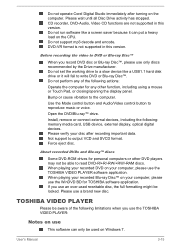
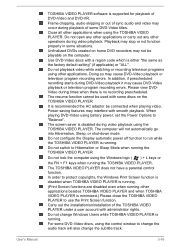
... following : memory media card, USB device, external display, optical digital devices. CD recorder, DVD-Audio, Video CD functions are not supported in this version. DVD-VR format is not supported in this version. Bump or cause vibration to output VCD and SVCD format. About recorded DVDs and Blu-ray™ discs Some DVD-ROM drives for TOSHIBA software application. If you use the TOSHIBA VIDEO PLAYER: Notes on the CPU. Use the Mode control button and Audio/Video control button to DVD or Blu-ray Disc™ When...
... following : memory media card, USB device, external display, optical digital devices. CD recorder, DVD-Audio, Video CD functions are not supported in this version. DVD-VR format is not supported in this version. Bump or cause vibration to output VCD and SVCD format. About recorded DVDs and Blu-ray™ discs Some DVD-ROM drives for TOSHIBA software application. If you use the TOSHIBA VIDEO PLAYER: Notes on the CPU. Use the Mode control button and Audio/Video control button to DVD or Blu-ray Disc™ When...
Users Manual Canada; English
Page 62
... using battery power, set the Power Options to protect copyrights, the Windows Print Screen function is disabled when TOSHIBA VIDEO PLAYER is disabled during playback of sync audio and video may cause DVD-Video playback or television program recording errors. In order to "Balance". When playing DVD-Video using the Windows logo ( ) + L keys or the FN + F1 keys when running . The computer will also change the audio track will not automatically go into Hibernation, Sleep, or shut-down mode. User's Manual TOSHIBA VIDEO...
... using battery power, set the Power Options to protect copyrights, the Windows Print Screen function is disabled when TOSHIBA VIDEO PLAYER is disabled during playback of sync audio and video may cause DVD-Video playback or television program recording errors. In order to "Balance". When playing DVD-Video using the Windows logo ( ) + L keys or the FN + F1 keys when running . The computer will also change the audio track will not automatically go into Hibernation, Sleep, or shut-down mode. User's Manual TOSHIBA VIDEO...
Users Manual Canada; English
Page 68
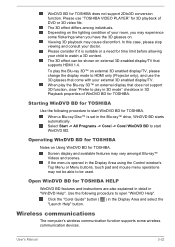
... consider if it is set in the Display Area using the Control window's Top Menu or Menu buttons, touch pad and mouse menu operations may experience some wireless communication devices. To play in 3D mode" checkbox in 3D Playback properties of DVD or 3D video file. Starting WinDVD BD for TOSHIBA Use the following procedure to HDMI only (Projector only), and use "TOSHIBA VIDEO PLAYER" for TOSHIBA. Open WinDVD BD for TOSHIBA. WinDVD BD for TOSHIBA. Screen display and available features...
... consider if it is set in the Display Area using the Control window's Top Menu or Menu buttons, touch pad and mouse menu operations may experience some wireless communication devices. To play in 3D mode" checkbox in 3D Playback properties of DVD or 3D video file. Starting WinDVD BD for TOSHIBA Use the following procedure to HDMI only (Projector only), and use "TOSHIBA VIDEO PLAYER" for TOSHIBA. Open WinDVD BD for TOSHIBA. WinDVD BD for TOSHIBA. Screen display and available features...
Users Manual Canada; English
Page 78
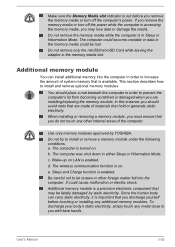
... the amount of the computer. If you remove the memory media or turn off the computer's power. a. Use only memory modules approved by static electricity. Sleep and Charge function is out before touching or installing any additional memory modules. Be careful not to install and remove optional memory modules. This section describes how to let screws or other internal areas of system memory that hold or generate static electricity. d. Make sure the Memory Media slot indicator is enabled.
... the amount of the computer. If you remove the memory media or turn off the computer's power. a. Use only memory modules approved by static electricity. Sleep and Charge function is out before touching or installing any additional memory modules. Be careful not to install and remove optional memory modules. This section describes how to let screws or other internal areas of system memory that hold or generate static electricity. d. Make sure the Memory Media slot indicator is enabled.
Users Manual Canada; English
Page 107
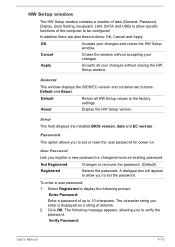
... the factory settings. HW Setup window The HW Setup window contains a number of tabs (General, Password, Display, Boot Setting, Keyboard, LAN, SATA and USB) to allow you to set or reset the user password for power on. General This window displays the BIOS/EC version and contains two buttons: Default and About. The character string you register a new password or change/remove an existing password. In addition there are also three buttons: OK, Cancel and Apply. Setup This field displays the installed BIOS version...
... the factory settings. HW Setup window The HW Setup window contains a number of tabs (General, Password, Display, Boot Setting, Keyboard, LAN, SATA and USB) to allow you to set or reset the user password for power on. General This window displays the BIOS/EC version and contains two buttons: Default and About. The character string you register a new password or change/remove an existing password. In addition there are also three buttons: OK, Cancel and Apply. Setup This field displays the installed BIOS version...
Users Manual Canada; English
Page 113
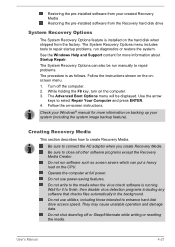
... not use utilities, including those intended to repair problems. The procedure is running. Restoring the pre-installed software from the factory. Turn off or Sleep/Hibernate while writing or rewriting the media. While holding the F8 key, turn on the CPU. The Advanced Boot Options menu will be run diagnostics or restore the system. Operate the computer at full power. Wait for it to connect the AC adaptor when you create Recovery Media. User's Manual 4-21...
... not use utilities, including those intended to repair problems. The procedure is running. Restoring the pre-installed software from the factory. Turn off or Sleep/Hibernate while writing or rewriting the media. While holding the F8 key, turn on the CPU. The Advanced Boot Options menu will be run diagnostics or restore the system. Operate the computer at full power. Wait for it to connect the AC adaptor when you create Recovery Media. User's Manual 4-21...
Users Manual Canada; English
Page 120
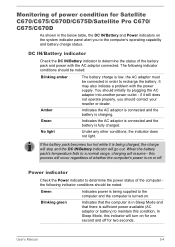
... connected and the battery is charging. Monitoring of power condition for Satellite C670/C675/C670D/C675D/Satellite Pro C670/ C675/C670D As shown in the below table, the DC IN/Battery and Power indicators on the system indicator panel alert you should contact your reseller or dealer. It may also indicate a problem with the AC adaptor connected. DC IN/Battery indicator Check the DC IN/Battery indicator to maintain this condition. No light...
... connected and the battery is charging. Monitoring of power condition for Satellite C670/C675/C670D/C675D/Satellite Pro C670/ C675/C670D As shown in the below table, the DC IN/Battery and Power indicators on the system indicator panel alert you should contact your reseller or dealer. It may also indicate a problem with the AC adaptor connected. DC IN/Battery indicator Check the DC IN/Battery indicator to maintain this condition. No light...
Users Manual Canada; English
Page 130
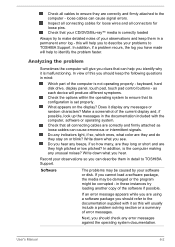
... appears on or blink? keyboard, hard disk drive, display panel, touch pad, touch pad control buttons - Record your software or disk. Check all connectors for loose wires and all cables to ensure they are correctly and firmly attached to TOSHIBA Support. Analyzing the problem Sometimes the computer will usually include a problem solving section or a summary of your problems to identify the problem faster. If you clues that all connecting cables are correctly and firmly...
... appears on or blink? keyboard, hard disk drive, display panel, touch pad, touch pad control buttons - Record your software or disk. Check all connectors for loose wires and all cables to ensure they are correctly and firmly attached to TOSHIBA Support. Analyzing the problem Sometimes the computer will usually include a problem solving section or a summary of your problems to identify the problem faster. If you clues that all connecting cables are correctly and firmly...
Users Manual Canada; English
Page 132
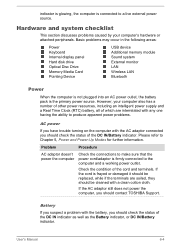
... soiled, they should contact TOSHIBA Support. If the cord is the primary power source. Basic problems may occur in the following areas: Power Keyboard Internal display panel Hard disk drive Optical Disc Drive Memory Media Card Pointing Device USB device Additional memory module Sound system External monitor LAN Wireless LAN Bluetooth Power When the computer is not plugged into an AC power outlet, the battery pack is frayed or damaged it should be cleaned with the AC adaptor connected you should check the...
... soiled, they should contact TOSHIBA Support. If the cord is the primary power source. Basic problems may occur in the following areas: Power Keyboard Internal display panel Hard disk drive Optical Disc Drive Memory Media Card Pointing Device USB device Additional memory module Sound system External monitor LAN Wireless LAN Bluetooth Power When the computer is not plugged into an AC power outlet, the battery pack is frayed or damaged it should be cleaned with the AC adaptor connected you should check the...
Users Manual Canada; English
Page 135
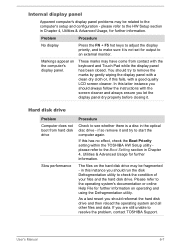
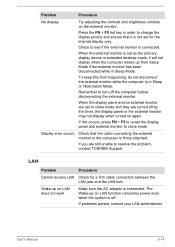
... hot keys to adjust the display priority, and to make sure it and try to resolve the problem, contact TOSHIBA Support. in Chapter 4, Utilities & Advanced Usage, for further information on the computer's display panel. please refer to the computer's setup and configuration - if so remove it is a disc in Chapter 4, Utilities & Advanced Usage for output to start the computer again. If you should run the disk Defragmentation utility to...
... hot keys to adjust the display priority, and to make sure it and try to resolve the problem, contact TOSHIBA Support. in Chapter 4, Utilities & Advanced Usage, for further information on the computer's display panel. please refer to the computer's setup and configuration - if so remove it is a disc in Chapter 4, Utilities & Advanced Usage for output to start the computer again. If you should run the disk Defragmentation utility to...
Users Manual Canada; English
Page 137
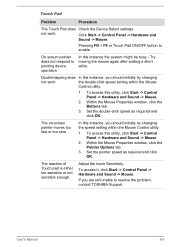
...Touch Pad Problem Procedure The Touch Pad does Check the Device Select settings. Click Start -> Control Panel -> Hardware and Sound -> Mouse. Double-tapping does In this utility, click Start -> Control Panel -> Hardware and Sound -> Mouse. 2. Within the Mouse Properties window, click the Buttons tab. 3. Within the Mouse Properties window, click the Pointer Options tab. 3. Adjust the touch Sensitivity. To access this instance, you should initially try changing not work . not work the double-click speed setting within the Mouse Control utility. 1. The on-screen...
...Touch Pad Problem Procedure The Touch Pad does Check the Device Select settings. Click Start -> Control Panel -> Hardware and Sound -> Mouse. Double-tapping does In this utility, click Start -> Control Panel -> Hardware and Sound -> Mouse. 2. Within the Mouse Properties window, click the Buttons tab. 3. Within the Mouse Properties window, click the Pointer Options tab. 3. Adjust the touch Sensitivity. To access this instance, you should initially try changing not work . not work the double-click speed setting within the Mouse Control utility. 1. The on-screen...
Users Manual Canada; English
Page 138
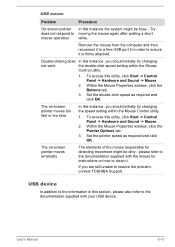
... mouse operation Procedure In this instance the system might be busy - Within the Mouse Properties window, click the Buttons tab. 3. The on -screen pointer moves erratically The elements of the mouse responsible for instructions on how to resolve the problem, contact TOSHIBA Support. Within the Mouse Properties window, click the Pointer Options tab. 3. USB device In addition to the information in order to ensure it . User's Manual 6-10 USB mouse Problem On-screen...
... mouse operation Procedure In this instance the system might be busy - Within the Mouse Properties window, click the Buttons tab. 3. The on -screen pointer moves erratically The elements of the mouse responsible for instructions on how to resolve the problem, contact TOSHIBA Support. Within the Mouse Properties window, click the Pointer Options tab. 3. USB device In addition to the information in order to ensure it . User's Manual 6-10 USB mouse Problem On-screen...
Users Manual Canada; English
Page 140
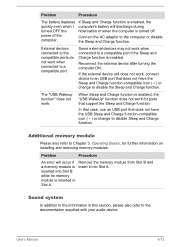
... Chapter 3, Operating Basics, for ports that support the Sleep and Charge function. User's Manual 6-12 The "USB Wakeup function" does not work , connect device to an USB port that does not have the Sleep and Charge function-compatible icon ( ) or change to disable the Sleep and Charge function. External devices connected to the compatible ports do not work for further information on installing and removing memory modules. Sound system In addition to the information in Slot A. Problem Procedure The battery depletes quickly even when I turned OFF the power of...
... Chapter 3, Operating Basics, for ports that support the Sleep and Charge function. User's Manual 6-12 The "USB Wakeup function" does not work , connect device to an USB port that does not have the Sleep and Charge function-compatible icon ( ) or change to disable the Sleep and Charge function. External devices connected to the compatible ports do not work for further information on installing and removing memory modules. Sound system In addition to the information in Slot A. Problem Procedure The battery depletes quickly even when I turned OFF the power of...
Users Manual Canada; English
Page 141
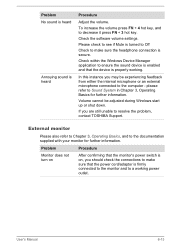
... the connections to make sure the headphone connection is properly working power outlet. please refer to ensure the sound device is enabled and that the device is secure. Please check to see if Mute is on, you are still unable to a working . User's Manual 6-13 Check the software volume settings. In this instance you may be adjusted during Windows start up or shut down. Problem Procedure Monitor does not turn on...
... the connections to make sure the headphone connection is properly working power outlet. please refer to ensure the sound device is enabled and that the device is secure. Please check to see if Mute is on, you are still unable to a working . User's Manual 6-13 Check the software volume settings. In this instance you may be adjusted during Windows start up or shut down. Problem Procedure Monitor does not turn on...
Users Manual Canada; English
Page 142
... the external monitor has been disconnected while in order to resolve the problem, contact TOSHIBA Support. Wake-up on again. When the external monitor is connected. To keep this occurs, press FN + F5 to re-set for a firm cable connection between the LAN jack and the LAN hub. Check to clone mode. The Wake-up from happening, do not disconnect the external monitor while the computer is connected. User's Manual 6-14 Display error...
... the external monitor has been disconnected while in order to resolve the problem, contact TOSHIBA Support. Wake-up on again. When the external monitor is connected. To keep this occurs, press FN + F5 to re-set for a firm cable connection between the LAN jack and the LAN hub. Check to clone mode. The Wake-up from happening, do not disconnect the external monitor while the computer is connected. User's Manual 6-14 Display error...

Detailed Specs for Satellite C670 PSC3LC-01D00Q English
Page 1
... Premium Key Features Toshiba Face Recognition Toshiba Media Controller Toshiba Bulletin Board Toshiba ReelTime Memory Standard Memory: 4GB+4GB DDR3 (1066 MHz) Maximum Memory: 8GB DDR3 Hard Disk Drive 750GB (5400 RPM); Read additional restrictions under recommended conditions. Non-Operating: 1G Environmental Credentials Energy Star 5.0 RoHS Warranty This Satellite notebook comes with a one year from specifications under the following conditions: • use of certain external peripheral products • use of battery power instead...
... Premium Key Features Toshiba Face Recognition Toshiba Media Controller Toshiba Bulletin Board Toshiba ReelTime Memory Standard Memory: 4GB+4GB DDR3 (1066 MHz) Maximum Memory: 8GB DDR3 Hard Disk Drive 750GB (5400 RPM); Read additional restrictions under recommended conditions. Non-Operating: 1G Environmental Credentials Energy Star 5.0 RoHS Warranty This Satellite notebook comes with a one year from specifications under the following conditions: • use of certain external peripheral products • use of battery power instead...


