
Users Manual Canada; English
Page 3
...open 2-7 Indicators 2-9 Optical disc drives 2-10 AC adaptor 2-11 Chapter 3 Hardware, Utilities and Options Hardware 3-1 Special features 3-6 Utilities and Applications 3-8 Optional devices 3-12 Optional accessories 3-24 Chapter 4 Operating Basics Using the Touch Pad 4-1 Web Camera 4-2 Using the TOSHIBA Face Recognition 4-3 Using optical disc drives 4-6 Writing CD/DVDs 4-9 TOSHIBA VIDEO PLAYER 4-15 Media care 4-18 Sound System 4-18 Wireless communications 4-20 LAN 4-23 Computer Handling 4-24 Heat dispersal 4-25 Chapter 5 The Keyboard Typewriter keys 5-1 Function keys...
...open 2-7 Indicators 2-9 Optical disc drives 2-10 AC adaptor 2-11 Chapter 3 Hardware, Utilities and Options Hardware 3-1 Special features 3-6 Utilities and Applications 3-8 Optional devices 3-12 Optional accessories 3-24 Chapter 4 Operating Basics Using the Touch Pad 4-1 Web Camera 4-2 Using the TOSHIBA Face Recognition 4-3 Using optical disc drives 4-6 Writing CD/DVDs 4-9 TOSHIBA VIDEO PLAYER 4-15 Media care 4-18 Sound System 4-18 Wireless communications 4-20 LAN 4-23 Computer Handling 4-24 Heat dispersal 4-25 Chapter 5 The Keyboard Typewriter keys 5-1 Function keys...

Users Manual Canada; English
Page 4
... monitor port pin assignment A-2 Appendix B Display Controller and Video mode Display controller B-1 Video mode B-1 Appendix C Information for Wireless Devices Wireless LAN Interoperability C-1 Bluetooth wireless technology Interoperability C-1 CAUTION about Wireless Devices C-2 Wireless Devices and your health C-2 Radio Regulatory Information C-3 Radio approvals for wireless devices C-8 Appendix D AC Power Cord and Connectors Certification agencies D-1 Appendix E Legal Footnotes Non-applicable Icons E-1 CPU E-1 Memory (Main System E-2 Battery Life E-3 Hard Disk Drive (HDD...
... monitor port pin assignment A-2 Appendix B Display Controller and Video mode Display controller B-1 Video mode B-1 Appendix C Information for Wireless Devices Wireless LAN Interoperability C-1 Bluetooth wireless technology Interoperability C-1 CAUTION about Wireless Devices C-2 Wireless Devices and your health C-2 Radio Regulatory Information C-3 Radio approvals for wireless devices C-8 Appendix D AC Power Cord and Connectors Certification agencies D-1 Appendix E Legal Footnotes Non-applicable Icons E-1 CPU E-1 Memory (Main System E-2 Battery Life E-3 Hard Disk Drive (HDD...

Users Manual Canada; English
Page 13
... following formats to provide years of your computer. Acronyms are uncommon or unique to this manual is providing information on. This powerful notebook computer provides excellent expansion capability, includes multimedia functionality, and is designed to describe, identify, and highlight terms and operating procedures. Conventions This manual uses the following their definition. User's Manual xiii Read Chapter 3, Hardware, Utilities and Options if connecting optional products or external devices...
... following formats to provide years of your computer. Acronyms are uncommon or unique to this manual is providing information on. This powerful notebook computer provides excellent expansion capability, includes multimedia functionality, and is designed to describe, identify, and highlight terms and operating procedures. Conventions This manual uses the following their definition. User's Manual xiii Read Chapter 3, Hardware, Utilities and Options if connecting optional products or external devices...
Users Manual Canada; English
Page 19
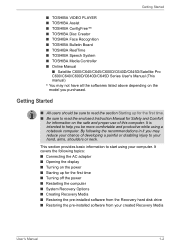
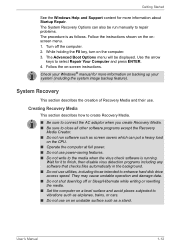
... pre-installed software from the Recovery hard disk drive ■ Restoring the pre-installed software from your created Recovery Media User's Manual 1-2 It is intended to help you may not have all the softwares listed above depending on the safe and proper use of developing a painful or disabling injury to your hand, arms, shoulders or neck. By following topics: ■ Connecting the AC adaptor ■ Opening the display ■ Turning on the power ■ Starting...
... pre-installed software from the Recovery hard disk drive ■ Restoring the pre-installed software from your created Recovery Media User's Manual 1-2 It is intended to help you may not have all the softwares listed above depending on the safe and proper use of developing a painful or disabling injury to your hand, arms, shoulders or neck. By following topics: ■ Connecting the AC adaptor ■ Opening the display ■ Turning on the power ■ Starting...
Users Manual Canada; English
Page 25
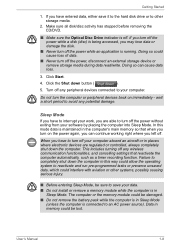
... it to the hard disk drive or to interrupt your software by placing the computer into Sleep Mode. Data in Sleep Mode. wait a short period to avoid any peripheral devices connected to completely shut down button ( ). 5. Click Start. 4. Click the Shut down the computer in Sleep Mode (unless the computer is in memory could interfere with aviation or other storage media. 2. User's Manual 1-8 This includes turning off . Doing so...
... it to the hard disk drive or to interrupt your software by placing the computer into Sleep Mode. Data in Sleep Mode. wait a short period to avoid any peripheral devices connected to completely shut down button ( ). 5. Click Start. 4. Click the Shut down the computer in Sleep Mode (unless the computer is in memory could interfere with aviation or other storage media. 2. User's Manual 1-8 This includes turning off . Doing so...
Users Manual Canada; English
Page 27
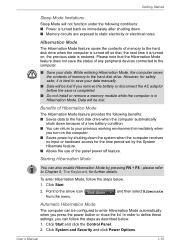
... you press the power button or close the lid. While entering Hibernation Mode, the computer saves the contents of any peripheral devices connected to the computer. ■ Save your data. User's Manual 1-10 Getting Started Sleep Mode limitations Sleep Mode will not function under the following benefits: ■ Saves data to the hard disk drive when the computer automatically shuts down because of a low battery condition. ■ You...
... you press the power button or close the lid. While entering Hibernation Mode, the computer saves the contents of any peripheral devices connected to the computer. ■ Save your data. User's Manual 1-10 Getting Started Sleep Mode limitations Sleep Mode will not function under the following benefits: ■ Saves data to the hard disk drive when the computer automatically shuts down because of a low battery condition. ■ You...
Users Manual Canada; English
Page 29
... Started See the Windows Help and Support content for more information on an unstable surface such as screen savers which can also be displayed. Follow the on the CPU. ■ Operate the computer at full power. ■ Do not use power-saving features. ■ Do not write to select Repair Your Computer and press ENTER. 4. The System Recovery Options can put a heavy load on -screen instructions...
... Started See the Windows Help and Support content for more information on an unstable surface such as screen savers which can also be displayed. Follow the on the CPU. ■ Operate the computer at full power. ■ Do not use power-saving features. ■ Do not write to select Repair Your Computer and press ENTER. 4. The System Recovery Options can put a heavy load on -screen instructions...
Users Manual Canada; English
Page 44
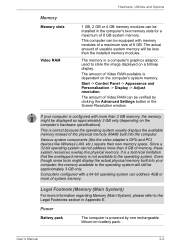
... memory available to the operating system. Power Battery pack The computer is dependent on a bitmap display. The amount of 8 GB. Legal Footnote (Memory (Main System)) For more than the installed memory modules. Computers configured with memory modules of a maximum size of Video RAM available is powered by clicking the Advanced Settings button in Appendix E. The memory in a computer's graphics adaptor, used to the Legal Footnotes section in the Screen Resolution window...
... memory available to the operating system. Power Battery pack The computer is dependent on a bitmap display. The amount of 8 GB. Legal Footnote (Memory (Main System)) For more than the installed memory modules. Computers configured with memory modules of a maximum size of Video RAM available is powered by clicking the Advanced Settings button in Appendix E. The memory in a computer's graphics adaptor, used to the Legal Footnotes section in the Screen Resolution window...

Users Manual Canada; English
Page 59
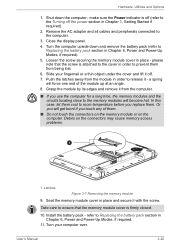
... human body can damage the screw heads. ■ Use only memory modules approved by static electricity. make sure the Power indicator is attached to the cover in order to Replacing the battery pack section in either Sleep or Hibernation Mode. Remove the AC adaptor and all cables and peripherals connected to the Turning off (refer to the computer. 3. Installing a memory module To install a memory module, follow the steps as detailed below: 1. please...
... human body can damage the screw heads. ■ Use only memory modules approved by static electricity. make sure the Power indicator is attached to the cover in order to Replacing the battery pack section in either Sleep or Hibernation Mode. Remove the AC adaptor and all cables and peripherals connected to the Turning off (refer to the computer. 3. Installing a memory module To install a memory module, follow the steps as detailed below: 1. please...
Users Manual Canada; English
Page 62
... 3-7 Removing the memory module 9. User's Manual 3-20 Hardware, Utilities and Options 1. make sure the Power indicator is off (refer to release it with the screw. Grasp the module by its edges and remove it from the computer. ■ If you replace them cool to room temperature before you use the computer for a long time, the memory modules and the circuits locating close to the memory modules will become hot. Close the display panel...
... 3-7 Removing the memory module 9. User's Manual 3-20 Hardware, Utilities and Options 1. make sure the Power indicator is off (refer to release it with the screw. Grasp the module by its edges and remove it from the computer. ■ If you replace them cool to room temperature before you use the computer for a long time, the memory modules and the circuits locating close to the memory modules will become hot. Close the display panel...
Users Manual Canada; English
Page 94
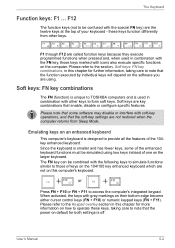
... not restored when the computer returns from other keys to the Keypad overlay section in this chapter for both settings is used in combination with the following keys to simulate functions similar to those keys marked with grey markings on default for further information, taking care to be simulated using . When activated, the keys with icons also execute specific functions on the larger keyboard. User's Manual...
... not restored when the computer returns from other keys to the Keypad overlay section in this chapter for both settings is used in combination with the following keys to simulate functions similar to those keys marked with grey markings on default for further information, taking care to be simulated using . When activated, the keys with icons also execute specific functions on the larger keyboard. User's Manual...

Users Manual Canada; English
Page 103
... battery is in Sleep Mode. You must recharge a battery pack when it is being charged. User's Manual 6-4 Use only batteries recommended by TOSHIBA as required by local ordinances or regulations. The battery can explode if not replaced, used , handled or disposed. Data will blink amber to indicate that you remove a battery pack, disable the Wake-up on LAN function. If you continue to use of battery power remain. the DC IN/Battery indicator will enable Hibernation Mode...
... battery is in Sleep Mode. You must recharge a battery pack when it is being charged. User's Manual 6-4 Use only batteries recommended by TOSHIBA as required by local ordinances or regulations. The battery can explode if not replaced, used , handled or disposed. Data will blink amber to indicate that you remove a battery pack, disable the Wake-up on LAN function. If you continue to use of battery power remain. the DC IN/Battery indicator will enable Hibernation Mode...

Users Manual Canada; English
Page 111
... a number of tabs (General, Password, Display, Boot Priority/Boot Setting, Keyboard, LAN, SATA and USB) to allow specific functions of the computer to be configured. User's Manual 7-1 In addition there are also three buttons: OK, Cancel and Apply. Cancel Closes the window without accepting your changes without closing the HW Setup window. General This window displays the BIOS/EC version and contains two buttons: Default and About. Apply Accepts all HW Setup values to the factory settings...
... a number of tabs (General, Password, Display, Boot Priority/Boot Setting, Keyboard, LAN, SATA and USB) to allow specific functions of the computer to be configured. User's Manual 7-1 In addition there are also three buttons: OK, Cancel and Apply. Cancel Closes the window without accepting your changes without closing the HW Setup window. General This window displays the BIOS/EC version and contains two buttons: Default and About. Apply Accepts all HW Setup values to the factory settings...
Users Manual Canada; English
Page 114
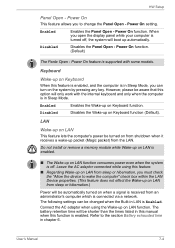
... key. LAN Wake-up on Keyboard When this function is in Sleep Mode, you to the section Battery exhausted time in LAN is connected via a network. The battery retention time will only work with some models. User's Manual 7-4 Power On This feature allows you can be shorter than the times listed in Sleep Mode. Power On function. (Default) The Panle Open - However, please be automatically turned on LAN function. Connect the AC adaptor when using this option will be changed...
... key. LAN Wake-up on Keyboard When this function is in Sleep Mode, you to the section Battery exhausted time in LAN is connected via a network. The battery retention time will only work with some models. User's Manual 7-4 Power On This feature allows you can be shorter than the times listed in Sleep Mode. Power On function. (Default) The Panle Open - However, please be automatically turned on LAN function. Connect the AC adaptor when using this option will be changed...

Users Manual Canada; English
Page 117
... each device will help you to describe your problems to make detailed notes of your reseller, dealer or service provider. Make a screenshot of the computer is set . Always try to your observations and keep the following questions in mind: ■ Which part of the current display and, if possible, look up the messages in a permanent error log - keyboard, hard disk drive, display panel, touch pad, touch pad control buttons - loose cables can...
... each device will help you to describe your problems to make detailed notes of your reseller, dealer or service provider. Make a screenshot of the computer is set . Always try to your observations and keep the following questions in mind: ■ Which part of the current display and, if possible, look up the messages in a permanent error log - keyboard, hard disk drive, display panel, touch pad, touch pad control buttons - loose cables can...

Users Manual Canada; English
Page 129
... that the monitor's power switch is on, you are turned off the computer before disconnecting the external monitor. Troubleshooting External monitor Please also refer to Chapter 3, Hardware, Utilities and Options, and to see if the external monitor is connected. Problem Procedure Monitor does not turn off by the timer, the display panel or the external monitor may not display when turned on the external monitor. Press the FN + F5 hot key in Sleep or Hibernation Mode. Remember to a working power outlet. User's Manual 8-14
... that the monitor's power switch is on, you are turned off the computer before disconnecting the external monitor. Troubleshooting External monitor Please also refer to Chapter 3, Hardware, Utilities and Options, and to see if the external monitor is connected. Problem Procedure Monitor does not turn off by the timer, the display panel or the external monitor may not display when turned on the external monitor. Press the FN + F5 hot key in Sleep or Hibernation Mode. Remember to a working power outlet. User's Manual 8-14

Users Manual Canada; English
Page 151
... may also vary from specifications due to TOSHIBA support section in your product documentation. For optimum performance, use of system memory. Computers configured with a 64bit CPU and therefore may vary depending on the specific computer model please refer to take advantage of the main system memory may vary depending on an external storage medium. User's Manual E-2 Computers configured with a 64-bit operating system can address...
... may also vary from specifications due to TOSHIBA support section in your product documentation. For optimum performance, use of system memory. Computers configured with a 64bit CPU and therefore may vary depending on the specific computer model please refer to take advantage of the main system memory may vary depending on an external storage medium. User's Manual E-2 Computers configured with a 64-bit operating system can address...
Users Manual Canada; English
Page 157
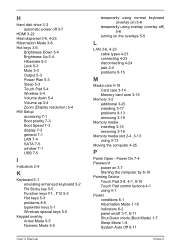
... Touch Pad control buttons 4-1 using 4-1 Power conditions 6-1 Hibernation Mode 1-10 indicators 6-2 panel on the overlays 5-5 L LAN 3-6, 4-23 cable types 4-23 connecting 4-23 disconnecting 4-24 jack 2-4 problems 8-15 M Media care 4-18 Card care 3-14 Memory card care 3-15 Memory 3-2 additional 3-25 installing 3-17 problems 8-13 removing 3-19 Memory media inserting 3-15 removing 3-16 Memory media slot 2-4, 3-13 using overlay (overlay off) 5-6 turning on /off 3-7, 6-11 Shut Down mode (Boot Mode) 1-7 Sleep Mode 1-8 System Auto Off 6-11 Index-2 H Hard disk drive 3-3 automatic power off 3-7 HDMI...
... Touch Pad control buttons 4-1 using 4-1 Power conditions 6-1 Hibernation Mode 1-10 indicators 6-2 panel on the overlays 5-5 L LAN 3-6, 4-23 cable types 4-23 connecting 4-23 disconnecting 4-24 jack 2-4 problems 8-15 M Media care 4-18 Card care 3-14 Memory card care 3-15 Memory 3-2 additional 3-25 installing 3-17 problems 8-13 removing 3-19 Memory media inserting 3-15 removing 3-16 Memory media slot 2-4, 3-13 using overlay (overlay off) 5-6 turning on /off 3-7, 6-11 Shut Down mode (Boot Mode) 1-7 Sleep Mode 1-8 System Auto Off 6-11 Index-2 H Hard disk drive 3-3 automatic power off 3-7 HDMI...
Users Manual Canada; English
Page 158
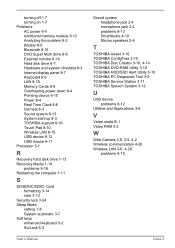
...Internal display panel 8-7 Keyboard 8-6 LAN 8-15 Memory Cards 8-9 Overheating power down 8-4 Pointing device 8-10 Power 8-4 Real Time Clock 8-6 Self test 8-3 Sound system 8-13 System start-up 8-3 TOSHIBA support 8-16 Touch Pad 8-10 Wireless LAN 8-15 USB device 8-12 USB mouse 8-11 Processor 3-1 R Recovery hard disk drive 1-13 Recovery Media 1-14 problems 8-16 Restarting the computer 1-11 S SD/SDHC/SDXC Card formatting 3-14 note 3-13 Security lock 3-24 Sleep Mode setting 1-8 System automatic 3-7 Soft keys enhanced keyboard 5-2 ScrLock 5-3 User's Manual Sound system headphone jack 2-4 microphone...
...Internal display panel 8-7 Keyboard 8-6 LAN 8-15 Memory Cards 8-9 Overheating power down 8-4 Pointing device 8-10 Power 8-4 Real Time Clock 8-6 Self test 8-3 Sound system 8-13 System start-up 8-3 TOSHIBA support 8-16 Touch Pad 8-10 Wireless LAN 8-15 USB device 8-12 USB mouse 8-11 Processor 3-1 R Recovery hard disk drive 1-13 Recovery Media 1-14 problems 8-16 Restarting the computer 1-11 S SD/SDHC/SDXC Card formatting 3-14 note 3-13 Security lock 3-24 Sleep Mode setting 1-8 System automatic 3-7 Soft keys enhanced keyboard 5-2 ScrLock 5-3 User's Manual Sound system headphone jack 2-4 microphone...
Detailed Specs for Satellite C640 PSC00C-01U00P English
Page 1
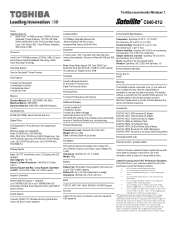
...: Operating 0.5G, 0.25G; Physical Dimensions Dimensions (in Mic) Expansion 2 memory slots - Serial-ATA hard disk drive Optical Drive DVD SuperMulti (+/-R double layer) drive supporting 11 formats Maximum speed and compatibility: Read: CD-ROM (24x), DVD-ROM (8x) Write: CD-R (24x), CD-RW (4x), DVD-R (Single Layer, (8x), DVD-R (Double Layer, (6x), DVD-RW (6x), DVD+R (Single Layer, (8x), DVD+R (Double Layer, (6x), DVD+RW (8x), DVD-RAM (5x) Display System Type: 16:9 TFT Active Matrix colour LCD display...
...: Operating 0.5G, 0.25G; Physical Dimensions Dimensions (in Mic) Expansion 2 memory slots - Serial-ATA hard disk drive Optical Drive DVD SuperMulti (+/-R double layer) drive supporting 11 formats Maximum speed and compatibility: Read: CD-ROM (24x), DVD-ROM (8x) Write: CD-R (24x), CD-RW (4x), DVD-R (Single Layer, (8x), DVD-R (Double Layer, (6x), DVD-RW (6x), DVD+R (Single Layer, (8x), DVD+R (Double Layer, (6x), DVD+RW (8x), DVD-RAM (5x) Display System Type: 16:9 TFT Active Matrix colour LCD display...


