User Guide
Page 29
... for the first time 52 Opening the display panel 52 Your computer's features and specifications ....53 Turning on the power 53 Adding memory 54 Installing a memory module 55 Removing a memory module 60 Using the TouchPad 62 Scrolling with the TouchPad 62 Control buttons 63 Disabling or enabling the TouchPad 63 Turning off the...
... for the first time 52 Opening the display panel 52 Your computer's features and specifications ....53 Turning on the power 53 Adding memory 54 Installing a memory module 55 Removing a memory module 60 Using the TouchPad 62 Scrolling with the TouchPad 62 Control buttons 63 Disabling or enabling the TouchPad 63 Turning off the...

User Guide
Page 33
... help you 170 Resolving a hardware conflict 171 A plan of action 171 Resolving hardware conflicts on your own .....172 Fixing a problem with Device Manager ...........173 Memory problems 175 Power and the batteries 176 Keyboard problems 178 Display problems 179 Disk drive problems 181 DVD-ROM or multi-function drive problems...184... 194 Develop good computing habits 197 Data and system configuration backup in Windows XP 198 If you need further assistance 204 Before you contact Toshiba 204 Contacting Toshiba 205 Other Toshiba Internet Web sites 206 Toshiba's worldwide offices 206
... help you 170 Resolving a hardware conflict 171 A plan of action 171 Resolving hardware conflicts on your own .....172 Fixing a problem with Device Manager ...........173 Memory problems 175 Power and the batteries 176 Keyboard problems 178 Display problems 179 Disk drive problems 181 DVD-ROM or multi-function drive problems...184... 194 Develop good computing habits 197 Data and system configuration backup in Windows XP 198 If you need further assistance 204 Before you contact Toshiba 204 Contacting Toshiba 205 Other Toshiba Internet Web sites 206 Toshiba's worldwide offices 206
User Guide
Page 44
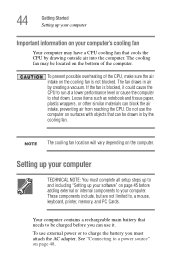
... that cools the CPU by the cooling fan. NOTE The cooling fan location will vary depending on the computer. See "Connecting to , a mouse, keyboard, printer, memory, and PC Cards. Loose items such as notebook and tissue paper, plastic wrappers, or other similar materials can be drawn in air by creating a vacuum...
... that cools the CPU by the cooling fan. NOTE The cooling fan location will vary depending on the computer. See "Connecting to , a mouse, keyboard, printer, memory, and PC Cards. Loose items such as notebook and tissue paper, plastic wrappers, or other similar materials can be drawn in air by creating a vacuum...
User Guide
Page 47
After starting your computer for the first time you may want to: ❖ Add more memory (see "Adding memory" on page 54) ❖ Connect a mouse (see "Using a mouse" on page 68) ❖ Connect a full-size keyboard (see "Using an external keyboard" on page 67) &#... Cards (see "Inserting and removing PC Cards" on page 45. Getting Started Adding external devices 47 Adding external devices NOTE Before adding external devices or memory, Toshiba recommends setting up your software. See "Setting up your software" on page 136)
After starting your computer for the first time you may want to: ❖ Add more memory (see "Adding memory" on page 54) ❖ Connect a mouse (see "Using a mouse" on page 68) ❖ Connect a full-size keyboard (see "Using an external keyboard" on page 67) &#... Cards (see "Inserting and removing PC Cards" on page 45. Getting Started Adding external devices 47 Adding external devices NOTE Before adding external devices or memory, Toshiba recommends setting up your software. See "Setting up your software" on page 136)

User Guide
Page 54
...run most of data. 54 Getting Started Adding memory Sample turning on memory options, check the accessories information that came with your system or visit accessories.toshiba.com. Adding memory HINT: To purchase additional memory modules, see the accessories information packaged with your... computer, or visit accessories.toshiba.com. For more information on the power The preinstalled ...
...run most of data. 54 Getting Started Adding memory Sample turning on memory options, check the accessories information that came with your system or visit accessories.toshiba.com. Adding memory HINT: To purchase additional memory modules, see the accessories information packaged with your... computer, or visit accessories.toshiba.com. For more information on the power The preinstalled ...

User Guide
Page 55
...damage the computer, the module, or both. The computer has two memory module slots - Installing a memory module with the computer's power on the base of the computer. If you install or remove a memory module, turn off the computer using the Start menu. otherwise, skip...page 45. The Turn off computer. NOTE Before adding external devices or memory, Toshiba recommends setting up your software. Getting Started Adding memory 55 Installing a memory module Additional memory modules can install one or two memory modules. See "Setting up your software" on , click Start, Turn...
...damage the computer, the module, or both. The computer has two memory module slots - Installing a memory module with the computer's power on the base of the computer. If you install or remove a memory module, turn off the computer using the Start menu. otherwise, skip...page 45. The Turn off computer. NOTE Before adding external devices or memory, Toshiba recommends setting up your software. Getting Started Adding memory 55 Installing a memory module Additional memory modules can install one or two memory modules. See "Setting up your software" on , click Start, Turn...

User Guide
Page 56
... upside down to the computer, including the AC adapter. 4 Remove the battery. Memory module slot cover Sample locating the memory module slot cover 6 Using a standard Phillips No. 1 screwdriver, unscrew the screw that secures the memory module slot cover. Unscrewing the memory module slot cover The operating system turns off the computer. 3 Unplug and remove...
... upside down to the computer, including the AC adapter. 4 Remove the battery. Memory module slot cover Sample locating the memory module slot cover 6 Using a standard Phillips No. 1 screwdriver, unscrew the screw that secures the memory module slot cover. Unscrewing the memory module slot cover The operating system turns off the computer. 3 Unplug and remove...

User Guide
Page 57
...up. Grease or dust on the computer. Sample inserting the memory module into the slot Before you handle the module, touch a grounded metal surface to touch its antistatic packaging. Getting Started Adding memory 57 7 Remove the memory slot cover. 8 Place the screw and the cover in ...a safe place so that you may cause memory access problems. 10 Insert the memory module into the computer. 9 Remove the new memory module from its pin connector on...
...up. Grease or dust on the computer. Sample inserting the memory module into the slot Before you handle the module, touch a grounded metal surface to touch its antistatic packaging. Getting Started Adding memory 57 7 Remove the memory slot cover. 8 Place the screw and the cover in ...a safe place so that you may cause memory access problems. 10 Insert the memory module into the computer. 9 Remove the new memory module from its pin connector on...

User Guide
Page 58
58 Getting Started Adding memory 11 Hold the memory module by its edges so that the module is inserted completely into the socket and lined up squarely with the socket clips. Sample aligning the module into the socket 12 Check that the gold connector bar faces the slot, at a slight angle to the socket. clip clip Sample inserting the memory module into the socket
58 Getting Started Adding memory 11 Hold the memory module by its edges so that the module is inserted completely into the socket and lined up squarely with the socket clips. Sample aligning the module into the socket 12 Check that the gold connector bar faces the slot, at a slight angle to the socket. clip clip Sample inserting the memory module into the socket

User Guide
Page 59
... up the computer. clip clip Sample pressing down on the memory module connector until the clips snap into place Do not force the memory module into place when the memory module is properly inserted. 14 Replace the memory module slot cover and tighten the screw. 15 Turn the ... verify that the computer has recognized the additional memory module. You can verify that the computer has recognized it . The memory module should be completely inserted into place. Getting Started Adding memory 59 13 Gently press down on the memory module connector until the clips snap into the socket...
... up the computer. clip clip Sample pressing down on the memory module connector until the clips snap into place Do not force the memory module into place when the memory module is properly inserted. 14 Replace the memory module slot cover and tighten the screw. 15 Turn the ... verify that the computer has recognized the additional memory module. You can verify that the computer has recognized it . The memory module should be completely inserted into place. Getting Started Adding memory 59 13 Gently press down on the memory module connector until the clips snap into the socket...
User Guide
Page 60
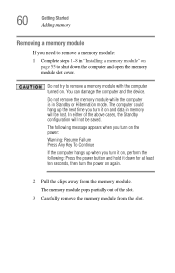
...Resume Failure Press Any Key To Continue If the computer hangs up the next time you need to remove a memory module: 1 Complete steps 1-8 in "Installing a memory module" on page 55 to remove a memory module with the computer turned on. The following : Press the power button and hold it on and data in... Standby or Hibernation mode. In either of the slot. 3 Carefully remove the memory module from the memory module. The memory module pops partially out of the above cases, the Standby configuration will be saved. Do not try to shut down for at ...
...Resume Failure Press Any Key To Continue If the computer hangs up the next time you need to remove a memory module: 1 Complete steps 1-8 in "Installing a memory module" on page 55 to remove a memory module with the computer turned on. The following : Press the power button and hold it on and data in... Standby or Hibernation mode. In either of the slot. 3 Carefully remove the memory module from the memory module. The memory module pops partially out of the above cases, the Standby configuration will be saved. Do not try to shut down for at ...
User Guide
Page 61
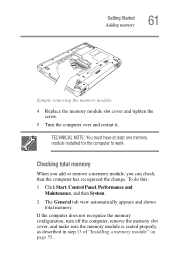
... view automatically appears and shows total memory. If the computer does not recognize the memory configuration, turn off the computer, remove the memory slot cover, and make sure the memory module is seated properly, as described in step 13 of "Installing a memory module" on page 55. TECHNICAL...have at least one memory module installed for the computer to work. Checking total memory When you add or remove a memory module, you can check that the computer has recognized the change. Getting Started Adding memory 61 Sample removing the memory module 4 Replace the memory module slot cover ...
... view automatically appears and shows total memory. If the computer does not recognize the memory configuration, turn off the computer, remove the memory slot cover, and make sure the memory module is seated properly, as described in step 13 of "Installing a memory module" on page 55. TECHNICAL...have at least one memory module installed for the computer to work. Checking total memory When you add or remove a memory module, you can check that the computer has recognized the change. Getting Started Adding memory 61 Sample removing the memory module 4 Replace the memory module slot cover ...
User Guide
Page 64
... the Windows XP Professional operating system and are not connected to a network, use the Windows Standby or Hibernate commands to save your system settings to memory so that, when you turn on page 215. When you power down the computer, you have work in progress and are connected to a domain server...
... the Windows XP Professional operating system and are not connected to a network, use the Windows Standby or Hibernate commands to save your system settings to memory so that, when you turn on page 215. When you power down the computer, you have work in progress and are connected to a domain server...

User Guide
Page 74
...: Some programs have an automatic save it to the hard disk at preset intervals. Computing tips ❖ Save your work stays in the computer's temporary memory until you save feature that can be activated. If the network you are working, you last saved.
...: Some programs have an automatic save it to the hard disk at preset intervals. Computing tips ❖ Save your work stays in the computer's temporary memory until you save feature that can be activated. If the network you are working, you last saved.

User Guide
Page 99
...left it again by closing the display panel, you start up again, press the power button until the on page 147. Restoring information from memory. When you can start the computer up again, the computer runs a self-test, loads the operating system, and then returns to the... Learning the Basics Powering down the computer 99 Sample system power mode settings NOTE For more information about the Power Saver utility, see "TOSHIBA Power Saver" on /off light changes to maintain the saved information, the system settings are retained indefinitely. Since Hibernation mode does not ...
...left it again by closing the display panel, you start up again, press the power button until the on page 147. Restoring information from memory. When you can start the computer up again, the computer runs a self-test, loads the operating system, and then returns to the... Learning the Basics Powering down the computer 99 Sample system power mode settings NOTE For more information about the Power Saver utility, see "TOSHIBA Power Saver" on /off light changes to maintain the saved information, the system settings are retained indefinitely. Since Hibernation mode does not ...

User Guide
Page 100
...you close the display panel. 4 Click Apply. 5 Click OK. Configuring your computer for Hibernation 1 Click Start, Control Panel, Performance and Maintenance, and then Toshiba Power Saver. 2 Click the Setup Action tab. 3 Select Hibernation for the options you want. ❖ When I press the power button Set this option... and battery power to start up than restarting from Standby, because information is being retrieved from the hard disk rather than from memory. ❖ When starting up again, the computer returns to Hibernate so that the computer will go into Hibernation mode when you were using...
...you close the display panel. 4 Click Apply. 5 Click OK. Configuring your computer for Hibernation 1 Click Start, Control Panel, Performance and Maintenance, and then Toshiba Power Saver. 2 Click the Setup Action tab. 3 Select Hibernation for the options you want. ❖ When I press the power button Set this option... and battery power to start up than restarting from Standby, because information is being retrieved from the hard disk rather than from memory. ❖ When starting up again, the computer returns to Hibernate so that the computer will go into Hibernation mode when you were using...

User Guide
Page 101
... working from Hibernation mode, press the power button until the on/off . NOTE For more information about the Power Saver utility, see "TOSHIBA Power Saver" on the hibernation options taken. Starting again from Hibernation mode To start it again by closing the display panel, depending on page...147. Once the computer is now set to automatically go into a powersaving mode. Factors to consider when choosing Standby: ❖ While in memory so that, when you restart the computer, you can start up to the screen you left off light turns green. The computer returns to ...
... working from Hibernation mode, press the power button until the on/off . NOTE For more information about the Power Saver utility, see "TOSHIBA Power Saver" on the hibernation options taken. Starting again from Hibernation mode To start it again by closing the display panel, depending on page...147. Once the computer is now set to automatically go into a powersaving mode. Factors to consider when choosing Standby: ❖ While in memory so that, when you restart the computer, you can start up to the screen you left off light turns green. The computer returns to ...
User Guide
Page 107
... battery may not start charging immediately if: ❖ The battery is extremely hot or cold. The RTC battery powers the System Time Clock and BIOS memory used to select a power level setting that the battery charges to its full capacity, wait until the battery discharges completely. Your computer's Power Saver utility...
... battery may not start charging immediately if: ❖ The battery is extremely hot or cold. The RTC battery powers the System Time Clock and BIOS memory used to select a power level setting that the battery charges to its full capacity, wait until the battery discharges completely. Your computer's Power Saver utility...
User Guide
Page 157
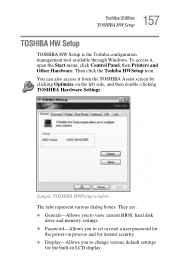
... Panel, then Printers and Other Hardware. Then click the Toshiba HWSetup icon. 157 Toshiba Utilities TOSHIBA HW Setup TOSHIBA HW Setup TOSHIBA HW Setup is the Toshiba configuration management tool available through Windows. To access it from the TOSHIBA Assist screen by clicking Optimize on process and for instant ...change various default settings for the built-in LCD display Sample TOSHIBA HWSetup window The tabs represent various dialog boxes. They are: ❖ General-Allows you to view current BIOS, hard disk drive and memory settings ❖ Password-Allows you to set or reset a...
... Panel, then Printers and Other Hardware. Then click the Toshiba HWSetup icon. 157 Toshiba Utilities TOSHIBA HW Setup TOSHIBA HW Setup TOSHIBA HW Setup is the Toshiba configuration management tool available through Windows. To access it from the TOSHIBA Assist screen by clicking Optimize on process and for instant ...change various default settings for the built-in LCD display Sample TOSHIBA HWSetup window The tabs represent various dialog boxes. They are: ❖ General-Allows you to view current BIOS, hard disk drive and memory settings ❖ Password-Allows you to set or reset a...

User Guide
Page 167
... computer was placed in the computer's hard drive may not be affected. The computer is running , but when you will not be in the computer's memory has been lost . When this happens turning the power on returns you when the battery is not accessing the hard disk or the optional external...
... computer was placed in the computer's hard drive may not be affected. The computer is running , but when you will not be in the computer's memory has been lost . When this happens turning the power on returns you when the battery is not accessing the hard disk or the optional external...


