
User Guide
Page 54
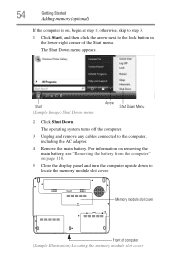
otherwise, skip to step 3. 1 Click Start, and then click the arrow next to locate the memory module slot cover. Start (Sample Image) Shut Down menu Arrow Shut Down Menu 2 Click Shut Down. Memory module slot cover Front of the Start menu. The Shut Down menu appears. For ...
otherwise, skip to step 3. 1 Click Start, and then click the arrow next to locate the memory module slot cover. Start (Sample Image) Shut Down menu Arrow Shut Down Menu 2 Click Shut Down. Memory module slot cover Front of the Start menu. The Shut Down menu appears. For ...
User Guide
Page 62
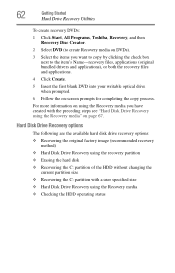
...on page 67. Hard Disk Drive Recovery options The following are the available hard disk drive recovery options: ❖ Recovering the original factory image (recommended recovery method) ❖ Hard Disk Drive Recovery using the recovery partition ❖ Erasing the hard disk ❖ Recovering the ... ❖ Checking the HDD operating status 62 Getting Started Hard Drive Recovery Utilities To create recovery DVDs: 1 Click Start, All Programs, Toshiba, Recovery, and then Recovery Disc Creator. 2 Select DVD (to create Recovery media on DVDs). 3 Select the items you have created with...
...on page 67. Hard Disk Drive Recovery options The following are the available hard disk drive recovery options: ❖ Recovering the original factory image (recommended recovery method) ❖ Hard Disk Drive Recovery using the recovery partition ❖ Erasing the hard disk ❖ Recovering the ... ❖ Checking the HDD operating status 62 Getting Started Hard Drive Recovery Utilities To create recovery DVDs: 1 Click Start, All Programs, Toshiba, Recovery, and then Recovery Disc Creator. 2 Select DVD (to create Recovery media on DVDs). 3 Select the items you have created with...
User Guide
Page 63
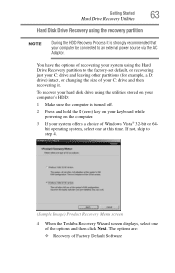
... your C: drive and leaving other partitions (for example, a D: drive) intact, or changing the size of your computer be connected to step 4. (Sample Image) Product Recovery Menu screen 4 When the Toshiba Recovery Wizard screen displays, select one at this time. If not, skip to an external power source via the AC Adaptor. The...
... your C: drive and leaving other partitions (for example, a D: drive) intact, or changing the size of your computer be connected to step 4. (Sample Image) Product Recovery Menu screen 4 When the Toshiba Recovery Wizard screen displays, select one at this time. If not, skip to an external power source via the AC Adaptor. The...

User Guide
Page 64
... of Factory Default Software, and then click Next. 64 Getting Started Hard Drive Recovery Utilities ❖ Erase the hard disk (Sample Image) Toshiba Recovery Wizard screen Recovering the original factory image (recommended recovery method) Recovering a hard disk drive to its out of box state deletes all partitions on the hard disk drive and...
... of Factory Default Software, and then click Next. 64 Getting Started Hard Drive Recovery Utilities ❖ Erase the hard disk (Sample Image) Toshiba Recovery Wizard screen Recovering the original factory image (recommended recovery method) Recovering a hard disk drive to its out of box state deletes all partitions on the hard disk drive and...
User Guide
Page 66
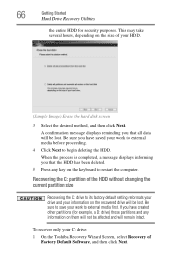
... drive and your work to external media first. To recover only your C: drive: 1 On the Toshiba Recovery Wizard Screen, select Recovery of your work to external media before proceeding. 4 Click Next to save your HDD. (Sample Image) Erase the hard disk screen 3 Select the desired method, and then click Next. When the...
... drive and your work to external media first. To recover only your C: drive: 1 On the Toshiba Recovery Wizard Screen, select Recovery of your work to external media before proceeding. 4 Click Next to save your HDD. (Sample Image) Erase the hard disk screen 3 Select the desired method, and then click Next. When the...
User Guide
Page 68
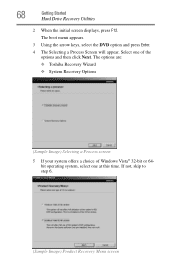
Select one at this time. The boot menu appears. 3 Using the arrow keys, select the DVD option and press Enter. 4 The Selecting a Process Screen will appear. If not, skip to step 6. (Sample Image) Product Recovery Menu screen The options are: ❖ Toshiba Recovery Wizard ❖ System Recovery Options (Sample Image) Selecting a Process screen 5 If your system offers a choice of Windows Vista® 32-bit or 64bit operating system, select one of the options and then click Next. 68 Getting Started Hard Drive Recovery Utilities 2 When the initial screen displays, press F12.
Select one at this time. The boot menu appears. 3 Using the arrow keys, select the DVD option and press Enter. 4 The Selecting a Process Screen will appear. If not, skip to step 6. (Sample Image) Product Recovery Menu screen The options are: ❖ Toshiba Recovery Wizard ❖ System Recovery Options (Sample Image) Selecting a Process screen 5 If your system offers a choice of Windows Vista® 32-bit or 64bit operating system, select one of the options and then click Next. 68 Getting Started Hard Drive Recovery Utilities 2 When the initial screen displays, press F12.

User Guide
Page 69
Click Yes to explain the available recovery options. (Sample Image) Toshiba Recovery Wizard screen Please refer to "Hard Disk Drive Recovery options" on page 62 to continue. (Sample Image) Warning screen 7 The Toshiba Recovery Wizard screen will be deleted and rewritten. Getting Started 69 Hard Drive Recovery Utilities 6 A warning screen will appear stating that when the recovery is executed all data will appear.
Click Yes to explain the available recovery options. (Sample Image) Toshiba Recovery Wizard screen Please refer to "Hard Disk Drive Recovery options" on page 62 to continue. (Sample Image) Warning screen 7 The Toshiba Recovery Wizard screen will be deleted and rewritten. Getting Started 69 Hard Drive Recovery Utilities 6 A warning screen will appear stating that when the recovery is executed all data will appear.

User Guide
Page 74
...) simultaneously ❖ TV (or other video display device), you may need to adjust the video settings. To swap sides, select Swap Image Display. 2 Release the Fn key. This mode is available only if the current setting is for additional configuration steps. Using an external ...10070; Swap-Switch primary display between internal display and external monitor when using extended desktop (Sample Image) Display options window NOTE The right-most USBcompatible keyboards. In extended desktop mode, the image is split into two sides, one to use a full-size keyboard, you can attach one ...
...) simultaneously ❖ TV (or other video display device), you may need to adjust the video settings. To swap sides, select Swap Image Display. 2 Release the Fn key. This mode is available only if the current setting is for additional configuration steps. Using an external ...10070; Swap-Switch primary display between internal display and external monitor when using extended desktop (Sample Image) Display options window NOTE The right-most USBcompatible keyboards. In extended desktop mode, the image is split into two sides, one to use a full-size keyboard, you can attach one ...
User Guide
Page 76
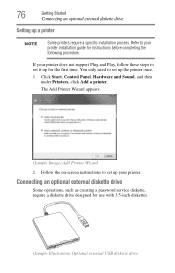
You only need to set up for instructions before completing the following procedure. The Add Printer Wizard appears. (Sample Image) Add Printer Wizard 2 Follow the on-screen instructions to set it up your printer. If your printer installation guide for the first time. 76 Getting ...
You only need to set up for instructions before completing the following procedure. The Add Printer Wizard appears. (Sample Image) Add Printer Wizard 2 Follow the on-screen instructions to set it up your printer. If your printer installation guide for the first time. 76 Getting ...
User Guide
Page 79
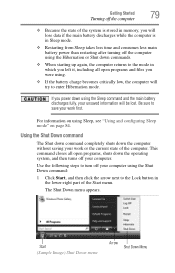
... the Shut Down command: 1 Click Start, and then click the arrow next to save your work or the current state of the computer. Start (Sample Image) Shut Down menu Arrow Shut Down Menu If you were using. ❖ If the battery charge becomes critically low, the computer will be lost. The...
... the Shut Down command: 1 Click Start, and then click the arrow next to save your work or the current state of the computer. Start (Sample Image) Shut Down menu Arrow Shut Down Menu If you were using. ❖ If the battery charge becomes critically low, the computer will be lost. The...
User Guide
Page 80
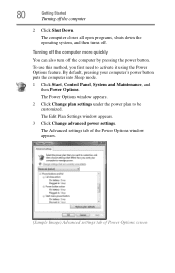
... then Power Options. The Edit Plan Settings window appears. 3 Click Change advanced power settings. The Advanced settings tab of the Power Options window appears. (Sample Image) Advanced settings tab of Power Options screen To use this method, you first need to be customized. Turning off the computer more quickly You can...
... then Power Options. The Edit Plan Settings window appears. 3 Click Change advanced power settings. The Advanced settings tab of the Power Options window appears. (Sample Image) Advanced settings tab of Power Options screen To use this method, you first need to be customized. Turning off the computer more quickly You can...
User Guide
Page 82
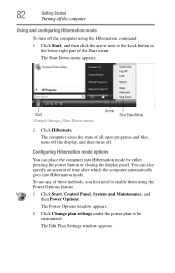
The Shut Down menu appears. Start (Sample Image) Shut Down menu Arrow Shut Down Menu 2 Click Hibernate. To use any of the Start menu. The Power Options window appears. 2 Click Change plan settings ...
The Shut Down menu appears. Start (Sample Image) Shut Down menu Arrow Shut Down Menu 2 Click Hibernate. To use any of the Start menu. The Power Options window appears. 2 Click Change plan settings ...

User Guide
Page 83
The Advanced settings tab of the Power Options window appears. (Sample Image) Advanced settings tab of Power Options screen 4 Click Power buttons and lid to go into Hibernation mode when you want the computer to display the ...
The Advanced settings tab of the Power Options window appears. (Sample Image) Advanced settings tab of Power Options screen 4 Click Power buttons and lid to go into Hibernation mode when you want the computer to display the ...
User Guide
Page 84
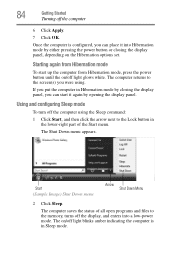
... blinks amber indicating the computer is configured, you can start up the computer from Hibernation mode To start it into a low-power mode. Start (Sample Image) Shut Down menu Arrow Shut Down Menu 2 Click Sleep. Once the computer is in Hibernation mode by opening the display panel. Using and configuring Sleep...
... blinks amber indicating the computer is configured, you can start up the computer from Hibernation mode To start it into a low-power mode. Start (Sample Image) Shut Down menu Arrow Shut Down Menu 2 Click Sleep. Once the computer is in Hibernation mode by opening the display panel. Using and configuring Sleep...
User Guide
Page 85
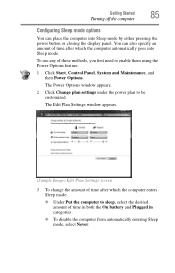
... the computer automatically goes into Sleep mode by either pressing the power button or closing the display panel. The Edit Plan Settings window appears. (Sample Image) Edit Plan Settings screen 3 To change the amount of these methods, you first need to enable them using the Power Options feature. 1 Click Start, Control...
... the computer automatically goes into Sleep mode by either pressing the power button or closing the display panel. The Edit Plan Settings window appears. (Sample Image) Edit Plan Settings screen 3 To change the amount of these methods, you first need to enable them using the Power Options feature. 1 Click Start, Control...

User Guide
Page 86
The Advanced settings tab of the Power Options window appears. (Sample Image) Advanced settings tab of Power Options screen 5 Click Power buttons and lid to go into Sleep mode when you press the power button. ❖ Start ...
The Advanced settings tab of the Power Options window appears. (Sample Image) Advanced settings tab of Power Options screen 5 Click Power buttons and lid to go into Sleep mode when you press the power button. ❖ Start ...

User Guide
Page 97
... Start menu. Saving your work Before you type, all matching files and programs are displayed in the Start Search field. Start Search field Arrow (Sample Image) Start Search field in Start menu 2 Start typing the program's name (wordpad) in the Start menu. 3 Click WordPad under Programs at regular intervals. Many programs...
... Start menu. Saving your work Before you type, all matching files and programs are displayed in the Start Search field. Start Search field Arrow (Sample Image) Start Search field in Start menu 2 Start typing the program's name (wordpad) in the Start menu. 3 Click WordPad under Programs at regular intervals. Many programs...

User Guide
Page 98
... stored. 4 Type a file name, then click Save. If you are currently working with , click File, and then Save As, and give it a file name. (Sample Image) Save As dialog box 3 Choose the drive and folder where you created a new document, your program displays a Save As dialog box. 98 Learning the Basics...
... stored. 4 Type a file name, then click Save. If you are currently working with , click File, and then Save As, and give it a file name. (Sample Image) Save As dialog box 3 Choose the drive and folder where you created a new document, your program displays a Save As dialog box. 98 Learning the Basics...

User Guide
Page 100
The program displays a Print dialog box. (Sample Image) Print dialog box 3 Specify the print parameters. You can be backed up on the computer's internal storage drive. To back up several files at one ...
The program displays a Print dialog box. (Sample Image) Print dialog box 3 Specify the print parameters. You can be backed up on the computer's internal storage drive. To back up several files at one ...

User Guide
Page 115
... the default notification settings: 1 Click Start, Control Panel, Mobile PC, and then Power Options. The Advanced settings tab of the Power Options window appears. (Sample Image) Advanced settings tab of factors, such as: ❖ How the computer is configured ❖ How much you use the internal storage drive, optical drive, diskette...
... the default notification settings: 1 Click Start, Control Panel, Mobile PC, and then Power Options. The Advanced settings tab of the Power Options window appears. (Sample Image) Advanced settings tab of factors, such as: ❖ How the computer is configured ❖ How much you use the internal storage drive, optical drive, diskette...


