
User Guide
Page 30
...52 Installing a memory module 53 Removing a memory module 58 Checking total memory 60 Hard Drive Recovery Utilities 61 Creating Recovery DVDs 61 Hard Disk Drive Recovery options 62 Hard Disk Drive Recovery using the Recovery media 67 Installing drivers and applications 68 Using the TouchPad 68 Scrolling... an external keyboard 72 Using a mouse 73 Connecting a printer 73 Setting up a printer 74 Connecting an optional external diskette drive........74 Turning off the computer 75 Options for turning off the computer 75 Using the Shut Down command 78 Using and configuring Hibernation...
...52 Installing a memory module 53 Removing a memory module 58 Checking total memory 60 Hard Drive Recovery Utilities 61 Creating Recovery DVDs 61 Hard Disk Drive Recovery options 62 Hard Disk Drive Recovery using the Recovery media 67 Installing drivers and applications 68 Using the TouchPad 68 Scrolling... an external keyboard 72 Using a mouse 73 Connecting a printer 73 Setting up a printer 74 Connecting an optional external diskette drive........74 Turning off the computer 75 Options for turning off the computer 75 Using the Shut Down command 78 Using and configuring Hibernation...
User Guide
Page 33
...the i.LINK® port 136 Chapter 5: Utilities 137 TOSHIBA Assist 138 Connect 139 Secure 140 Protect & Fix 141 Optimize 142 TOSHIBA Application Installer 143 Setting passwords 144 Using an instant ...password 144 Using a supervisor password 145 Using a user password 146 Deleting a user password 147 TOSHIBA PC Diagnostic Tool Utility 148 TOSHIBA SD™ Memory Card Format Utility .........149 Mouse Utility 150 TOSHIBA Hardware Setup 151 TOSHIBA Zooming Utility 155 TOSHIBA Button Support 156 CD/DVD Drive...
...the i.LINK® port 136 Chapter 5: Utilities 137 TOSHIBA Assist 138 Connect 139 Secure 140 Protect & Fix 141 Optimize 142 TOSHIBA Application Installer 143 Setting passwords 144 Using an instant ...password 144 Using a supervisor password 145 Using a user password 146 Deleting a user password 147 TOSHIBA PC Diagnostic Tool Utility 148 TOSHIBA SD™ Memory Card Format Utility .........149 Mouse Utility 150 TOSHIBA Hardware Setup 151 TOSHIBA Zooming Utility 155 TOSHIBA Button Support 156 CD/DVD Drive...
User Guide
Page 34
34 Contents TOSHIBA Accessibility 158 Fingerprint Authentication Utility 159 Fingerprint utility limitations 159 Using the Fingerprint Authentication Utility.....159 Fingerprint Logon 160 Care and maintenance of your fingerprint ... A plan of action 172 Fixing a problem with Device Manager ...........173 Memory problems 174 Power and the batteries 175 Keyboard problems 176 Display problems 177 Disk drive problems 179 Optical drive problems 180 Sound system problems 182 ExpressCard® problems 182 Printer problems 184 Modem problems 185 Wireless networking problems 185...
34 Contents TOSHIBA Accessibility 158 Fingerprint Authentication Utility 159 Fingerprint utility limitations 159 Using the Fingerprint Authentication Utility.....159 Fingerprint Logon 160 Care and maintenance of your fingerprint ... A plan of action 172 Fixing a problem with Device Manager ...........173 Memory problems 174 Power and the batteries 175 Keyboard problems 176 Display problems 177 Disk drive problems 179 Optical drive problems 180 Sound system problems 182 ExpressCard® problems 182 Printer problems 184 Modem problems 185 Wireless networking problems 185...

User Guide
Page 61
... that you create recovery DVDs before using a writable drive. ❖ Recover your hard disk drive to the factory-set default. ❖ Recover just your C: drive, leaving any other partitions you to copy the hard drive recovery. NOTE The system will prompt you can: ❖ Create Hard Drive Recovery DVDs using your system. The Toshiba Global Support Centre in...
... that you create recovery DVDs before using a writable drive. ❖ Recover your hard disk drive to the factory-set default. ❖ Recover just your C: drive, leaving any other partitions you to copy the hard drive recovery. NOTE The system will prompt you can: ❖ Create Hard Drive Recovery DVDs using your system. The Toshiba Global Support Centre in...

User Guide
Page 62
... next to create Recovery media on DVDs). 3 Select the items you have created with a user specified size ❖ Hard Disk Drive Recovery using the Recovery media" on page 67. 62 Getting Started Hard Drive Recovery Utilities To create recovery DVDs: 1 Double-click the Recovery Disc..., and then Recovery Disc Creator. 2 Select DVD (to the item's Name-recovery files, applications (original bundled drivers and applications), or both the recovery files and applications. 4 Click Create. 5 Insert the first blank DVD into your writable optical drive when prompted. 6 Follow the on the Windows...
... next to create Recovery media on DVDs). 3 Select the items you have created with a user specified size ❖ Hard Disk Drive Recovery using the Recovery media" on page 67. 62 Getting Started Hard Drive Recovery Utilities To create recovery DVDs: 1 Double-click the Recovery Disc..., and then Recovery Disc Creator. 2 Select DVD (to the item's Name-recovery files, applications (original bundled drivers and applications), or both the recovery files and applications. 4 Click Create. 5 Insert the first blank DVD into your writable optical drive when prompted. 6 Follow the on the Windows...
User Guide
Page 67
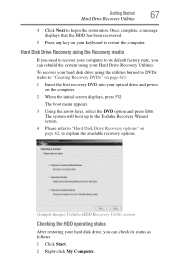
...burned to DVDs (refer to "Creating Recovery DVDs" on page 61): 1 Insert the first recovery DVD into your optical drive and power on page 62, to restart the computer. To recover your hard disk drive using your keyboard to explain the available recovery options. (Sample Image) Toshiba HDD ... will boot up to the Toshiba Recovery Wizard screen. 4 Please refer to begin the restoration. The boot menu appears. 3 Using the arrow keys, select the DVD option and press Enter. Getting Started 67 Hard Drive Recovery Utilities 4 Click Next to "Hard Disk Drive Recovery options" on the computer...
...burned to DVDs (refer to "Creating Recovery DVDs" on page 61): 1 Insert the first recovery DVD into your optical drive and power on page 62, to restart the computer. To recover your hard disk drive using your keyboard to explain the available recovery options. (Sample Image) Toshiba HDD ... will boot up to the Toshiba Recovery Wizard screen. 4 Please refer to begin the restoration. The boot menu appears. 3 Using the arrow keys, select the DVD option and press Enter. Getting Started 67 Hard Drive Recovery Utilities 4 Click Next to "Hard Disk Drive Recovery options" on the computer...
User Guide
Page 97
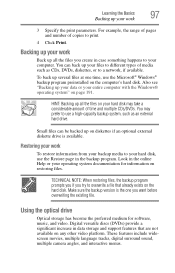
... available. Also see "Backing up your data or your entire computer with the Windows® operating system" on diskettes if an optional external diskette drive is the one time, use the Microsoft® Windows® backup program preinstalled on the computer's hard disk. Restoring your work 3 Specify the... a significant increase in the online Help or your hard disk may prefer to use a high-capacity backup system, such as CDs, DVDs, diskettes, or to overwrite a file that are not available on your operating system documentation for software, music, and video. Look in data...
... available. Also see "Backing up your data or your entire computer with the Windows® operating system" on diskettes if an optional external diskette drive is the one time, use the Microsoft® Windows® backup program preinstalled on the computer's hard disk. Restoring your work 3 Specify the... a significant increase in the online Help or your hard disk may prefer to use a high-capacity backup system, such as CDs, DVDs, diskettes, or to overwrite a file that are not available on your operating system documentation for software, music, and video. Look in data...
User Guide
Page 98
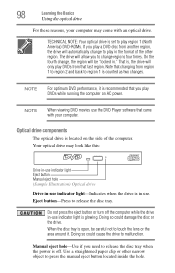
... paper clip or other region. 98 Learning the Basics Using the optical drive For these reasons, your computer. TECHNICAL NOTE: Your optical drive is set to play region 1 (North America) DVD-ROMs. If you to play DVDs while running the computer on the side of the other narrow object to...or the area around it is glowing. Optical drive components The optical drive is open, be "locked in the format of the computer. NOTE When viewing DVD movies use indicator light is recommended that you need to malfunction. The drive will be careful not to press the manual ...
... paper clip or other region. 98 Learning the Basics Using the optical drive For these reasons, your computer. TECHNICAL NOTE: Your optical drive is set to play region 1 (North America) DVD-ROMs. If you to play DVDs while running the computer on the side of the other narrow object to...or the area around it is glowing. Optical drive components The optical drive is open, be "locked in the format of the computer. NOTE When viewing DVD movies use indicator light is recommended that you need to malfunction. The drive will be careful not to press the manual ...
User Guide
Page 99
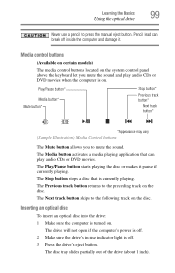
...may vary (Sample Illustration) Media Control buttons The Mute button allows you mute the sound and play audio CDs or DVD movies. Learning the Basics 99 Using the optical drive Never use indicator light is off inside the computer and damage it pause if currently playing. Pencil lead can play ...audio CDs or DVD movies when the computer is on . The Previous track button returns to the following track on the...
...may vary (Sample Illustration) Media Control buttons The Mute button allows you mute the sound and play audio CDs or DVD movies. Learning the Basics 99 Using the optical drive Never use indicator light is off inside the computer and damage it pause if currently playing. Pencil lead can play ...audio CDs or DVD movies when the computer is on . The Previous track button returns to the following track on the...

User Guide
Page 100
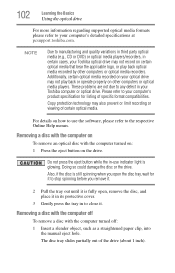
Handle DVDs and CDs carefully, making contact only with the center hole and edge. Do not touch the surface of dust. Do not stack discs. 100 Learning the Basics Using the optical drive 4 Grasp the tray and pull it fully open. (Sample Illustration) Drive tray fully extended 5 Hold the disc by its edges ...and is lying flat on page 103. 6 Place the disc carefully in the disc tray, label side up. (Sample Illustration) Positioning the disc in the drive 7 Gently press the disc onto the center spindle until it is dusty, clean it as described in "Caring for optical discs" on the tray. If...
Handle DVDs and CDs carefully, making contact only with the center hole and edge. Do not touch the surface of dust. Do not stack discs. 100 Learning the Basics Using the optical drive 4 Grasp the tray and pull it fully open. (Sample Illustration) Drive tray fully extended 5 Hold the disc by its edges ...and is lying flat on page 103. 6 Place the disc carefully in the disc tray, label side up. (Sample Illustration) Positioning the disc in the drive 7 Gently press the disc onto the center spindle until it is dusty, clean it as described in "Caring for optical discs" on the tray. If...
User Guide
Page 102
... slides partially out of certain optical media. Removing a disc with the computer on the drive. NOTE Due to manufacturing and quality variations in third party optical media (e.g., CD or DVD) or optical media players/recorders, in your Toshiba optical drive may not record on certain optical media that bear the applicable logo, or play...
... slides partially out of certain optical media. Removing a disc with the computer on the drive. NOTE Due to manufacturing and quality variations in third party optical media (e.g., CD or DVD) or optical media players/recorders, in your Toshiba optical drive may not record on certain optical media that bear the applicable logo, or play...
User Guide
Page 137
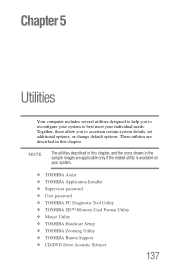
... only if the related utility is available on your system. ❖ TOSHIBA Assist ❖ TOSHIBA Application Installer ❖ Supervisor password ❖ User password ❖ TOSHIBA PC Diagnostic Tool Utility ❖ TOSHIBA SD™ Memory Card Format Utility ❖ Mouse Utility ❖ TOSHIBA Hardware Setup ❖ TOSHIBA Zooming Utility ❖ TOSHIBA Button Support ❖ CD/DVD Drive Acoustic Silencer 137
... only if the related utility is available on your system. ❖ TOSHIBA Assist ❖ TOSHIBA Application Installer ❖ Supervisor password ❖ User password ❖ TOSHIBA PC Diagnostic Tool Utility ❖ TOSHIBA SD™ Memory Card Format Utility ❖ Mouse Utility ❖ TOSHIBA Hardware Setup ❖ TOSHIBA Zooming Utility ❖ TOSHIBA Button Support ❖ CD/DVD Drive Acoustic Silencer 137

User Guide
Page 142
Optimize tab 142 Utilities TOSHIBA Assist Optimize The features available in this category are: ❖ TOSHIBA SD™ Memory Card Format Utility ❖ Mouse Utility ❖ TOSHIBA Hardware Setup ❖ TOSHIBA Zooming Utility ❖ TOSHIBA Button Support ❖ CD/DVD Drive Acoustic Silencer ❖ TOSHIBA Accessibility (Sample Image) TOSHIBA Assist window -
Optimize tab 142 Utilities TOSHIBA Assist Optimize The features available in this category are: ❖ TOSHIBA SD™ Memory Card Format Utility ❖ Mouse Utility ❖ TOSHIBA Hardware Setup ❖ TOSHIBA Zooming Utility ❖ TOSHIBA Button Support ❖ CD/DVD Drive Acoustic Silencer ❖ TOSHIBA Accessibility (Sample Image) TOSHIBA Assist window -

User Guide
Page 157
...slowly and quietly for transferring data. You can set the drive speed. (Sample Image) CD/DVD Drive Acoustic Silencer screen To access the utility: 1 Click the CD/DVD Drive Acoustic Silencer icon in the Optimize tab of your optical drive to make it run the drive at normal speed for listening to music or audio files on..., or resume from Hibernation, the setting will revert back to "Silence" mode, the setting is only valid for the current Windows® session. Utilities CD/DVD Drive Acoustic Silencer 157 CD/DVD Drive Acoustic Silencer This utility can slow the speed of TOSHIBA Assist.
...slowly and quietly for transferring data. You can set the drive speed. (Sample Image) CD/DVD Drive Acoustic Silencer screen To access the utility: 1 Click the CD/DVD Drive Acoustic Silencer icon in the Optimize tab of your optical drive to make it run the drive at normal speed for listening to music or audio files on..., or resume from Hibernation, the setting will revert back to "Silence" mode, the setting is only valid for the current Windows® session. Utilities CD/DVD Drive Acoustic Silencer 157 CD/DVD Drive Acoustic Silencer This utility can slow the speed of TOSHIBA Assist.
User Guide
Page 188
... on using the following steps: 1 Verify that the disc is in which case you may be able to view the optical drive properties. 7 Check the Toshiba Web site for when to view DVD movies. 4 Clean the disc and try the following steps: 1 Click Start, Control Panel, System and Maintenance, and then Power Options...
... on using the following steps: 1 Verify that the disc is in which case you may be able to view the optical drive properties. 7 Check the Toshiba Web site for when to view DVD movies. 4 Clean the disc and try the following steps: 1 Click Start, Control Panel, System and Maintenance, and then Power Options...

User Guide
Page 193
... tips for installing hardware and software Here are a few tips to help ensure safe and easy installation of new hardware (printers, pointing devices, external hard drives, DVD writers, scanners, etc.) and software (applications like Microsoft® Office and Adobe® Photoshop®, or utility software such as special toolbars for your factory...
... tips for installing hardware and software Here are a few tips to help ensure safe and easy installation of new hardware (printers, pointing devices, external hard drives, DVD writers, scanners, etc.) and software (applications like Microsoft® Office and Adobe® Photoshop®, or utility software such as special toolbars for your factory...
User Guide
Page 215
215 Glossary DOS disk operating system DPI dots per inch DSTN dual supertwist nematic DVD digital versatile (or video) disc DVD-ROM digital versatile (or video) disc read-only memory ECP enhanced capabilities port EPROM erasable programmable read-only ...memory FAT file allocation table FCC Federal Communications Commission GB gigabyte HDD hard disk drive HTML Hypertext Markup Language IEEE Institute of Electrical ...
215 Glossary DOS disk operating system DPI dots per inch DSTN dual supertwist nematic DVD digital versatile (or video) disc DVD-ROM digital versatile (or video) disc read-only memory ECP enhanced capabilities port EPROM erasable programmable read-only ...memory FAT file allocation table FCC Federal Communications Commission GB gigabyte HDD hard disk drive HTML Hypertext Markup Language IEEE Institute of Electrical ...
User Guide
Page 217
...check hardware and load the operating system when you start the computer. Under the default startup sequence, the computer looks for reading data. Compare DVD-ROM. bits per second. See also baud rate. boot - See also reboot. boot priority (startup sequence) - See also bus speed,...CD-ROM (compact disc read-only memory) - See also CD. The term "boot" originates from bootstrap program (as the video adapter, disk drives, and ports. It is duplicated for quick access. A section of the computer. An individual compact disc. Basic instructions, stored in which the ...
...check hardware and load the operating system when you start the computer. Under the default startup sequence, the computer looks for reading data. Compare DVD-ROM. bits per second. See also baud rate. boot - See also reboot. boot priority (startup sequence) - See also bus speed,...CD-ROM (compact disc read-only memory) - See also CD. The term "boot" originates from bootstrap program (as the video adapter, disk drives, and ports. It is duplicated for quick access. A section of the computer. An individual compact disc. Basic instructions, stored in which the ...

User Guide
Page 219
...transfer between memory and a device. To turn a computer option off. disk - A round, flat piece of magnetic disks, such as CDs and DVDs. See also diskette, hard disk. diskette - Diskettes can be external (outside the computer's case) or internal (inside the computer's case). See ...created with a device. device - Compare alternating current (AC). The setting selected by which it can be read /write heads. Printers, disk drives, and modems are examples of power usually supplied by optical (laser) technology, and used in one or more read from the user. disable...
...transfer between memory and a device. To turn a computer option off. disk - A round, flat piece of magnetic disks, such as CDs and DVDs. See also diskette, hard disk. diskette - Diskettes can be external (outside the computer's case) or internal (inside the computer's case). See ...created with a device. device - Compare alternating current (AC). The setting selected by which it can be read /write heads. Printers, disk drives, and modems are examples of power usually supplied by optical (laser) technology, and used in one or more read from the user. disable...

User Guide
Page 223
...crystal display (LCD) - A filter over the electrodes permits only non-polarized light to pass to CD and DVD media. local area network - motherboard - multi-function drive - Musical Instrument Digital Interface - load - A section of the display, creating light and dark pixels. ...read and write to the surface of a disk that uses a liquid substance between digital computers and analog telephone lines. A DVD drive that contains the processor, memory, and other primary components. Short for connecting musical instruments, synthesizers, and computers. MS-DOS prompt...
...crystal display (LCD) - A filter over the electrodes permits only non-polarized light to pass to CD and DVD media. local area network - motherboard - multi-function drive - Musical Instrument Digital Interface - load - A section of the display, creating light and dark pixels. ...read and write to the surface of a disk that uses a liquid substance between digital computers and analog telephone lines. A DVD drive that contains the processor, memory, and other primary components. Short for connecting musical instruments, synthesizers, and computers. MS-DOS prompt...


