
Users Manual Canada; English
Page 21
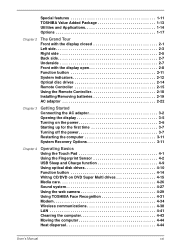
Special features 1-11 TOSHIBA Value Added Package 1-13 Utilities and Applications 1-14 Options 1-17 Chapter 2 The Grand Tour Front with the display closed 2-1 Left side 2-3 Right side 2-5 Back side 2-7 Underside 2-7 Front with the display open 2-8 Function button 2-11 System indicators 2-12 Optical disc drives 2-14 Remote Controller 2-15 Using the Remote Controller 2-18 Installing...
Special features 1-11 TOSHIBA Value Added Package 1-13 Utilities and Applications 1-14 Options 1-17 Chapter 2 The Grand Tour Front with the display closed 2-1 Left side 2-3 Right side 2-5 Back side 2-7 Underside 2-7 Front with the display open 2-8 Function button 2-11 System indicators 2-12 Optical disc drives 2-14 Remote Controller 2-15 Using the Remote Controller 2-18 Installing...
Users Manual Canada; English
Page 22
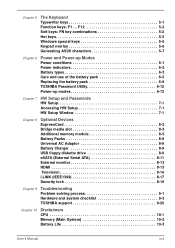
...-up Modes Power conditions 6-1 Power indicators 6-2 Battery types 6-3 Care and use of the battery pack 6-5 Replacing the battery pack 6-9 TOSHIBA Password Utility 6-12 Power-up modes 6-13 Chapter 7 HW Setup and Passwords HW Setup 7-1 Accessing HW Setup 7-1 HW Setup Window ...USB floppy diskette drive 8-9 eSATA (External Serial ATA 8-11 External monitor 8-13 HDMI 8-13 Television 8-16 i.LINK (IEEE1394 8-17 Security lock 8-19 Chapter 9 Troubleshooting Problem solving process 9-1 Hardware and system checklist 9-3 TOSHIBA support 9-25 Chapter 10 Disclaimers CPU 10-1 Memory (...
...-up Modes Power conditions 6-1 Power indicators 6-2 Battery types 6-3 Care and use of the battery pack 6-5 Replacing the battery pack 6-9 TOSHIBA Password Utility 6-12 Power-up modes 6-13 Chapter 7 HW Setup and Passwords HW Setup 7-1 Accessing HW Setup 7-1 HW Setup Window ...USB floppy diskette drive 8-9 eSATA (External Serial ATA 8-11 External monitor 8-13 HDMI 8-13 Television 8-16 i.LINK (IEEE1394 8-17 Security lock 8-19 Chapter 9 Troubleshooting Problem solving process 9-1 Hardware and system checklist 9-3 TOSHIBA support 9-25 Chapter 10 Disclaimers CPU 10-1 Memory (...
Users Manual Canada; English
Page 37
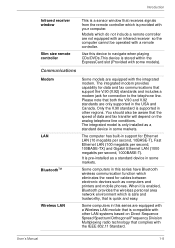
... network environment which is safe and trustworthy, that is quick and easy. Models which do not include a remote controller are equipped with the IEEE 802.11 Standard. Please note that both the V.90 and V.92 standards are equipped with a Wireless LAN module that is compatible with your computer. The integrated model...
... network environment which is safe and trustworthy, that is quick and easy. Models which do not include a remote controller are equipped with the IEEE 802.11 Standard. Please note that both the V.90 and V.92 standards are equipped with a Wireless LAN module that is compatible with your computer. The integrated model...
Users Manual Canada; English
Page 38
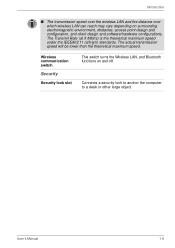
... a security lock to anchor the computer to a desk or other large object. The Transmit Rate (at X Mbit/s) is the theoretical maximum speed under the IEEE802.11 (a/b/g/n) standards. User's Manual 1-9 The actual transmission speed will be lower than the theoretical maximum speed.
... a security lock to anchor the computer to a desk or other large object. The Transmit Rate (at X Mbit/s) is the theoretical maximum speed under the IEEE802.11 (a/b/g/n) standards. User's Manual 1-9 The actual transmission speed will be lower than the theoretical maximum speed.
Users Manual Canada; English
Page 40
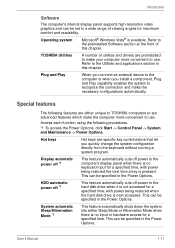
...the preinstalled Software section at the front of utilities and drivers are preinstalled to make your computer more convenient to TOSHIBA computers or are specific key combinations that let you install a component, Plug and Play capability enables the system to... of viewing angles for a specified time, with power being restored the next time a key is next accessed. TOSHIBA Utilities A number of this chapter. User's Manual 1-11 Operating system Microsoft® Windows Vista® is no keyboard input for maximum comfort and readability. Introduction Software The...
...the preinstalled Software section at the front of utilities and drivers are preinstalled to make your computer more convenient to TOSHIBA computers or are specific key combinations that let you install a component, Plug and Play capability enables the system to... of viewing angles for a specified time, with power being restored the next time a key is next accessed. TOSHIBA Utilities A number of this chapter. User's Manual 1-11 Operating system Microsoft® Windows Vista® is no keyboard input for maximum comfort and readability. Introduction Software The...
Users Manual Canada; English
Page 57
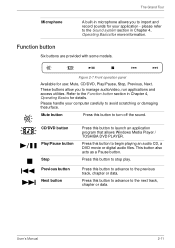
... Refer to the Function button section in Chapter 4, Operating Basics for use: Mute, CD/DVD, Play/Pause, Stop, Previous, Next. User's Manual 2-11 CD/DVD button Play/Pause button Stop Previous button Next button Press this button to stop play. Function button Six buttons are provided with some...handle your application - This button also acts as a Pause button. Press this button to launch an application program that allows Windows Media Player / TOSHIBA DVD PLAYER. Press this button to begin playing an audio CD, a DVD movie or digital audio files. Press this button to advance to the ...
... Refer to the Function button section in Chapter 4, Operating Basics for use: Mute, CD/DVD, Play/Pause, Stop, Previous, Next. User's Manual 2-11 CD/DVD button Play/Pause button Stop Previous button Next button Press this button to stop play. Function button Six buttons are provided with some...handle your application - This button also acts as a Pause button. Press this button to launch an application program that allows Windows Media Player / TOSHIBA DVD PLAYER. Press this button to begin playing an audio CD, a DVD movie or digital audio files. Press this button to advance to the ...
Users Manual Canada; English
Page 64
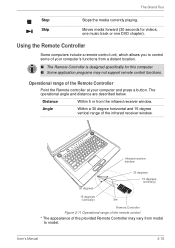
... Remote Controller may not support remote control functions. Infrared receiver window 30 degrees 30 degrees 15 degrees (vertically) 15 degrees (vertically) 5m Remote Controller Figure 2-11 Operational range of the remote control * The appearance of the Remote Controller Point the Remote controller at your computer's functions from a distant location. ■ The...
... Remote Controller may not support remote control functions. Infrared receiver window 30 degrees 30 degrees 15 degrees (vertically) 15 degrees (vertically) 5m Remote Controller Figure 2-11 Operational range of the remote control * The appearance of the Remote Controller Point the Remote controller at your computer's functions from a distant location. ■ The...
Users Manual Canada; English
Page 80
... noise. This partition stores files which can continue where you left when you shut down the computer. ■ When the computer is deleted. User's Manual 3-11 When you turn the power back on, you can be used to display the menu window, then select Restart from the menu. ■ Press CTRL...
... noise. This partition stores files which can continue where you left when you shut down the computer. ■ When the computer is deleted. User's Manual 3-11 When you turn the power back on, you can be used to display the menu window, then select Restart from the menu. ■ Press CTRL...

Users Manual Canada; English
Page 94
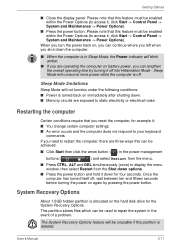
Figure 4-4 Pulling the disc tray open the disc tray slightly. When the computer's power is fully opened. Grasp the disc tray gently and pull until it is on, press the eject button to open User's Manual 4-11 Disc tray LED Eject button Eject hole Figure 4-3 Pressing the eject button 2. Loading discs To load CD/DVD's, follow the steps as listed below and refer to figures 4-4 to view DVD-Video discs. Operating Basics Use the DVD playback application to 4-6. 1.
Figure 4-4 Pulling the disc tray open the disc tray slightly. When the computer's power is fully opened. Grasp the disc tray gently and pull until it is on, press the eject button to open User's Manual 4-11 Disc tray LED Eject button Eject hole Figure 4-3 Pressing the eject button 2. Loading discs To load CD/DVD's, follow the steps as listed below and refer to figures 4-4 to view DVD-Video discs. Operating Basics Use the DVD playback application to 4-6. 1.
Users Manual Canada; English
Page 110
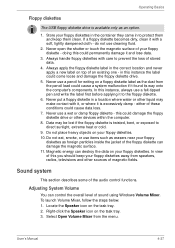
... magnetic fields. Always apply the floppy diskette label in a location where water or other devices within the computer. 8. Magnetic energy can damage the magnetic surface. 11. In view of stored data. 4. User's Manual 4-27 Store your floppy diskettes. 10. either of these conditions could damage the floppy diskette drive or other...
... magnetic fields. Always apply the floppy diskette label in a location where water or other devices within the computer. 8. Magnetic energy can damage the magnetic surface. 11. In view of stored data. 4. User's Manual 4-27 Store your floppy diskettes. 10. either of these conditions could damage the floppy diskette drive or other...

Users Manual Canada; English
Page 115
...data needed when you do not wish to the left , right, down and up . To launch this utility, click Start -> All Programs -> TOSHIBA -> Utilities -> TOSHIBA Face Recognition. ■ The Registration screen is displayed for a logged-in user whose face has already been registered. 2. Now take a picture while...in user whose face has not been registered. ■ The Management screen is successful, click the Next button and register an account. 11. Perform the verification test. Please refer to the left and right, and then move your face has been positioned properly, the recording will...
...data needed when you do not wish to the left , right, down and up . To launch this utility, click Start -> All Programs -> TOSHIBA -> Utilities -> TOSHIBA Face Recognition. ■ The Registration screen is displayed for a logged-in user whose face has already been registered. 2. Now take a picture while...in user whose face has not been registered. ■ The Management screen is successful, click the Next button and register an account. 11. Perform the verification test. Please refer to the left and right, and then move your face has been positioned properly, the recording will...

Users Manual Canada; English
Page 120
... internal modem Do not pull on the plug in the telephone jack and pull it out from within the computer. Operating Basics 2. User's Manual Figure 4-11 Connecting the FM tuner jack 4-37 Plug the other end of Windows Media Center to listen to the computer's FM antenna port.
... internal modem Do not pull on the plug in the telephone jack and pull it out from within the computer. Operating Basics 2. User's Manual Figure 4-11 Connecting the FM tuner jack 4-37 Plug the other end of Windows Media Center to listen to the computer's FM antenna port.
Users Manual Canada; English
Page 121
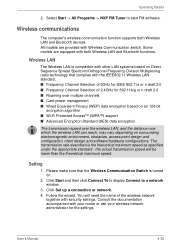
... accompanied with Wireless Communication switch. Select Start -> All Programs -> NXP FM Tuner to a network window. 3. Wireless LAN The Wireless LAN is compatible with the IEEE802.11 Wireless LAN standard. ■ Frequency Channel Selection of 5GHz for 802.11b/g or n draft 2.0 ■ Roaming over multiple channels ■ Card power management ■ Wired...
... accompanied with Wireless Communication switch. Select Start -> All Programs -> NXP FM Tuner to a network window. 3. Wireless LAN The Wireless LAN is compatible with the IEEE802.11 Wireless LAN standard. ■ Frequency Channel Selection of 5GHz for 802.11b/g or n draft 2.0 ■ Roaming over multiple channels ■ Card power management ■ Wired...
Users Manual Canada; English
Page 145
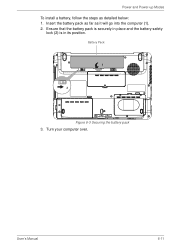
Ensure that the battery pack is securely in place and the battery safety lock (2) is in its position. Turn your computer over. User's Manual 6-11 Power and Power-up Modes To install a battery, follow the steps as it will go into the computer (1). 2. Insert the battery pack as far as detailed below: 1. Battery Pack Figure 6-3 Securing the battery pack 3.
Ensure that the battery pack is securely in place and the battery safety lock (2) is in its position. Turn your computer over. User's Manual 6-11 Power and Power-up Modes To install a battery, follow the steps as it will go into the computer (1). 2. Insert the battery pack as far as detailed below: 1. Battery Pack Figure 6-3 Securing the battery pack 3.
Users Manual Canada; English
Page 164
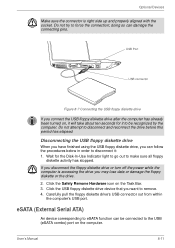
...'s USB connector out from within the computer's USB port. Wait for it to be connected to the USB (eSATA combo) port on , it : 1. User's Manual 8-11 eSATA (External Serial ATA) An device corresponding to remove. 4. Do not try to disconnect and reconnect the drive before this period has elapsed. If you...
...'s USB connector out from within the computer's USB port. Wait for it to be connected to the USB (eSATA combo) port on , it : 1. User's Manual 8-11 eSATA (External Serial ATA) An device corresponding to remove. 4. Do not try to disconnect and reconnect the drive before this period has elapsed. If you...
Users Manual Canada; English
Page 169
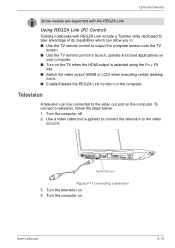
...desktop icons. ■ Enable/Disable the REGZA Link function on . Turn the television on the computer. User's Manual 8-16 Vedio Out port Figure 8-11 Connecting a television 3. Use a video cable (not supplied) to connect the television to the video out port. To connect a television, follow the steps... below. 1. Optional Devices Some models are supported with REGZA Link include a Toshiba utility dedicated to take advantage of its capabilities which can be connected to the video out port on . 4. Turn the computer off. 2....
...desktop icons. ■ Enable/Disable the REGZA Link function on . Turn the television on the computer. User's Manual 8-16 Vedio Out port Figure 8-11 Connecting a television 3. Use a video cable (not supplied) to connect the television to the video out port. To connect a television, follow the steps... below. 1. Optional Devices Some models are supported with REGZA Link include a Toshiba utility dedicated to take advantage of its capabilities which can be connected to the video out port on . 4. Turn the computer off. 2....
Users Manual Canada; English
Page 184
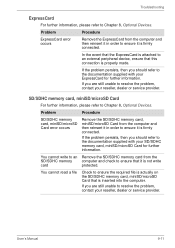
... card, miniSD/microSD Card from the SD/SDHC memory computer and check to the documentation supplied with your reseller, dealer or service provider. User's Manual 9-11 If the problem persists, then you are still unable to ensure the required file is actually on the SD/SDHC memory card, miniSD/microSD Card...
... card, miniSD/microSD Card from the SD/SDHC memory computer and check to the documentation supplied with your reseller, dealer or service provider. User's Manual 9-11 If the problem persists, then you are still unable to ensure the required file is actually on the SD/SDHC memory card, miniSD/microSD Card...
Users Manual Canada; English
Page 211
...-Fi Alliance. ■ Microsoft Windows® Networking ■ CSMA/CA (Collision Avoidance) with Acknowledgment (ACK) ■ 54/48/36/24/18/9/6 Mb/s (Revision A and G) ■ 11/5.5/2/1 Mb/s (Revision B) User's Manual D-1 Card Specifications Form Factor Compatibility Network Operating System Media Access Protocol Data Rate Mini Card ■ IEEE 802...
...-Fi Alliance. ■ Microsoft Windows® Networking ■ CSMA/CA (Collision Avoidance) with Acknowledgment (ACK) ■ 54/48/36/24/18/9/6 Mb/s (Revision A and G) ■ 11/5.5/2/1 Mb/s (Revision B) User's Manual D-1 Card Specifications Form Factor Compatibility Network Operating System Media Access Protocol Data Rate Mini Card ■ IEEE 802...
Users Manual Canada; English
Page 213
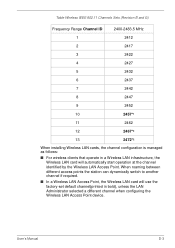
... Sets (Revision B and G) Frequency Range Channel ID 2400-2483.5 MHz 1 2412 2 2417 3 2422 4 2427 5 2432 6 2437 7 2442 8 2447 9 2452 10 2457*1 11 2462 12 2467*2 13 2472*2 When installing Wireless LAN cards, the channel configuration is managed as follows: ■ For wireless clients that operate in a Wireless ...
... Sets (Revision B and G) Frequency Range Channel ID 2400-2483.5 MHz 1 2412 2 2417 3 2422 4 2427 5 2432 6 2437 7 2442 8 2447 9 2452 10 2457*1 11 2462 12 2467*2 13 2472*2 When installing Wireless LAN cards, the channel configuration is managed as follows: ■ For wireless clients that operate in a Wireless ...
Users Manual Canada; English
Page 214
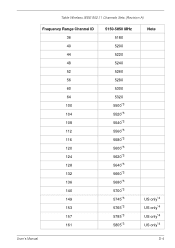
Table Wireless IEEE 802.11 Channels Sets (Revision A) Frequency Range Channel ID 36 40 44 48 52 56 60 64 100 104 108 112 116 120 124 128 132 136 140 149 153 157 161 5150-5850 MHz 5180 5200 5220 5240 5260 5280 5300 5320 5500*3 5520*3 5540*3 5560*3 5580*3 5600*3 5620*3 5640*3 5660*3 5680*3 5700*3 5745*3 5765*3 5785*3 5805*3 Note US only*4 US only*4 US only*4 US only*4 User's Manual D-4
Table Wireless IEEE 802.11 Channels Sets (Revision A) Frequency Range Channel ID 36 40 44 48 52 56 60 64 100 104 108 112 116 120 124 128 132 136 140 149 153 157 161 5150-5850 MHz 5180 5200 5220 5240 5260 5280 5300 5320 5500*3 5520*3 5540*3 5560*3 5580*3 5600*3 5620*3 5640*3 5660*3 5680*3 5700*3 5745*3 5765*3 5785*3 5805*3 Note US only*4 US only*4 US only*4 US only*4 User's Manual D-4
