
User Guide
Page 9
...damage this device is intended to be used indoors for frequency range 5.15 GHz to 5.25 GHz to reduce the potential for CE-Marking is TOSHIBA Europe GmbH, Hammfelddamm 8, 41460 Neuss, Germany. Si le matriel (ou son antenne d'emission) est installe a l'exterieur, il doit faire l'...1999/5/EC. The party responsible for harmful interference to co-channel Mobile Satellite systems. High power radars are allocated as primary users of Conformity TOSHIBA declares that this product to be operated indoors and away from windows to provide maximum shielding. 9 The term "IC" before the equipment ...
...damage this device is intended to be used indoors for frequency range 5.15 GHz to 5.25 GHz to reduce the potential for CE-Marking is TOSHIBA Europe GmbH, Hammfelddamm 8, 41460 Neuss, Germany. Si le matriel (ou son antenne d'emission) est installe a l'exterieur, il doit faire l'...1999/5/EC. The party responsible for harmful interference to co-channel Mobile Satellite systems. High power radars are allocated as primary users of Conformity TOSHIBA declares that this product to be operated indoors and away from windows to provide maximum shielding. 9 The term "IC" before the equipment ...
User Guide
Page 26
... Disposal Information This product contains mercury. Disposal of such marks by the Bluetooth SIG, Inc. 26 Trademarks Satellite is a trademark of Toshiba Corporation. DirectX, Active Desktop, DirectShow, and Windows Media are either registered trademarks or trademarks of Toshiba America Information Systems, Inc. ConfigFree is a registered trademark of Microsoft Corporation in the United States and...
... Disposal Information This product contains mercury. Disposal of such marks by the Bluetooth SIG, Inc. 26 Trademarks Satellite is a trademark of Toshiba Corporation. DirectX, Active Desktop, DirectShow, and Windows Media are either registered trademarks or trademarks of Toshiba America Information Systems, Inc. ConfigFree is a registered trademark of Microsoft Corporation in the United States and...
User Guide
Page 29
...88 Making your keyboard emulate a full-size keyboard 88 Ctrl, Fn, and Alt keys 89 Function keys 89 Special Windows® keys 89 Overlay keys 90 Using the overlay to type numeric data 90 Starting a program 91 Starting a ...program from the Start menu...........91 Starting a program from Windows® Explorer ...92 Starting a program using the Start Search field 93 Saving your work 93 Printing your work 95 ...102 Removing a disc with the computer off ..........103 Caring for CD or DVD discs 103 Toshiba's online resources 103
...88 Making your keyboard emulate a full-size keyboard 88 Ctrl, Fn, and Alt keys 89 Function keys 89 Special Windows® keys 89 Overlay keys 90 Using the overlay to type numeric data 90 Starting a program 91 Starting a ...program from the Start menu...........91 Starting a program from Windows® Explorer ...92 Starting a program using the Start Search field 93 Saving your work 93 Printing your work 95 ...102 Removing a disc with the computer off ..........103 Caring for CD or DVD discs 103 Toshiba's online resources 103
User Guide
Page 32
... Support 156 CD/DVD Drive Acoustic Silencer 157 TOSHIBA Accessibility 158 Fingerprint Authentication Utility 159 Fingerprint utility limitations 159 Fingerprint Enrollment 159 Fingerprint Logon 161 Power-on Security 161 Control Center 161 Password Bank ... Problems that are easy to fix 173 Problems when you turn on the computer............174 The Windows® operating system is not working ..177 Using Startup options to fix problems 177 Internet problems 178 The Windows® operating system can help you 179 Resolving a hardware conflict 179 A plan of action 179 Fixing...
... Support 156 CD/DVD Drive Acoustic Silencer 157 TOSHIBA Accessibility 158 Fingerprint Authentication Utility 159 Fingerprint utility limitations 159 Fingerprint Enrollment 159 Fingerprint Logon 161 Power-on Security 161 Control Center 161 Password Bank ... Problems that are easy to fix 173 Problems when you turn on the computer............174 The Windows® operating system is not working ..177 Using Startup options to fix problems 177 Internet problems 178 The Windows® operating system can help you 179 Resolving a hardware conflict 179 A plan of action 179 Fixing...
User Guide
Page 33
... Develop good computing habits 198 Data and system configuration backup in the Windows® operating system 199 If you need further assistance 203 Before you contact Toshiba 203 Contacting Toshiba 204 Other Toshiba Internet Web sites 204 Toshiba's worldwide offices 205 Appendix A: Hot Keys/TOSHIBA Cards 207 Hot Key Cards 207 Using the Hot Key Cards...
... Develop good computing habits 198 Data and system configuration backup in the Windows® operating system 199 If you need further assistance 203 Before you contact Toshiba 203 Contacting Toshiba 204 Other Toshiba Internet Web sites 204 Toshiba's worldwide offices 205 Appendix A: Hot Keys/TOSHIBA Cards 207 Hot Key Cards 207 Using the Hot Key Cards...
User Guide
Page 42
... and choose your background and then click Next. 5 Click the appropriate option from the Help Protect Windows Automatically screen. 6 Follow the remaining screen prompts to your computer. The Windows® operating system checks the system's performance, and then may vary according to complete the setup..., but are not limited to your computer. See "Connecting to enter the Setup Wizard. 2 Confirm acceptance of windows displayed, and the order in which windows appear, may restart your software setup choices. NOTE The names of Microsoft's End User License Agreement and click Next...
... and choose your background and then click Next. 5 Click the appropriate option from the Help Protect Windows Automatically screen. 6 Follow the remaining screen prompts to your computer. The Windows® operating system checks the system's performance, and then may vary according to complete the setup..., but are not limited to your computer. See "Connecting to enter the Setup Wizard. 2 Confirm acceptance of windows displayed, and the order in which windows appear, may restart your software setup choices. NOTE The names of Microsoft's End User License Agreement and click Next...
User Guide
Page 55
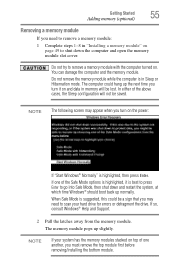
... is best to press Enter to go into Safe Mode, then shut down the computer and open the memory module slot cover. If so, consult Windows® Help and Support. 2 Pull the latches away from the memory module. Do not remove the memory module while the computer is highlighted, then press... Enter. In either of the Safe Mode options is highlighted, it on the power: If "Start Windows® Normally" is in memory will not be a sign that you may appear when you turn on and data in Sleep or Hibernation mode. NOTE...
... is best to press Enter to go into Safe Mode, then shut down the computer and open the memory module slot cover. If so, consult Windows® Help and Support. 2 Pull the latches away from the memory module. Do not remove the memory module while the computer is highlighted, then press... Enter. In either of the Safe Mode options is highlighted, it on the power: If "Start Windows® Normally" is in memory will not be a sign that you may appear when you turn on and data in Sleep or Hibernation mode. NOTE...
User Guide
Page 56
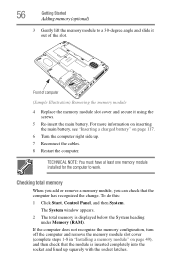
... memory When you add or remove a memory module, you can check that the module is displayed below the System heading under Memory (RAM). The System window appears. 2 The total memory is inserted completely into the socket and lined up . 7 Reconnect the cables. 8 Restart the computer. 56 Getting Started Adding memory (optional...
... memory When you add or remove a memory module, you can check that the module is displayed below the System heading under Memory (RAM). The System window appears. 2 The total memory is inserted completely into the socket and lined up . 7 Reconnect the cables. 8 Restart the computer. 56 Getting Started Adding memory (optional...
User Guide
Page 57
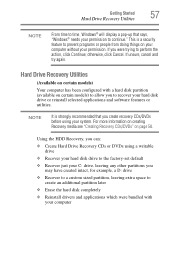
otherwise, click Cancel. Getting Started 57 Hard Drive Recovery Utilities NOTE From time to time, Windows® will display a pop-up that you create recovery CDs/DVDs before using a writable drive ❖ Recover your hard disk drive to the factory-set ... system. Hard Drive Recovery Utilities (Available on certain models) Your computer has been configured with your permission to continue." This is strongly recommended that says, "Windows® needs your computer
otherwise, click Cancel. Getting Started 57 Hard Drive Recovery Utilities NOTE From time to time, Windows® will display a pop-up that you create recovery CDs/DVDs before using a writable drive ❖ Recover your hard disk drive to the factory-set ... system. Hard Drive Recovery Utilities (Available on certain models) Your computer has been configured with your permission to continue." This is strongly recommended that says, "Windows® needs your computer
User Guide
Page 58
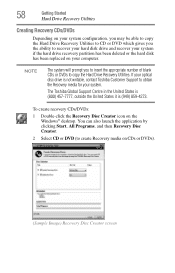
..., and then Recovery Disc Creator. 2 Select CD or DVD (to create Recovery media on the Windows® desktop. NOTE The system will prompt you the ability to obtain the Recovery media for your system. The Toshiba Global Support Centre in the United States is (800) 457-7777, outside the United States it... is not writable, contact Toshiba Customer Support to recover your hard disk drive and recover your system if the hard drive recovery partition has been deleted or the hard disk ...
..., and then Recovery Disc Creator. 2 Select CD or DVD (to create Recovery media on the Windows® desktop. NOTE The system will prompt you the ability to obtain the Recovery media for your system. The Toshiba Global Support Centre in the United States is (800) 457-7777, outside the United States it... is not writable, contact Toshiba Customer Support to recover your hard disk drive and recover your system if the hard drive recovery partition has been deleted or the hard disk ...
User Guide
Page 65
...Click Install. 5 Follow the on-screen prompts to complete the installation process. To reinstall drivers and applications: 1 Double-click the TOSHIBA Application Installer icon on the Windows® desktop. 2 Click Next. 3 Click the item(s) you would like to move the cursor: ❖ To move the ...the drivers and applications that were originally bundled with the stroke of a finger. Installing drivers and applications (Available on certain models) The TOSHIBA Application Installer (available on the TouchPad. ❖ To move the cursor to the bottom of the page, drag your finger toward ...
...Click Install. 5 Follow the on-screen prompts to complete the installation process. To reinstall drivers and applications: 1 Double-click the TOSHIBA Application Installer icon on the Windows® desktop. 2 Click Next. 3 Click the item(s) you would like to move the cursor: ❖ To move the ...the drivers and applications that were originally bundled with the stroke of a finger. Installing drivers and applications (Available on certain models) The TOSHIBA Application Installer (available on the TouchPad. ❖ To move the cursor to the bottom of the page, drag your finger toward ...
User Guide
Page 67
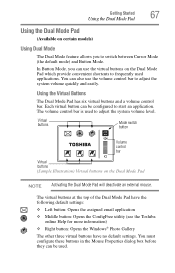
... Dual Mode Pad have the following default settings: ❖ Left button: Opens the assigned email application ❖ Middle button: Opens the ConfigFree utility (see the Toshiba online Help for more information) ❖ Right button: Opens the Windows® Photo Gallery The other three virtual buttons have no default settings.
... Dual Mode Pad have the following default settings: ❖ Left button: Opens the assigned email application ❖ Middle button: Opens the ConfigFree utility (see the Toshiba online Help for more information) ❖ Right button: Opens the Windows® Photo Gallery The other three virtual buttons have no default settings.
User Guide
Page 68
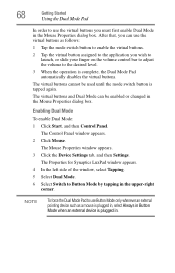
.... 2 Click Mouse. The Mouse Properties window appears. 3 Click the Device Settings tab, and then Settings. NOTE To force the Dual Mode Pad to use Button Mode only whenever an external pointing ... as a mouse is plugged in, select Always in Button Mode when an external device is tapped again. The Properties for Synaptics LuxPad window appears. 4 In the left side of the window, select Tapping. 5 Select Dual Mode. 6 Select Switch to Button Mode by tapping in the Mouse Properties dialog box. 68 Getting Started...
.... 2 Click Mouse. The Mouse Properties window appears. 3 Click the Device Settings tab, and then Settings. NOTE To force the Dual Mode Pad to use Button Mode only whenever an external pointing ... as a mouse is plugged in, select Always in Button Mode when an external device is tapped again. The Properties for Synaptics LuxPad window appears. 4 In the left side of the window, select Tapping. 5 Select Dual Mode. 6 Select Switch to Button Mode by tapping in the Mouse Properties dialog box. 68 Getting Started...

User Guide
Page 69
.... 2 Select the virtual button you wish to configure. 3 Select the desired options, and then click OK. 4 Click OK. 5 Click OK to close the Mouse Properties window. To configure a virtual button: 1 Perform steps 1-5 in "Enabling Dual Mode" on the bottom of the Dual Mode Pad (buttons 4, 5, and 6 in display, but you need... this , refer to these buttons if you must first configure that button so that it is associated with a built-in the Properties for Synaptics LuxPad window) are unassigned by default.
.... 2 Select the virtual button you wish to configure. 3 Select the desired options, and then click OK. 4 Click OK. 5 Click OK to close the Mouse Properties window. To configure a virtual button: 1 Perform steps 1-5 in "Enabling Dual Mode" on the bottom of the Dual Mode Pad (buttons 4, 5, and 6 in display, but you need... this , refer to these buttons if you must first configure that button so that it is associated with a built-in the Properties for Synaptics LuxPad window) are unassigned by default.
User Guide
Page 71
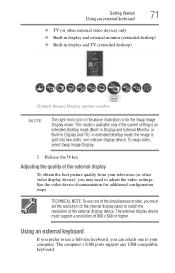
... external video device) only ❖ Built-in display and external monitor (extended desktop) ❖ Built-in display and TV (extended desktop) (Sample Image) Display options window NOTE The right-most icon in the above illustration is an extended desktop mode (Built-in Display and External Monitor, or Built-in Display and...
... external video device) only ❖ Built-in display and external monitor (extended desktop) ❖ Built-in display and TV (extended desktop) (Sample Image) Display options window NOTE The right-most icon in the above illustration is an extended desktop mode (Built-in Display and External Monitor, or Built-in Display and...
User Guide
Page 74
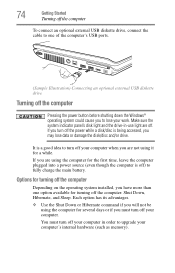
... the computer's USB ports. (Sample Illustration) Connecting an optional external USB diskette drive Turning off the computer Pressing the power button before shutting down the Windows® operating system could cause you may lose data or damage the disk/disc and/or drive. It is off) to fully charge the main...
... the computer's USB ports. (Sample Illustration) Connecting an optional external USB diskette drive Turning off the computer Pressing the power button before shutting down the Windows® operating system could cause you may lose data or damage the disk/disc and/or drive. It is off) to fully charge the main...
User Guide
Page 76
... main battery discharges while the computer is stored in Sleep mode, the computer uses some main battery power. ❖ Because the state of time, the Windows® operating system may save your work first. For information on using Sleep, see "Using and configuring Sleep mode" on page 81. 76 Getting Started...
... main battery discharges while the computer is stored in Sleep mode, the computer uses some main battery power. ❖ Because the state of time, the Windows® operating system may save your work first. For information on using Sleep, see "Using and configuring Sleep mode" on page 81. 76 Getting Started...
User Guide
Page 77
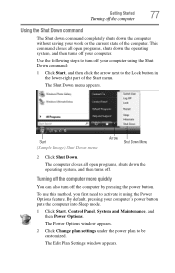
...computer into Sleep mode. 1 Click Start, Control Panel, System and Maintenance, and then Power Options. The Shut Down menu appears. The Power Options window appears. 2 Click Change plan settings under the power plan to the Lock button in the lower-right part of the computer. The Edit Plan ...Settings window appears. The computer closes all open programs, shuts down the operating system, and then turns off the computer by pressing the power button. Start...
...computer into Sleep mode. 1 Click Start, Control Panel, System and Maintenance, and then Power Options. The Shut Down menu appears. The Power Options window appears. 2 Click Change plan settings under the power plan to the Lock button in the lower-right part of the computer. The Edit Plan ...Settings window appears. The computer closes all open programs, shuts down the operating system, and then turns off the computer by pressing the power button. Start...
User Guide
Page 78
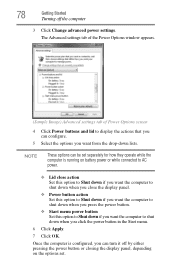
The Advanced settings tab of the Power Options window appears. (Sample Image) Advanced settings tab of Power Options screen 4 Click Power buttons and lid to shut down lists. NOTE These options can be set . ...
The Advanced settings tab of the Power Options window appears. (Sample Image) Advanced settings tab of Power Options screen 4 Click Power buttons and lid to shut down lists. NOTE These options can be set . ...
User Guide
Page 79
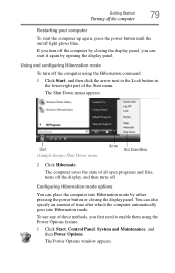
.... If you turn off the computer using the Power Options feature. 1 Click Start, Control Panel, System and Maintenance, and then Power Options. The Power Options window appears.
.... If you turn off the computer using the Power Options feature. 1 Click Start, Control Panel, System and Maintenance, and then Power Options. The Power Options window appears.


