User Guide
Page 9
...GHz and 5.65 GHz to 5.85 GHz bands. EU Declaration of Conformity TOSHIBA declares that this device. To prevent radio interference to the licensed service, this product to be operated indoors and away from windows to its transmit antenna) that the Industry Canada technical specifications were met. ...This product is restricted to indoor use due to provide maximum shielding. This device is carrying the CE-Mark in the 5.15 GHz to co-channel Mobile Satellite systems. High power...
...GHz and 5.65 GHz to 5.85 GHz bands. EU Declaration of Conformity TOSHIBA declares that this device. To prevent radio interference to the licensed service, this product to be operated indoors and away from windows to its transmit antenna) that the Industry Canada technical specifications were met. ...This product is restricted to indoor use due to provide maximum shielding. This device is carrying the CE-Mark in the 5.15 GHz to co-channel Mobile Satellite systems. High power...
User Guide
Page 26
26 Trademarks Satellite is a registered trademark of Synaptics, Inc. TouchPad is a trademark of Toshiba America Information Systems, Inc. xD-Picture Card is under license. Computer Disposal Information This product contains mercury. DirectX, Active Desktop, DirectShow, and Windows Media are trademarks or registered trademarks of Sony Corporation. Intel, Intel Core, Celeron, Centrino and Pentium are...
26 Trademarks Satellite is a registered trademark of Synaptics, Inc. TouchPad is a trademark of Toshiba America Information Systems, Inc. xD-Picture Card is under license. Computer Disposal Information This product contains mercury. DirectX, Active Desktop, DirectShow, and Windows Media are trademarks or registered trademarks of Sony Corporation. Intel, Intel Core, Celeron, Centrino and Pentium are...
User Guide
Page 29
...88 Making your keyboard emulate a full-size keyboard 88 Ctrl, Fn, and Alt keys 89 Function keys 89 Special Windows® keys 89 Overlay keys 90 Using the overlay to type numeric data 90 Starting a program 91 Starting a ...program from the Start menu...........91 Starting a program from Windows® Explorer ...92 Starting a program using the Start Search field 93 Saving your work 93 Printing your work 95 ...102 Removing a disc with the computer off ..........103 Caring for CD or DVD discs 103 Toshiba's online resources 103
...88 Making your keyboard emulate a full-size keyboard 88 Ctrl, Fn, and Alt keys 89 Function keys 89 Special Windows® keys 89 Overlay keys 90 Using the overlay to type numeric data 90 Starting a program 91 Starting a ...program from the Start menu...........91 Starting a program from Windows® Explorer ...92 Starting a program using the Start Search field 93 Saving your work 93 Printing your work 95 ...102 Removing a disc with the computer off ..........103 Caring for CD or DVD discs 103 Toshiba's online resources 103
User Guide
Page 32
... Support 156 CD/DVD Drive Acoustic Silencer 157 TOSHIBA Accessibility 158 Fingerprint Authentication Utility 159 Fingerprint utility limitations 159 Fingerprint Enrollment 159 Fingerprint Logon 161 Power-on Security 161 Control Center 161 Password Bank ... Problems that are easy to fix 173 Problems when you turn on the computer............174 The Windows® operating system is not working ..177 Using Startup options to fix problems 177 Internet problems 178 The Windows® operating system can help you 179 Resolving a hardware conflict 179 A plan of action 179 Fixing...
... Support 156 CD/DVD Drive Acoustic Silencer 157 TOSHIBA Accessibility 158 Fingerprint Authentication Utility 159 Fingerprint utility limitations 159 Fingerprint Enrollment 159 Fingerprint Logon 161 Power-on Security 161 Control Center 161 Password Bank ... Problems that are easy to fix 173 Problems when you turn on the computer............174 The Windows® operating system is not working ..177 Using Startup options to fix problems 177 Internet problems 178 The Windows® operating system can help you 179 Resolving a hardware conflict 179 A plan of action 179 Fixing...
User Guide
Page 33
... Develop good computing habits 198 Data and system configuration backup in the Windows® operating system 199 If you need further assistance 203 Before you contact Toshiba 203 Contacting Toshiba 204 Other Toshiba Internet Web sites 204 Toshiba's worldwide offices 205 Appendix A: Hot Keys/TOSHIBA Cards 207 Hot Key Cards 207 Using the Hot Key Cards...
... Develop good computing habits 198 Data and system configuration backup in the Windows® operating system 199 If you need further assistance 203 Before you contact Toshiba 203 Contacting Toshiba 204 Other Toshiba Internet Web sites 204 Toshiba's worldwide offices 205 Appendix A: Hot Keys/TOSHIBA Cards 207 Hot Key Cards 207 Using the Hot Key Cards...
User Guide
Page 42
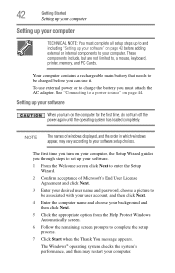
...click Next. 4 Enter the computer name and choose your background and then click Next. 5 Click the appropriate option from the Help Protect Windows Automatically screen. 6 Follow the remaining screen prompts to charge the battery you turn off the power again until the operating system has loaded ...completely. The Windows® operating system checks the system's performance, and then may vary according to , a mouse, keyboard, printer, memory, and PC Cards....
...click Next. 4 Enter the computer name and choose your background and then click Next. 5 Click the appropriate option from the Help Protect Windows Automatically screen. 6 Follow the remaining screen prompts to charge the battery you turn off the power again until the operating system has loaded ...completely. The Windows® operating system checks the system's performance, and then may vary according to , a mouse, keyboard, printer, memory, and PC Cards....
User Guide
Page 55
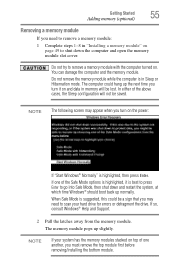
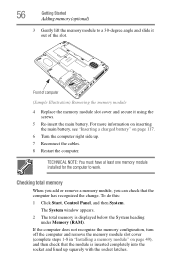
... another, you must remove the top module first before removing/installing the bottom module. When Safe Mode is highlighted, then press Enter. If so, consult Windows® Help and Support. 2 Pull the latches away from the memory module. Getting Started 55 Adding memory (optional) Removing a memory module If you need to... with the computer turned on and data in Sleep or Hibernation mode. Do not try to shut down and restart the system, at which time Windows® should boot back up normally. The memory module pops up the next time you turn on the power: If "Start...
... another, you must remove the top module first before removing/installing the bottom module. When Safe Mode is highlighted, then press Enter. If so, consult Windows® Help and Support. 2 Pull the latches away from the memory module. Getting Started 55 Adding memory (optional) Removing a memory module If you need to... with the computer turned on and data in Sleep or Hibernation mode. Do not try to shut down and restart the system, at which time Windows® should boot back up normally. The memory module pops up the next time you turn on the power: If "Start...
User Guide
Page 56
To do this: 1 Click Start, Control Panel, and then System. The System window appears. 2 The total memory is inserted completely into the socket and lined up . 7 Reconnect the cables. 8 Restart the computer. Front of computer (Sample Illustration) Removing ...
To do this: 1 Click Start, Control Panel, and then System. The System window appears. 2 The total memory is inserted completely into the socket and lined up . 7 Reconnect the cables. 8 Restart the computer. Front of computer (Sample Illustration) Removing ...
User Guide
Page 57
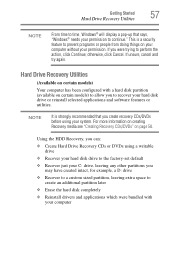
otherwise, click Cancel. If unsure, cancel and try again. This is strongly recommended that says, "Windows® needs your permission to continue." Hard Drive Recovery Utilities (Available on certain models) Your computer has been configured with a hard disk partition (...Recovery media see "Creating Recovery CDs/DVDs" on your computer without your permission. Getting Started 57 Hard Drive Recovery Utilities NOTE From time to time, Windows® will display a pop-up that you create recovery CDs/DVDs before using a writable drive ❖ Recover your hard disk drive to the ...
otherwise, click Cancel. If unsure, cancel and try again. This is strongly recommended that says, "Windows® needs your permission to continue." Hard Drive Recovery Utilities (Available on certain models) Your computer has been configured with a hard disk partition (...Recovery media see "Creating Recovery CDs/DVDs" on your computer without your permission. Getting Started 57 Hard Drive Recovery Utilities NOTE From time to time, Windows® will display a pop-up that you create recovery CDs/DVDs before using a writable drive ❖ Recover your hard disk drive to the ...
User Guide
Page 58
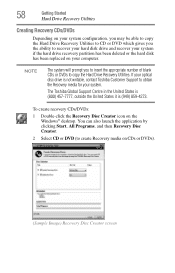
... is (800) 457-7777, outside the United States it is not writable, contact Toshiba Customer Support to obtain the Recovery media for your computer. To create recovery CDs/DVDs: 1 Double-click the Recovery Disc Creator icon on the Windows® desktop. NOTE The system will prompt you the ability to recover your...
... is (800) 457-7777, outside the United States it is not writable, contact Toshiba Customer Support to obtain the Recovery media for your computer. To create recovery CDs/DVDs: 1 Double-click the Recovery Disc Creator icon on the Windows® desktop. NOTE The system will prompt you the ability to recover your...
User Guide
Page 65
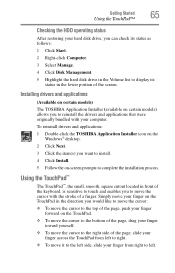
...small, smooth, square cutout located in the lower portion of the screen. Installing drivers and applications (Available on certain models) The TOSHIBA Application Installer (available on certain models) allows you to move the cursor with your finger forward on -screen prompts to complete the ...installation process. To reinstall drivers and applications: 1 Double-click the TOSHIBA Application Installer icon on the Windows® desktop. 2 Click Next. 3 Click the item(s) you would like to move the cursor: ❖ To move ...
...small, smooth, square cutout located in the lower portion of the screen. Installing drivers and applications (Available on certain models) The TOSHIBA Application Installer (available on certain models) allows you to move the cursor with your finger forward on -screen prompts to complete the ...installation process. To reinstall drivers and applications: 1 Double-click the TOSHIBA Application Installer icon on the Windows® desktop. 2 Click Next. 3 Click the item(s) you would like to move the cursor: ❖ To move ...
User Guide
Page 67
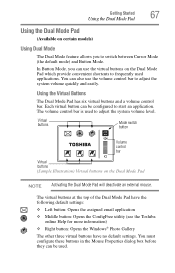
... have the following default settings: ❖ Left button: Opens the assigned email application ❖ Middle button: Opens the ConfigFree utility (see the Toshiba online Help for more information) ❖ Right button: Opens the Windows® Photo Gallery The other three virtual buttons have no default settings. The volume control bar is used .
... have the following default settings: ❖ Left button: Opens the assigned email application ❖ Middle button: Opens the ConfigFree utility (see the Toshiba online Help for more information) ❖ Right button: Opens the Windows® Photo Gallery The other three virtual buttons have no default settings. The volume control bar is used .
User Guide
Page 68
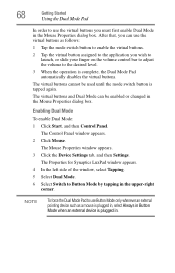
The virtual buttons cannot be enabled or changed in the Mouse Properties dialog box. The Control Panel window appears. 2 Click Mouse. After that, you can be used until the mode switch button is complete, the Dual Mode Pad automatically disables the virtual ... To force the Dual Mode Pad to Button Mode by tapping in . The Mouse Properties window appears. 3 Click the Device Settings tab, and then Settings. The Properties for Synaptics LuxPad window appears. 4 In the left side of the window, select Tapping. 5 Select Dual Mode. 6 Select Switch to use the virtual buttons as a...
The virtual buttons cannot be enabled or changed in the Mouse Properties dialog box. The Control Panel window appears. 2 Click Mouse. After that, you can be used until the mode switch button is complete, the Dual Mode Pad automatically disables the virtual ... To force the Dual Mode Pad to Button Mode by tapping in . The Mouse Properties window appears. 3 Click the Device Settings tab, and then Settings. The Properties for Synaptics LuxPad window appears. 4 In the left side of the window, select Tapping. 5 Select Dual Mode. 6 Select Switch to use the virtual buttons as a...

User Guide
Page 69
... to a live electrical outlet. To configure a virtual button: 1 Perform steps 1-5 in the Properties for Synaptics LuxPad window) are preconfigured for the type of the computer. 2 Connect the device's power cable to close the Mouse Properties window. Using external display devices Your computer comes with a function. You cannot connect both the S-video Out...
... to a live electrical outlet. To configure a virtual button: 1 Perform steps 1-5 in the Properties for Synaptics LuxPad window) are preconfigured for the type of the computer. 2 Connect the device's power cable to close the Mouse Properties window. Using external display devices Your computer comes with a function. You cannot connect both the S-video Out...
User Guide
Page 71
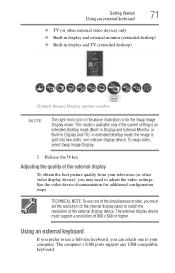
... external video device) only ❖ Built-in display and external monitor (extended desktop) ❖ Built-in display and TV (extended desktop) (Sample Image) Display options window NOTE The right-most icon in Display and TV). The computer's USB ports support any USB-compatible keyboard. This mode is available only if the...
... external video device) only ❖ Built-in display and external monitor (extended desktop) ❖ Built-in display and TV (extended desktop) (Sample Image) Display options window NOTE The right-most icon in Display and TV). The computer's USB ports support any USB-compatible keyboard. This mode is available only if the...
User Guide
Page 74
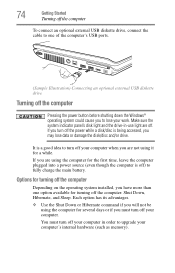
... the computer's USB ports. (Sample Illustration) Connecting an optional external USB diskette drive Turning off the computer Pressing the power button before shutting down the Windows® operating system could cause you to lose your computer's internal hardware (such as memory). You must turn off the power while a disk/disc is...
... the computer's USB ports. (Sample Illustration) Connecting an optional external USB diskette drive Turning off the computer Pressing the power button before shutting down the Windows® operating system could cause you to lose your computer's internal hardware (such as memory). You must turn off the power while a disk/disc is...
User Guide
Page 76
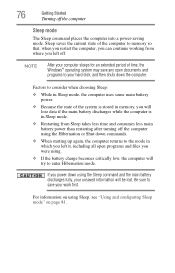
... using the Sleep command and the main battery discharges fully, your work first. NOTE After your computer sleeps for an extended period of time, the Windows® operating system may save your unsaved information will try to the mode in Sleep mode. ❖ Restarting from where you left it, including all...
... using the Sleep command and the main battery discharges fully, your work first. NOTE After your computer sleeps for an extended period of time, the Windows® operating system may save your unsaved information will try to the mode in Sleep mode. ❖ Restarting from where you left it, including all...
User Guide
Page 77
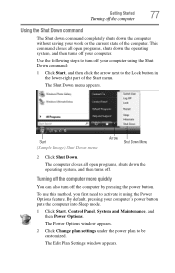
... Down command: 1 Click Start, and then click the arrow next to the Lock button in the lower-right part of the computer. The Power Options window appears. 2 Click Change plan settings under the power plan to turn off your computer's power button puts the computer into Sleep mode. 1 Click Start, Control... button. Start (Sample Image) Shut Down menu Arrow Shut Down Menu 2 Click Shut Down. Use the following steps to be customized. The Edit Plan Settings window appears.
... Down command: 1 Click Start, and then click the arrow next to the Lock button in the lower-right part of the computer. The Power Options window appears. 2 Click Change plan settings under the power plan to turn off your computer's power button puts the computer into Sleep mode. 1 Click Start, Control... button. Start (Sample Image) Shut Down menu Arrow Shut Down Menu 2 Click Shut Down. Use the following steps to be customized. The Edit Plan Settings window appears.
User Guide
Page 78
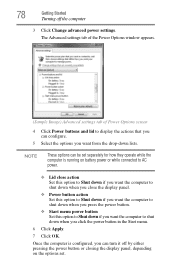
... from the drop-down when you can turn it off the computer 3 Click Change advanced power settings. The Advanced settings tab of the Power Options window appears. (Sample Image) Advanced settings tab of Power Options screen 4 Click Power buttons and lid to shut down lists.
... from the drop-down when you can turn it off the computer 3 Click Change advanced power settings. The Advanced settings tab of the Power Options window appears. (Sample Image) Advanced settings tab of Power Options screen 4 Click Power buttons and lid to shut down lists.
User Guide
Page 79
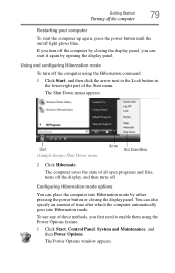
... panel. Configuring Hibernation mode options You can place the computer into Hibernation mode. The computer saves the state of the Start menu. The Power Options window appears. Using and configuring Hibernation mode To turn off . Getting Started 79 Turning off the computer Restarting your computer To start it again by closing...
... panel. Configuring Hibernation mode options You can place the computer into Hibernation mode. The computer saves the state of the Start menu. The Power Options window appears. Using and configuring Hibernation mode To turn off . Getting Started 79 Turning off the computer Restarting your computer To start it again by closing...


