User Guide
Page 33
...backup in the Windows® operating system 199 If you need further assistance 203 Before you contact Toshiba 203 Contacting Toshiba 204 Other Toshiba Internet Web sites 204 Toshiba's worldwide offices 205 Appendix A: Hot Keys/TOSHIBA Cards 207 Hot Key Cards 207 Using the Hot Key Cards 208 Application Cards 209 Using the ... modes 217 Display brightness 218 Disabling or enabling wireless devices............219 Disabling or enabling the TouchPad™ or Dual Mode Pad 220 Changing screen resolution 221 Keyboard hot key functions 222 Appendix B: Power Cord/Cable Connectors 223
...backup in the Windows® operating system 199 If you need further assistance 203 Before you contact Toshiba 203 Contacting Toshiba 204 Other Toshiba Internet Web sites 204 Toshiba's worldwide offices 205 Appendix A: Hot Keys/TOSHIBA Cards 207 Hot Key Cards 207 Using the Hot Key Cards 208 Application Cards 209 Using the ... modes 217 Display brightness 218 Disabling or enabling wireless devices............219 Disabling or enabling the TouchPad™ or Dual Mode Pad 220 Changing screen resolution 221 Keyboard hot key functions 222 Appendix B: Power Cord/Cable Connectors 223
User Guide
Page 42
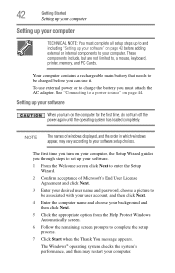
... computer Setting up your computer TECHNICAL NOTE: You must complete all setup steps up to and including "Setting up your software. 1 From the Welcome screen click Next to enter the Setup Wizard. 2 Confirm acceptance of windows displayed, and the order in which windows appear, may restart your computer. Your... Next. 4 Enter the computer name and choose your background and then click Next. 5 Click the appropriate option from the Help Protect Windows Automatically screen. 6 Follow the remaining screen prompts to complete the setup process. 7 Click Start when the Thank You message appears.
... computer Setting up your computer TECHNICAL NOTE: You must complete all setup steps up to and including "Setting up your software. 1 From the Welcome screen click Next to enter the Setup Wizard. 2 Confirm acceptance of windows displayed, and the order in which windows appear, may restart your computer. Your... Next. 4 Enter the computer name and choose your background and then click Next. 5 Click the appropriate option from the Help Protect Windows Automatically screen. 6 Follow the remaining screen prompts to complete the setup process. 7 Click Start when the Thank You message appears.
User Guide
Page 47
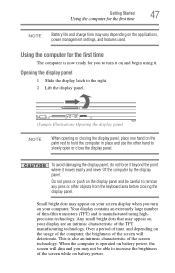
... turn on the applications, power management settings, and features used. Small bright dots may appear on your screen display when you turn it on the usage of the computer, the brightness of the... screen will dim and you to increase the brightness of the screen while on your display are an intrinsic characteristic of the screen technology. Getting Started 47 Using the computer for the first time ...When the computer is now ready for the first time The computer is operated on battery power, the screen will deteriorate.
... turn on the applications, power management settings, and features used. Small bright dots may appear on your screen display when you turn it on the usage of the computer, the brightness of the... screen will dim and you to increase the brightness of the screen while on your display are an intrinsic characteristic of the screen technology. Getting Started 47 Using the computer for the first time ...When the computer is now ready for the first time The computer is operated on battery power, the screen will deteriorate.
User Guide
Page 55
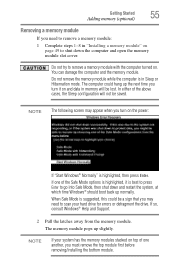
... Mode, then shut down the computer and open the memory module slot cover. You can damage the computer and the memory module. NOTE The following screen may need to remove a memory module: 1 Complete steps 1-8 in Sleep or Hibernation mode. The computer could be lost. When Safe Mode is suggested, this could...
... Mode, then shut down the computer and open the memory module slot cover. You can damage the computer and the memory module. NOTE The following screen may need to remove a memory module: 1 Complete steps 1-8 in Sleep or Hibernation mode. The computer could be lost. When Safe Mode is suggested, this could...
User Guide
Page 58
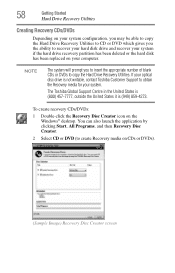
...Drive Recovery Utilities. If your optical disc drive is (949) 859-4273. The Toshiba Global Support Centre in the United States is (800) 457-7777, outside the United States it is not... writable, contact Toshiba Customer Support to obtain the Recovery media for your system if the hard drive recovery partition... been deleted or the hard disk has been replaced on CDs or DVDs). (Sample Image) Recovery Disc Creator screen You can also launch the application by clicking Start, All Programs, and then Recovery Disc Creator. 2 Select ...
...Drive Recovery Utilities. If your optical disc drive is (949) 859-4273. The Toshiba Global Support Centre in the United States is (800) 457-7777, outside the United States it is not... writable, contact Toshiba Customer Support to obtain the Recovery media for your system if the hard drive recovery partition... been deleted or the hard disk has been replaced on CDs or DVDs). (Sample Image) Recovery Disc Creator screen You can also launch the application by clicking Start, All Programs, and then Recovery Disc Creator. 2 Select ...
User Guide
Page 59
... 59 Hard Drive Recovery Utilities 3 Select the items you have created with a user specified size ❖ Hard Disk Drive Recovery using the Recovery media" on -screen prompts for completing the copy process.
... 59 Hard Drive Recovery Utilities 3 Select the items you have created with a user specified size ❖ Hard Disk Drive Recovery using the Recovery media" on -screen prompts for completing the copy process.
User Guide
Page 60
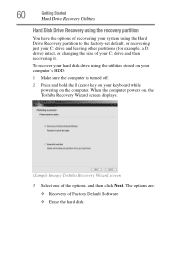
... sure the computer is turned off. 2 Press and hold the 0 (zero) key on the computer. When the computer powers on, the Toshiba Recovery Wizard screen displays. (Sample Image) Toshiba Recovery Wizard screen 3 Select one of your keyboard while powering on your C: drive and then recovering it. The options are: ❖ Recovery of Factory Default...
... sure the computer is turned off. 2 Press and hold the 0 (zero) key on the computer. When the computer powers on, the Toshiba Recovery Wizard screen displays. (Sample Image) Toshiba Recovery Wizard screen 3 Select one of your keyboard while powering on your C: drive and then recovering it. The options are: ❖ Recovery of Factory Default...
User Guide
Page 61
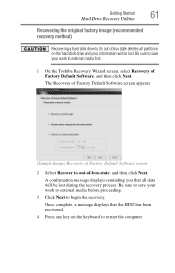
...HDD has been recovered. 4 Press any key on the hard disk drive and your work to external media first. 1 On the Toshiba Recovery Wizard screen, select Recovery of Factory Default Software, and then click Next. Be sure to save your information will be lost during the recovery ...your work to external media before proceeding. 3 Click Next to begin the recovery. The Recovery of Factory Default Software screen appears. (Sample Image) Recovery of Factory Default Software screen 2 Select Recover to out-of-box-state, and then click Next. Once complete, a message displays that all ...
...HDD has been recovered. 4 Press any key on the hard disk drive and your work to external media first. 1 On the Toshiba Recovery Wizard screen, select Recovery of Factory Default Software, and then click Next. Be sure to save your information will be lost during the recovery ...your work to external media before proceeding. 3 Click Next to begin the recovery. The Recovery of Factory Default Software screen appears. (Sample Image) Recovery of Factory Default Software screen 2 Select Recover to out-of-box-state, and then click Next. Once complete, a message displays that all ...
User Guide
Page 62
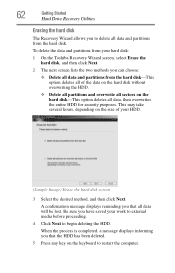
...the process is completed, a message displays informing you that all of your hard disk: 1 On the Toshiba Recovery Wizard screen, select Erase the hard disk, and then click Next. 2 The next screen lists the two methods you can choose: ❖ Delete all data, then overwrites the entire HDD for... security purposes. To delete the data and partitions from your HDD. (Sample Image) Erase the hard disk screen 3 Select the desired method, and then click Next. 62 Getting Started Hard Drive Recovery Utilities Erasing the hard disk The Recovery Wizard allows...
...the process is completed, a message displays informing you that all of your hard disk: 1 On the Toshiba Recovery Wizard screen, select Erase the hard disk, and then click Next. 2 The next screen lists the two methods you can choose: ❖ Delete all data, then overwrites the entire HDD for... security purposes. To delete the data and partitions from your HDD. (Sample Image) Erase the hard disk screen 3 Select the desired method, and then click Next. 62 Getting Started Hard Drive Recovery Utilities Erasing the hard disk The Recovery Wizard allows...
User Guide
Page 63
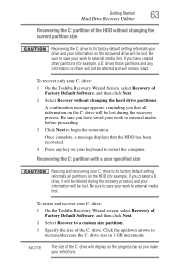
... will remain intact. To recover only your information will be lost. To resize and recover your C: drive: 1 On the Toshiba Recovery Wizard screen, select Recovery of Factory Default Software, and then click Next. 2 Select Recover to its factory default setting reformats all information... on the recovered drive will be lost during the recovery process) and your C: drive: 1 On the Toshiba Recovery Wizard Screen, select Recovery of the C: drive. A confirmation message appears, reminding you have saved your information on the C: drive will be...
... will remain intact. To recover only your information will be lost. To resize and recover your C: drive: 1 On the Toshiba Recovery Wizard screen, select Recovery of Factory Default Software, and then click Next. 2 Select Recover to its factory default setting reformats all information... on the recovered drive will be lost during the recovery process) and your C: drive: 1 On the Toshiba Recovery Wizard Screen, select Recovery of the C: drive. A confirmation message appears, reminding you have saved your information on the C: drive will be...

User Guide
Page 64
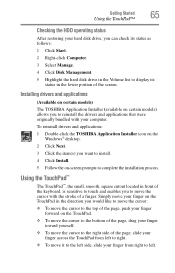
...The boot menu appears. 3 Using the arrow keys, select the CD/DVD option and press Enter. The system will boot up to the Toshiba Recovery Wizard screen. 4 Please refer to "Hard Disk Drive Recovery options" on page 58): 1 Insert the first recovery CD or DVD into your keyboard...restart the computer. 64 Getting Started Hard Drive Recovery Utilities 4 Click Next to explain the available recovery options. (Sample Image) Toshiba HDD Recovery Utility screen To recover your hard disk drive using your Hard Drive Recovery Utilities. Hard Disk Drive Recovery using the Recovery media If you...
...The boot menu appears. 3 Using the arrow keys, select the CD/DVD option and press Enter. The system will boot up to the Toshiba Recovery Wizard screen. 4 Please refer to "Hard Disk Drive Recovery options" on page 58): 1 Insert the first recovery CD or DVD into your keyboard...restart the computer. 64 Getting Started Hard Drive Recovery Utilities 4 Click Next to explain the available recovery options. (Sample Image) Toshiba HDD Recovery Utility screen To recover your hard disk drive using your Hard Drive Recovery Utilities. Hard Disk Drive Recovery using the Recovery media If you...
User Guide
Page 65
..., is sensitive to touch and enables you to reinstall the drivers and applications that were originally bundled with the stroke of the screen. Getting Started 65 Using the TouchPad™ Checking the HDD operating status After restoring your hard disk drive, you can check ...Simply move the cursor to the right side of the page, push your finger forward on -screen prompts to complete the installation process. Installing drivers and applications (Available on certain models) The TOSHIBA Application Installer (available on certain models) allows you to move it to left side, slide ...
..., is sensitive to touch and enables you to reinstall the drivers and applications that were originally bundled with the stroke of the screen. Getting Started 65 Using the TouchPad™ Checking the HDD operating status After restoring your hard disk drive, you can check ...Simply move the cursor to the right side of the page, push your finger forward on -screen prompts to complete the installation process. Installing drivers and applications (Available on certain models) The TOSHIBA Application Installer (available on certain models) allows you to move it to left side, slide ...
User Guide
Page 66
... 220. Disabling or enabling the TouchPad™ The TouchPad™ is much smaller than the display screen, moving your finger along the right edge of the TouchPad. To scroll vertically, run your cursor across the screen often means having to move the cursor to the item, then press and release the primary...
... 220. Disabling or enabling the TouchPad™ The TouchPad™ is much smaller than the display screen, moving your finger along the right edge of the TouchPad. To scroll vertically, run your cursor across the screen often means having to move the cursor to the item, then press and release the primary...

User Guide
Page 69
... 4, 5, and 6 in "Enabling Dual Mode" on the bottom of device you wish. The virtual buttons on page 68. 2 Select the virtual button you need a larger screen. Using external display devices Your computer comes with a function. Getting Started 69 Using external display devices Configuring virtual buttons The virtual buttons at the same...
... 4, 5, and 6 in "Enabling Dual Mode" on the bottom of device you wish. The virtual buttons on page 68. 2 Select the virtual button you need a larger screen. Using external display devices Your computer comes with a function. Getting Started 69 Using external display devices Configuring virtual buttons The virtual buttons at the same...

User Guide
Page 70
Your computer will automatically detect the external display device and activate a screen with display options. 4 Select the settings you desire and click Apply. 5 Click OK. Then click OK. Directing the display output when you turn on the ... device. Refer to your television. NOTE Some modes are only available with display options. Your computer will automatically detect the external display device and activate a screen with the appropriate device attached and turned on the side of your computer) to the HDMI Out port on . Connecting an HDMI-compatible television or...
Your computer will automatically detect the external display device and activate a screen with display options. 4 Select the settings you desire and click Apply. 5 Click OK. Then click OK. Directing the display output when you turn on the ... device. Refer to your television. NOTE Some modes are only available with display options. Your computer will automatically detect the external display device and activate a screen with the appropriate device attached and turned on the side of your computer) to the HDMI Out port on . Connecting an HDMI-compatible television or...
User Guide
Page 73
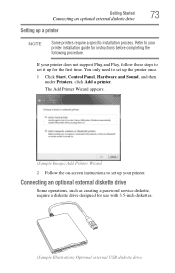
..., Control Panel, Hardware and Sound, and then under Printers, click Add a printer. The Add Printer Wizard appears. (Sample Image) Add Printer Wizard 2 Follow the on-screen instructions to your printer. Connecting an optional external diskette drive Some operations, such as creating a password service diskette, require a diskette drive designed for instructions before...
..., Control Panel, Hardware and Sound, and then under Printers, click Add a printer. The Add Printer Wizard appears. (Sample Image) Add Printer Wizard 2 Follow the on-screen instructions to your printer. Connecting an optional external diskette drive Some operations, such as creating a password service diskette, require a diskette drive designed for instructions before...
User Guide
Page 78
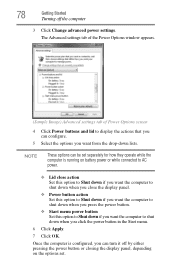
... computer is running on the options set. The Advanced settings tab of the Power Options window appears. (Sample Image) Advanced settings tab of Power Options screen 4 Click Power buttons and lid to shut down when you can configure. 5 Select the options you want from the drop-down lists. 78 Getting Started...
... computer is running on the options set. The Advanced settings tab of the Power Options window appears. (Sample Image) Advanced settings tab of Power Options screen 4 Click Power buttons and lid to shut down when you can configure. 5 Select the options you want from the drop-down lists. 78 Getting Started...
User Guide
Page 80
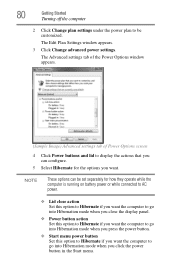
... window appears. 3 Click Change advanced power settings. The Advanced settings tab of the Power Options window appears. (Sample Image) Advanced settings tab of Power Options screen 4 Click Power buttons and lid to display the actions that you can be customized. 80 Getting Started Turning off the computer 2 Click Change plan settings...
... window appears. 3 Click Change advanced power settings. The Advanced settings tab of the Power Options window appears. (Sample Image) Advanced settings tab of Power Options screen 4 Click Power buttons and lid to display the actions that you can be customized. 80 Getting Started Turning off the computer 2 Click Change plan settings...

User Guide
Page 81
... open programs and files to the memory, turns off the computer using the Sleep command: 1 Click Start, and then click the arrow next to the screen(s) you were using. Once the computer is in Hibernation mode by closing the display panel, depending on /off light glows blue. Using and configuring Sleep...
... open programs and files to the memory, turns off the computer using the Sleep command: 1 Click Start, and then click the arrow next to the screen(s) you were using. Once the computer is in Hibernation mode by closing the display panel, depending on /off light glows blue. Using and configuring Sleep...
User Guide
Page 82
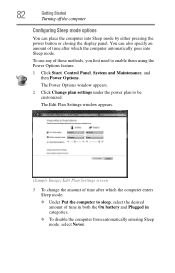
... Power Options feature. 1 Click Start, Control Panel, System and Maintenance, and then Power Options. The Edit Plan Settings window appears. (Sample Image) Edit Plan Settings screen 3 To change the amount of time after which the computer enters Sleep mode: ❖ Under Put the computer to sleep, select the desired amount of...
... Power Options feature. 1 Click Start, Control Panel, System and Maintenance, and then Power Options. The Edit Plan Settings window appears. (Sample Image) Edit Plan Settings screen 3 To change the amount of time after which the computer enters Sleep mode: ❖ Under Put the computer to sleep, select the desired amount of...


