
User Manual
Page 27
... first time 45 Opening the display panel 45 Your computer's features and specifications ....46 Turning on the power 46 Adding memory (optional 47 Installing a memory module 48 Removing a memory module 53 Checking total memory 55 Using the TouchPad 55 Scrolling with the TouchPad 56 Control buttons 56 Disabling or enabling the TouchPad 56 Using...
... first time 45 Opening the display panel 45 Your computer's features and specifications ....46 Turning on the power 46 Adding memory (optional 47 Installing a memory module 48 Removing a memory module 53 Checking total memory 55 Using the TouchPad 55 Scrolling with the TouchPad 56 Control buttons 56 Disabling or enabling the TouchPad 56 Using...
User Manual
Page 30
... Card 124 Setting up a PC Card for your computer .........124 Using the Bridge Media Adapter Slot 125 Inserting memory media 125 Removing memory media 126 Using the i.LINK® port 126 Chapter 5: Toshiba Utilities 127 TOSHIBA Assist 128 Connect 129 Secure 130 Protect & Fix 131 Optimize 132 Setting passwords 133 Using an instant password...
... Card 124 Setting up a PC Card for your computer .........124 Using the Bridge Media Adapter Slot 125 Inserting memory media 125 Removing memory media 126 Using the i.LINK® port 126 Chapter 5: Toshiba Utilities 127 TOSHIBA Assist 128 Connect 129 Secure 130 Protect & Fix 131 Optimize 132 Setting passwords 133 Using an instant password...
User Manual
Page 31
... problems 163 The Windows® operating system can help you 164 Resolving a hardware conflict 164 A plan of action 164 Fixing a problem with Device Manager ...........165 Memory problems 166 Power and the batteries 167 Keyboard problems 168 Display problems 169 Disk drive problems 171 Optical drive problems 172 Sound system problems 173...
... problems 163 The Windows® operating system can help you 164 Resolving a hardware conflict 164 A plan of action 164 Fixing a problem with Device Manager ...........165 Memory problems 166 Power and the batteries 167 Keyboard problems 168 Display problems 169 Disk drive problems 171 Optical drive problems 172 Sound system problems 173...
User Manual
Page 40
... include, but are not limited to be associated with your software setup choices. Your computer contains a rechargeable main battery that needs to , a mouse, keyboard, printer, memory, and PC Cards. See "Connecting to your user account, and then click Next. 4 Enter the computer name and description and click Next. 5 Click the appropriate...
... include, but are not limited to be associated with your software setup choices. Your computer contains a rechargeable main battery that needs to , a mouse, keyboard, printer, memory, and PC Cards. See "Connecting to your user account, and then click Next. 4 Enter the computer name and description and click Next. 5 Click the appropriate...
User Manual
Page 41
... page 40. Adding optional external devices NOTE Before adding external devices or memory, Toshiba recommends setting up process of your computer. Product registration can either double-click the Toshiba Registration icon on your desktop or go to the Toshiba Web site at www.register.toshiba.com at a later time. Getting Started Registering your computer with...
... page 40. Adding optional external devices NOTE Before adding external devices or memory, Toshiba recommends setting up process of your computer. Product registration can either double-click the Toshiba Registration icon on your desktop or go to the Toshiba Web site at www.register.toshiba.com at a later time. Getting Started Registering your computer with...
User Manual
Page 47
.... See "Setting up your model)-about one second. (Sample Illustration) Turning on your software. Adding memory (optional) HINT: To purchase additional memory modules, see the accessories information packaged with enough memory to increase the computer's memory if you turn on the computer for the first time, do not turn off light on the... operating system will load automatically. When you use complex software or process large amounts of today's popular applications. NOTE Before adding external devices or memory, Toshiba recommends setting up your system or visit accessories...
.... See "Setting up your model)-about one second. (Sample Illustration) Turning on your software. Adding memory (optional) HINT: To purchase additional memory modules, see the accessories information packaged with enough memory to increase the computer's memory if you turn on the computer for the first time, do not turn off light on the... operating system will load automatically. When you use complex software or process large amounts of today's popular applications. NOTE Before adding external devices or memory, Toshiba recommends setting up your system or visit accessories...
User Manual
Page 48
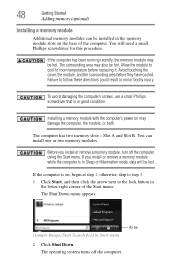
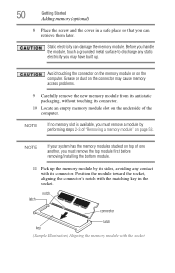
... slots on the base of the Start menu. If the computer has been running recently, the memory module may be installed in good condition. If you install or remove a memory module, turn off the computer. Allow the module to cool to follow these directions could result ... the computer's power on , begin at step 1; The computer has two memory slots-Slot A and Slot B. The Shut Down menu appears. 48 Getting Started Adding memory (optional) Installing a memory module Additional memory modules can install one or two memory modules. otherwise, skip to step 3. 1 Click Start, and then click ...
... slots on the base of the Start menu. If the computer has been running recently, the memory module may be installed in good condition. If you install or remove a memory module, turn off the computer. Allow the module to cool to follow these directions could result ... the computer's power on , begin at step 1; The computer has two memory slots-Slot A and Slot B. The Shut Down menu appears. 48 Getting Started Adding memory (optional) Installing a memory module Additional memory modules can install one or two memory modules. otherwise, skip to step 3. 1 Click Start, and then click ...
User Manual
Page 49
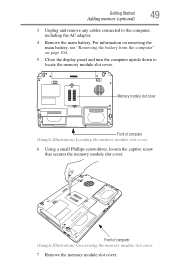
... slot cover 6 Using a small Phillips screwdriver, loosen the captive screw that secures the memory module slot cover. For information on removing the main battery, see "Removing the battery from the computer" on page 104. 5 Close the display ...and turn the computer upside down to the computer, including the AC adaptor. 4 Remove the main battery. Memory module slot cover Front of computer (Sample Illustration) Unscrewing the memory module slot cover 7 Remove the memory module slot cover. Getting Started Adding memory (optional) 49 3 Unplug and remove any cables connected to locate the...
... slot cover 6 Using a small Phillips screwdriver, loosen the captive screw that secures the memory module slot cover. For information on removing the main battery, see "Removing the battery from the computer" on page 104. 5 Close the display ...and turn the computer upside down to the computer, including the AC adaptor. 4 Remove the main battery. Memory module slot cover Front of computer (Sample Illustration) Unscrewing the memory module slot cover 7 Remove the memory module slot cover. Getting Started Adding memory (optional) 49 3 Unplug and remove any cables connected to locate the...
User Manual
Page 50
... metal surface to discharge any contact with the matching key in a safe place so that you may cause memory access problems. 9 Carefully remove the new memory module from its antistatic packaging, without touching its connector. Position the module toward the socket, aligning the connector...'s notch with its connector. 10 Locate an empty memory module slot on the underside of "Removing a memory module" on the computer. Static electricity can retrieve them later. notch latch connector latch key (Sample Illustration...
... metal surface to discharge any contact with the matching key in a safe place so that you may cause memory access problems. 9 Carefully remove the new memory module from its antistatic packaging, without touching its connector. Position the module toward the socket, aligning the connector...'s notch with its connector. 10 Locate an empty memory module slot on the underside of "Removing a memory module" on the computer. Static electricity can retrieve them later. notch latch connector latch key (Sample Illustration...
User Manual
Page 51
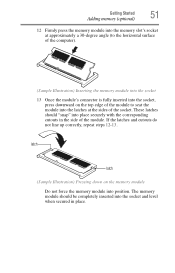
... into the socket 13 Once the module's connector is fully inserted into the socket, press downward on the memory module Do not force the memory module into the socket and level when secured in the side of the socket. These latches should be completely inserted into position. latch latch (Sample ... module into the latches at the sides of the module. If the latches and cutouts do not line up correctly, repeat steps 12-13. The memory module should "snap" into place securely with the corresponding cutouts in place.
... into the socket 13 Once the module's connector is fully inserted into the socket, press downward on the memory module Do not force the memory module into the socket and level when secured in the side of the socket. These latches should be completely inserted into position. latch latch (Sample ... module into the latches at the sides of the module. If the latches and cutouts do not line up correctly, repeat steps 12-13. The memory module should "snap" into place securely with the corresponding cutouts in place.
User Manual
Page 52
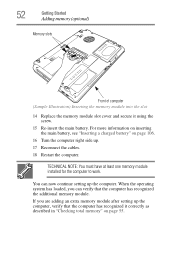
...-insert the main battery. 52 Getting Started Adding memory (optional) Memory slots Front of computer (Sample Illustration) Inserting the memory module into the slot 14 Replace the memory module slot cover and secure it correctly as described in "Checking total memory" on page 106. 16 Turn the computer right... side up the computer. When the operating system has loaded, you are adding an extra memory module after setting up the computer, verify that the computer has recognized the additional memory module. If you can now continue setting up . 17 Reconnect the cables. 18 Restart the...
...-insert the main battery. 52 Getting Started Adding memory (optional) Memory slots Front of computer (Sample Illustration) Inserting the memory module into the slot 14 Replace the memory module slot cover and secure it correctly as described in "Checking total memory" on page 106. 16 Turn the computer right... side up the computer. When the operating system has loaded, you are adding an extra memory module after setting up the computer, verify that the computer has recognized the additional memory module. If you can now continue setting up . 17 Reconnect the cables. 18 Restart the...
User Manual
Page 53
.... If one another, you must remove the top module first before removing/installing the bottom module. You can damage the computer and the memory module. The following screen appears when you turn it is highlighted, it on the power: If "Start Windows® Normally" is suggested..., this could hang up slightly. When Safe Mode is highlighted, then press Enter. Getting Started Adding memory (optional) 53 Removing a memory module If you need to shut down and restart the system, at which time Windows® should boot back up normally. The...
.... If one another, you must remove the top module first before removing/installing the bottom module. You can damage the computer and the memory module. The following screen appears when you turn it is highlighted, it on the power: If "Start Windows® Normally" is suggested..., this could hang up slightly. When Safe Mode is highlighted, then press Enter. Getting Started Adding memory (optional) 53 Removing a memory module If you need to shut down and restart the system, at which time Windows® should boot back up normally. The...
User Manual
Page 54
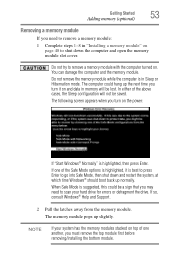
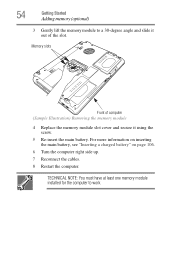
TECHNICAL NOTE: You must have at least one memory module installed for the computer to a 30-degree angle and slide it out of computer (Sample Illustration) Removing the memory module 4 Replace the memory module slot cover and secure it using the screw. 5 Re-insert the main battery. Memory slots Front of the slot. 54 Getting Started Adding memory (optional) 3 Gently lift the memory module to work. For more information on inserting the main battery, see "Inserting a charged battery" on page 106. 6 Turn the computer right side up. 7 Reconnect the cables. 8 Restart the computer.
TECHNICAL NOTE: You must have at least one memory module installed for the computer to a 30-degree angle and slide it out of computer (Sample Illustration) Removing the memory module 4 Replace the memory module slot cover and secure it using the screw. 5 Re-insert the main battery. Memory slots Front of the slot. 54 Getting Started Adding memory (optional) 3 Gently lift the memory module to work. For more information on inserting the main battery, see "Inserting a charged battery" on page 106. 6 Turn the computer right side up. 7 Reconnect the cables. 8 Restart the computer.
User Manual
Page 55
...-tapping the TouchPad or clicking the control buttons. To do this: 1 Click Start, Control Panel, System and Maintenance, and then System. 2 The total memory is a security feature to prevent programs or people from right to the right side of a finger. If unsure, cancel and try again. Once you have...From time to time, Windows® will display a pop-up squarely with the socket latches. Simply move your finger on the TouchPad in "Installing a memory module" on the TouchPad. ❖ To move the cursor to the bottom of the page, drag your finger toward yourself. ❖ To move the ...
...-tapping the TouchPad or clicking the control buttons. To do this: 1 Click Start, Control Panel, System and Maintenance, and then System. 2 The total memory is a security feature to prevent programs or people from right to the right side of a finger. If unsure, cancel and try again. Once you have...From time to time, Windows® will display a pop-up squarely with the socket latches. Simply move your finger on the TouchPad in "Installing a memory module" on the TouchPad. ❖ To move the cursor to the bottom of the page, drag your finger toward yourself. ❖ To move the ...
User Manual
Page 63
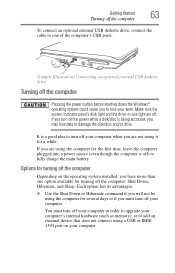
Make sure the system indicator panel's disk light and the drive-in order to upgrade your computer's internal hardware (such as memory), or to add an external device that does not connect using a USB or IEEE 1394 port on the operating system installed, you to lose your ...
Make sure the system indicator panel's disk light and the drive-in order to upgrade your computer's internal hardware (such as memory), or to add an external device that does not connect using a USB or IEEE 1394 port on the operating system installed, you to lose your ...
User Manual
Page 64
... seconds before turning the computer on again. ❖ Use the Sleep command to save your work, system settings, and current state of the computer to memory. For information on how to use and configure Hibernation mode see "Using and configuring Hibernation mode" on page 68. Since Hibernation mode does not require...
... seconds before turning the computer on again. ❖ Use the Sleep command to save your work, system settings, and current state of the computer to memory. For information on how to use and configure Hibernation mode see "Using and configuring Hibernation mode" on page 68. Since Hibernation mode does not require...
User Manual
Page 65
...the mode in sleep mode. ❖ Restarting from where you were using Sleep, see "Using and configuring Sleep mode" on page 70. Be sure to memory so that, when you restart the computer, you left off. If you power down using the Hibernation or Shut down the computer. Getting Started Turning...using . ❖ If the battery charge becomes critically low, the computer will be lost. Sleep saves the current state of the system is stored to memory, you will lose data if the main battery discharges while the computer is in which you can continue working from Sleep takes less time and...
...the mode in sleep mode. ❖ Restarting from where you were using Sleep, see "Using and configuring Sleep mode" on page 70. Be sure to memory so that, when you restart the computer, you left off. If you power down using the Hibernation or Shut down the computer. Getting Started Turning...using . ❖ If the battery charge becomes critically low, the computer will be lost. Sleep saves the current state of the system is stored to memory, you will lose data if the main battery discharges while the computer is in which you can continue working from Sleep takes less time and...
User Manual
Page 75
... hard disk suddenly fails, you will lose all the data on a regular basis. Label the backup copies clearly and store them in the computer's temporary memory until you last saved. HINT: Some programs have a separate backup copy. 75 This feature saves your battery runs out of charge while you are working...
... hard disk suddenly fails, you will lose all the data on a regular basis. Label the backup copies clearly and store them in the computer's temporary memory until you last saved. HINT: Some programs have a separate backup copy. 75 This feature saves your battery runs out of charge while you are working...

User Manual
Page 94
... product model, configuration, applications, power management settings and features utilized, as well as the natural performance variations produced by Toshiba at accessories.toshiba.com. Recharge time varies depending on AC power, either through an AC adaptor or a port replicator (if applicable to...power is continuously operated on usage. To purchase a new battery pack, see "Maintaining your Toshiba notebook computer. If the computer is attached. The RTC battery powers the RTC memory that shipped with your battery" on . It maintains this information for procedures. The RTC ...
... product model, configuration, applications, power management settings and features utilized, as well as the natural performance variations produced by Toshiba at accessories.toshiba.com. Recharge time varies depending on AC power, either through an AC adaptor or a port replicator (if applicable to...power is continuously operated on usage. To purchase a new battery pack, see "Maintaining your Toshiba notebook computer. If the computer is attached. The RTC battery powers the RTC memory that shipped with your battery" on . It maintains this information for procedures. The RTC ...
User Manual
Page 96
... battery capacity. Leave the power connected and the battery should begin charging after a few minutes. The RTC battery powers the System Time Clock and BIOS memory used to select a power level setting that you operate your computer on or off . 96 Mobile Computing Charging batteries Charging the main battery To charge...
... battery capacity. Leave the power connected and the battery should begin charging after a few minutes. The RTC battery powers the System Time Clock and BIOS memory used to select a power level setting that you operate your computer on or off . 96 Mobile Computing Charging batteries Charging the main battery To charge...


