User Manual
Page 26
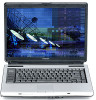
Contents Introduction 35 This guide 37 Safety icons 37 Other icons used 38 Other documentation 38 Service options 39 Chapter 1: Getting Started 40 Selecting a place to work 40 Creating a computer-friendly environment........40 Keeping yourself comfortable 41 Precautions 41 Important information on your computer's cooling fan 44 Setting up your computer 44 Setting up your software 45 Registering your computer with Toshiba 46 Setting up other devices 46 Connecting to a power source 47 Charging the main battery 50 26
Contents Introduction 35 This guide 37 Safety icons 37 Other icons used 38 Other documentation 38 Service options 39 Chapter 1: Getting Started 40 Selecting a place to work 40 Creating a computer-friendly environment........40 Keeping yourself comfortable 41 Precautions 41 Important information on your computer's cooling fan 44 Setting up your computer 44 Setting up your software 45 Registering your computer with Toshiba 46 Setting up other devices 46 Connecting to a power source 47 Charging the main battery 50 26
User Manual
Page 29
... CD or DVD Discs 106 Toshiba's online resources 107 Chapter 3: Mobile Computing 108 Toshiba's energy-saver design 108 Running the computer on battery power 108 Battery Notice 109 Power management 110 Using additional batteries 110 Charging batteries 111 Charging the main battery 111 Charging the RTC battery 112 Monitoring main battery power 113 Determining remaining battery power 115 What to...
... CD or DVD Discs 106 Toshiba's online resources 107 Chapter 3: Mobile Computing 108 Toshiba's energy-saver design 108 Running the computer on battery power 108 Battery Notice 109 Power management 110 Using additional batteries 110 Charging batteries 111 Charging the main battery 111 Charging the RTC battery 112 Monitoring main battery power 113 Determining remaining battery power 115 What to...
User Manual
Page 32
... conflict 196 A plan of action 196 Resolving hardware conflicts on your own .....197 Fixing a problem with Device Manager ...........198 Memory problems 200 Power and the batteries 201 Keyboard problems 203 Display problems 204 Disk drive problems 206 CD-RW/DVD-ROM or multi-function drive problems 209 Sound system problems 210...
... conflict 196 A plan of action 196 Resolving hardware conflicts on your own .....197 Fixing a problem with Device Manager ...........198 Memory problems 200 Power and the batteries 201 Keyboard problems 203 Display problems 204 Disk drive problems 206 CD-RW/DVD-ROM or multi-function drive problems 209 Sound system problems 210...
User Manual
Page 33
...Data and system configuration backup in Windows XP 223 If you need further assistance 229 Before you contact Toshiba 229 Contacting Toshiba 230 Other Toshiba Internet Web sites 231 Toshiba's worldwide offices 232 Appendix A: Hot Keys 234 Volume Mute 234 Password security 235 Without a password... 235 With a password 235 Maintaining security when the battery is not fully charged 236 Power usage mode 237 ...
...Data and system configuration backup in Windows XP 223 If you need further assistance 229 Before you contact Toshiba 229 Contacting Toshiba 230 Other Toshiba Internet Web sites 231 Toshiba's worldwide offices 232 Appendix A: Hot Keys 234 Volume Mute 234 Password security 235 Without a password... 235 With a password 235 Maintaining security when the battery is not fully charged 236 Power usage mode 237 ...

User Manual
Page 42
... damage or serious injury. Turn off the computer. 2. If pain persists despite rest, consult your computer, and never expose the computer to skin. Remove the battery pack. Avoid prolonged contact to prevent heat injury to rain, water, seawater or moisture. 42 Getting Started Selecting a place to work Never allow any liquids...
... damage or serious injury. Turn off the computer. 2. If pain persists despite rest, consult your computer, and never expose the computer to skin. Remove the battery pack. Avoid prolonged contact to prevent heat injury to rain, water, seawater or moisture. 42 Getting Started Selecting a place to work Never allow any liquids...
User Manual
Page 44
... the bottom of the CPU, make sure the air intake on page 47. These components include, but are not limited to charge the battery you can use the computer on surfaces with objects that can block the air intake, preventing air from reaching the CPU. 44 Getting Started...to your computer's cooling fan Your computer may be charged before adding external or internal components to shut down. Your computer contains a rechargeable main battery that cools the CPU by creating a vacuum. To prevent possible overheating of the computer. If the fan is not blocked. Setting up your computer...
... the bottom of the CPU, make sure the air intake on page 47. These components include, but are not limited to charge the battery you can use the computer on surfaces with objects that can block the air intake, preventing air from reaching the CPU. 44 Getting Started...to your computer's cooling fan Your computer may be charged before adding external or internal components to shut down. Your computer contains a rechargeable main battery that cools the CPU by creating a vacuum. To prevent possible overheating of the computer. If the fan is not blocked. Setting up your computer...
User Manual
Page 47
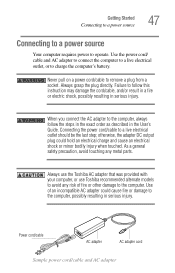
... directly. otherwise, the adapter DC output plug could cause fire or damage to avoid any metal parts. Always use the Toshiba AC adapter that was provided with your computer, or use Toshiba recommended alternate models to the computer, possibly resulting in serious injury. Failure to the computer. Use of fire or other.../cable, and/or result in a fire or electric shock, possibly resulting in the User's Guide. When you connect the AC adapter to charge the computer's battery.
... directly. otherwise, the adapter DC output plug could cause fire or damage to avoid any metal parts. Always use the Toshiba AC adapter that was provided with your computer, or use Toshiba recommended alternate models to the computer, possibly resulting in serious injury. Failure to the computer. Use of fire or other.../cable, and/or result in a fire or electric shock, possibly resulting in the User's Guide. When you connect the AC adapter to charge the computer's battery.
User Manual
Page 49
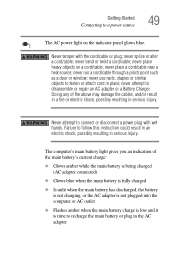
...light on a cord/cable; Getting Started Connecting to fasten or attach cord in place; Failure to disassemble or repair an AC adapter or a Battery Charger. Never tamper with wet hands. never bend or twist a cord/cable; never attempt to follow this instruction could result in an electric ...shock, possibly resulting in serious injury. The computer's main battery light gives you an indication of the above may damage the cables, and/or result in a fire or electric shock, possibly resulting in ...
...light on a cord/cable; Getting Started Connecting to fasten or attach cord in place; Failure to disassemble or repair an AC adapter or a Battery Charger. Never tamper with wet hands. never bend or twist a cord/cable; never attempt to follow this instruction could result in an electric ...shock, possibly resulting in serious injury. The computer's main battery light gives you an indication of the above may damage the cables, and/or result in a fire or electric shock, possibly resulting in ...
User Manual
Page 50
...Adapter to recharge. Your computer's Power Saver utility can damage the battery. Disconnect the AC power cord/cable and remove the main battery pack. Before using all of the battery cannot occur. Charging the main battery Your computer came with the computer turned off for the first time,... a few hours at least three hours with its battery already installed. To charge the battery, leave the computer plugged into an AC power source for information on replacing the main battery. 50 Getting Started Charging the main battery NOTE If the AC power light flashes amber during ...
...Adapter to recharge. Your computer's Power Saver utility can damage the battery. Disconnect the AC power cord/cable and remove the main battery pack. Before using all of the battery cannot occur. Charging the main battery Your computer came with the computer turned off for the first time,... a few hours at least three hours with its battery already installed. To charge the battery, leave the computer plugged into an AC power source for information on replacing the main battery. 50 Getting Started Charging the main battery NOTE If the AC power light flashes amber during ...
User Manual
Page 51
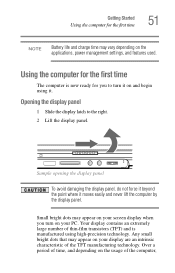
... the display panel. Your display contains an extremely large number of thin-film transistors (TFT) and is now ready for the first time 51 NOTE Battery life and charge time may appear on the usage of the TFT manufacturing technology. Sample opening the display panel To avoid damaging the display panel...
... the display panel. Your display contains an extremely large number of thin-film transistors (TFT) and is now ready for the first time 51 NOTE Battery life and charge time may appear on the usage of the TFT manufacturing technology. Sample opening the display panel To avoid damaging the display panel...
User Manual
Page 52
... this guide. Your select model may not be able to all of the many possible icons used on battery power. Below are examples of some of the icons or switches shown on battery power, the screen will deteriorate. When the computer is also an intrinsic characteristic of the screen while on... To turn on the computer: 1 Make sure any external devices (such as the AC adapter, if you plan to use AC power rather than battery power) are properly connected and ready. 2 Check to ensure that all drives are designed to accommodate all possible configurations for the first time the brightness...
... this guide. Your select model may not be able to all of the many possible icons used on battery power. Below are examples of some of the icons or switches shown on battery power, the screen will deteriorate. When the computer is also an intrinsic characteristic of the screen while on... To turn on the computer: 1 Make sure any external devices (such as the AC adapter, if you plan to use AC power rather than battery power) are properly connected and ready. 2 Check to ensure that all drives are designed to accommodate all possible configurations for the first time the brightness...
User Manual
Page 55
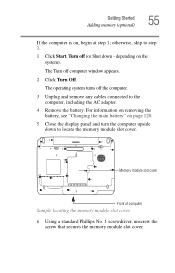
The Turn off (or Shut down to the computer, including the AC adapter. 4 Remove the battery. otherwise, skip to step 3. 1 Click Start, Turn off computer window appears. 2 Click Turn Off. The operating system turns off the computer. 3 Unplug and remove... slot cover 6 Using a standard Phillips No. 1 screwdriver, unscrew the screw that secures the memory module slot cover. For information on removing the battery, see "Changing the main battery" on page 120. 5 Close the display panel and turn the computer upside down - Getting Started Adding memory (optional) 55 If the computer is...
The Turn off (or Shut down to the computer, including the AC adapter. 4 Remove the battery. otherwise, skip to step 3. 1 Click Start, Turn off computer window appears. 2 Click Turn Off. The operating system turns off the computer. 3 Unplug and remove... slot cover 6 Using a standard Phillips No. 1 screwdriver, unscrew the screw that secures the memory module slot cover. For information on removing the battery, see "Changing the main battery" on page 120. 5 Close the display panel and turn the computer upside down - Getting Started Adding memory (optional) 55 If the computer is...
User Manual
Page 58
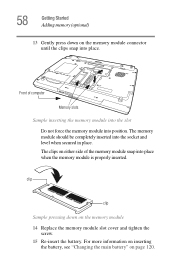
...down on page 120. The clips on the memory module 14 Replace the memory module slot cover and tighten the screw. 15 Re-insert the battery. 58 Getting Started Adding memory (optional) 13 Gently press down on either side of computer Memory slots Sample inserting the memory module into the ...slot Do not force the memory module into the socket and level when secured in place. For more information on inserting the battery, see "Changing the main battery" on the memory module connector until the clips snap into place when the memory module is properly inserted. Front of the memory ...
...down on page 120. The clips on the memory module 14 Replace the memory module slot cover and tighten the screw. 15 Re-insert the battery. 58 Getting Started Adding memory (optional) 13 Gently press down on either side of computer Memory slots Sample inserting the memory module into the ...slot Do not force the memory module into the socket and level when secured in place. For more information on inserting the battery, see "Changing the main battery" on the memory module connector until the clips snap into place when the memory module is properly inserted. Front of the memory ...
User Manual
Page 60
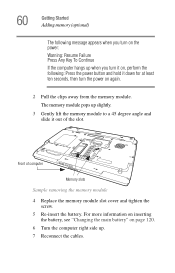
... slide it out of computer Memory slots Sample removing the memory module 4 Replace the memory module slot cover and tighten the screw. 5 Re-insert the battery. Front of the slot. The memory module pops up . 7 Reconnect the cables. For more information on inserting the...
... slide it out of computer Memory slots Sample removing the memory module 4 Replace the memory module slot cover and tighten the screw. 5 Re-insert the battery. Front of the slot. The memory module pops up . 7 Reconnect the cables. For more information on inserting the...
User Manual
Page 74
... drive. If you are using the computer for a while. If you turn off the power while a disk is a good idea to fully charge the main battery. It is being accessed, you to lose your computer when you turn off the computer Depending on the operating system installed, you have up to...
... drive. If you are using the computer for a while. If you turn off the power while a disk is a good idea to fully charge the main battery. It is being accessed, you to lose your computer when you turn off the computer Depending on the operating system installed, you have up to...
User Manual
Page 75
... system is being retrieved from the hard disk rather than from memory, restarting from Hibernation takes a little more time and consumes more main battery power to start up than when restarting from Standby. ❖ When starting up again, Hibernation takes less time and consumes less main...Hibernation mode shuts the computer down completely, but it , including all , wait a few seconds before turning the computer on the hard disk, no main battery power. ❖ Because the state of these options to the state in progress and are not connected to a network, use the Windows® Standby ...
... system is being retrieved from the hard disk rather than from memory, restarting from Hibernation takes a little more time and consumes more main battery power to start up than when restarting from Standby. ❖ When starting up again, Hibernation takes less time and consumes less main...Hibernation mode shuts the computer down completely, but it , including all , wait a few seconds before turning the computer on the hard disk, no main battery power. ❖ Because the state of these options to the state in progress and are not connected to a network, use the Windows® Standby ...
User Manual
Page 76
...79. You should save your work before putting your computer on Standby. ❖ Restarting from Standby takes less time and consumes less main battery power than restarting from where you left it, including all open programs and files you can continue working from turning off the computer or ...using . Be sure to the mode in Standby mode, the computer uses some main battery power. ❖ The Standby command does not store unsaved information on your hard disk. Standby mode The Standby command places the computer into ,...
...79. You should save your work before putting your computer on Standby. ❖ Restarting from Standby takes less time and consumes less main battery power than restarting from where you left it, including all open programs and files you can continue working from turning off the computer or ...using . Be sure to the mode in Standby mode, the computer uses some main battery power. ❖ The Standby command does not store unsaved information on your hard disk. Standby mode The Standby command places the computer into ,...

User Manual
Page 83
Getting Started Caring for your computer 83 Caring for your computer This section gives tips on purchasing a cable lock, visit accessories.toshiba.com. Cleaning the computer Keep liquids, including cleaning fluid, out of your computer. Never spray cleaner directly onto the computer. To keep ...a lightly dampened cloth. Never use harsh or caustic chemical products to purchase an optional computer lock cable. Moving the computer Before moving your battery" on page 123. Doing so could damage the system. The easiest way to do this is to clean the computer. For information about...
Getting Started Caring for your computer 83 Caring for your computer This section gives tips on purchasing a cable lock, visit accessories.toshiba.com. Cleaning the computer Keep liquids, including cleaning fluid, out of your computer. Never spray cleaner directly onto the computer. To keep ...a lightly dampened cloth. Never use harsh or caustic chemical products to purchase an optional computer lock cable. Moving the computer Before moving your battery" on page 123. Doing so could damage the system. The easiest way to do this is to clean the computer. For information about...
User Manual
Page 85
.... See your file to the hard disk at preset intervals. Your work since you save feature that can be activated. Computing tips ❖ Save your battery runs out of charge while you are using goes down and you must restart your computer to the disk. HINT: Some programs have an automatic...
.... See your file to the hard disk at preset intervals. Your work since you save feature that can be activated. Computing tips ❖ Save your battery runs out of charge while you are using goes down and you must restart your computer to the disk. HINT: Some programs have an automatic...

User Manual
Page 93
...; If you turn off the computer, save feature. TECHNICAL NOTE: Save your data even when you are using the Standby command, in case the main battery discharges before you return to access WordPad, type: c:\Program Files\Windows NT\Accessories\Wordpad.exe, then click OK. ❖ If you do not know the...
...; If you turn off the computer, save feature. TECHNICAL NOTE: Save your data even when you are using the Standby command, in case the main battery discharges before you return to access WordPad, type: c:\Program Files\Windows NT\Accessories\Wordpad.exe, then click OK. ❖ If you do not know the...


