

User Manual
Page 2
... conversion to digital format, alteration, transfer of copied material and distribution on a network) without notice. Copyrighted material can be reproduced in making any form without the prior written permission of International Business Machines Corporation. Disclaimer This manual has been validated and reviewed for the TOSHIBA Satellite A100/Satellite Pro A100 Portable Personal Computer at the time of Microsoft Corporation. Windows and Microsoft are...
... conversion to digital format, alteration, transfer of copied material and distribution on a network) without notice. Copyrighted material can be reproduced in making any form without the prior written permission of International Business Machines Corporation. Disclaimer This manual has been validated and reviewed for the TOSHIBA Satellite A100/Satellite Pro A100 Portable Personal Computer at the time of Microsoft Corporation. Windows and Microsoft are...

User Manual
Page 9
... makes it is to the telephone network. In the event repairs are notified, you should complete the setup of your right to do this disconnection. If these changes might affect your service or the operation of your telephone line, as possible. In order to file a complaint with the best service...decide to correct the problem and informed of TOSHIBA Corporation. ix If advance notice is not operating properly, you should immediately remove it from its present line, please call the telephone company and let them to make changes in writing to allow you to make any message via a...
... makes it is to the telephone network. In the event repairs are notified, you should complete the setup of your right to do this disconnection. If these changes might affect your service or the operation of your telephone line, as possible. In order to file a complaint with the best service...decide to correct the problem and informed of TOSHIBA Corporation. ix If advance notice is not operating properly, you should immediately remove it from its present line, please call the telephone company and let them to make changes in writing to allow you to make any message via a...
User Manual
Page 27
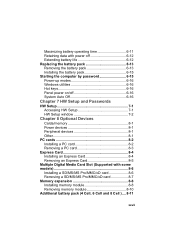
... Starting the computer by password 6-15 Power-up modes 6-16 Windows utilities 6-16 Hot keys 6-16 Panel power on/off 6-16 System Auto Off 6-16 Chapter 7 HW Setup and Passwords HW Setup 7-1 Accessing HW Setup 7-1 HW Setup window 7-2 Chapter 8 Optional Devices Cards/memory 8-1 Power devices 8-1 Peripheral devices 8-1 Other 8-1 PC cards 8-2 Installing a PC card 8-2 Removing a PC card 8-3 Express Card 8-4 Installing an Express Card 8-4 Removing an Express Card 8-5 Multiple Digital Media Card Slot (Supported with some models 8-6 Installing a SD/MS/MS Pro/MMC/xD card 8-6 Removing...
... Starting the computer by password 6-15 Power-up modes 6-16 Windows utilities 6-16 Hot keys 6-16 Panel power on/off 6-16 System Auto Off 6-16 Chapter 7 HW Setup and Passwords HW Setup 7-1 Accessing HW Setup 7-1 HW Setup window 7-2 Chapter 8 Optional Devices Cards/memory 8-1 Power devices 8-1 Peripheral devices 8-1 Other 8-1 PC cards 8-2 Installing a PC card 8-2 Removing a PC card 8-3 Express Card 8-4 Installing an Express Card 8-4 Removing an Express Card 8-5 Multiple Digital Media Card Slot (Supported with some models 8-6 Installing a SD/MS/MS Pro/MMC/xD card 8-6 Removing...
User Manual
Page 31
... drive, Wireless LAN, LANs, Audio/Video controls and internal modem. Be sure to look over the Introduction and The Grand Tour chapters to provide years of the TOSHIBA Satellite A100/Satellite Pro A100 computer. Chapter 3, Getting Started, provides a quick overview of the computer's features, capabilities, and options. If you are going to install PC cards or connect external devices such as a printer, be sure to set up your computer, basic operations and care, using optional devices and troubleshooting...
... drive, Wireless LAN, LANs, Audio/Video controls and internal modem. Be sure to look over the Introduction and The Grand Tour chapters to provide years of the TOSHIBA Satellite A100/Satellite Pro A100 computer. Chapter 3, Getting Started, provides a quick overview of the computer's features, capabilities, and options. If you are going to install PC cards or connect external devices such as a printer, be sure to set up your computer, basic operations and care, using optional devices and troubleshooting...
User Manual
Page 47
.... Refer to the preinstalled software section at the front of utilities and drivers are preinstalled to make the necessary configurations automatically. 1-9 When you connect an external device to the computer or when you install a component, Plug and Play capability enables the system to a desk or other large object. This switch turns the Wireless LAN and Blurtooth function on 256 bit encryption algorithm (Atheros module type). Refer to...
.... Refer to the preinstalled software section at the front of utilities and drivers are preinstalled to make the necessary configurations automatically. 1-9 When you connect an external device to the computer or when you install a component, Plug and Play capability enables the system to a desk or other large object. This switch turns the Wireless LAN and Blurtooth function on 256 bit encryption algorithm (Atheros module type). Refer to...

User Manual
Page 50
... Windows Start button and click Control Panel. For details on -screen interface and functions. TOSHIBA Power To access this power savings management program, Saver click the Control Panel and select the TOSHIBA Power Saver icon. HW Setup This program lets you customize your work with CD-RW/DVD-ROM drive, DVD-R/-RW drive, DVD+-R/+-RW drive and DVD Super Multi drive. Fn-esse This Windows program lets you define your own "shortcut" keys to quickly launch applications and speed your hardware settings...
... Windows Start button and click Control Panel. For details on -screen interface and functions. TOSHIBA Power To access this power savings management program, Saver click the Control Panel and select the TOSHIBA Power Saver icon. HW Setup This program lets you customize your work with CD-RW/DVD-ROM drive, DVD-R/-RW drive, DVD+-R/+-RW drive and DVD Super Multi drive. Fn-esse This Windows program lets you define your own "shortcut" keys to quickly launch applications and speed your hardware settings...
User Manual
Page 55
... the fan. Some models are equipped with a i.LINK port. (Provided with some models) Note: When multiple IEEE1394 devices are connected or when the power to this jack. CAUTION: Be careful not to a PC, the devices may occur when Windows® XP is turned on. If it occurs, disconnect the IEEE1394 cables and then reconnect them.. 2-3 i.LINK (IEEE 1394) Port Connect an external device, such as a digital video camera...
... the fan. Some models are equipped with a i.LINK port. (Provided with some models) Note: When multiple IEEE1394 devices are connected or when the power to this jack. CAUTION: Be careful not to a PC, the devices may occur when Windows® XP is turned on. If it occurs, disconnect the IEEE1394 cables and then reconnect them.. 2-3 i.LINK (IEEE 1394) Port Connect an external device, such as a digital video camera...
User Manual
Page 64
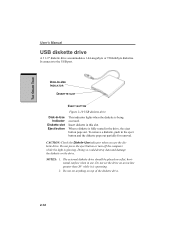
... or the drive. CAUTION: Check the Disk-In-Use indicator when you use . It connects to the USB port. Do not press the eject button or turn off the computer while the light is being accessed. To remove a diskette, push in this slot. When a diskette is operating. 2. DISK-IN-USE INDICATOR DISKETTE SLOT EJECT BUTTON Figure 2-10 USB diskette drive Disk-In-Use Indicator Diskette slot Eject button This indicator lights when the diskette is glowing. The external diskette drive should...
... or the drive. CAUTION: Check the Disk-In-Use indicator when you use . It connects to the USB port. Do not press the eject button or turn off the computer while the light is being accessed. To remove a diskette, push in this slot. When a diskette is operating. 2. DISK-IN-USE INDICATOR DISKETTE SLOT EJECT BUTTON Figure 2-10 USB diskette drive Disk-In-Use Indicator Diskette slot Eject button This indicator lights when the diskette is glowing. The external diskette drive should...

User Manual
Page 78
... Chapter 5, Keyboard, for the duration set by . 2. Close the display panel. The computer or the module could be lost. 4. Data in the Control Panel. In Windows® XP, open Performance and Maintenance and open TOSHIBA Power Saver. 3-10 Before entering Standby mode, be sure to shut down the system when the computer receives no input or hardware access for details. In Windows® XP, click Start, click Turn Off Computer...
... Chapter 5, Keyboard, for the duration set by . 2. Close the display panel. The computer or the module could be lost. 4. Data in the Control Panel. In Windows® XP, open Performance and Maintenance and open TOSHIBA Power Saver. 3-10 Before entering Standby mode, be sure to shut down the system when the computer receives no input or hardware access for details. In Windows® XP, click Start, click Turn Off Computer...
User Manual
Page 116
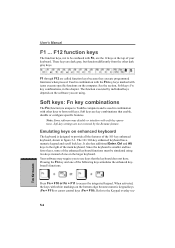
... the main keyboard. It also has additional Enter, Ctrl and Alt keys to use keys that enable, disable or configure specific features. Your software may disable or interfere with white markings on the larger keyboard. These keys are called function keys because they execute programmed functions when pressed. The function executed by the Resume feature. The 101/102-key enhanced keyboard has a numeric keypad and scroll lock key. Since the keyboard is smaller...
... the main keyboard. It also has additional Enter, Ctrl and Alt keys to use keys that enable, disable or configure specific features. Your software may disable or interfere with white markings on the larger keyboard. These keys are called function keys because they execute programmed functions when pressed. The function executed by the Resume feature. The 101/102-key enhanced keyboard has a numeric keypad and scroll lock key. Since the keyboard is smaller...
User Manual
Page 146
... is set, the menu above does not appear when you can turn on Keyboard When this option to the current setting in HW Setup. If your operating system does not support USB, you use a USB mouse and keyboard by pressing any key. The selection method above or if the selected device is in standby mode. If you can still use the user password to select boot device you want and press Enter. Enabled Enables Wake...
... is set, the menu above does not appear when you can turn on Keyboard When this option to the current setting in HW Setup. If your operating system does not support USB, you use a USB mouse and keyboard by pressing any key. The selection method above or if the selected device is in standby mode. If you can still use the user password to select boot device you want and press Enter. Enabled Enables Wake...
User Manual
Page 155
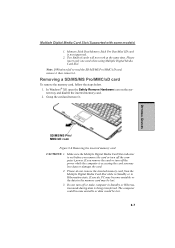
... the power while the computer is being transferred. Do not turn off or make computer in the memory card may lose data or damage the card. 2. OPTIONAL DEVICES Multiple Digital Media Card Slot (Supported with some models) 1. Memory Stick Duo/Memory Stick Pro Duo/Mini SD card is out before you may be lost . 3. Two kinds of cards will not work at the same time. Make sure the Multiple Digital Media Card Slot indicator...
... the power while the computer is being transferred. Do not turn off or make computer in the memory card may lose data or damage the card. 2. OPTIONAL DEVICES Multiple Digital Media Card Slot (Supported with some models) 1. Memory Stick Duo/Memory Stick Pro Duo/Mini SD card is out before you may be lost . 3. Two kinds of cards will not work at the same time. Make sure the Multiple Digital Media Card Slot indicator...
User Manual
Page 156
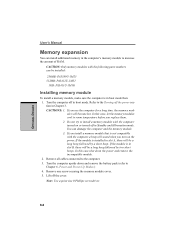
... sound when you install a memory module that is in Standby and Hibernation mode. Remove all cables connected to Chapter 6, Power and Power-Up Modes.) 4. Note: Use a point size 0 Phillips screwdriver. 8-8 OPTIONAL DEVICES User's Manual Memory expansion You can install additional memory in slot B, there will be a long beep followed by a short beep. Turn the computer off in boot mode then: 1. Refer to increase the amount of RAM. In this case shut down and remove the battery...
... sound when you install a memory module that is in Standby and Hibernation mode. Remove all cables connected to Chapter 6, Power and Power-Up Modes.) 4. Note: Use a point size 0 Phillips screwdriver. 8-8 OPTIONAL DEVICES User's Manual Memory expansion You can install additional memory in slot B, there will be a long beep followed by a short beep. Turn the computer off in boot mode then: 1. Refer to increase the amount of RAM. In this case shut down and remove the battery...
User Manual
Page 158
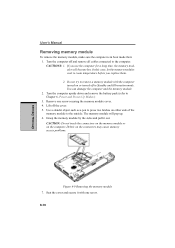
... the memory module to the computer. Debris on the computer. Turn the computer off the cover. 5. Do not try to press two latches on or turned off in boot mode then: 1. Use a slender object such as a pen to remove a memory module with one screw securing the memory module cover. 4. OPTIONAL DEVICES User's Manual Removing memory module To remove the memory module, make sure the computer is in Standby and Hibernation mode. Remove one screw. 8-10 If you replace...
... the memory module to the computer. Debris on the computer. Turn the computer off the cover. 5. Do not try to press two latches on or turned off in boot mode then: 1. Use a slender object such as a pen to remove a memory module with one screw securing the memory module cover. 4. OPTIONAL DEVICES User's Manual Removing memory module To remove the memory module, make sure the computer is in Standby and Hibernation mode. Remove one screw. 8-10 If you replace...

User Manual
Page 202
... format This command controls whether result codes (including call progress monitoring This command selects which result codes will be used by the modem. NECT X2 Enable Disable OK, RING, NO CARRIER, ERROR, NODI- ALTONE, CONNECT X3 Disable Enable X4 (default) Enable Enable OK, RING, NO CARRIER, ERROR, BUSY, CONNECT , BLACKLISTED OK, RING, NO CARRIER, ERROR, NODIALTONE, BUSY, CONNECT , DELAYED, BLACKLISTED, REORDER, WARBLE, CALL WAITING DETECTED C-6 Result Codes: OK n=0,1 ERROR Otherwise XnResult code...
... format This command controls whether result codes (including call progress monitoring This command selects which result codes will be used by the modem. NECT X2 Enable Disable OK, RING, NO CARRIER, ERROR, NODI- ALTONE, CONNECT X3 Disable Enable X4 (default) Enable Enable OK, RING, NO CARRIER, ERROR, BUSY, CONNECT , BLACKLISTED OK, RING, NO CARRIER, ERROR, NODIALTONE, BUSY, CONNECT , DELAYED, BLACKLISTED, REORDER, WARBLE, CALL WAITING DETECTED C-6 Result Codes: OK n=0,1 ERROR Otherwise XnResult code...
User Manual
Page 235
... controlling the number of bits (binary digits) used to indicate the transmission speed of hardware, software, firmware, and peripheral components assembled to initiate a particular function within a program. delete: To remove data from the keyboard to process data into the processor that enable it is usually supplied by the system when you enter from a disk or other data storage device. You use the Hardware Setup, MaxTime or HW Setup...
... controlling the number of bits (binary digits) used to indicate the transmission speed of hardware, software, firmware, and peripheral components assembled to initiate a particular function within a program. delete: To remove data from the keyboard to process data into the processor that enable it is usually supplied by the system when you enter from a disk or other data storage device. You use the Hardware Setup, MaxTime or HW Setup...
User Manual
Page 238
... from the keyboard or external or internal storage devices. interface: 1) Hardware and/or software components of a system used to communicate with the extended function key, Fn, can manipulate. See also byte and kilobyte. hot dock/undock hot dock/undock: Connecting or disconnecting a device to the 10th power. infrared port: A cableless communications capable of contact between user, the computer, and the program, for the receiving computer. instruction: Statements...
... from the keyboard or external or internal storage devices. interface: 1) Hardware and/or software components of a system used to communicate with the extended function key, Fn, can manipulate. See also byte and kilobyte. hot dock/undock hot dock/undock: Connecting or disconnecting a device to the 10th power. infrared port: A cableless communications capable of contact between user, the computer, and the program, for the receiving computer. instruction: Statements...

User Manual
Page 239
... and then converts modulated data (demodulates) to microprocessors with transparent conducting material. MDA: Monochrome Display Adapter. Each keystroke activates a switch that transmits a specific code to lighted portions of options on a single chip. 2) An integrated circuit that uses the large scale integration. Also called a screen. menu: A software interface that displays a list of the display. MMX: Refers to digital format where received. Light Emitting Diode (LED): A semiconductor device that emits light when a current...
... and then converts modulated data (demodulates) to microprocessors with transparent conducting material. MDA: Monochrome Display Adapter. Each keystroke activates a switch that transmits a specific code to lighted portions of options on a single chip. 2) An integrated circuit that uses the large scale integration. Also called a screen. menu: A software interface that displays a list of the display. MMX: Refers to digital format where received. Light Emitting Diode (LED): A semiconductor device that emits light when a current...

User Manual
Page 246
User's Manual Fn + Enter 5-3 Fn + Esc (sound mute) 5-3 Fn + F1 (instant security) 5-4 Fn + F2 (power save mode) 5-4 Fn + F3 (standby) 5-4 Fn + F4 (hibernation) 5-4 Fn + F5 (display selection) 5-5 Fn + F6 (display brightness) 5-5 Fn + F7 (display brightness) 5-5 Fn + F8 (wireless setting) 5-5 Fn + F9 (Touch Pad mode) 5-6 Fn + F10 (arrow mode) 5-2 Fn + F11 (numeric mode) 5-2 Fn + F12 (ScrLock) 5-3 Fn Sticky key 5-7 Function Keys 5-2 H Hard disk drive 1-4 automatic power off ) 5-9 turning on ) 5-8 temporarily using 4-33 LCD, See Display, Video modes, Monitor external Level 2 cache, See Cache ...
User's Manual Fn + Enter 5-3 Fn + Esc (sound mute) 5-3 Fn + F1 (instant security) 5-4 Fn + F2 (power save mode) 5-4 Fn + F3 (standby) 5-4 Fn + F4 (hibernation) 5-4 Fn + F5 (display selection) 5-5 Fn + F6 (display brightness) 5-5 Fn + F7 (display brightness) 5-5 Fn + F8 (wireless setting) 5-5 Fn + F9 (Touch Pad mode) 5-6 Fn + F10 (arrow mode) 5-2 Fn + F11 (numeric mode) 5-2 Fn + F12 (ScrLock) 5-3 Fn Sticky key 5-7 Function Keys 5-2 H Hard disk drive 1-4 automatic power off ) 5-9 turning on ) 5-8 temporarily using 4-33 LCD, See Display, Video modes, Monitor external Level 2 cache, See Cache ...
Detailed Specs for Satellite A100 PSAA9C-SK900E English
Page 1
... picture card, Memory Stick, Memory Stick Pro, Multi Media Card), 4 USB 2.0, RJ11, RJ45, IEEE1394, external microphone port, headphone port, RGB, S-Video Out Keyboard Full sized 85 keys with special effects • use of standard telephone lines or low speed network connections • use of certain multimedia games or videos with 12 function keys 2.7mm keystroke, 6mm height Dedicated Windows Keys. CD/DVD Control Function: Play/Pause, Stop, Previous track/Next track Pointing Device Dual Mode Pad Pointing device Additional Software Optical Drive...
... picture card, Memory Stick, Memory Stick Pro, Multi Media Card), 4 USB 2.0, RJ11, RJ45, IEEE1394, external microphone port, headphone port, RGB, S-Video Out Keyboard Full sized 85 keys with special effects • use of standard telephone lines or low speed network connections • use of certain multimedia games or videos with 12 function keys 2.7mm keystroke, 6mm height Dedicated Windows Keys. CD/DVD Control Function: Play/Pause, Stop, Previous track/Next track Pointing Device Dual Mode Pad Pointing device Additional Software Optical Drive...


