

User Guide
Page 5
... transmission, the date and time it is not operating properly, you to make any message via a telephone fax machine unless such message clearly contains in the appropriate Terminal Equipment Technical Requirements document(s). In the event repairs are notified, you should be installed using an acceptable method of Toshiba. Instructions for your telephone equipment is sent and an identification...
... transmission, the date and time it is not operating properly, you to make any message via a telephone fax machine unless such message clearly contains in the appropriate Terminal Equipment Technical Requirements document(s). In the event repairs are notified, you should be installed using an acceptable method of Toshiba. Instructions for your telephone equipment is sent and an identification...
User Guide
Page 14
... the external display..... 54 Display limitations 54 Connecting an external diskette drive 55 Using an external keyboard 56 Connecting the AC adapter 56 Charging the battery 58 Using the computer for the first time 59 Opening the display panel 59 Turning on the power 59 Activating the power-on password 61 Important Information on your computer's built-in LCD Sensor 62 Using the TouchPad 63 Primary and secondary control buttons........... 64 Toshiba Scroller 64 Disabling or enabling the TouchPad 64 Setting up...
... the external display..... 54 Display limitations 54 Connecting an external diskette drive 55 Using an external keyboard 56 Connecting the AC adapter 56 Charging the battery 58 Using the computer for the first time 59 Opening the display panel 59 Turning on the power 59 Activating the power-on password 61 Important Information on your computer's built-in LCD Sensor 62 Using the TouchPad 63 Primary and secondary control buttons........... 64 Toshiba Scroller 64 Disabling or enabling the TouchPad 64 Setting up...
User Guide
Page 19
... Card supporting software 175 Inserting PC Cards 175 Removing PC Cards 176 Hot swapping 176 Using SD cards 177 Inserting a SD card 177 Removing a SD card 178 Chapter 7: Toshiba Utilities 179 TOSHIBA Accessibility 179 Fn-esse 181 Starting Fn-esse 181 Assigning a key to a program or document ... 182 Viewing existing key assignments 184 Changing or removing existing key assignments 184 Hotkey utility 185 TOSHIBA Console 185 Customize Your Computer 186 Network 187 Security 187 Power Management 187 TOSHIBA Button Controls 190 Toshiba Hardware Setup...
... Card supporting software 175 Inserting PC Cards 175 Removing PC Cards 176 Hot swapping 176 Using SD cards 177 Inserting a SD card 177 Removing a SD card 178 Chapter 7: Toshiba Utilities 179 TOSHIBA Accessibility 179 Fn-esse 181 Starting Fn-esse 181 Assigning a key to a program or document ... 182 Viewing existing key assignments 184 Changing or removing existing key assignments 184 Hotkey utility 185 TOSHIBA Console 185 Customize Your Computer 186 Network 187 Security 187 Power Management 187 TOSHIBA Button Controls 190 Toshiba Hardware Setup...

User Guide
Page 27
.../DVD control buttons allow you adjust the loudness of these controls, see "System indicator panel" on page 35. To open the display panel, slide the display latch to play audio CDs when the computer is turned off. The lights on the system indicator panel provide information about various system functions. The 3.5 mm headphone out lets you connect an external monaural microphone. The 3.5 mm microphone in jack lets you connect stereo headphones or other devices...
.../DVD control buttons allow you adjust the loudness of these controls, see "System indicator panel" on page 35. To open the display panel, slide the display latch to play audio CDs when the computer is turned off. The lights on the system indicator panel provide information about various system functions. The 3.5 mm headphone out lets you connect an external monaural microphone. The 3.5 mm microphone in jack lets you connect stereo headphones or other devices...

User Guide
Page 32
.... The power button turns the computer on a mouse. The volume control dial lets you open This section describes features that has a compatible infrared port. The 3.5 mm headphone out lets you connect an external monaural microphone. Connecting other audio-output devices, such as a computer or printer, that are visible when the display panel is closed if set to perform this function. The Internet button turns on page 26. For more information, see "Hot Keys...
.... The power button turns the computer on a mouse. The volume control dial lets you open This section describes features that has a compatible infrared port. The 3.5 mm headphone out lets you connect an external monaural microphone. Connecting other audio-output devices, such as a computer or printer, that are visible when the display panel is closed if set to perform this function. The Internet button turns on page 26. For more information, see "Hot Keys...

User Guide
Page 45
... computer. Getting Started Setting up your computer 45 6 Enter your personal information in the registration window. 7 Click Finish to a voice-grade telephone line. NOTE: To register online, your Toshiba warranty worldwide at no charge to : Add more memory (see "Installing additional memory (optional)" on page 46) Connect a mouse (see "Connecting a mouse" on page 51) Connect a full-size keyboard (see "Using an external keyboard" on page 56) Connect an external monitor (see "Using external display devices" on...
... computer. Getting Started Setting up your computer 45 6 Enter your personal information in the registration window. 7 Click Finish to a voice-grade telephone line. NOTE: To register online, your Toshiba warranty worldwide at no charge to : Add more memory (see "Installing additional memory (optional)" on page 46) Connect a mouse (see "Connecting a mouse" on page 51) Connect a full-size keyboard (see "Using an external keyboard" on page 56) Connect an external monitor (see "Using external display devices" on...

User Guide
Page 47
Getting Started Installing additional memory (optional) 47 CAUTION: Do not install or remove a memory module while the DVD-ROM drive power is on. 1 If the computer is on page 99. 2 Unplug and remove any cables connected to the computer. 3 Close the display panel and turn the computer upside down command" on , turn it off. See "Turn Off or Shut down . Expansion memory slot cover Underside of the computer NOTE: Use a point size 0 Phillips screwdriver. 4 Locate the expansion memory slot cover and remove the screw that secures the cover.
Getting Started Installing additional memory (optional) 47 CAUTION: Do not install or remove a memory module while the DVD-ROM drive power is on. 1 If the computer is on page 99. 2 Unplug and remove any cables connected to the computer. 3 Close the display panel and turn the computer upside down command" on , turn it off. See "Turn Off or Shut down . Expansion memory slot cover Underside of the computer NOTE: Use a point size 0 Phillips screwdriver. 4 Locate the expansion memory slot cover and remove the screw that secures the cover.

User Guide
Page 48
... into the computer). 7 Remove the new memory module from its antistatic packaging. 8 Holding the memory module by its edges so that you may have built up. The memory module should be careful not to discharge any static electricity you can damage the memory module. Do not force the module into place. 48 Getting Started Installing additional memory (optional) Removing the expansion memory slot cover screw 5 Using your finger or a narrow...
... into the computer). 7 Remove the new memory module from its antistatic packaging. 8 Holding the memory module by its edges so that you may have built up. The memory module should be careful not to discharge any static electricity you can damage the memory module. Do not force the module into place. 48 Getting Started Installing additional memory (optional) Removing the expansion memory slot cover screw 5 Using your finger or a narrow...

User Guide
Page 49
... room temperature before you can now continue setting up the computer, verify that the computer has recognized the additional memory. Getting Started Installing additional memory (optional) 49 Inserting the memory module CAUTION: Avoid touching the connectors on the memory module or on page 51. Grease or dust on the connectors may cause memory access problems. 10 Replace the memory slot cover. 11 Replace the screw and tighten it correctly...
... room temperature before you can now continue setting up the computer, verify that the computer has recognized the additional memory. Getting Started Installing additional memory (optional) 49 Inserting the memory module CAUTION: Avoid touching the connectors on the memory module or on page 51. Grease or dust on the connectors may cause memory access problems. 10 Replace the memory slot cover. 11 Replace the screw and tighten it correctly...

User Guide
Page 51
... may want to use a mouse instead of the computer's USB ports. Checking total memory When you add or remove memory, you turn off the computer, remove the memory slot cover, and make sure the memory module is seated properly, as described in steps 8 and 9 of "Installing additional memory (optional)" on page 46. The mouse and TouchPad can check that the computer has recognized the change. Connecting a mouse You may cause memory access problems. 4 Complete the procedure...
... may want to use a mouse instead of the computer's USB ports. Checking total memory When you add or remove memory, you turn off the computer, remove the memory slot cover, and make sure the memory module is seated properly, as described in steps 8 and 9 of "Installing additional memory (optional)" on page 46. The mouse and TouchPad can check that the computer has recognized the change. Connecting a mouse You may cause memory access problems. 4 Complete the procedure...
User Guide
Page 66
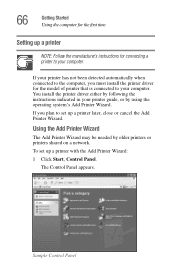
... NOTE: Follow the manufacturer's instructions for the model of printer that is connected to your computer. Using the Add Printer Wizard The Add Printer Wizard may be needed by using the operating system's Add Printer Wizard. Sample Control Panel To set up a printer with the Add Printer Wizard: 1 Click Start, Control Panel. You install the printer driver either by following the instructions indicated in your printer has...
... NOTE: Follow the manufacturer's instructions for the model of printer that is connected to your computer. Using the Add Printer Wizard The Add Printer Wizard may be needed by using the operating system's Add Printer Wizard. Sample Control Panel To set up a printer with the Add Printer Wizard: 1 Click Start, Control Panel. You install the printer driver either by following the instructions indicated in your printer has...

User Guide
Page 68
The Printers and Faxes window appears. 2 Click the Set up faxing option. 3 Follow the on -screen instructions. To disable the auto-receive function, repeat steps 1-4. Setting up the fax function To set up the fax capability:. 1 Click Start, Printers and Faxes. The fax function default setting is descriptive enough to receive. But, under the device name, right-click Toshiba Soft Modem AMR, select Receive and then select...
The Printers and Faxes window appears. 2 Click the Set up faxing option. 3 Follow the on -screen instructions. To disable the auto-receive function, repeat steps 1-4. Setting up the fax function To set up the fax capability:. 1 Click Start, Printers and Faxes. The fax function default setting is descriptive enough to receive. But, under the device name, right-click Toshiba Soft Modem AMR, select Receive and then select...

User Guide
Page 74
... spacebar creates a space character instead of just passing over an area of the keyboard. The Caps Lock key changes only the alphabet keys to be confused with the Fn key) are using. The uppercase letter O and the number 0 are not interchangeable. The lowercase l (el) and the number 1 are not interchangeable. the number and symbol keys are called function keys because they run specific functions on the...
... spacebar creates a space character instead of just passing over an area of the keyboard. The Caps Lock key changes only the alphabet keys to be confused with the Fn key) are using. The uppercase letter O and the number 0 are not interchangeable. The lowercase l (el) and the number 1 are not interchangeable. the number and symbol keys are called function keys because they run specific functions on the...

User Guide
Page 175
... the Windows® XP operating system. Other cards may work with your data and turn off the computer before inserting the PC Card. PC Card supporting software The operating system provides the Card and Socket Services for removable hard disks and other functions that came with the PC Card to the PCMCIA 2.01 standard, or later. For more difficult to set up and the connector side toward the slot...
... the Windows® XP operating system. Other cards may work with your data and turn off the computer before inserting the PC Card. PC Card supporting software The operating system provides the Card and Socket Services for removable hard disks and other functions that came with the PC Card to the PCMCIA 2.01 standard, or later. For more difficult to set up and the connector side toward the slot...
User Guide
Page 196
.... The computer displays the Non-System disk or disk error message. Make sure there is no diskette in Standby mode and the battery has discharged. For example: The operating system fails to start after the Starting Windows XP message appears. If you change the system in some way such as installing a new program or adding a device. The computer was placed in the diskette drive. If pressing...
.... The computer displays the Non-System disk or disk error message. Make sure there is no diskette in Standby mode and the battery has discharged. For example: The operating system fails to start after the Starting Windows XP message appears. If you change the system in some way such as installing a new program or adding a device. The computer was placed in the diskette drive. If pressing...

User Guide
Page 206
... using an external monitor: Check that the cable connecting the external monitor to continue working power outlet. Check that the monitor's power cable is registered, press Enter. Try adjusting the contrast and brightness controls on . You may have gone into a working . To choose the desired option, hold down Fn and press F5 repeatedly until your system: built-in display panel only built-in display panel and external monitor simultaneously external monitor only external video device only (composite port) To open the display options window...
... using an external monitor: Check that the cable connecting the external monitor to continue working power outlet. Check that the monitor's power cable is registered, press Enter. Try adjusting the contrast and brightness controls on . You may have gone into a working . To choose the desired option, hold down Fn and press F5 repeatedly until your system: built-in display panel only built-in display panel and external monitor simultaneously external monitor only external video device only (composite port) To open the display options window...

User Guide
Page 240
... activates a memory resident program. Internet - See also World Wide Web. A key or combination of pixels is refreshed. See also byte. It is running and have the operating system automatically recognize the change. A group of computers or other on the motherboard to interact with the Fn key can set system options or control system parameters, such as the battery save mode. (2) A key or combination of keys...
... activates a memory resident program. Internet - See also World Wide Web. A key or combination of pixels is refreshed. See also byte. It is running and have the operating system automatically recognize the change. A group of computers or other on the motherboard to interact with the Fn key can set system options or control system parameters, such as the battery save mode. (2) A key or combination of keys...

User Guide
Page 250
...'t access disc 210 drive tray won't open 210 eject button 84 light 35 manual eject hole/button 84 problems 210 troubleshooting 202 DVDs 27, 33, 83 playing 171 E email 168 emulating a full-size keyboard 77 environmental considerations 38, 39, 40 ergonomics lighting 41 posture 40 seating guidelines 40 work habits 42 error messages device driver conflict 199 general hardware problem 199 non-system disk or disk error 196, 209 problem with display settings/ current settings not working...
...'t access disc 210 drive tray won't open 210 eject button 84 light 35 manual eject hole/button 84 problems 210 troubleshooting 202 DVDs 27, 33, 83 playing 171 E email 168 emulating a full-size keyboard 77 environmental considerations 38, 39, 40 ergonomics lighting 41 posture 40 seating guidelines 40 work habits 42 error messages device driver conflict 199 general hardware problem 199 non-system disk or disk error 196, 209 problem with display settings/ current settings not working...

User Guide
Page 253
..., 213 removing 176 replacing 176 slots 30 using 174 PCMCIA (Personal Computer Memory Card International Association) 174 play/pause button 36 playing CDs and DVDs 83 ports COM 163 external diskette drive 55 infrared 27 LAN 28 modem 28 parallel 28 RGB (monitor) 28 USB 28 power cable 57 cable connectors 230 computer will not start 195 light 35 monitoring 117 on/off button 32 problem solving 204 Power Management 187 running on batteries 189 power off...
..., 213 removing 176 replacing 176 slots 30 using 174 PCMCIA (Personal Computer Memory Card International Association) 174 play/pause button 36 playing CDs and DVDs 83 ports COM 163 external diskette drive 55 infrared 27 LAN 28 modem 28 parallel 28 RGB (monitor) 28 USB 28 power cable 57 cable connectors 230 computer will not start 195 light 35 monitoring 117 on/off button 32 problem solving 204 Power Management 187 running on batteries 189 power off...

User Guide
Page 254
... Index external display not working 208 external keyboard not working 205 external monitor 206 faulty memory 203 hardware conflict 199, 200 high-pitched noise 211 illegal operation 194 Internet bookmarked site not found 198 Internet connection is slow 198 keyboard not responding 195 keyboard produces unexpected characters 205 missing files/trouble accessing a disk 208 modem not receiving or transmitting 215, 216 no sound 211 non-system disk or disk error 196, 209 PC Card...
... Index external display not working 208 external keyboard not working 205 external monitor 206 faulty memory 203 hardware conflict 199, 200 high-pitched noise 211 illegal operation 194 Internet bookmarked site not found 198 Internet connection is slow 198 keyboard not responding 195 keyboard produces unexpected characters 205 missing files/trouble accessing a disk 208 modem not receiving or transmitting 215, 216 no sound 211 non-system disk or disk error 196, 209 PC Card...


