
User Guide
Page 29
... Connecting an optional external diskette drive 63 Connecting external speakers or headphones 64 Connecting an external microphone 65 Using an expansion device 65 Adding memory 66 Installing memory modules 66 Using Slim SelectBay® modules 76 Removing a module from the Slim SelectBay 76 Inserting a module into the Slim SelectBay 77 Inserting and...
... Connecting an optional external diskette drive 63 Connecting external speakers or headphones 64 Connecting an external microphone 65 Using an expansion device 65 Adding memory 66 Installing memory modules 66 Using Slim SelectBay® modules 76 Removing a module from the Slim SelectBay 76 Inserting a module into the Slim SelectBay 77 Inserting and...
User Guide
Page 32
...to the Internet 153 Surfing the Internet 154 Internet features 154 Uploading and downloading files from the Internet 155 Chapter 6: Toshiba Utilities 156 Fn-esse 157 Starting Fn-esse 157 Using the keyboard or pointing device to assign keys 159 Viewing ...161 Changing or removing existing key assignments 161 TOSHIBA HW Setup 161 Accessing TOSHIBA HW Setup 162 TOSHIBA Power Saver 164 TOSHIBA Mobile Extension 165 TOSHIBA Password Utility 167 TOSHIBA Zooming Utility 169 TOSHIBA CD/DVD Drive Acoustic Silencer 170 TOSHIBA SD Memory Boot Utility 171 PC Diagnostic Tool 172 Chapter...
...to the Internet 153 Surfing the Internet 154 Internet features 154 Uploading and downloading files from the Internet 155 Chapter 6: Toshiba Utilities 156 Fn-esse 157 Starting Fn-esse 157 Using the keyboard or pointing device to assign keys 159 Viewing ...161 Changing or removing existing key assignments 161 TOSHIBA HW Setup 161 Accessing TOSHIBA HW Setup 162 TOSHIBA Power Saver 164 TOSHIBA Mobile Extension 165 TOSHIBA Password Utility 167 TOSHIBA Zooming Utility 169 TOSHIBA CD/DVD Drive Acoustic Silencer 170 TOSHIBA SD Memory Boot Utility 171 PC Diagnostic Tool 172 Chapter...
User Guide
Page 33
...a power-on (user-level) password 176 Creating a user token on an SD™ memory card......... 178 Deleting a power on (user-level) password 178 Deleting a user token on an SD™ memory card......... 179 Using the power-on (user-level) password 179 Using a supervisor password 180... Setting a supervisor password 180 Creating a supervisor token on an SD™ memory card 182 Deleting a supervisor password 182 Deleting a supervisor on an SD™ Memory Card ........ 183 Hard disk drive passwords 184 Setting a hard disk drive user only password in System...
...a power-on (user-level) password 176 Creating a user token on an SD™ memory card......... 178 Deleting a power on (user-level) password 178 Deleting a user token on an SD™ memory card......... 179 Using the power-on (user-level) password 179 Using a supervisor password 180... Setting a supervisor password 180 Creating a supervisor token on an SD™ memory card 182 Deleting a supervisor password 182 Deleting a supervisor on an SD™ Memory Card ........ 183 Hard disk drive passwords 184 Setting a hard disk drive user only password in System...

User Guide
Page 34
... Contents A plan of action 197 Resolving hardware conflicts on your own ........198 Fixing a problem with Device Manager 199 Memory problems 201 Power and the batteries 202 Keyboard problems 203 Display problems 204 Disk drive problems 206 DVD-ROM or multi...Printer problems 213 Modem problems 214 Develop good computing habits 214 If you need further assistance 215 Before you call 216 Contacting Toshiba 216 Other Toshiba Internet Web sites 217 Toshiba's worldwide offices 218 Appendix A: Hot Keys 220 Appendix B: Power Cord/Cable Connectors 227 Appendix C: Using ConfigFree™ ...
... Contents A plan of action 197 Resolving hardware conflicts on your own ........198 Fixing a problem with Device Manager 199 Memory problems 201 Power and the batteries 202 Keyboard problems 203 Display problems 204 Disk drive problems 206 DVD-ROM or multi...Printer problems 213 Modem problems 214 Develop good computing habits 214 If you need further assistance 215 Before you call 216 Contacting Toshiba 216 Other Toshiba Internet Web sites 217 Toshiba's worldwide offices 218 Appendix A: Hot Keys 220 Appendix B: Power Cord/Cable Connectors 227 Appendix C: Using ConfigFree™ ...
User Guide
Page 46
... online, or to sign up for an Internet account, you must attach the AC adapter. See "Using a keyboard" on page 47. For more memory. To use it. See "Connecting the AC adapter" on page 60. ❖ Connect an external monitor. Before adding any of these devices to... a mouse" on page 61. ❖ Install PC Cards. See "Connecting a local printer" on page 61. ❖ Connect a full-size keyboard. See "Adding memory" on page 66. ❖ Connect a mouse. 46 Getting Started Setting up your computer Setting up your computer TECHNICAL NOTE: You must complete all set-up...
... online, or to sign up for an Internet account, you must attach the AC adapter. See "Using a keyboard" on page 47. For more memory. To use it. See "Connecting the AC adapter" on page 60. ❖ Connect an external monitor. Before adding any of these devices to... a mouse" on page 61. ❖ Install PC Cards. See "Connecting a local printer" on page 61. ❖ Connect a full-size keyboard. See "Adding memory" on page 66. ❖ Connect a mouse. 46 Getting Started Setting up your computer Setting up your computer TECHNICAL NOTE: You must complete all set-up...
User Guide
Page 55
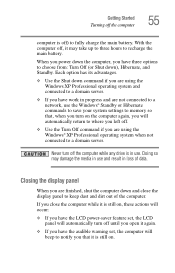
... the Shut down command if you are not connected to a network, use the Windows® Standby or Hibernate commands to save your system settings to memory so that it may damage the media in use . If you turn off the computer while any drive is in use and result in progress...
... the Shut down command if you are not connected to a network, use the Windows® Standby or Hibernate commands to save your system settings to memory so that it may damage the media in use . If you turn off the computer while any drive is in use and result in progress...

User Guide
Page 66
..., use only compatible memory. If this occurs, contact Toshiba's support center at (800) 457-7777. Installing memory modules Additional memory modules can provide various memory configurations. There are two memory expansion slots; In the event original memory is designed for quick installation. 66 Connecting Other External Devices Adding memory Adding memory HINT: To purchase additional memory modules, see the accessories...
..., use only compatible memory. If this occurs, contact Toshiba's support center at (800) 457-7777. Installing memory modules Additional memory modules can provide various memory configurations. There are two memory expansion slots; In the event original memory is designed for quick installation. 66 Connecting Other External Devices Adding memory Adding memory HINT: To purchase additional memory modules, see the accessories...

User Guide
Page 67
...down or Turn Off command. Installing a memory module with this procedure. Installing a memory module in the secondary slot If the computer is vacant. See "Turning off the computer" on , begin at step 1; Toshiba recommends installing a memory module in the secondary slot prior to removing... and installing a memory module in the primary slot, due to complete this , please contact your Toshiba sales representative for a service professional to the ease of...
...down or Turn Off command. Installing a memory module with this procedure. Installing a memory module in the secondary slot If the computer is vacant. See "Turning off the computer" on , begin at step 1; Toshiba recommends installing a memory module in the secondary slot prior to removing... and installing a memory module in the primary slot, due to complete this , please contact your Toshiba sales representative for a service professional to the ease of...
User Guide
Page 68
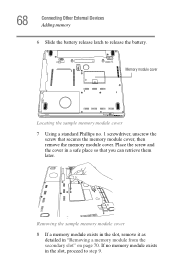
... no . 1 screwdriver, unscrew the screw that you can retrieve them later. 2 Removing the sample memory module cover 8 If a memory module exists in the slot, remove it as detailed in "Removing a memory module from the secondary slot" on page 70. Place the screw and the cover in the slot,... proceed to release the battery. 2 1 Memory module cover Locating the sample memory module cover 7 Using a standard Phillips no memory module exists in a safe place so...
... no . 1 screwdriver, unscrew the screw that you can retrieve them later. 2 Removing the sample memory module cover 8 If a memory module exists in the slot, remove it as detailed in "Removing a memory module from the secondary slot" on page 70. Place the screw and the cover in the slot,... proceed to release the battery. 2 1 Memory module cover Locating the sample memory module cover 7 Using a standard Phillips no memory module exists in a safe place so...

User Guide
Page 69
...clips snap into the socket. 11 Gently press down on the connectors may have built up. Connecting Other External Devices Adding memory 69 Static electricity can damage the memory module. Before you handle the module, touch a grounded metal surface to touch its edges so that the gold connector bar...discharge any static electricity you insert into the computer. 9 Remove the new memory module from its antistatic packaging. 10 Holding the memory module at an angle by its pin connector on the side you may cause memory access problems. 12 Replace the cover slot and the screw. Do not ...
...clips snap into the socket. 11 Gently press down on the connectors may have built up. Connecting Other External Devices Adding memory 69 Static electricity can damage the memory module. Before you handle the module, touch a grounded metal surface to touch its edges so that the gold connector bar...discharge any static electricity you insert into the computer. 9 Remove the new memory module from its antistatic packaging. 10 Holding the memory module at an angle by its pin connector on the side you may cause memory access problems. 12 Replace the cover slot and the screw. Do not ...
User Guide
Page 70
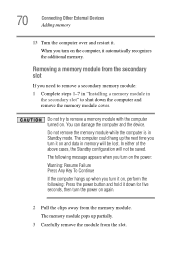
...when you turn on the computer, it down the computer and remove the memory module cover. 70 Connecting Other External Devices Adding memory 13 Turn the computer over and restart it on and data in memory will not be lost. You can damage the computer and the device. The... the following message appears when you turn on . The following : Press the power button and hold it automatically recognizes the additional memory. When you need to remove a memory module with the computer turned on the power: Warning: Resume Failure Press Any Key To Continue If the computer hangs up partially...
...when you turn on the computer, it down the computer and remove the memory module cover. 70 Connecting Other External Devices Adding memory 13 Turn the computer over and restart it on and data in memory will not be lost. You can damage the computer and the device. The... the following message appears when you turn on . The following : Press the power button and hold it automatically recognizes the additional memory. When you need to remove a memory module with the computer turned on the power: Warning: Resume Failure Press Any Key To Continue If the computer hangs up partially...

User Guide
Page 71
If you install any memory module in your Toshiba sales representative for a service professional to complete this , please contact your computer, be sure that a memory module resides in the secondary slot first (due to step 2. 1 Save your work, then shut down your computer completely using the ...boot when the primary slot is on page 54. If the computer is vacant. NOTE If you are uncomfortable with this procedure. Toshiba recommends installing a memory module in the primary slot. See "Turning off the computer" on , begin at step 1; Connecting Other External Devices Adding...
If you install any memory module in your Toshiba sales representative for a service professional to complete this , please contact your computer, be sure that a memory module resides in the secondary slot first (due to step 2. 1 Save your work, then shut down your computer completely using the ...boot when the primary slot is on page 54. If the computer is vacant. NOTE If you are uncomfortable with this procedure. Toshiba recommends installing a memory module in the primary slot. See "Turning off the computer" on , begin at step 1; Connecting Other External Devices Adding...
User Guide
Page 72
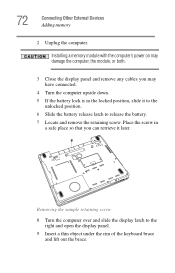
.... 1 2 Removing the sample retaining screw 8 Turn the computer over and slide the display latch to release the battery. 7 Locate and remove the retaining screw. Installing a memory module with the computer's power on may damage the computer, the module, or both. 3 Close the display panel and remove any cables you may have...
.... 1 2 Removing the sample retaining screw 8 Turn the computer over and slide the display latch to release the battery. 7 Locate and remove the retaining screw. Installing a memory module with the computer's power on may damage the computer, the module, or both. 3 Close the display panel and remove any cables you may have...

User Guide
Page 73
Rotating the sample keyboard Connecting Other External Devices Adding memory 73 Removing the sample keyboard brace 10 Remove two screws securing the keyboard. Place the screws in a safe place so that you can retrieve them later. 11 Lift up the back of the keyboard, rotate it toward you and lay in face down on the palm rest.
Rotating the sample keyboard Connecting Other External Devices Adding memory 73 Removing the sample keyboard brace 10 Remove two screws securing the keyboard. Place the screws in a safe place so that you can retrieve them later. 11 Lift up the back of the keyboard, rotate it toward you and lay in face down on the palm rest.

User Guide
Page 74
The clips on either side of the module will click to secure the module. Removing the sample metal brace 14 Remove the new memory module from the memory module. Place the module in antistatic packaging and store it lies flat and is secured by two latches on either side. Place the screw in... a safe place so that you can retrieve it later. 13 Remove the existing memory module from the slot by pulling the clips away from its antistatic packaging. 15 Holding the memory module by its edges so that the gold connector bar faces the slot, fit the module into...
The clips on either side of the module will click to secure the module. Removing the sample metal brace 14 Remove the new memory module from the memory module. Place the module in antistatic packaging and store it lies flat and is secured by two latches on either side. Place the screw in... a safe place so that you can retrieve it later. 13 Remove the existing memory module from the slot by pulling the clips away from its antistatic packaging. 15 Holding the memory module by its edges so that the gold connector bar faces the slot, fit the module into...
User Guide
Page 75
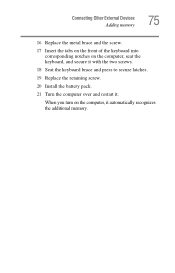
Connecting Other External Devices Adding memory 75 16 Replace the metal brace and the screw. 17 Insert the tabs on the front of the keyboard into corresponding notches on the computer, it . When you turn on the computer, seat the keyboard, and secure it with the two screws. 18 Seat the keyboard brace and press to secure latches. 19 Replace the retaining screw. 20 Install the battery pack. 21 Turn the computer over and restart it automatically recognizes the additional memory.
Connecting Other External Devices Adding memory 75 16 Replace the metal brace and the screw. 17 Insert the tabs on the front of the keyboard into corresponding notches on the computer, it . When you turn on the computer, seat the keyboard, and secure it with the two screws. 18 Seat the keyboard brace and press to secure latches. 19 Replace the retaining screw. 20 Install the battery pack. 21 Turn the computer over and restart it automatically recognizes the additional memory.
User Guide
Page 87
... details. ❖ Back up your file to the hard disk at preset intervals. Label the backup copies clearly and store them in the computer's temporary memory until you save feature that you can turn on a regular basis. See your software documentation for further information. This feature saves your files to the...
... details. ❖ Back up your file to the hard disk at preset intervals. Label the backup copies clearly and store them in the computer's temporary memory until you save feature that you can turn on a regular basis. See your software documentation for further information. This feature saves your files to the...

User Guide
Page 115
NOTE For more information about the Power Saver utility, see "PC Diagnostic Tool" on /off light changes to green. Restoring information from memory. Using Hibernation Hibernation mode shuts the computer down completely, but it from the hard disk takes longer than restoring it first saves the current settings ...
NOTE For more information about the Power Saver utility, see "PC Diagnostic Tool" on /off light changes to green. Restoring information from memory. Using Hibernation Hibernation mode shuts the computer down completely, but it from the hard disk takes longer than restoring it first saves the current settings ...

User Guide
Page 116
Configuring your computer for Hibernation 1 Click Start, Control Panel, and then Performance and Maintenance. 2 In the Control Panel window, double-click the TOSHIBA Power Saver icon. 3 Click the Setup Action tab. 4 Select Hibernation for the options you want. ❖ When I close the display panel. 5 Click...a little more time and power to start up than restarting from Standby, because information is being retrieved from the hard disk rather than from memory. ❖ When starting up again, the computer returns to the mode in which you left it , including all open programs and files ...
Configuring your computer for Hibernation 1 Click Start, Control Panel, and then Performance and Maintenance. 2 In the Control Panel window, double-click the TOSHIBA Power Saver icon. 3 Click the Setup Action tab. 4 Select Hibernation for the options you want. ❖ When I close the display panel. 5 Click...a little more time and power to start up than restarting from Standby, because information is being retrieved from the hard disk rather than from memory. ❖ When starting up again, the computer returns to the mode in which you left it , including all open programs and files ...

User Guide
Page 117
Once the computer is now set to consider when choosing Standby: ❖ While in memory so that, when you power on the hibernation options taken. 117 Learning the Basics Powering down the computer 6 Click OK again, then close the Control ...
Once the computer is now set to consider when choosing Standby: ❖ While in memory so that, when you power on the hibernation options taken. 117 Learning the Basics Powering down the computer 6 Click OK again, then close the Control ...


