
User Guide
Page 16
... 41 Selecting a place to work 41 Creating a computer-friendly environment 41 Keeping yourself comfortable 42 Precautions 46 Setting up your computer 47 Installing additional memory (optional 48 Removing a memory module 50 Connecting a mouse 52 Connecting a keyboard 53 Connecting a printer 53 Connecting the AC adapter 54 Charging the battery 56 Using the computer...
... 41 Selecting a place to work 41 Creating a computer-friendly environment 41 Keeping yourself comfortable 42 Precautions 46 Setting up your computer 47 Installing additional memory (optional 48 Removing a memory module 50 Connecting a mouse 52 Connecting a keyboard 53 Connecting a printer 53 Connecting the AC adapter 54 Charging the battery 56 Using the computer...
User Guide
Page 21
... can help you 202 Resolving a hardware conflict 203 A plan of action 204 Resolving hardware conflicts on your own 204 Fixing a problem with Device Manager 206 Memory card problems 207 Power problems 208 Keyboard problems 209 Display problems 210 Disk drive problems 212 CD-ROM/DVD-ROM drive problems 214 Sound system... Printer problems 218 Modem problems 219 Develop good computing habits 220 Using VirtualTech 222 If you need further assistance 223 Before you call 223 Contacting Toshiba 224
... can help you 202 Resolving a hardware conflict 203 A plan of action 204 Resolving hardware conflicts on your own 204 Fixing a problem with Device Manager 206 Memory card problems 207 Power problems 208 Keyboard problems 209 Display problems 210 Disk drive problems 212 CD-ROM/DVD-ROM drive problems 214 Sound system... Printer problems 218 Modem problems 219 Develop good computing habits 220 Using VirtualTech 222 If you need further assistance 223 Before you call 223 Contacting Toshiba 224
User Guide
Page 39
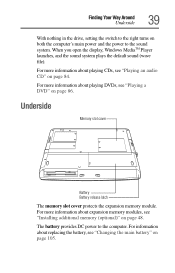
...battery" on both the computer's main power and the power to the computer. For more information about replacing the battery, see "Installing additional memory (optional)" on page 84. Finding Your Way Around Underside 39 With nothing in the drive, setting the switch to the right turns on... page 105. Underside Memory slot cover Battery Battery release latch The memory slot cover protects the expansion memory module. The battery provides DC power to the sound system. When you open the display, Windows ...
...battery" on both the computer's main power and the power to the computer. For more information about replacing the battery, see "Installing additional memory (optional)" on page 84. Finding Your Way Around Underside 39 With nothing in the drive, setting the switch to the right turns on... page 105. Underside Memory slot cover Battery Battery release latch The memory slot cover protects the expansion memory module. The battery provides DC power to the sound system. When you open the display, Windows ...

User Guide
Page 47
... the AC adapter" on page 88. You'll need a special program to help you must connect the built-in modem to : ❖ Add more memory (see "Installing additional memory (optional)" on page 48) ❖ Connect a mouse (see "Connecting a mouse" on page 52) ❖ Connect a full-size keyboard (see "Connecting a monitor, keyboard and...
... the AC adapter" on page 88. You'll need a special program to help you must connect the built-in modem to : ❖ Add more memory (see "Installing additional memory (optional)" on page 48) ❖ Connect a mouse (see "Connecting a mouse" on page 52) ❖ Connect a full-size keyboard (see "Connecting a monitor, keyboard and...
User Guide
Page 48
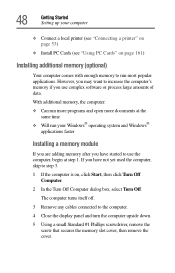
...4 Close the display panel and turn the computer upside down. 5 Using a small Standard #1 Phillips screwdriver, remove the screw that secures the memory slot cover, then remove the cover. The computer turns itself off. 3 Remove any cables connected to use complex software or process large amounts ... you have not yet used the computer, skip to step 3. 1 If the computer is on page 161) Installing additional memory (optional) Your computer comes with enough memory to run your computer ❖ Connect a local printer (see "Connecting a printer" on page 53) ❖ Install PC Cards (see "...
...4 Close the display panel and turn the computer upside down. 5 Using a small Standard #1 Phillips screwdriver, remove the screw that secures the memory slot cover, then remove the cover. The computer turns itself off. 3 Remove any cables connected to use complex software or process large amounts ... you have not yet used the computer, skip to step 3. 1 If the computer is on page 161) Installing additional memory (optional) Your computer comes with enough memory to run your computer ❖ Connect a local printer (see "Connecting a printer" on page 53) ❖ Install PC Cards (see "...

User Guide
Page 49
Oil or dust on the computer. Avoid touching the connectors on the memory module or on the connectors can damage the memory module. Before you handle the module, touch a grounded metal surface to discharge any static electricity you may have built up ...'s screws, use a small Standard #1 Phillips screwdriver that is in good condition. Getting Started Setting up . Removing the memory slot cover CAUTION: Static electricity can cause memory access problems. 6 Remove the memory module from its antistatic packaging, holding it by its edges. 7 Gently slide the module into the socket.
Oil or dust on the computer. Avoid touching the connectors on the memory module or on the connectors can damage the memory module. Before you handle the module, touch a grounded metal surface to discharge any static electricity you may have built up ...'s screws, use a small Standard #1 Phillips screwdriver that is in good condition. Getting Started Setting up . Removing the memory slot cover CAUTION: Static electricity can cause memory access problems. 6 Remove the memory module from its antistatic packaging, holding it by its edges. 7 Gently slide the module into the socket.

User Guide
Page 50
... by gently pressing outward on the latches on either side of the socket engage, securing the module in the socket. 9 Position the memory module cover on the computer and secure it with the screw. 10 Turn your computer right side up. 11 Reconnect any cables you disconnected. 12 ...Turn on either side of the module pops up your computer Inserting the memory module 8 Push the module down until the latches on the computer. 13 Click Start, then click Control Panel to open the Control Panel. 14 Double...
... by gently pressing outward on the latches on either side of the socket engage, securing the module in the socket. 9 Position the memory module cover on the computer and secure it with the screw. 10 Turn your computer right side up. 11 Reconnect any cables you disconnected. 12 ...Turn on either side of the module pops up your computer Inserting the memory module 8 Push the module down until the latches on the computer. 13 Click Start, then click Control Panel to open the Control Panel. 14 Double...

User Guide
Page 51
Getting Started Setting up . Oil or dust on the connectors can damage the memory module. CAUTION: Static electricity can cause memory access problems. 4 Position the memory module cover on the computer. Before you handle the module, touch a grounded metal surface to discharge any cables you may have ...built up your computer 51 Removing the memory module 3 Remove the memory module from the computer and store it in antistatic packaging. Avoid touching the connectors on the memory module or on the computer and secure it with the screw. 5 Turn the...
Getting Started Setting up . Oil or dust on the connectors can damage the memory module. CAUTION: Static electricity can cause memory access problems. 4 Position the memory module cover on the computer. Before you handle the module, touch a grounded metal surface to discharge any cables you may have ...built up your computer 51 Removing the memory module 3 Remove the memory module from the computer and store it in antistatic packaging. Avoid touching the connectors on the memory module or on the computer and secure it with the screw. 5 Turn the...
User Guide
Page 66
... the Windows Turn Off Computer command. If you are not using it may damage your information will be lost. NOTE: Save your system settings to memory so that, when you turn off the power while a disk light on . If the battery discharges fully, your hard disk, diskette drive, CD-ROM, DVD...
... the Windows Turn Off Computer command. If you are not using it may damage your information will be lost. NOTE: Save your system settings to memory so that, when you turn off the power while a disk light on . If the battery discharges fully, your hard disk, diskette drive, CD-ROM, DVD...
User Guide
Page 69
... details. 69 See your software documentation for example, a system error occurs and you must restart your computer, or your work stays in the computer's temporary memory until you save feature which you are working. This feature saves your notebook computer, and provides important information about the computer's basic features. Chapter 3 Learning...
... details. 69 See your software documentation for example, a system error occurs and you must restart your computer, or your work stays in the computer's temporary memory until you save feature which you are working. This feature saves your notebook computer, and provides important information about the computer's basic features. Chapter 3 Learning...
User Guide
Page 93
... completely. When you left it. You must open programs and files you will be away from your computer for an extended time. ❖ Restarting from memory. Factors to consider when choosing Hibernation: ❖ While in which you start up again, the system does not automatically open any programs and files you...
... completely. When you left it. You must open programs and files you will be away from your computer for an extended time. ❖ Restarting from memory. Factors to consider when choosing Hibernation: ❖ While in which you start up again, the system does not automatically open any programs and files you...
User Guide
Page 94
... the computer in Standby mode, the computer uses some battery power. Standby holds the current state of memory. ❖ When starting up again, the computer returns to consider when choosing Standby: ❖ While in memory so that, when you restart the computer, you can continue working from Shut down . ❖ Restarting from...
... the computer in Standby mode, the computer uses some battery power. Standby holds the current state of memory. ❖ When starting up again, the computer returns to consider when choosing Standby: ❖ While in memory so that, when you restart the computer, you can continue working from Shut down . ❖ Restarting from...

User Guide
Page 98
...the display, and goes into a low-power mode. Starting again from Standby To start it again by either of all open programs and files to memory, turns off light blinks amber to the screen you can also put the computer in the Power Saver utility. 1 Open the Start menu, then click... Control Panel. 2 In the Control Panel window, double-click the Toshiba Power Saver icon. The Power Saver Properties dialog box appears. 3 Click the Details button, then the System Power Mode tab, and select the options you...
...the display, and goes into a low-power mode. Starting again from Standby To start it again by either of all open programs and files to memory, turns off light blinks amber to the screen you can also put the computer in the Power Saver utility. 1 Open the Start menu, then click... Control Panel. 2 In the Control Panel window, double-click the Toshiba Power Saver icon. The Power Saver Properties dialog box appears. 3 Click the Details button, then the System Power Mode tab, and select the options you...

User Guide
Page 100
... and date for many times. In addition to disassemble a battery pack. ❖ Never overcharge or reverse charge a battery. For more information, see "Toshiba Power Saver" on battery power Click the Details button, then the Power Save Mode tab. You can recharge it many hours without an AC power... source, you . The RTC battery powers the RTC memory, which stores your computer. Overcharging will shorten its life and reverse charging could destroy it to overheat and may want to carry additional charged ...
... and date for many times. In addition to disassemble a battery pack. ❖ Never overcharge or reverse charge a battery. For more information, see "Toshiba Power Saver" on battery power Click the Details button, then the Power Save Mode tab. You can recharge it many hours without an AC power... source, you . The RTC battery powers the RTC memory, which stores your computer. Overcharging will shorten its life and reverse charging could destroy it to overheat and may want to carry additional charged ...
User Guide
Page 161
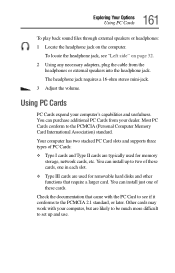
.... Other cards may work with the PC Card to two of these cards, one in each slot. ❖ Type III cards are typically used for memory storage, network cards, etc. The headphone jack requires a 16-ohm stereo mini-jack. 3 Adjust the volume. Using PC Cards PC Cards expand your dealer. You... difficult to set up to see "Left side" on the computer. To locate the headphone jack, see if it conforms to the PCMCIA (Personal Computer Memory Card International Association) standard. Most PC Cards conform to the PCMCIA 2.1 standard, or later.
.... Other cards may work with the PC Card to two of these cards, one in each slot. ❖ Type III cards are typically used for memory storage, network cards, etc. The headphone jack requires a 16-ohm stereo mini-jack. 3 Adjust the volume. Using PC Cards PC Cards expand your dealer. You... difficult to set up to see "Left side" on the computer. To locate the headphone jack, see if it conforms to the PCMCIA (Personal Computer Memory Card International Association) standard. Most PC Cards conform to the PCMCIA 2.1 standard, or later.

User Guide
Page 172
Allows you to have the system auto-select one Sample Toshiba HWSetup window The tabs represent various dialog boxes. Allows you to use both the TouchPad and external pointing devices together or to set...Devices - To access it, open the Start menu, click Control Panel, then double-click Toshiba HW Setup. Shows the Device configuration options ❖ Parallel/Printer - 172 Toshiba Utilities Toshiba Hardware Setup Toshiba Hardware Setup Toshiba Hardware Setup is the Toshiba configuration management tool available through Windows. They are: ❖ General-Allows you to view ...
Allows you to have the system auto-select one Sample Toshiba HWSetup window The tabs represent various dialog boxes. Allows you to use both the TouchPad and external pointing devices together or to set...Devices - To access it, open the Start menu, click Control Panel, then double-click Toshiba HW Setup. Shows the Device configuration options ❖ Parallel/Printer - 172 Toshiba Utilities Toshiba Hardware Setup Toshiba Hardware Setup Toshiba Hardware Setup is the Toshiba configuration management tool available through Windows. They are: ❖ General-Allows you to view ...

User Guide
Page 204
... requests some of the processor's time. These channels of communication are commonly referred to as it works. The recommended procedure for attention. Direct Memory Access Similarly, the data required by one most recently connected to the system is the one After you add each device, test it to ...make sure it interrupts what the processor is called the Direct Memory Access (DMA). It also needs a direct channel to the computer's memory to store information as system resources. If two or more devices use the same DMA, the data required ...
... requests some of the processor's time. These channels of communication are commonly referred to as it works. The recommended procedure for attention. Direct Memory Access Similarly, the data required by one most recently connected to the system is the one After you add each device, test it to ...make sure it interrupts what the processor is called the Direct Memory Access (DMA). It also needs a direct channel to the computer's memory to store information as system resources. If two or more devices use the same DMA, the data required ...
User Guide
Page 207
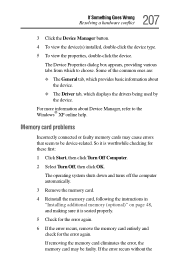
... it is worthwhile checking for the error again. If removing the memory card eliminates the error, the memory card may cause errors that seem to choose. Memory card problems Incorrectly connected or faulty memory cards may be device-related. For more information about the device.... to be faulty. The operating system shuts down and turns off the computer automatically. 3 Remove the memory card. 4 Reinstall the memory card, following the instructions in "Installing additional memory (optional)" on page 48, and making sure it is seated properly. 5 Check for the error again...
... it is worthwhile checking for the error again. If removing the memory card eliminates the error, the memory card may cause errors that seem to choose. Memory card problems Incorrectly connected or faulty memory cards may be device-related. For more information about the device.... to be faulty. The operating system shuts down and turns off the computer automatically. 3 Remove the memory card. 4 Reinstall the memory card, following the instructions in "Installing additional memory (optional)" on page 48, and making sure it is seated properly. 5 Check for the error again...

User Guide
Page 208
... too hot or too cold to solve them: The AC power light does not come on when you think this is working properly by the memory card. The battery may not be in a lamp or other appliance. For example, a faulty AC adapter or power cable will not charge. 208 If Something... Goes Wrong Resolving a hardware conflict memory card installed, the error is consuming full power. Here are some typical problems and how to charge properly. Turn off the computer. If you plug...
... too hot or too cold to solve them: The AC power light does not come on when you think this is working properly by the memory card. The battery may not be in a lamp or other appliance. For example, a faulty AC adapter or power cable will not charge. 208 If Something... Goes Wrong Resolving a hardware conflict memory card installed, the error is consuming full power. Here are some typical problems and how to charge properly. Turn off the computer. If you plug...
User Guide
Page 209
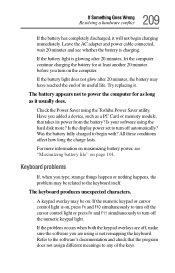
... battery? If the battery light does not glow after 20 minutes, let the computer continue charging the battery for as long as a PC Card or memory module, that the program does not assign different meanings to the keyboard itself. Was the battery fully charged to turn off the numeric keypad light... to the software's documentation and check that takes its useful life. If the battery light is not remapping the keyboard. Is your software using the Toshiba Power Saver utility. Try replacing it will not begin with? Have you are off automatically?
... battery? If the battery light does not glow after 20 minutes, let the computer continue charging the battery for as long as a PC Card or memory module, that the program does not assign different meanings to the keyboard itself. Was the battery fully charged to turn off the numeric keypad light... to the software's documentation and check that takes its useful life. If the battery light is not remapping the keyboard. Is your software using the Toshiba Power Saver utility. Try replacing it will not begin with? Have you are off automatically?


